


Big 3 pics
Le Mans Master


Joined: Nov 2004
Posts: 8,718
Likes: 20
From: Dyer IN
Cruise-In IX Veteran
haha that was half joking but let me figure out lengths or ill try and get DPG to measure it out and i have tons of wire i can cut and crimp and get you set up
i make no promises i am beyond swamped with school and installs right now
i make no promises i am beyond swamped with school and installs right now
Race Director


Joined: Oct 2007
Posts: 11,367
Likes: 211
From: Edgewood Washington
St. Jude Donor '11-'12-'13-'14-'15
Has this subject been documented with pics, for the C6?
I've looked in the FAQ's and haven't been able to find it.
Any help as to the 'best' way to do this would be greatly appreciated. THNX.
I've looked in the FAQ's and haven't been able to find it.
Any help as to the 'best' way to do this would be greatly appreciated. THNX.
Last edited by Knob Jockey; Mar 21, 2009 at 01:24 AM. Reason: clarification
Night Owl for life


Joined: Nov 2003
Posts: 24,725
Likes: 4,564
From: Bugs Bunny should'a made a left turn here
i'm planning on adding an amp and sub in the next month or so, so i figured it's best to get this done first.
let me know if you can hook a CF brotha up.

Night Owl for life
Joined: Nov 2003
Posts: 24,725
Likes: 4,564
From: Bugs Bunny should'a made a left turn here
hmmm...sounds like there could be a market for this. you should start building up sets and market them thru richard.


Tech Contributor


Joined: Dec 1999
Posts: 32,910
Likes: 2,402
From: Anthony TX
CI 6,7,8,9,11 Vet
St. Jude Donor '08
DPG
I hope you don't mind me adding this to your fantastic post!
I've been thinking about making this post for a while. Its raining and cold out and my ZO6 is beyond dead
 so, I'm bummed out.
If you improve the following MAJOR wiring paths, you will significantly improve the electrical system operation and efficiency!! Ive been studying this issue for a LONG TIME and here are my recommendation:
1- Follow this post and clean and tune up your IGNITION SWITCH. Its FREE and works very well!! Over a period of time the contacts inside the switch get burnt and some critical body control and PCM circuits receive less than actual battery voltage. Once you clean the ignition switch and improve the contact pressure on the switches, you will see a significant improvement in module functionality:
http://forums.corvetteforum.com/c5-t...ch-repair.html
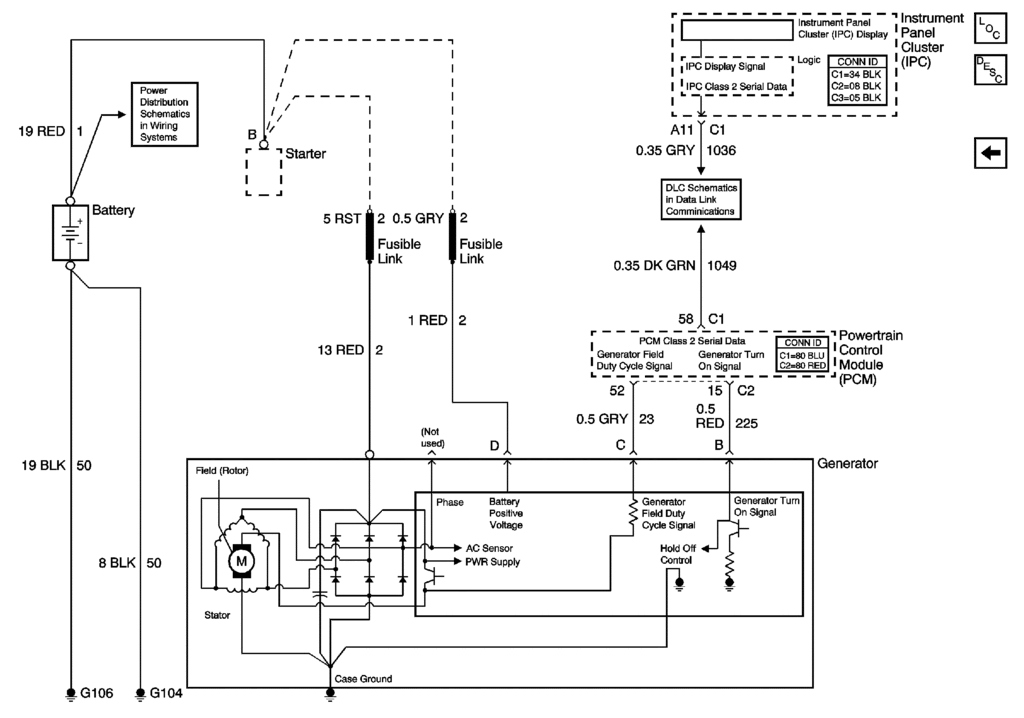
2- Improve the battery to alternator circuit. The alternator charges the battery thru the starter solenoid. In that circuit there are in line fuseaible links and eyelet type connections that are exposed to heat, weather and corrosion. As time goes by, these connections become POOR and alternator performance suffers. Examine the attached GM Schematic and notice how the alternator connects to the battery and the fusible links on the starter solenoid for the alternator.
-----------------------------------------------------------------
--------------------------------------------------------------------
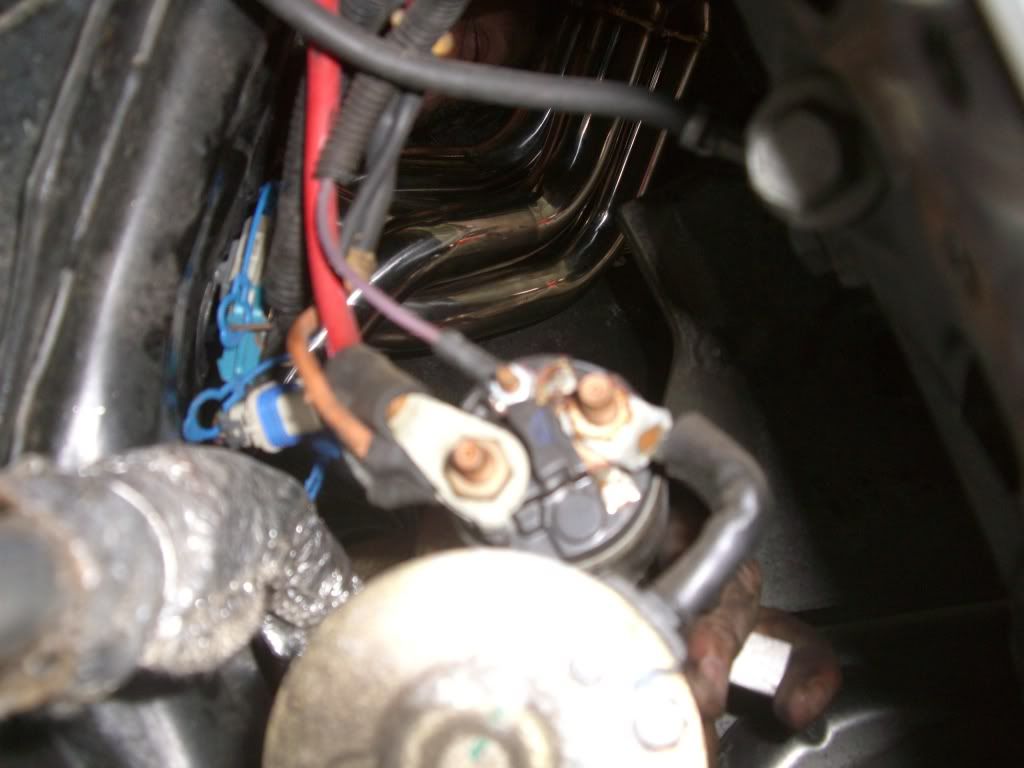
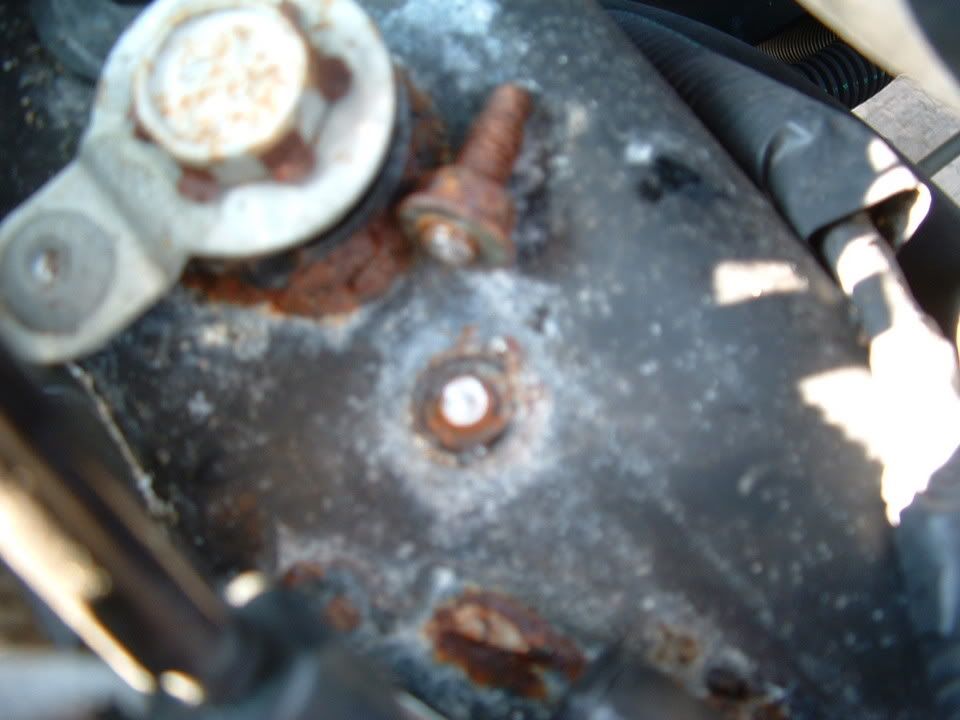
Heres a picture of the connections on the starter solenoid. They are the main cause for poor charging system performance:
Recommendation! Run a 4 - 8 gage wire from the POSITIVE battery terminal to the field terminal on the back of the alternator. Obtain a 60 amp fuse and fuse holder and install a fuse in that line near the battery to protect that hot wire from short circuits.
3- Better Chassis Ground at G-104/108. Chassis ground G-104/108 is a significant grounding point for numerous other chassis grounded circuits. ALL of the other chassis ground points enter the negative battery terminal through this wire.
Remove the negative battery terminal and remove the plastic/rubber cover from the battery terminal. You will see that the wire connections to the neg terminal are CRIMPED to the wire. This crimped connection frequently gets corroded/burnt/loose etc.. and causes poor performance. Remove the small negative ground wire from that connection and replace it with a 4 -8 gage wire. When you get the wire in the crimp connection, solder the connection. I use a giant soldering gun or a torch on low flame. Use lots of non acid flux for a good clean solder joint.
While your examining the battery terminals, inspect the POSITIVE BATTERY terminal wire crimped connections for proper conditions.
MAKE SURE THAT YOU PROPERLY ATTACH THE BATTERY TERMINALS TO THE BATTERY!! They need to be clean and tight. The GM torque spec for 97-2003 battery terminals is 11 ft/lbs.
If you follow the POSITIVE battery wires out of the crimped connection on the battery lead, you will see that it goes to TWO places:
- The Starter (main starter wire)
- The Engine Compartment Fuse Block, B+ terminal (main power for ALL the under-hood loads)
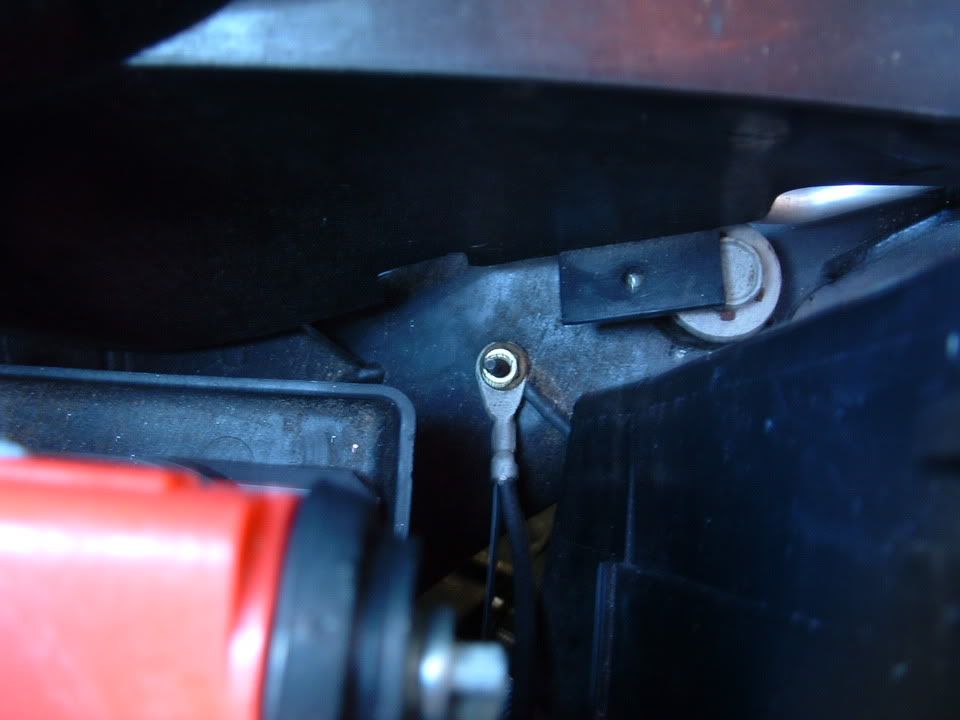
If you look at the pic below, you will see that the under hood fuse center has a B+ terminal on it that is where the battery cable connects to power the fuse block. You will also notice that theres a SECOND wire on that terminal. That wire is the B+ power wire for the Instrument Panel Fuse Block. NOTE! You will also note that in my pic, theres a "THIRD" connection. Thats my heated seat power line. You will NOT have this wire on yours

Some people have improved instrument panel circuit operation by incorporating that feed wire directly to the battery terminal; either in the crimp connection or if you have a side and top terminal on your battery, on one of those terminals.
General Chassis Grounds and circuit performance. Over the years, I have seen too many electrical problems to count. Many problems that I have seen can be contributed to poor chassis grounds. I have covered this in many electrical post but, make sure that you inspect and maintain your chassis grounds. Heres are some well documented examples of what hiding at your ground and grounding points!


THE GROUND SCHEMATIC!

The BIG THREE really does help. Get that engine and alternator better grounded to the CHASSIS!!!!
I hope this helps the BIG THREE get some more exposure and to help those of you who are experiencing POWER issue solve them. I will also copy this into my sticky (IMPORTANT ELECTRICAL INFORMATION (Long)
Bill Curlee
I hope you don't mind me adding this to your fantastic post!
I've been thinking about making this post for a while. Its raining and cold out and my ZO6 is beyond dead
so, I'm bummed out.If you improve the following MAJOR wiring paths, you will significantly improve the electrical system operation and efficiency!! Ive been studying this issue for a LONG TIME and here are my recommendation:
1- Follow this post and clean and tune up your IGNITION SWITCH. Its FREE and works very well!! Over a period of time the contacts inside the switch get burnt and some critical body control and PCM circuits receive less than actual battery voltage. Once you clean the ignition switch and improve the contact pressure on the switches, you will see a significant improvement in module functionality:
http://forums.corvetteforum.com/c5-t...ch-repair.html
2- Improve the battery to alternator circuit. The alternator charges the battery thru the starter solenoid. In that circuit there are in line fuseaible links and eyelet type connections that are exposed to heat, weather and corrosion. As time goes by, these connections become POOR and alternator performance suffers. Examine the attached GM Schematic and notice how the alternator connects to the battery and the fusible links on the starter solenoid for the alternator.
-----------------------------------------------------------------
--------------------------------------------------------------------
Heres a picture of the connections on the starter solenoid. They are the main cause for poor charging system performance:
Recommendation! Run a 4 - 8 gage wire from the POSITIVE battery terminal to the field terminal on the back of the alternator. Obtain a 60 amp fuse and fuse holder and install a fuse in that line near the battery to protect that hot wire from short circuits.
3- Better Chassis Ground at G-104/108. Chassis ground G-104/108 is a significant grounding point for numerous other chassis grounded circuits. ALL of the other chassis ground points enter the negative battery terminal through this wire.
Remove the negative battery terminal and remove the plastic/rubber cover from the battery terminal. You will see that the wire connections to the neg terminal are CRIMPED to the wire. This crimped connection frequently gets corroded/burnt/loose etc.. and causes poor performance. Remove the small negative ground wire from that connection and replace it with a 4 -8 gage wire. When you get the wire in the crimp connection, solder the connection. I use a giant soldering gun or a torch on low flame. Use lots of non acid flux for a good clean solder joint.
While your examining the battery terminals, inspect the POSITIVE BATTERY terminal wire crimped connections for proper conditions.
MAKE SURE THAT YOU PROPERLY ATTACH THE BATTERY TERMINALS TO THE BATTERY!!
They need to be clean and tight. The GM torque spec for 97-2003 battery terminals is 11 ft/lbs.If you follow the POSITIVE battery wires out of the crimped connection on the battery lead, you will see that it goes to TWO places:
- The Starter (main starter wire)
- The Engine Compartment Fuse Block, B+ terminal (main power for ALL the under-hood loads)
If you look at the pic below, you will see that the under hood fuse center has a B+ terminal on it that is where the battery cable connects to power the fuse block. You will also notice that theres a SECOND wire on that terminal. That wire is the B+ power wire for the Instrument Panel Fuse Block.
NOTE! You will also note that in my pic, theres a "THIRD" connection. Thats my heated seat power line. You will NOT have this wire on yoursSome people have improved instrument panel circuit operation by incorporating that feed wire directly to the battery terminal; either in the crimp connection or if you have a side and top terminal on your battery, on one of those terminals.
General Chassis Grounds and circuit performance. Over the years, I have seen too many electrical problems to count. Many problems that I have seen can be contributed to poor chassis grounds. I have covered this in many electrical post but, make sure that you inspect and maintain your chassis grounds. Heres are some well documented examples of what hiding at your ground and grounding points!
THE GROUND SCHEMATIC!
The BIG THREE really does help. Get that engine and alternator better grounded to the CHASSIS!!!!
I hope this helps the BIG THREE get some more exposure and to help those of you who are experiencing POWER issue solve them. I will also copy this into my sticky (IMPORTANT ELECTRICAL INFORMATION (Long)
Bill Curlee
Last edited by Bill Curlee; Oct 19, 2009 at 06:31 PM.
Corvette Stories
The Best of Corvette for Corvette Enthusiasts

Top 10 Most Expensive Corvettes Ever Sold on Bring A Trailer
Brett Foote
10 Things Every Corvette Owner Needs (2026 Edition)
Michael S. Palmer
8 Most "Only Corvette Owners Understand" Quirks and Problems
Pouria Savadkouei
10 Reasons the C6 Z06 is Still A Performance Benchmark After 20 Years
Joe Kucinski
How Much Horsepower Every Corvette Engine "LOST" in 1972
Joe Kucinski
Top 10 DOs and DON'Ts for Protecting Your Convertible Top!
Michael S. Palmer
Top 10 Most Explosive Corvettes Ever Made: Power-to-Weight Ratio Ranked!
Joe Kucinski
150 hp to 1,250 hp: Every Corvette Generation Compared by the Specs That Matter
Joe Kucinski
8 Coolest Corvette Pace Cars (and Replicas) of All Time
Verdad GallardoDrifting

Joined: Sep 2008
Posts: 1,630
Likes: 3
From: Aiea Hi.
I'm not quite sure I understand how this mod will help with the alternator being able to generate more power as to supply the needs of a high powered after market audio system.
It makes sense in that you would get a better chassis ground, but that shouldn't help with the dimming of lights when the amps are at peak power.
Typically the use of a capacitor would correct, or at least decrees the amount of light dimming you would get, but that is done by storing & releasing power when needed, not by adding additional ground.
Can anyone explain this in lay terms?
Thanks,
Keith
Tech Contributor
Joined: Dec 1999
Posts: 32,910
Likes: 2,402
From: Anthony TX
CI 6,7,8,9,11 Vet
St. Jude Donor '08
Keith
For all but the guys running 3 gigawatt amps and electric everything, the stock alternator will perform 100%.
When poor electrical connections and defective components cause low voltage and they start to see weird things happening to their C5,,,they think they need special high dollar stuff to fix the issues and they really don't.
If this post helps ONE person,,,to me, its well worth the time.
BC

Safety Car

Joined: Jan 2004
Posts: 3,783
Likes: 15
From: Northern California
Solder the Lugs onto the 4 gauge wire and install.
Last edited by GKK; Apr 12, 2009 at 02:06 AM.
Night Owl for life
Joined: Nov 2003
Posts: 24,725
Likes: 4,564
From: Bugs Bunny should'a made a left turn here
^ i actually ended up going with 0 gauge for the alternator/battery and 2 gauge for both the grounds.
i also think an easy kit could be made for upgrading the wires exactly as shown in the original post. i think a kit like this would be great for 95% of most big3 upgrades.
i also think an easy kit could be made for upgrading the wires exactly as shown in the original post. i think a kit like this would be great for 95% of most big3 upgrades.
Tech Contributor
Joined: Dec 1999
Posts: 32,910
Likes: 2,402
From: Anthony TX
CI 6,7,8,9,11 Vet
St. Jude Donor '08
TTT to help distribute the BIG 3 electrical system improvements. They really do help if your running additional loads on your electrical system.
BC
BC
Melting Slicks

Joined: Aug 2009
Posts: 2,785
Likes: 8
From: Sacramento California
Can you explain the Big Three. Or is this right?
1) Positive cable upgrade from Battery terminal to alternator.
2) Ground cable upgrade from engine block to chassis(frame)
3) Ground cable upgrade from Battery to chassis(frame)
1) Positive cable upgrade from Battery terminal to alternator.
2) Ground cable upgrade from engine block to chassis(frame)
3) Ground cable upgrade from Battery to chassis(frame)
Former Vendor
Joined: Nov 2005
Posts: 8,995
Likes: 2
From: Spring Texas
St. Jude Donor '08
Night Owl for life
Joined: Nov 2003
Posts: 24,725
Likes: 4,564
From: Bugs Bunny should'a made a left turn here
pics of my big3 upgrade can be found here:
http://forums.corvetteforum.com/audi...-for-a-c5.html
Advanced

Joined: Dec 2007
Posts: 95
Likes: 0
From: Liberty NC
When I ran my wire from the alternator back to the battery, I disconnected the one that runs from the starter to the alternator. Woudl that be a problem? I am running a 4 guage from the alternator to the battery. About 6 foot if i remember correctly.