When you click on links to various merchants on this site and make a purchase, this can result in this site earning a commission. Affiliate programs and affiliations include, but are not limited to, the eBay Partner Network.
I pulled the headlight assemblies out of the car on the weekend and found the header bar to be completely rusted out on the passenger side.
I've ordered a new bonding strip and reinforcement bar to replace it and was hoping any of you who have tackled this job before could share some of your experiences.
Year specific ... sounds liks a chrome bumper vette.
My suggestion is to abolish rivets .... just use a good adhesive.
However, that means ruining the finish on the nose.
You may ruin it just trying to get the old bar/strip out.
Good luck and don't rush it ... use some heat to soften any adhesives.
I hope you got new end brackets, too. You will likely need them.
For adhesives, a 2-part flexible epoxy or urethane is best (Lord, SEM, 3M).
However, a single part urethane will work, too (3M windoweld, high grade const adhesive).
Spring clamps are handy (lots of medium/small ones) to hold the part in place.
I had the luxury of my front clip removed when I replaced mine (upside-down).
In addition to the good advice you've already gotten, I would add this: Before you bond the new bar, clamp it in position and put in one of the horseshoe supports and put in the headlight assembly on one side with the hinge bolts near the center of their oversize holes. It's easiest if all the springs, etc are taken off first. Move the header bar around to get a good front-to-back and side-to-side fit on the headlight doors, then mark the header bar's position on the fiberglass. Repeat on the other side. While there is some adjustability on the hinge positions in the horseshoes, your life will be easier if the bar is very close to where it needs to be.
I bought my new bar from Dynamic Corvettes in Michigan, bonded it in with two-part epoxy. Best tip I have it to cover everything under the nose and wear gloves because the epoxy ooozed EVERYWHERE.
I ground off all remnants of the old bar (79, so no rivets, only resin/bonding material) then test fitted the bar with the headlight parts attached to it, marked where it goes. Removed headlight pieces, loaded up the bar with epoxy, and fed it through the headlight-hole. Fit a bunch of clamps, let it cure overnight, worked perfectly. I used my pop-ups for two years after that and the bar held them up just fine. Oh, I did have to replace the two side-braces as well, got em from Corvette Mack on ebay.
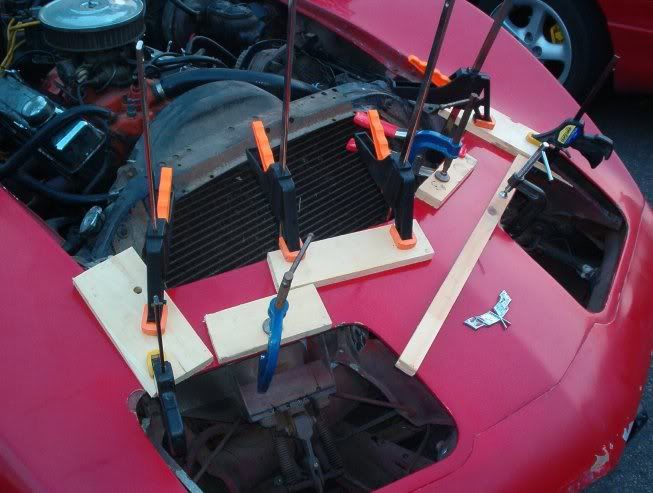
I tried to find my "during" pics but only found this one. Make sure you have tons of clamps, I borrowed every one that my dad and my brother owned.
Thanks for the good comments. The car is a 73. I ordered the reinforcement bar and bonding strip from Zip. According to there part descriptions, the bar is good from 68-72 and the bonding strip, 68-82. I called them on this and they've confirmed both pieces will work on a 73. I hope they are correct.
The parts should be here in a week, I post a few shots once we get going.
Can anybody tell me what adhesive will work best for this?
My 73 bar has come loose from the nose, and the whole assembly is hanging down now. I popped the headlights on last night, and the headlight doors were binding on the nose.
I opened the hood, and noticed the frame was hanging, so I pulled it up. The headlights popped up and chipped paint off the edges of the headling doors
I don't want to hijack this thread but it has prompted a question.
I too have this job to tackle. I have the new header bar, end brackets and the bonding strip. I noticed when I removed the old bar there was no bonding strip used by the factory. My car is a 73. The question is, does the bonding strip have to go back in with the repair? I'm afraid the extra 1/4" of the bonding strip will cause alignment issues with the headlights.
If anyone has run into this before, please post your results.
I am about to tackle this job as well. For corrosion protection it would probably not be a bad idea to respray the bar and brackets with a good epoxy primer.
I noticed when I pulled my bar off today that it has reinforcement plates spot welded on (16ga) where the headlights bolt to
The new bar is not only a lighter gauge stamping but it has been stamped in such a way to take up the space the reinforcement once took.
Is it worth while to weld in a reinforcement plate inside or am I being too paranoid?
I looked mine over this afternoon and noticed the same thing. I think I'm going to install the bonding strip.
My bar was not completely off, just hanging down about 1/4 inch. Enough to chip the paint on the headlight doors. It looked like someone had tried to glue it up before. Probably when the front-end was replaced.
I bought some JB weld from Lowes, then cleaned off the bar and under side of the nose. I mixed up the JB weld and appplied it to both pieces and clamped it together. I let it set for 17 hours before I removed the clamps.
I don't know if this is going to be permanent, but it has held up for the past 12 hours...
I'm thinking with the light brackets attached to the front bumper bracket as well as the header bar it may be ok. just a lot lighter gauge then the original....too bad is wasn't stamped in the U.S.A.
Sorry, don't mean to be hijacking the post...just sharing info
at any rate the new one is better than what was in there!
Do you have new side braces too? I see one attached to the old bar.
I think these are very instrumental in keeping the hood edge and the header edge lined up. Without it, the header edge will sag. I read a few threads about this when I was researching this repair.
Do you have new side braces too? I see one attached to the old bar.
Yup, bought new braces and reinforcement plates for mounting them
Left the old bracket on due to major rust seizure and things were just crumbling & twisting....no use gouging a knuckle for nothing
Hi I have 80 c3 corvette and my front headlight support bar has rusted have you replaced this is it hard.
sny help would be great I live in Australia not many people know tricks with vettes like you Americans.
Originally Posted by Star79
I bought my new bar from Dynamic Corvettes in Michigan, bonded it in with two-part epoxy. Best tip I have it to cover everything under the nose and wear gloves because the epoxy ooozed EVERYWHERE.
I ground off all remnants of the old bar (79, so no rivets, only resin/bonding material) then test fitted the bar with the headlight parts attached to it, marked where it goes. Removed headlight pieces, loaded up the bar with epoxy, and fed it through the headlight-hole. Fit a bunch of clamps, let it cure overnight, worked perfectly. I used my pop-ups for two years after that and the bar held them up just fine. Oh, I did have to replace the two side-braces as well, got em from Corvette Mack on ebay.
I tried to find my "during" pics but only found this one. Make sure you have tons of clamps, I borrowed every one that my dad and my brother owned.
Also check other braces as well.... if one is rusted through, it may not be alone! I found the very front nose brace on my 71 was rusted in half right in the middle, so I did it the same time I removed my "rivet bumps".
Hi there Robbie, Is it badly rusted and no longer strong enough to work , it is the piece in your pic ?,how are the other pieces under there ?
So to get at it you have to remove the headlight units completely , the front bumper cover has to come off (I hope you haven't just painted the car). The "honeycomb " impact cover is still probably in the way now so that will have to come off . The big "battering" ram metal impact bumper might have to come off or maybe just loosened to get at the middle of the front support. There is some angled bracing coming off the frame in the front wheel wells , they go out to each front corner , they have to be dealt with. THEN you have to drill out the original rivets holding it onto the hood surround (fibreglass).Sounds easy enough
Designer Imagines A Corvette That Looks More Like a Corvette Than the Corvette
Slideshow: A Jaguar designer's personal project imagines what a modern front-engined Corvette might look like if Chevrolet revisited the golden age of the Stingray.