


Some Bodywork Progress
Thread Starter
Melting Slicks


Joined: May 2005
Posts: 2,486
Likes: 71
From: Elkhart Lake, Wisconsin
Jeremy,
Your making good progress on yours. If I had worked as hard on mine as you are on yours, I would have been done 3 years ago!
I haven't updated recently so here is the latest.
69 restomod came over and helped me drop the new windshield in. I had polished all the stainless over the winter and seem to get a decent fit and height on the windshield. New glass is thinner than the original, so you have to compensate with the setting blocks.
After that was done, I went to put the interior moldings in and the left and right pillar posts were made with velcro style tabs that don't work with the oem ones. I finally get a response from Corvette America as they were the supplier and they did have a problem a few years ago and I had purchased these a few years ago. I haven't resolved that yet.
I installed the deck lid. I had pre fit it when I was doing the bodywork, but must have done it when the body was on the body dolly rather than on the chassis as it no longer fit. I had to shave on side by a good 1/8" to get the deck lid to close. As soon as I get some touch up paint I will have to paint one edge. Should be no big deal.
I decided to use C5 Sport Seats rather than the C5 standard seats so my shoulder harness would go through the seat without cutting holes and using bezels. I ordered new leather seat skins through eBay and they shipped direct from China. Well sure enough they had issues. Zippers sewn half on backwards, others with two male sides sewn on with no female end. So now I have new USA made skins on order. I hope to have these by Friday and should have those done over the weekend.

The soft top frame is partially disassembled and went to start riveting the one side back on. I had ordered a rivet kit from Zip, well it has issues also. Short one rivet, one rivet a different size, spring washer wrong size, bushing way bigger than originals, so I stopped and I'm waiting on Zip for some answers. This photo has the new parts plus some old parts for reference.

Your making good progress on yours. If I had worked as hard on mine as you are on yours, I would have been done 3 years ago!
I haven't updated recently so here is the latest.
69 restomod came over and helped me drop the new windshield in. I had polished all the stainless over the winter and seem to get a decent fit and height on the windshield. New glass is thinner than the original, so you have to compensate with the setting blocks.
After that was done, I went to put the interior moldings in and the left and right pillar posts were made with velcro style tabs that don't work with the oem ones. I finally get a response from Corvette America as they were the supplier and they did have a problem a few years ago and I had purchased these a few years ago. I haven't resolved that yet.
I installed the deck lid. I had pre fit it when I was doing the bodywork, but must have done it when the body was on the body dolly rather than on the chassis as it no longer fit. I had to shave on side by a good 1/8" to get the deck lid to close. As soon as I get some touch up paint I will have to paint one edge. Should be no big deal.
I decided to use C5 Sport Seats rather than the C5 standard seats so my shoulder harness would go through the seat without cutting holes and using bezels. I ordered new leather seat skins through eBay and they shipped direct from China. Well sure enough they had issues. Zippers sewn half on backwards, others with two male sides sewn on with no female end. So now I have new USA made skins on order. I hope to have these by Friday and should have those done over the weekend.
The soft top frame is partially disassembled and went to start riveting the one side back on. I had ordered a rivet kit from Zip, well it has issues also. Short one rivet, one rivet a different size, spring washer wrong size, bushing way bigger than originals, so I stopped and I'm waiting on Zip for some answers. This photo has the new parts plus some old parts for reference.
Last edited by RobRace10; Mar 22, 2010 at 04:40 PM.
Thread Starter
Melting Slicks
Joined: May 2005
Posts: 2,486
Likes: 71
From: Elkhart Lake, Wisconsin
I have been very busy with work lately and took some time off to go racing, but back trying to get the car finished. I had a few issues with the seats skins as in my previous post, but finally got the USA C5 Sport Seats Skins and they are much better than the China skins. A few weeks ago I got the side windows in and today I got the door panels on and one seat done today.


Thread Starter
Melting Slicks
Joined: May 2005
Posts: 2,486
Likes: 71
From: Elkhart Lake, Wisconsin
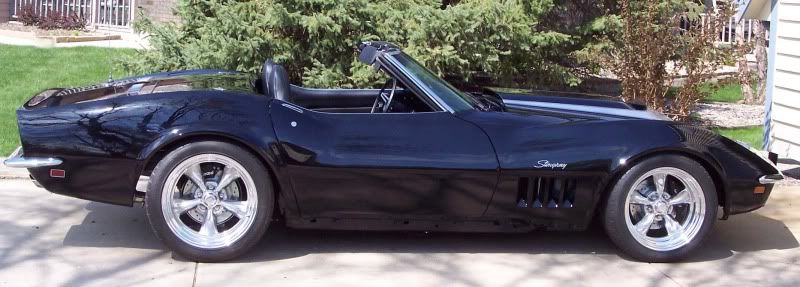
I finally got the hood today and wasted no time in dropping it on. I still have to do the rear locks and the support bracket, but at least it is in place. Both seats are now in also. I think I will take a run to the gas station to put a few more gallons in it. Might be a little brisk out as I don't have the top done yet, but should be fun anyway.
Still a long list of things to complete, but were getting close.

Still a long list of things to complete, but were getting close.
Thread Starter
Melting Slicks
Joined: May 2005
Posts: 2,486
Likes: 71
From: Elkhart Lake, Wisconsin
Took it for a drive last night. A few issues, head lights wouldn't pop up (they worked fine a few weeks ago), and after I pulled them up, they are clearly pointed to low. The rear of the car is to low, the Pypes pipes hit when the car hits a bump. I will raise it up and probably stiffen the rear dual mount spring. I also have adjustable shocks, so I may stiffen them also.
I have only rough aligned the car and I need to adjust the tie rods so the steering wheel runs straight up when going straight plus it seems to wander a little, so at some point I will take to the local guy who has an alignment machine and has done vettes before.
The 427 sure has some smoke once the secondaries open up
Thread Starter
Melting Slicks
Joined: May 2005
Posts: 2,486
Likes: 71
From: Elkhart Lake, Wisconsin
Wheels are polished aluminum TTII’s
Fronts are 17X8 245/45 4”BS
Rears are 18X10 275/40 5.5”BS
BF Goodrich G force t/a KDW’s.
I don't think they make the 10" rims anymore at least as standards, but you should be able to get 9-1/2" wide rims.
I also get these questions asked fairly often, so:
VBP Dual Mount Spring, I believe about 1" shorter than stock with a set of single offset trailing arms. Not sure those are necessary, but got those before the rims.
1 coil cut off the stock 550lb BBC coils in the front.
Last edited by RobRace10; Apr 23, 2010 at 12:39 PM.
Corvette Stories
The Best of Corvette for Corvette Enthusiasts

Top 10 Most Expensive Corvettes Ever Sold on Bring A Trailer
Brett Foote
10 Things Every Corvette Owner Needs (2026 Edition)
Michael S. Palmer
8 Most "Only Corvette Owners Understand" Quirks and Problems
Pouria Savadkouei
10 Reasons the C6 Z06 is Still A Performance Benchmark After 20 Years
Joe Kucinski
How Much Horsepower Every Corvette Engine "LOST" in 1972
Joe Kucinski
Top 10 DOs and DON'Ts for Protecting Your Convertible Top!
Michael S. Palmer
Top 10 Most Explosive Corvettes Ever Made: Power-to-Weight Ratio Ranked!
Joe Kucinski
150 hp to 1,250 hp: Every Corvette Generation Compared by the Specs That Matter
Joe Kucinski
8 Coolest Corvette Pace Cars (and Replicas) of All Time
Verdad Gallardo

Thread Starter
Melting Slicks
Joined: May 2005
Posts: 2,486
Likes: 71
From: Elkhart Lake, Wisconsin
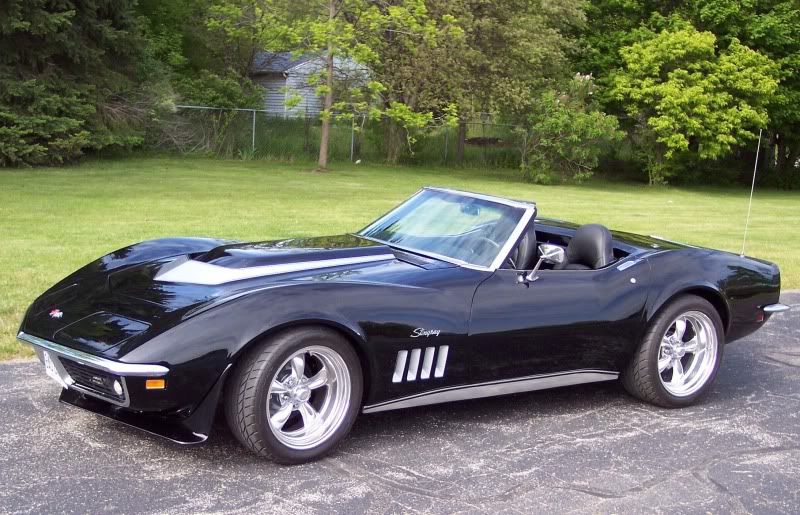
Thanks for the comments guys. I wanted to build it with some modern touches without destroying the integrity of the 69. The car was a mess when I got it,(bought it off a for sale ad here) but had a very good frame and was a triple black vert. I knew it would be a multi year project, Most of the changes /modifications I have made can be undone if I ever want to make it more original. I have the original Muncie, seats, radio, trailing arms, rally wheels, big block hood, etc if I ever want to take it back to a stock look. I plan on driving the car and built it for fun. At one point I was going to do a two tone interior (black and red) as I had seen a C-1 with that look and it was stunning. But I decided since it was originally a triple black car, I would keep it that way. I had even gotten some Red Wilwood calipers at first, but sold them and bought their standard black and silver ones. I have used Wilwoods on some race cars and always liked them. I'm in the process of polishing some later year side rails. I will see how they look, but also have the black correct 69 versions. I tried sanding some scratches out of the aluminum ones and they are either coated or plated, so I will have to completely strip them and then bring them up to a polish. Not looking forward to that, but it has to be done.
Still a lot of misc things to do, but each day I get closer and at least I can drive it a little bit.
Still a lot of misc things to do, but each day I get closer and at least I can drive it a little bit.


Thread Starter
Melting Slicks
Joined: May 2005
Posts: 2,486
Likes: 71
From: Elkhart Lake, Wisconsin
I'm getting closer to completion. I took it for alignment last week and air conditioning charge. The car was very sloppy in the steering and thought the Jeep box was no good. Turns out the joint that goes into the pittman arm was not threaded far enough, so even though the nut was tight, the taper was not tight in the arm. A few washers and it was fixed. I still have to finish the convertible top frame and then have the top installed. Besides that the right side mirror needs to go along with the hood latches, a relay so the fans come on when the air is turned on and a few small projects, but at least I'm at the point where I can drive the car as long as it doesn't look like rain.
5 years of work!
5 years of work!
1969/1971/2021 Coupes


Joined: Jan 2008
Posts: 2,212
Likes: 80
From: Port Huron MI
St. Jude Donor '09-'10-'11-'12-'13-'14-'15
Rob,
Very nice. It just keeps getting better looking (if that's at all possibe). I really like the look of the later year rocker panel moldings on your car better than the standard black. They look right in place with the other aluminum/chrome. Good Job!!!!!
Terry
Very nice. It just keeps getting better looking (if that's at all possibe). I really like the look of the later year rocker panel moldings on your car better than the standard black. They look right in place with the other aluminum/chrome. Good Job!!!!!
Terry


 Incredible. Enjoy that Bad Boy.


Thread Starter
Melting Slicks
Joined: May 2005
Posts: 2,486
Likes: 71
From: Elkhart Lake, Wisconsin
I have a buddy who started building an all aluminum body A/C Cobra and it has been sitting partially done for at least 10 years now. He even has a correct 427 side oilier motor for it. Probably will want to much but we will see when I feel the need for a project.
Thread Starter
Melting Slicks
Joined: May 2005
Posts: 2,486
Likes: 71
From: Elkhart Lake, Wisconsin
I finally got the convertible top done. I posted some of the pics in an older thread, but now I have the final pics.
When I pulled the old top off the frame, I find the front header had a lot of rust. All but two of the tabs that hold the front tack strip in were gone-rusted away and there are several holes, some several inches long and also some very thin metal in places. I could spend almost $400. for a new header or fix this one.
So I dug the mig out, die grinder, angle grinder with flap disc, wire brushes and some new sheet metal and began repairs. I had to form a new compound radius edge for probably 8 inches on either end and make new tabs to hold the tack strip in. None of this stuff gets seen once the new top is on so my priority was strength and making sure all the holes are filled and the rust is stopped. A little por15 and Epoxy paint for extra measure over the repaired areas.


For the tabs I just cut some small pieces of sheet metal and bent them at a 90. There is an inner strip of metal that the original tabs were part of. I used a die grinder and carbide bur to remove the inner lip so the tab could be out to the outer lips inner edge.
After all the rust etc was fixed I ground some clean area with a new CURVE flap disc from PFERD. They have abrasive on the edge and the back side which makes grinding in a channel like these a snap. It also worked great for grinding the welds flat so the tack strip doesn't stick up.


PFERD "CURVE" flap disc


I had to re-rivet the one side as it was worn out. The new rivet kits are not very close to original so I had to re-use some parts, but was able to get it re done using my hydraulic press and an air rivet hammer.

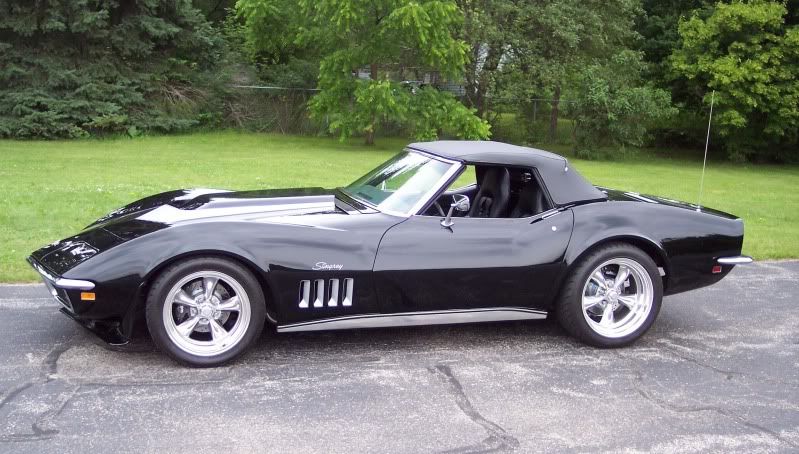
My other project was leather wrapping the steering wheel. Wheelskins basic cover with a custom size 15" X 3". Without the padding the 3" would have been a little large.
The standard wheel grip is a little small, so I added some padding and this Leather wrap.

When I pulled the old top off the frame, I find the front header had a lot of rust. All but two of the tabs that hold the front tack strip in were gone-rusted away and there are several holes, some several inches long and also some very thin metal in places. I could spend almost $400. for a new header or fix this one.
So I dug the mig out, die grinder, angle grinder with flap disc, wire brushes and some new sheet metal and began repairs. I had to form a new compound radius edge for probably 8 inches on either end and make new tabs to hold the tack strip in. None of this stuff gets seen once the new top is on so my priority was strength and making sure all the holes are filled and the rust is stopped. A little por15 and Epoxy paint for extra measure over the repaired areas.
For the tabs I just cut some small pieces of sheet metal and bent them at a 90. There is an inner strip of metal that the original tabs were part of. I used a die grinder and carbide bur to remove the inner lip so the tab could be out to the outer lips inner edge.
After all the rust etc was fixed I ground some clean area with a new CURVE flap disc from PFERD. They have abrasive on the edge and the back side which makes grinding in a channel like these a snap. It also worked great for grinding the welds flat so the tack strip doesn't stick up.
PFERD "CURVE" flap disc
I had to re-rivet the one side as it was worn out. The new rivet kits are not very close to original so I had to re-use some parts, but was able to get it re done using my hydraulic press and an air rivet hammer.
My other project was leather wrapping the steering wheel. Wheelskins basic cover with a custom size 15" X 3". Without the padding the 3" would have been a little large.
The standard wheel grip is a little small, so I added some padding and this Leather wrap.