


Question About.....Distributor static shield brackets.
Thread Starter
Instructor

Joined: Sep 2010
Posts: 132
Likes: 1
From: Pioneer California
Are there different brackets that hold the distributor shield on. I seem to have a fit /alignment problem of the distributor cover and vertical shield on the passenger side bracket. The bracket that I have doesn't seem to go back far enough toward the firewall to assemble correctly. The drivers side fits perfect. Does any one have picture that I compare what I have with a know correct one. I might have the incorrect bracket on that side. This would be for a 72 base 350 CI
Help would be appreciated.
John
Help would be appreciated.
John
Race Director


Joined: May 2006
Posts: 18,733
Likes: 2,582
Thread Starter
Instructor
Joined: Sep 2010
Posts: 132
Likes: 1
From: Pioneer California
Hi Guys
The pictures help are helping. Hi Alan In looking at your picture looks like I do have the bracket installed on the proper intake bolt ( the second one in from the back) My bracket looks like yours but where the wing nut attaches to the cover is too far forward by at least 3/4 of an inch. If I was to attach the cover where it is, the air cleaner would interfere and not set down properly. I also notice on mine that the vacuum diaphragm and vacuum line is right up against the bracket not allowing any more adjustment in the counterclockwise direction. It doesn't look like you have much room to adjust your either. Which leads me to believe that I have the incorrect bracket.
I don't where I heard this but it sticks in my mind that there are two different brackets for that side that from general appearance look the same but might have different attach point dimensions.
John
Team Owner


Joined: Jun 2000
Posts: 38,923
Likes: 1,482
From: Southbound
Cruise-In II Veteran

...I don't where I heard this but it sticks in my mind that there are two different brackets for that side that from general appearance look the same but might have different attach point dimensions...

UPDATE: Corvette Central shows the same brackets for 68-74 for small blocks. A different pair for big block cars.
Check with Willcox. I'm betting they would know if the brackets changed.
Last edited by Easy Mike; Oct 15, 2010 at 01:19 PM.

Team Owner

Joined: Aug 1999
Posts: 30,995
Likes: 99
From: Ontario
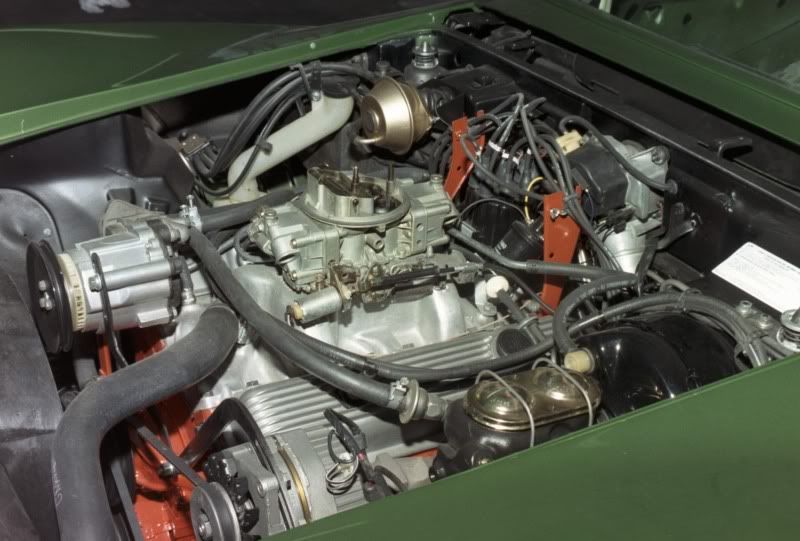
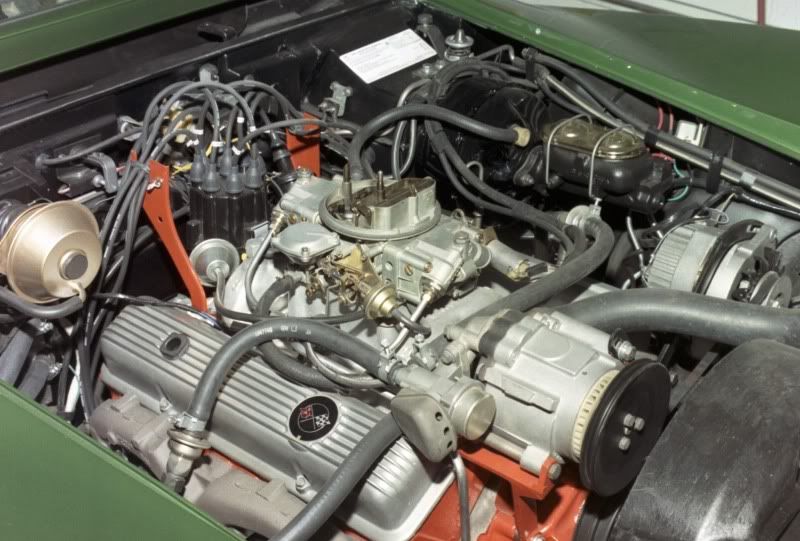
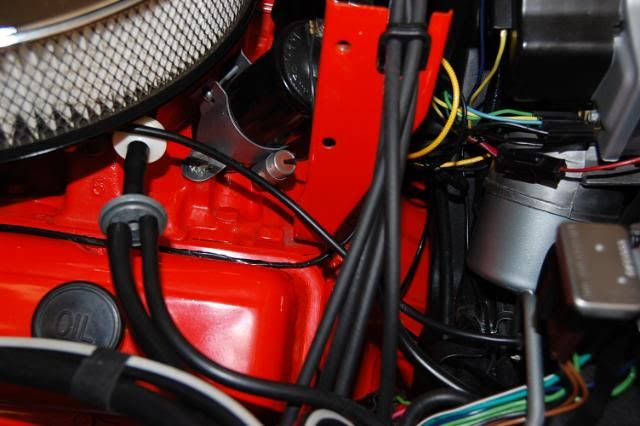
Here goes. The two are very different. The passenger side is bent much further back. Driver's side is on #1 bolt and passenger side on 2nd one in. I do not know if this is correct but it obviously works.


Last edited by Paul L; Oct 15, 2010 at 04:23 PM.
Team Owner


Joined: Sep 2006
Posts: 31,270
Likes: 4,362
From: Westminster Maryland
Hi John,
I agree that the mounting points on the bracket changed over the years as the distributor shield changed. On my 71, (not in the picture), I can fit either the 70 or 71-72 styles on the original 71 bracket.
As I remember you're getting ready to have your car judged, sorry I can't help more!
Regards,
Alan
Corvette Stories
The Best of Corvette for Corvette Enthusiasts

Top 10 Most Expensive Corvettes Ever Sold on Bring A Trailer
Brett Foote
10 Things Every Corvette Owner Needs (2026 Edition)
Michael S. Palmer
8 Most "Only Corvette Owners Understand" Quirks and Problems
Pouria Savadkouei
10 Reasons the C6 Z06 is Still A Performance Benchmark After 20 Years
Joe Kucinski
How Much Horsepower Every Corvette Engine "LOST" in 1972
Joe Kucinski
Top 10 DOs and DON'Ts for Protecting Your Convertible Top!
Michael S. Palmer
Top 10 Most Explosive Corvettes Ever Made: Power-to-Weight Ratio Ranked!
Joe Kucinski
150 hp to 1,250 hp: Every Corvette Generation Compared by the Specs That Matter
Joe Kucinski
8 Coolest Corvette Pace Cars (and Replicas) of All Time
Verdad Gallardo
Team Owner
Joined: Aug 1999
Posts: 30,995
Likes: 99
From: Ontario
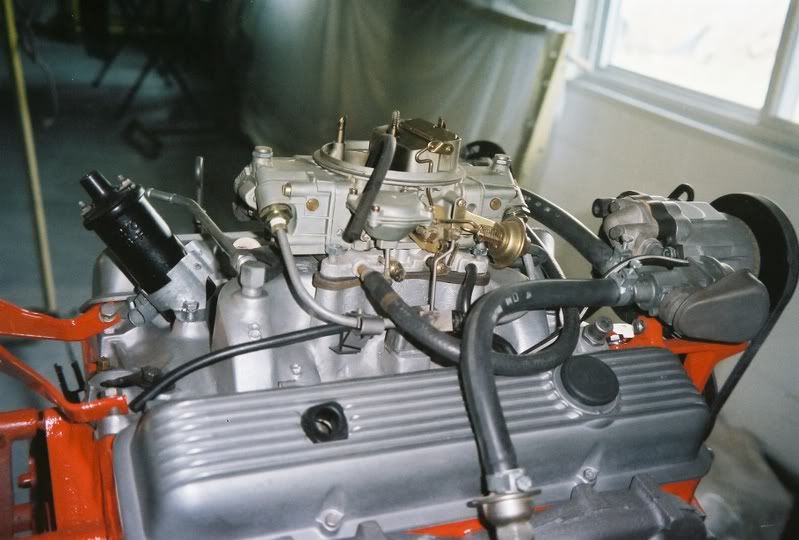
[QUOTE=rvazquez;1575633271]couple of pics of my setup, hope they help some. 1972 small block.
Regards
Roy
Yep, exactly like mine. Note #1 bolt on the driver's sideand #2 on the passenger side. Of course you have a prettier engine....
Regards
Roy
Yep, exactly like mine. Note #1 bolt on the driver's sideand #2 on the passenger side. Of course you have a prettier engine....
Last edited by Paul L; Oct 15, 2010 at 07:20 PM.
Thread Starter
Instructor
Joined: Sep 2010
Posts: 132
Likes: 1
From: Pioneer California
Thank you all for the pictures and comments. I think I may have the correct brackets, but today I have ordered a new (right) one just in case and to see if there is a difference in the brackets. I also noticed that I may just need to "mechanically adjust" the other bracket back towards the firewall which in turn will move the cover on the right side to move forward and get it a lot closer to where it needs to attach.
I also noticed in the various pictures the different positions of the distributor vacuum advance module. Mine is right up against the bracket ( no room for adjustment counterclockwise) and others are away from the bracket allowing for adjustments both ways.
More to come after I get the bracket.
John
Team Owner
Joined: Sep 2006
Posts: 31,270
Likes: 4,362
From: Westminster Maryland
Hi John,
I took some pictures this morning of both sides. Perhaps they'll help along with the other good pictures and suggestions already posted.
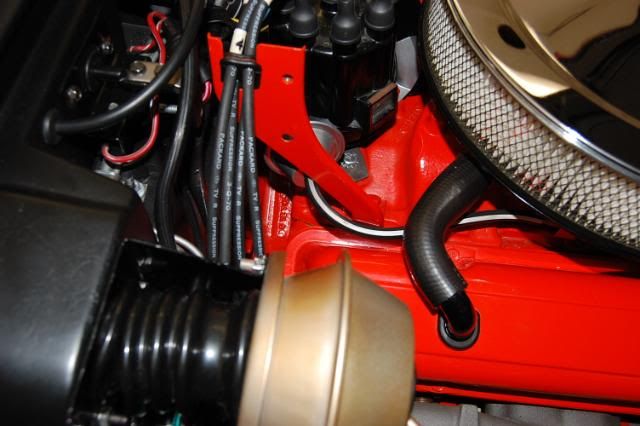
Note how close the distributor can is to the bracket. The original vacuum hose has a little mark on it where it leaned against the bracket for all those years.
Good Luck!
Regards,
Alan


I took some pictures this morning of both sides. Perhaps they'll help along with the other good pictures and suggestions already posted.
Note how close the distributor can is to the bracket. The original vacuum hose has a little mark on it where it leaned against the bracket for all those years.
Good Luck!
Regards,
Alan
Team Owner
Joined: Aug 1999
Posts: 30,995
Likes: 99
From: Ontario
Thank you all for the pictures and comments. I think I may have the correct brackets, but today I have ordered a new (right) one just in case and to see if there is a difference in the brackets. I also noticed that I may just need to "mechanically adjust" the other bracket back towards the firewall which in turn will move the cover on the right side to move forward and get it a lot closer to where it needs to attach.
I also noticed in the various pictures the different positions of the distributor vacuum advance module. Mine is right up against the bracket ( no room for adjustment counterclockwise) and others are away from the bracket allowing for adjustments both ways.
More to come after I get the bracket.
John
I also noticed in the various pictures the different positions of the distributor vacuum advance module. Mine is right up against the bracket ( no room for adjustment counterclockwise) and others are away from the bracket allowing for adjustments both ways.
More to come after I get the bracket.
John
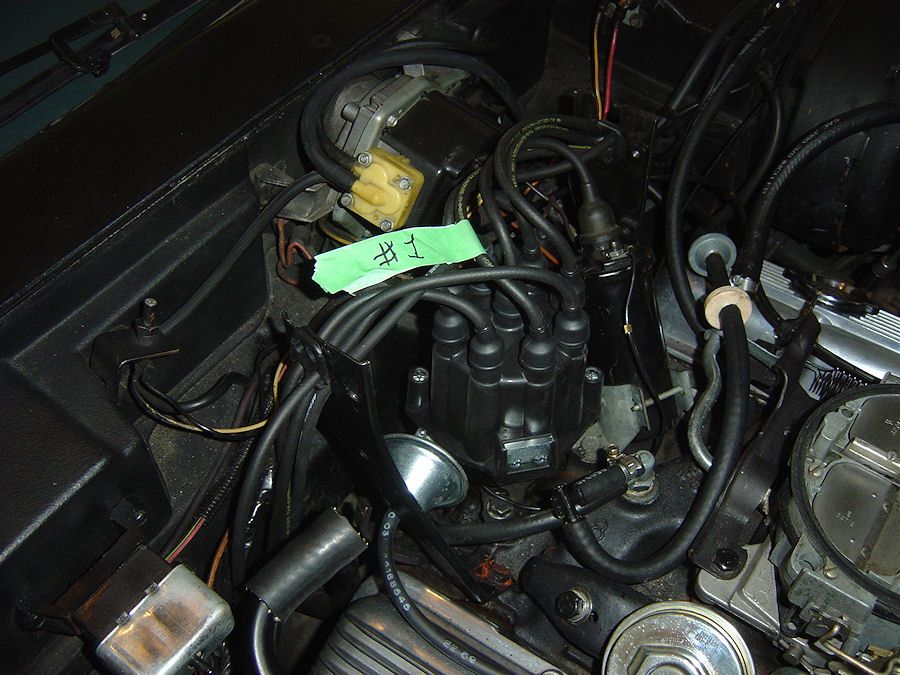
Alan's pic shows the wires numbered. Here is mine.
Last edited by Paul L; Oct 16, 2010 at 09:56 AM.
Team Owner
Joined: Sep 2006
Posts: 31,270
Likes: 4,362
From: Westminster Maryland
Hi Paul,
The position of your can is seems to be identical to the position of my can.
Regards,
Alan
Yes, I know almost all men have their cans in the same place except perhaps those who's cans are dragging.
The position of your can is seems to be identical to the position of my can.
Regards,
Alan
Yes, I know almost all men have their cans in the same place except perhaps those who's cans are dragging.
Thread Starter
Instructor
Joined: Sep 2010
Posts: 132
Likes: 1
From: Pioneer California
Hi Paul and Alan
I just got done looking at both of your pictures and comparing them with my car and everything's identical to yours. My can and vacuum tube is right up against the bracket. Now I have a different problem that the position of your # 1 plug wire isn't the same on mine. The wire in that position on mine goes to the right bank ( probably # 2) instead. Yours goes to the left bank.
Time to get the books out.
John
Team Owner
Joined: Aug 1999
Posts: 30,995
Likes: 99
From: Ontario
Hi Paul and Alan
I just got done looking at both of your pictures and comparing them with my car and everything's identical to yours. My can and vacuum tube is right up against the bracket. Now I have a different problem that the position of your # 1 plug wire isn't the same on mine. The wire in that position on mine goes to the right bank ( probably # 2) instead. Yours goes to the left bank.
Time to get the books out.
John
I just got done looking at both of your pictures and comparing them with my car and everything's identical to yours. My can and vacuum tube is right up against the bracket. Now I have a different problem that the position of your # 1 plug wire isn't the same on mine. The wire in that position on mine goes to the right bank ( probably # 2) instead. Yours goes to the left bank.
Time to get the books out.
John

This is not a good pic but you can see the tach cable coming straight into the distributor.

Last edited by Paul L; Oct 16, 2010 at 05:51 PM.
Team Owner
Joined: Aug 1999
Posts: 30,995
Likes: 99
From: Ontario
OK, Alan. I can get very adequate timing ranges with my configuration. It's bang on about 12* static now. The car runs well. No comment on my TCS bypass.
Team Owner
Joined: Sep 2006
Posts: 31,270
Likes: 4,362
From: Westminster Maryland
Hi Paul,
I was mostly trying to make a 'can' joke!
I've spent the day transferring the heel pad from my original carpet to new carpet. A REAL project to do without making any new stitch holes in the pad.
For a crazy person there are quite some differences in the pads that come on the various reproduction carpets compared to the original.
I'm a little loopy now. Cheap champagne hasn't helped either.
The weather is just fine enough to do hamburgers outside for maybe the last time.
Regards,
Alan
Last edited by Alan 71; Oct 17, 2010 at 11:05 AM.
Team Owner
Joined: Aug 1999
Posts: 30,995
Likes: 99
From: Ontario
Hi Paul,
I was mostly trying to make a 'can' joke!
I've spent the day transferring the heel pad from my original carpet to new carpet. A REAL project to do without making any new stitch holes in the pad.
For a crazy person there are quite some differences in the pads that come on the various reproduction carpets compared to the original.
I'm a little loopy now. Cheap champagne has helped either.
The weather is just fine enough to do hamburgers outside for maybe the last time.
Regards,
Alan
See my post re pics.
Drifting


Joined: Apr 2007
Posts: 1,970
Likes: 45
From: Cameron Park CA
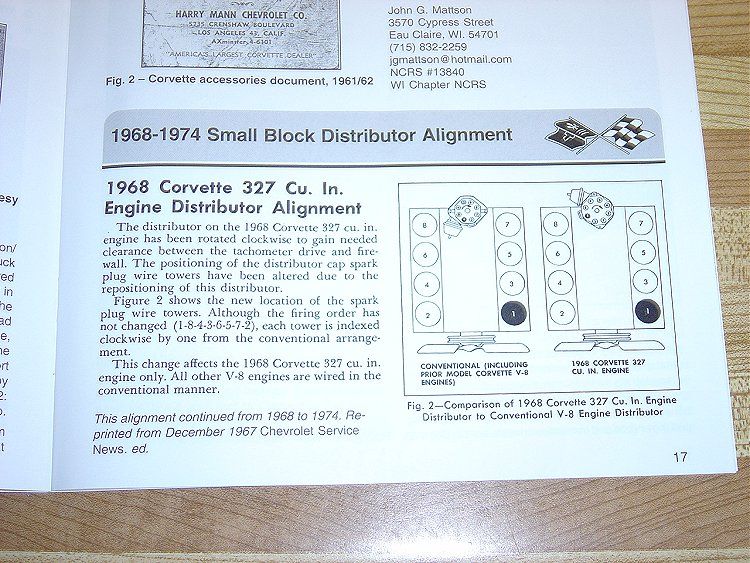
The 1969 AIM, UPC 6, Page B6, shows a diagram of the correct position of the distributor. The vacuum nipple of the can points ~105� clockwise from straight ahead. That puts it more rearward than your photos show yours are. The AIM agrees with the diagram in post 12. Positioning the distributor correctly as the diagram shows gives the tach cable a straight shot to the drive fitting. No need for those 90� gimmicks, or kinks in the tach drive cable.

Pete
Pete
Team Owner
Joined: Aug 1999
Posts: 30,995
Likes: 99
From: Ontario
The 1969 AIM, UPC 6, Page B6, shows a diagram of the correct position of the distributor. The vacuum nipple of the can points ~105� clockwise from straight ahead. That puts it more rearward than your photos show yours are. The AIM agrees with the diagram in post 12. Positioning the distributor correctly as the diagram shows gives the tach cable a straight shot to the drive fitting. No need for those 90� gimmicks, or kinks in the tach drive cable.
Pete
Pete