




Engine Compartment Detailing
Thread Starter
Le Mans Master


Joined: Sep 2002
Posts: 5,236
Likes: 898
From: Myrtle Beach SC
 Engine Compartment Detailing
I started by removing the radiator to repair a crack in the neck...now I've got emission hoses, plug wires and hardware pretty much removed. Kind of got carried away..underneath even removed heat shields and starter. Found a nice broadcast code on the M38 tranny. Even went to extent of removing the plug wire looms that bolt to the block...and refinished as well.
After searching past threads on the engine detailing, I was inspired to go nearly the entire route stopping short of pulling the engine.
http://www.hunt4cleanair.net/Images/engined.JPG
http://www.hunt4cleanair.net/Images/engined1.JPG
http://www.hunt4cleanair.net/Images/engined2.JPG
http://www.hunt4cleanair.net/Images/enginep1.JPG
http://www.hunt4cleanair.net/Images/enginep2.JPG
http://www.hunt4cleanair.net/Images/enginep3.JPG
You can see what happened when coolant was leaking and spraying the engine and manifold areas. I now have paint flakes on most of those areas so plan to use, brushes, cleaner and whatever to remove and prep surface for painting.
So brackets have been bead blasted and finished per NCRS rather paltry guidance.
I plan to use airbrush to paint engine surfaces original GM corporate blue.
Yeah...radiator is repaired, painted and awaiting until I get everything else done.
After searching past threads on the engine detailing, I was inspired to go nearly the entire route stopping short of pulling the engine.
http://www.hunt4cleanair.net/Images/engined.JPG
http://www.hunt4cleanair.net/Images/engined1.JPG
http://www.hunt4cleanair.net/Images/engined2.JPG
http://www.hunt4cleanair.net/Images/enginep1.JPG
http://www.hunt4cleanair.net/Images/enginep2.JPG
http://www.hunt4cleanair.net/Images/enginep3.JPG
You can see what happened when coolant was leaking and spraying the engine and manifold areas. I now have paint flakes on most of those areas so plan to use, brushes, cleaner and whatever to remove and prep surface for painting.
So brackets have been bead blasted and finished per NCRS rather paltry guidance.
I plan to use airbrush to paint engine surfaces original GM corporate blue.
Yeah...radiator is repaired, painted and awaiting until I get everything else done.

Le Mans Master
Joined: Sep 2004
Posts: 5,116
Likes: 5
From: Livonia MI
Only way you're gonna be happy at this point, is to yank the motor, and do the whole thing right. Surely the engine compartment needs some work, and really only way to do it. Dupli-Color engine enamel should be fine for the block. Eastwood carries all kinds of specialized restoration paints. Basic Rust-Oleum satin black and stainless steel finishes from the local hardware are good choices having around too.
Safety Car


Joined: Jun 2004
Posts: 4,366
Likes: 221
From: Beecher Illinois
July and August I went through this on THREE of my Vettes, having done the fourth 2 years ago.
Did them all with the engine in place, BUT, stripped everything off leaving just the block and heads in place.
Removed the oil pan, front cover, damper, water pump, intake, exhaust manifolds, and valve covers. Sandblasted everything but the valve covers(paint stripped those) and painted.
All the accessory brackets and pulleys too. Especially the ps pump, that was ratty!
Decided to go ahead and paint the crank pulleys, original finish tended to rust(black phosphate?) Painted the starter, too.
With the oil pan off I was able to safely jack up the motor to remove the motor mounts.
Thoroughly cleaned the block/heads, masked everything off, and painted.
With the motor mounts blasted, painted and reinstalled I put the oil pan and front cover back on. Then repainted along the rails and bolts.
Was actually fun putting everything back together, all clean and 'new'.
Final paint on the motor looks so much better than the thin spotty job done by the factory.
Probably take a judging hit but I prefer things to look their best.
I also found out the 'corporate blue' paint wasn't really a good match(used it on the one I did 2 years ago).
Found 'chevy blue' from Plastikote. Kinda a green tinge to it. BUT, the newer cans are totally wrong. You gotta find an old one.
Will post a pic of the different cans of paint if anyone wants to see differences.
Didn't need to do anything with the engine compartment as all was good.
You'd think low mile Vettes would look great as is, but things are also 30+ years old!
Did them all with the engine in place, BUT, stripped everything off leaving just the block and heads in place.
Removed the oil pan, front cover, damper, water pump, intake, exhaust manifolds, and valve covers. Sandblasted everything but the valve covers(paint stripped those) and painted.
All the accessory brackets and pulleys too. Especially the ps pump, that was ratty!
Decided to go ahead and paint the crank pulleys, original finish tended to rust(black phosphate?) Painted the starter, too.
With the oil pan off I was able to safely jack up the motor to remove the motor mounts.
Thoroughly cleaned the block/heads, masked everything off, and painted.
With the motor mounts blasted, painted and reinstalled I put the oil pan and front cover back on. Then repainted along the rails and bolts.
Was actually fun putting everything back together, all clean and 'new'.
Final paint on the motor looks so much better than the thin spotty job done by the factory.
Probably take a judging hit but I prefer things to look their best.
I also found out the 'corporate blue' paint wasn't really a good match(used it on the one I did 2 years ago).
Found 'chevy blue' from Plastikote. Kinda a green tinge to it. BUT, the newer cans are totally wrong. You gotta find an old one.
Will post a pic of the different cans of paint if anyone wants to see differences.
Didn't need to do anything with the engine compartment as all was good.
You'd think low mile Vettes would look great as is, but things are also 30+ years old!
Last edited by KapsSA; Oct 17, 2011 at 05:28 PM.
Thread Starter
Le Mans Master
Joined: Sep 2002
Posts: 5,236
Likes: 898
From: Myrtle Beach SC
Did them all with the engine in place, BUT, stripped everything off leaving just the block and heads in place.
Removed the oil pan, front cover, damper, water pump, intake, exhaust manifolds, and valve covers. Sandblasted everything but the valve covers (paint stripped those) and painted.
Removed the oil pan, front cover, damper, water pump, intake, exhaust manifolds, and valve covers. Sandblasted everything but the valve covers (paint stripped those) and painted.

I was tempted to pull the oil pan because I suspect I've got a leak somewhere. I can see how sand blast would really clean up the oil pan nicely. Mine is a mix of a finish that is thin and rusted.
What's the front cover? Also, why pull water pump? Did you have it rebuilt?
All the accessory brackets and pulleys too. Especially the ps pump, that was ratty!
Decided to go ahead and paint the crank pulleys, original finish tended to rust(black phosphate?) Painted the starter, too.
With the oil pan off I was able to safely jack up the motor to remove the motor mounts.
With the oil pan off I was able to safely jack up the motor to remove the motor mounts.
Thoroughly cleaned the block/heads, masked everything off, and painted. With the motor mounts blasted, painted and reinstalled I put the oil pan and front cover back on. Then repainted along the rails and bolts.
Was actually fun putting everything back together, all clean and 'new'.
Final paint on the motor looks so much better than the thin spotty job done by the factory.
Was actually fun putting everything back together, all clean and 'new'.
Final paint on the motor looks so much better than the thin spotty job done by the factory.
I also found out the 'corporate blue' paint wasn't really a good match(used it on the one I did 2 years ago). Found 'chevy blue' from Plastikote. Kinda a green tinge to it. BUT, the newer cans are totally wrong. You gotta find an old one.
Will post a pic of the different cans of paint if anyone wants to see differences.
Will post a pic of the different cans of paint if anyone wants to see differences.
Didn't need to do anything with the engine compartment as all was good. You'd think low mile Vettes would look great as is, but things are also 30+ years old!
I've got a bunch of parts (bolts and brackets) I plan to use either black phosphate or metal blackener (Eastwood) to restore that flat black finish.
So here's a question for you gurus of originality out there.
There is a bracket on the driver's side, rear (78 AIM p 336) that is used to attached the K30 cruise control bracket. It is also used to route the K30 solenoid adjusting cable. The question is...was the bracket installed at the engine factory or at the assembly plant? My L48 shows blue paint but the L82 shows it natural and rusted. It appears to have been an engine factory install.
Safety Car
Joined: Jun 2004
Posts: 4,366
Likes: 221
From: Beecher Illinois
Front cover-timing chain cover.
Pulled EVERYTHING off to blast and paint. Figured paint the water pump off to do a better, altho not NCRS ,quality job.
Didn't want to paint over rough paint, plus the sandblasted surface holds the paint so nice.
And new gaskets was a bonus.
I actually did the oil pans on the 78SA and white79 about 5 years ago. Still pulled them off again. Pace car did need pan gaskets, just didn't want to mess with originality til now.
Pretty sure that bracket you're asking about, plus the engine pull brackets, were installed at the engine factory.
My pace car brackets were painted 'aluminum', but you could see blue on them too. In fact, the front engine pull bracket was all blue on the valve cover side, alum on the manifold side.
edit....not sure which bracket you're talking about now looking at page 336 in the AIM?
The one the vac diaphram for the cruise attaches to? It APPEARS to be bare steel, but there may be some kind of finish on it, but not black.
The bracket on the back of the carb for accelerator? Same as cruise bracket, bare with some type of finish. Kinda a pukey brown look.
Or the bracket I thought above that's attached with intake manifold bolts?
Pulled EVERYTHING off to blast and paint. Figured paint the water pump off to do a better, altho not NCRS
,quality job.Didn't want to paint over rough paint, plus the sandblasted surface holds the paint so nice.
And new gaskets was a bonus.
I actually did the oil pans on the 78SA and white79 about 5 years ago. Still pulled them off again. Pace car did need pan gaskets, just didn't want to mess with originality til now.
Pretty sure that bracket you're asking about, plus the engine pull brackets, were installed at the engine factory.
My pace car brackets were painted 'aluminum', but you could see blue on them too. In fact, the front engine pull bracket was all blue on the valve cover side, alum on the manifold side.
edit....not sure which bracket you're talking about now looking at page 336 in the AIM?
The one the vac diaphram for the cruise attaches to? It APPEARS to be bare steel, but there may be some kind of finish on it, but not black.
The bracket on the back of the carb for accelerator? Same as cruise bracket, bare with some type of finish. Kinda a pukey brown look.
Or the bracket I thought above that's attached with intake manifold bolts?
Last edited by KapsSA; Oct 18, 2011 at 07:20 PM.

Team Owner


Joined: Sep 2006
Posts: 31,219
Likes: 4,306
From: Westminster Maryland
Hi H4A,
My understanding of the 'bracket' or any part, is that if the part or assembly has an item number in the AIM it was installed in St. Louis.
I've also heard John Z say that there was no engine orange paint in the St. Louis plant... Or Blue either?
Regards,
Alan
My understanding of the 'bracket' or any part, is that if the part or assembly has an item number in the AIM it was installed in St. Louis.
I've also heard John Z say that there was no engine orange paint in the St. Louis plant... Or Blue either?
Regards,
Alan
Thread Starter
Le Mans Master
Joined: Sep 2002
Posts: 5,236
Likes: 898
From: Myrtle Beach SC
The bracket on the back of the carb for accelerator?Same as cruise bracket, bare with some type of finish. Kinda a pukey brown look.
Or the bracket I thought above that's attached with intake manifold bolts?
Or the bracket I thought above that's attached with intake manifold bolts?
Corvette Stories
The Best of Corvette for Corvette Enthusiasts

Top 10 Most Explosive Corvettes Ever Made: Power-to-Weight Ratio Ranked!
Joe Kucinski
150 hp to 1,250 hp: Every Corvette Generation Compared by the Specs That Matter
Joe Kucinski
8 Coolest Corvette Pace Cars (and Replicas) of All Time
Verdad Gallardo
Top 10 Corvette Engines RANKED by Peak Torque (70+ Years of Muscle!)
Joe Kucinski
Corvette ZR1X Will Be Pacing the Indy 500, And Could Probably Race, Too!
Verdad Gallardo
Top 10 Corvettes Coming to Mecum Indy 2026!
Brett Foote
Top 10 C9 Corvette MUST-HAVES to Fix These C8 Generation Flaws!
Michael S. Palmer
10 Revolutionary 'Corvette Firsts' Most People Don't Know
Joe Kucinski
5 Reasons to Upgrade to an LS6-Powered Corvette; 5 Reasons to Stay LT2
Michael S. Palmer
Team Owner

Joined: Jan 2006
Posts: 37,637
Likes: 3,116
From: Crossville TN
Detailing your engine compartment with the engine in place is not fun, but is less work than removing the engine. And, when you get done, it will look better than 99% of the 'weekend' show cars.
Do what you can with engine in place. Eventually, you will need to pull the engine; then you can do the 'whole deal'.
P.S. Since you will be removing lots of "stuff", anyway, make sure you change spark plugs, plug wires and whatever else requires some removal of engine hardware, while you're at it.
Do what you can with engine in place. Eventually, you will need to pull the engine; then you can do the 'whole deal'.
P.S. Since you will be removing lots of "stuff", anyway, make sure you change spark plugs, plug wires and whatever else requires some removal of engine hardware, while you're at it.
Last edited by 7T1vette; Oct 18, 2011 at 10:11 AM.
Safety Car
Joined: Jun 2004
Posts: 4,366
Likes: 221
From: Beecher Illinois
Thread Starter
Le Mans Master
Joined: Sep 2002
Posts: 5,236
Likes: 898
From: Myrtle Beach SC
I'm not sure that bracket had another function. The AIM describes it as "engine Support." And my L82 M21 (K30 n/a with M21) has it so....?
Safety Car
Joined: Jun 2004
Posts: 4,366
Likes: 221
From: Beecher Illinois
Are you talking about the part that bolts on with the 2 rear intake manifold bolts?
The 'natural' finish cruise diaphram bracket bolts onto THAT bracket with 2 bolts and one bolt to the back of the head.
Your manual trans wouldn't have cruise but it WOULD have the bracket that's bolted on with 2 intake bolts. That bracket also has the rubber grommit that supports the brake booster vac line and a tab for the spark plug wire support.
THAT bracket would have been installed at the engine plant.
Painted blue on the L48, probably natural finish(or maybe alum silver painted) with blue overspray on the L82 as the engine was sprayed with the 'aluminum' painted aluminum manifold in place.
None of the 3 brackets on the intake manifolds on any of my Vettes were rusty, leading me to think they must have been painted 'aluminum' on L82s.
edit......this?

The 'natural' finish cruise diaphram bracket bolts onto THAT bracket with 2 bolts and one bolt to the back of the head.
Your manual trans wouldn't have cruise but it WOULD have the bracket that's bolted on with 2 intake bolts. That bracket also has the rubber grommit that supports the brake booster vac line and a tab for the spark plug wire support.
THAT bracket would have been installed at the engine plant.
Painted blue on the L48, probably natural finish(or maybe alum silver painted) with blue overspray on the L82 as the engine was sprayed with the 'aluminum' painted aluminum manifold in place.
None of the 3 brackets on the intake manifolds on any of my Vettes were rusty, leading me to think they must have been painted 'aluminum' on L82s.
edit......this?
Last edited by KapsSA; Oct 18, 2011 at 07:53 PM.
Thread Starter
Le Mans Master
Joined: Sep 2002
Posts: 5,236
Likes: 898
From: Myrtle Beach SC
Are you talking about the part that bolts on with the 2 rear intake manifold bolts?
The 'natural' finish cruise diaphram bracket bolts onto THAT bracket with 2 bolts and one bolt to the back of the head.
Your manual trans wouldn't have cruise but it WOULD have the bracket that's bolted on with 2 intake bolts. That bracket also has the rubber grommit that supports the brake booster vac line and a tab for the spark plug wire support.
The 'natural' finish cruise diaphram bracket bolts onto THAT bracket with 2 bolts and one bolt to the back of the head.
Your manual trans wouldn't have cruise but it WOULD have the bracket that's bolted on with 2 intake bolts. That bracket also has the rubber grommit that supports the brake booster vac line and a tab for the spark plug wire support.
THAT bracket would have been installed at the engine plant.
Painted blue on the L48, probably natural finish (or maybe alum silver painted) with blue overspray on the L82 as the engine was sprayed with the 'aluminum' painted aluminum manifold in place.
None of the 3 brackets on the intake manifolds on any of my Vettes were rusty, leading me to think they must have been painted 'aluminum' on L82s.
Painted blue on the L48, probably natural finish (or maybe alum silver painted) with blue overspray on the L82 as the engine was sprayed with the 'aluminum' painted aluminum manifold in place.
None of the 3 brackets on the intake manifolds on any of my Vettes were rusty, leading me to think they must have been painted 'aluminum' on L82s.
 nice work
PS...did you paint the return springs as well? We are into minutia aren't we?
Last edited by hunt4cleanair; Oct 19, 2011 at 02:54 AM. Reason: add PS
Safety Car
Joined: Jun 2004
Posts: 4,366
Likes: 221
From: Beecher Illinois
Didn't touch em two years ago when I went back to 'original'.
Left the ones on my others as they were, they looked OK.
You'll notice in the pic I decided not to do the blue overspray on the manifold or brackets.
Even with the detailing I've done on the Vettes I don't mind a little patina developing on things. I'm not gonna go nuts keeping things perfect.
Did you ever try painting that pvc elbow?
Last edited by KapsSA; Oct 19, 2011 at 06:57 PM.


Thread Starter
Le Mans Master
Joined: Sep 2002
Posts: 5,236
Likes: 898
From: Myrtle Beach SC
Just an update on my engine resto project. I've finally removed enough stuff that I'm down to block cleaning and its amazing the gunk that accumulates at the lower levels of the block. I'm also including a few pics to show progress including my "surgery mask" to protect firewalls as well as exterior finishes. I just took a big piece of plastic and cut the center so the flaps folded downward protecting firewall sides. Actually, thought it was pretty clever.
Here's my mask
engine compartment mask
I've used scotchbrite scouring pads and an air needle to get to this point along with some help from brake cleaner for the tough stuff. The front cover is as shipped from the factory plus the rust. It virtually had no paint on it.
engine
In these late model years, blocks were stamped with engine suffix code from the engine assembly plant and than stamped at the St Louis stamp with the VIN. What we expect to see is paint over the engine suffix but the paint cut for the VIN derivative...as illustrated.
CLM engine suffix
Finally...how do you read this casting date? It is rough but perhaps your eyes are better than mine. The resolution should be sufficient that you can zoom in.
casting date
Here's my mask
engine compartment mask
I've used scotchbrite scouring pads and an air needle to get to this point along with some help from brake cleaner for the tough stuff. The front cover is as shipped from the factory plus the rust. It virtually had no paint on it.
engine
In these late model years, blocks were stamped with engine suffix code from the engine assembly plant and than stamped at the St Louis stamp with the VIN. What we expect to see is paint over the engine suffix but the paint cut for the VIN derivative...as illustrated.
CLM engine suffix
Finally...how do you read this casting date? It is rough but perhaps your eyes are better than mine. The resolution should be sufficient that you can zoom in.
casting date
Team Owner
Joined: Jan 2006
Posts: 37,637
Likes: 3,116
From: Crossville TN
Very creative and efficient. You apparently had a particularly difficult task and you appear to be doing a great job of cleaning it all up.
I will suggest that you pay attention to the 'details' when you are finishing up the work: use volatile cleaner to degrease/decrud all the wiring insulation, then use a polymer protectant (for plastics) to coat them and make them look new; remove the covers from relays, etc. and clean/repaint them; remove wiring connectors from 'stuff' and use a small wire brush to clean off all the corrosion, etc. from the metal contacts and connectors;.... you get the idea. In the end, since you are already down to the nitty-gritty in the engine compartment, you will gain tremendous satisfaction from the detailing that you are doing and your car will operate better and for a longer time.
I will suggest that you pay attention to the 'details' when you are finishing up the work: use volatile cleaner to degrease/decrud all the wiring insulation, then use a polymer protectant (for plastics) to coat them and make them look new; remove the covers from relays, etc. and clean/repaint them; remove wiring connectors from 'stuff' and use a small wire brush to clean off all the corrosion, etc. from the metal contacts and connectors;.... you get the idea. In the end, since you are already down to the nitty-gritty in the engine compartment, you will gain tremendous satisfaction from the detailing that you are doing and your car will operate better and for a longer time.

Melting Slicks


Joined: Mar 2009
Posts: 3,126
Likes: 15
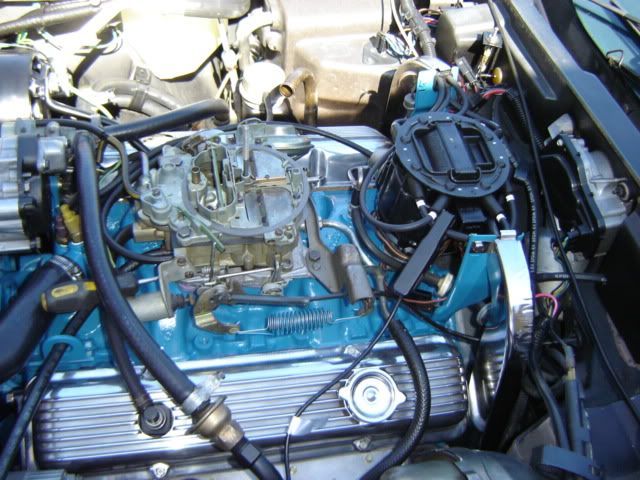
Hello Tom. Cover everything before you start the painting. I am finding black and blue overspray on all surfaces in the garage. My engine had even less paint on it than yours when I first tackled this back in '97. My current rsults are even better than my first crack at it. mike...
Thread Starter
Le Mans Master
Joined: Sep 2002
Posts: 5,236
Likes: 898
From: Myrtle Beach SC
Hey 7T...thanks for the final detail tips
Give me an example of a "volatile cleaner" like brake cleaner fluid? How about a "polymer protectant?" I just picked up some GM Super Lube which is I believe has some polymer in it.
Good point! I've already seen much gunk in the alternator connector and was trying to figure out how to clean it up. I won't use a paint on a plated part since it looks too unnatural so there are limits there without replating. I was looking at Eastwood's Zinc plating kit for some of this stuff.
Thanks for the tips
Remove the covers from relays, etc. and clean/repaint them; remove wiring connectors from 'stuff' and use a small wire brush to clean off all the corrosion, etc. from the metal contacts and connectors;.... you get the idea.
In the end, since you are already down to the nitty-gritty in the engine compartment, you will gain tremendous satisfaction from the detailing that you are doing and your car will operate better and for a longer time.