


1971 Journey

Safety Car


Joined: Jun 2013
Posts: 4,399
Likes: 793
Great work, sounds like you do have a plan. Also seems like you have done your research or have seen this stuff before. I don't think you need outside advice like suggested, other then to stick to your plan.


Thread Starter
Melting Slicks


Joined: Apr 2010
Posts: 2,795
Likes: 1,196
From: Canberra Australia
2025 C3 of the Year Finalist - Modified
Thanks guys, always happy for advice and I had read one of Dub's posts on fiberglass repair a while back before I started.
Did a few glass repairs when I did the engine bay but certainly no expert.
Just taking it slow as it was a big step to grind away the nice paint and get started on that front corner and chin spoiler.
That front corner was just a tiny crack that lead to a bad glass repair from the past covered in bog.
As I started grinding it out it got bigger and bigger.
More than happy with the repair so far now just need to move on to a few more then finish it ready for paint.
Sounds simple but it won't be :-)
Team Owner


Joined: Sep 2006
Posts: 31,283
Likes: 4,374
From: Westminster Maryland
Hi Craig,
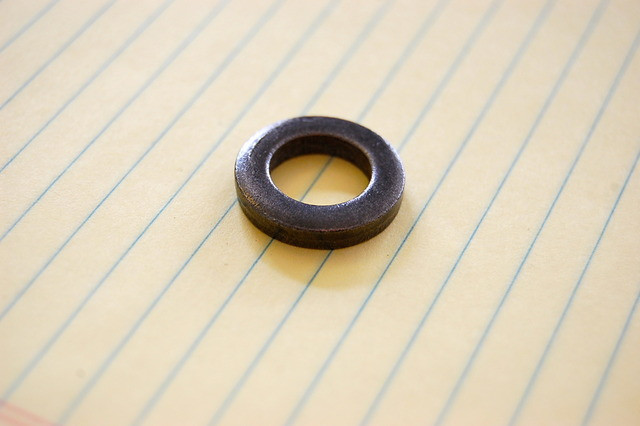
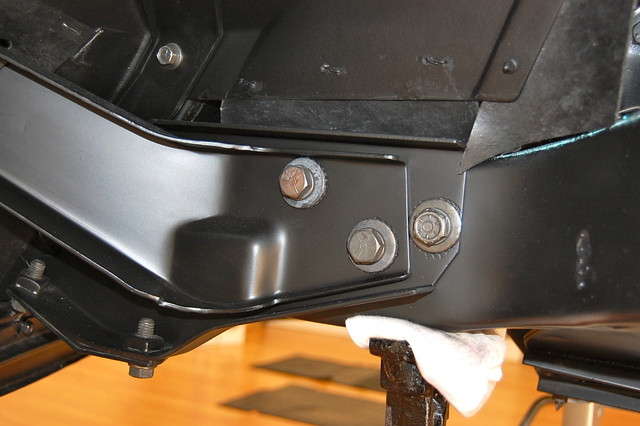
There was a thick 'spacer' that was used on the bolt for the bottom of the bumper-ette.
It's there to prevent the bumper-ette from crushing the fiberglass air dam when the bolt is tightened. It fills the 'gap' in the hole in the fiberglass. It also helps save the paint a little.
These have often been lost at some point so you might want to consider using them if you don't have them.
Also the nuts used on the bolts that mount the plastic extension had captured washers on them to help preserve the air dam paint as the bolts are tightened.
Regards,
Alan
Thread Starter
Melting Slicks
Joined: Apr 2010
Posts: 2,795
Likes: 1,196
From: Canberra Australia
2025 C3 of the Year Finalist - Modified
That's interesting Alan so the washer was thicker than the fibreglass and stopped the bumperette damaging the paint.
Will need to look at my originals to see if it's there, but I doubt it.
My reproduction black spoiler nuts and bolts don't have the washers as described. That would also mean originally the bolt came through from behind.
Will need to look at my originals to see if it's there, but I doubt it.
My reproduction black spoiler nuts and bolts don't have the washers as described. That would also mean originally the bolt came through from behind.
Team Owner
Joined: Sep 2006
Posts: 31,283
Likes: 4,374
From: Westminster Maryland
Hi Craig,
This is the configuration of the original bolts and nuts.
They each have a captured washer on them.
If you can't find the original 'spacers', using several flat washers will work since the area is covered so you can't see what's there.
Regards,
Alan
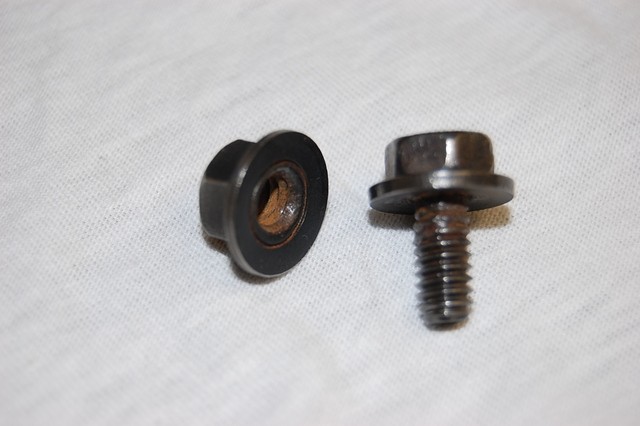

The bracket 'hides' the 'spacer'.

This is the configuration of the original bolts and nuts.
They each have a captured washer on them.
If you can't find the original 'spacers', using several flat washers will work since the area is covered so you can't see what's there.
Regards,
Alan
The bracket 'hides' the 'spacer'.
Thread Starter
Melting Slicks
Joined: Apr 2010
Posts: 2,795
Likes: 1,196
From: Canberra Australia
2025 C3 of the Year Finalist - Modified
Thread Starter
Melting Slicks
Joined: Apr 2010
Posts: 2,795
Likes: 1,196
From: Canberra Australia
2025 C3 of the Year Finalist - Modified
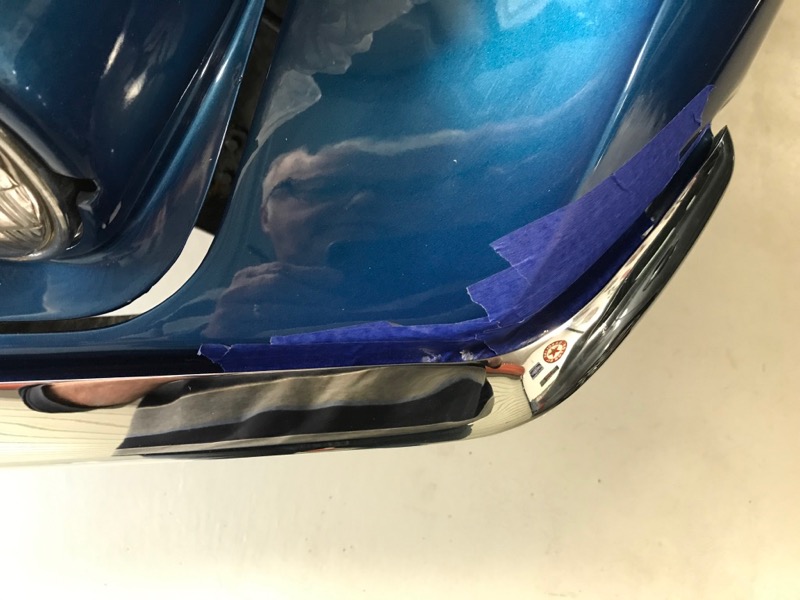
So we test fitted the bumper today. That was a bit of a pain to try and get it even and sitting almost correct.
Would love to have a large wood vise so i could twist it a bit to get it perfect but at the end of the day here is where we got.
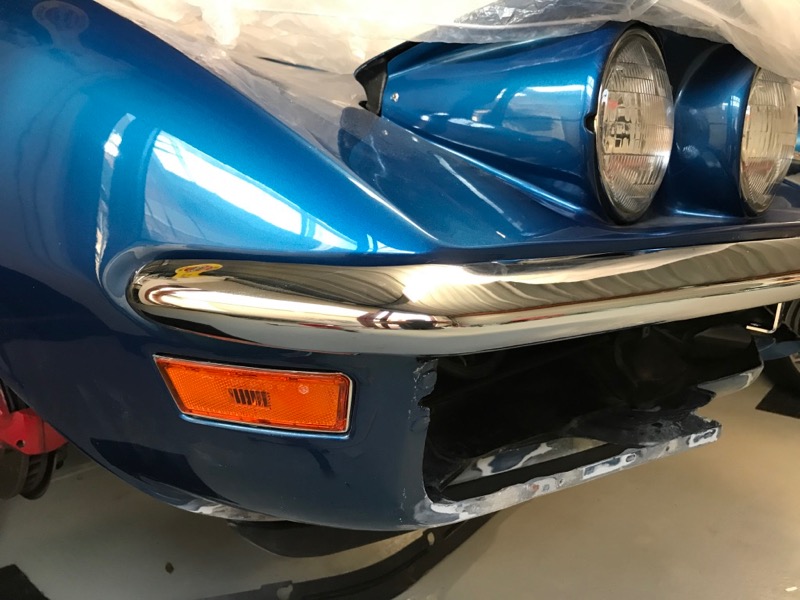
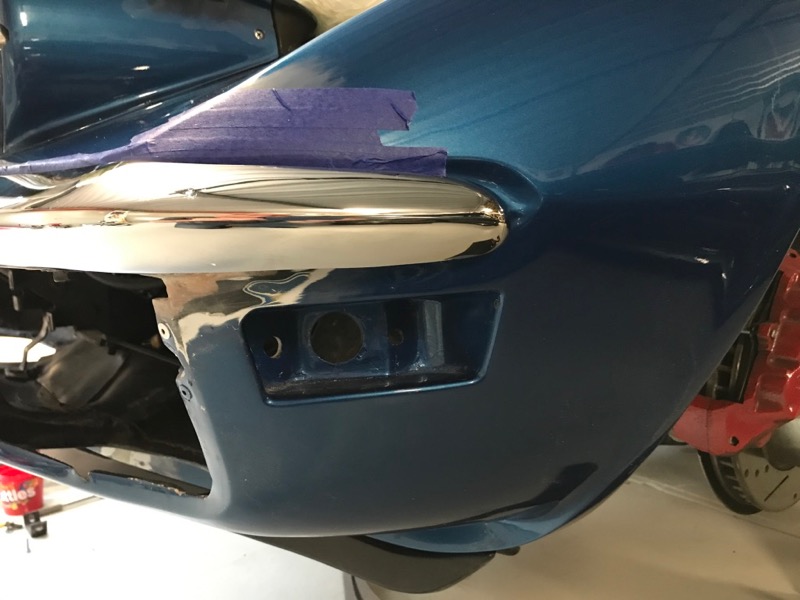
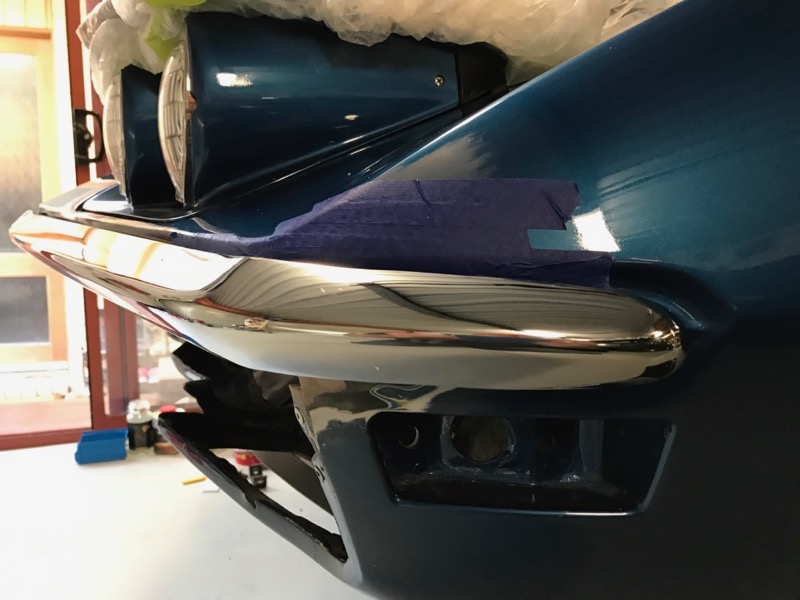
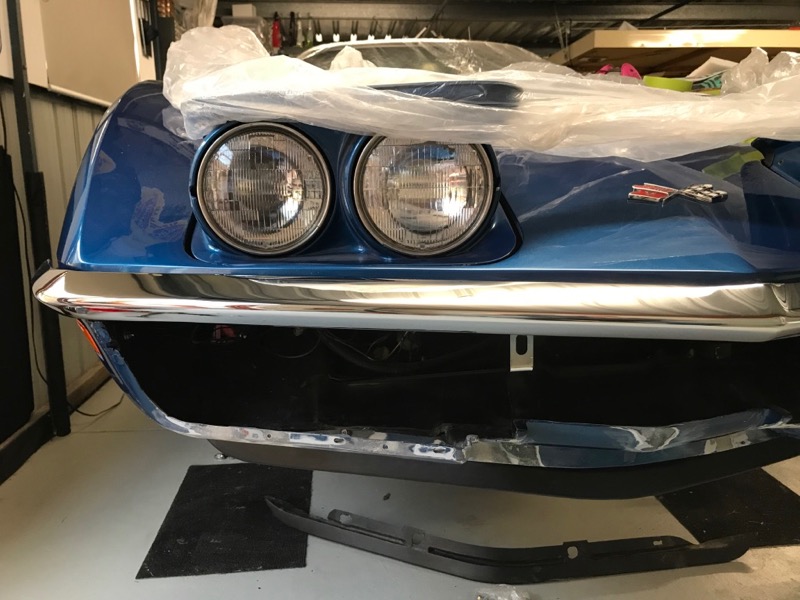
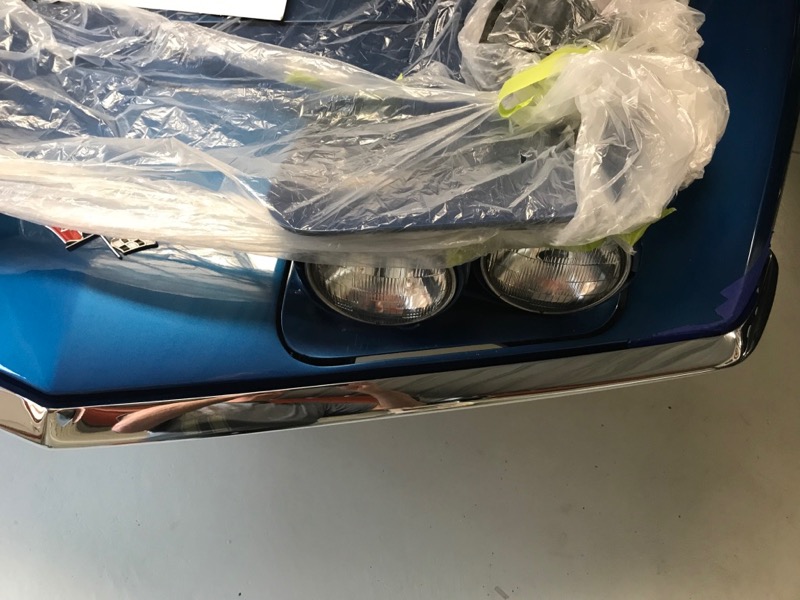

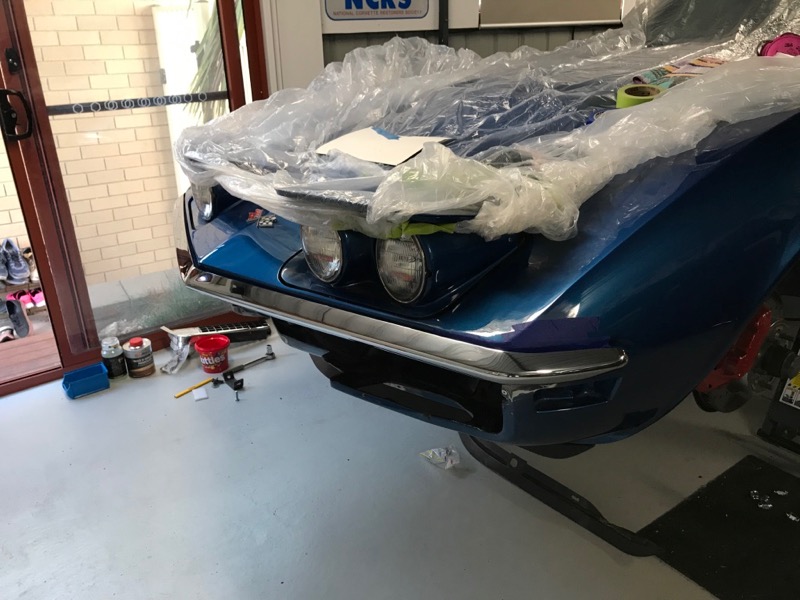
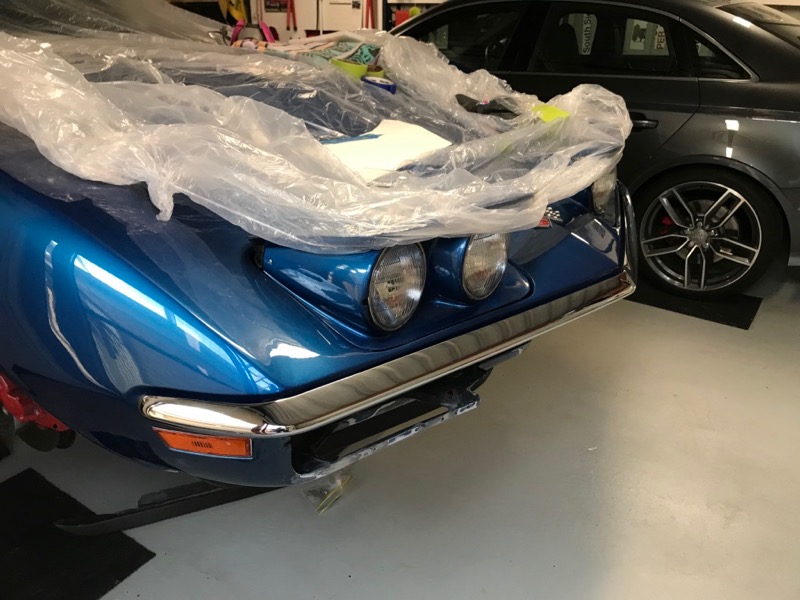
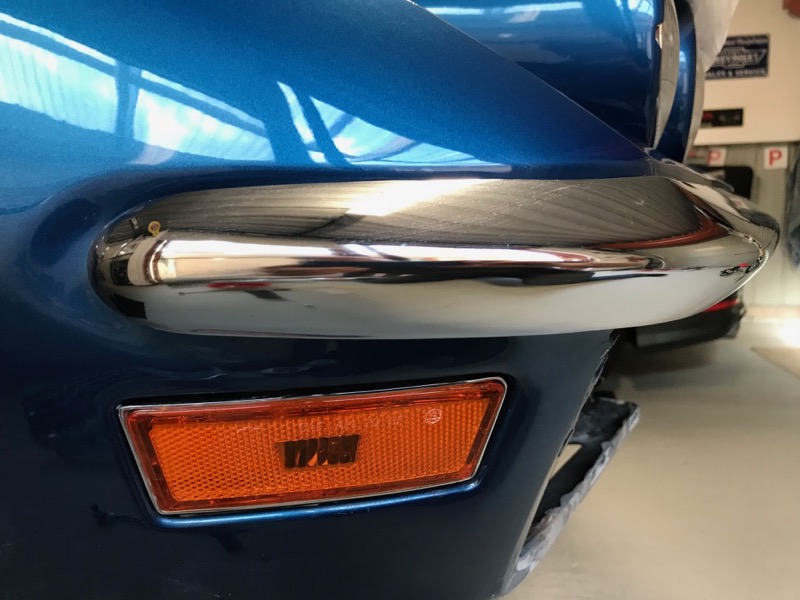
This corner has a slight drop that i can't get out without possibly twisting the bar. If I let it sit out a bit further at front it can be made a bit better.
We also noticed that the indented fiberglass curve on this side that goes around the end of the bar is not created properly and curves in way tot soon.
I may just reshape the fiberglass curve and edges to make it look straight :-) May be easier to trick the eye than bend the bar.
Compared to my old bar the ends sit in so much closer so its a big improvement already
Tell me what you think and any tips for adjusting the ends.
Would love to have a large wood vise so i could twist it a bit to get it perfect but at the end of the day here is where we got.
This corner has a slight drop that i can't get out without possibly twisting the bar. If I let it sit out a bit further at front it can be made a bit better.
We also noticed that the indented fiberglass curve on this side that goes around the end of the bar is not created properly and curves in way tot soon.
I may just reshape the fiberglass curve and edges to make it look straight :-) May be easier to trick the eye than bend the bar.
Compared to my old bar the ends sit in so much closer so its a big improvement already
Tell me what you think and any tips for adjusting the ends.
Last edited by CraigH; Apr 10, 2023 at 05:31 AM.
Corvette Stories
The Best of Corvette for Corvette Enthusiasts

Top 10 Most Expensive Corvettes Ever Sold on Bring A Trailer
Brett Foote
10 Things Every Corvette Owner Needs (2026 Edition)
Michael S. Palmer
8 Most "Only Corvette Owners Understand" Quirks and Problems
Pouria Savadkouei
10 Reasons the C6 Z06 is Still A Performance Benchmark After 20 Years
Joe Kucinski
How Much Horsepower Every Corvette Engine "LOST" in 1972
Joe Kucinski
Top 10 DOs and DON'Ts for Protecting Your Convertible Top!
Michael S. Palmer
Top 10 Most Explosive Corvettes Ever Made: Power-to-Weight Ratio Ranked!
Joe Kucinski
150 hp to 1,250 hp: Every Corvette Generation Compared by the Specs That Matter
Joe Kucinski
8 Coolest Corvette Pace Cars (and Replicas) of All Time
Verdad GallardoRacer


Joined: Jan 2005
Posts: 370
Likes: 77
From: Perth Western Australia
Looks good Craig. Your right though, it could use a slight twist to get the left side up a bit. I don't think it would take much along the length of the bumper to get the left side even.
Thread Starter
Melting Slicks
Joined: Apr 2010
Posts: 2,795
Likes: 1,196
From: Canberra Australia
2025 C3 of the Year Finalist - Modified
May need to make a plate that i can put in the vice then bolt the bar up to it and then try the twist.
Racer
Joined: Jan 2005
Posts: 370
Likes: 77
From: Perth Western Australia
With my rear bumpers I cut and re-welded the mounting pads so they both sat straight and even. It's a bit of extra work but worth the effort.
Team Owner
Joined: Sep 2006
Posts: 31,283
Likes: 4,374
From: Westminster Maryland
Hi Craig,
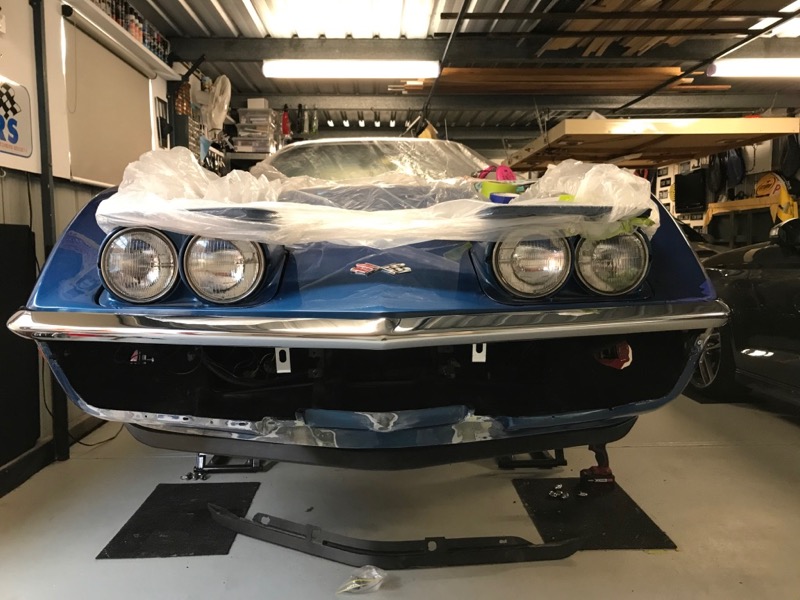
I wouldn't be at all happy with the fit. The left side corner looks pretty bad to me.
But what to do about it raises a lot of ugly possibilities.
'Twisting' the bumper may break the chrome and nickel loose from the copper� if not immediately, in the near future. This is because the layer of chrome is so hard and so thin it has very little ability to flex�. and that's what you're asking it to do.
A few questions.
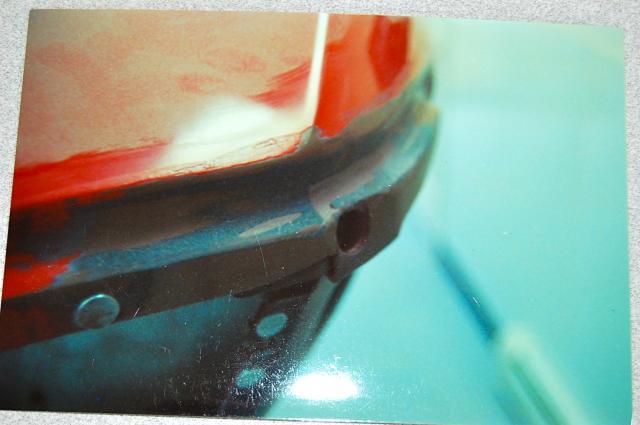
First, do you have photos that show the fit before the 'incident'?
What is the front bumper? An original replaced? A reproduction? If a reproduction, do you know where it came from?
What is the front clip? Is it an original?
And the big one� how far do you want to go with this? It seemed like you were enjoying the car the way it was� do you just want to get back to that point with it?
Regards,
Alan
I wouldn't be at all happy with the fit. The left side corner looks pretty bad to me.
But what to do about it raises a lot of ugly possibilities.
'Twisting' the bumper may break the chrome and nickel loose from the copper� if not immediately, in the near future. This is because the layer of chrome is so hard and so thin it has very little ability to flex�. and that's what you're asking it to do.
A few questions.
First, do you have photos that show the fit before the 'incident'?
What is the front bumper? An original replaced? A reproduction? If a reproduction, do you know where it came from?
What is the front clip? Is it an original?
And the big one� how far do you want to go with this? It seemed like you were enjoying the car the way it was� do you just want to get back to that point with it?
Regards,
Alan
Thread Starter
Melting Slicks
Joined: Apr 2010
Posts: 2,795
Likes: 1,196
From: Canberra Australia
2025 C3 of the Year Finalist - Modified
Hi Craig,
I wouldn't be at all happy with the fit. The left side corner looks pretty bad to me.
But what to do about it raises a lot of ugly possibilities.
'Twisting' the bumper may break the chrome and nickel loose from the copper� if not immediately, in the near future. This is because the layer of chrome is so hard and so thin it has very little ability to flex�. and that's what you're asking it to do.
A few questions.
First, do you have photos that show the fit before the 'incident'?
What is the front bumper? An original replaced? A reproduction? If a reproduction, do you know where it came from?
What is the front clip? Is it an original?
And the big one� how far do you want to go with this? It seemed like you were enjoying the car the way it was� do you just want to get back to that point with it?
Regards,
Alan
The front corner was not damaged in the incident.
I decided to correct a couple of minor cracks while the other paint was being done and found a heap of body filler.
However the front corner had been replaced at some time in the cars life. Not that well from what I have found here and in the engine bay where I needed to remake the inner guard closer to what was originally there.
The old bar sat level but both sides stuck out way more than the new one.
I want to get it sitting level on the end but I don't want to boil the ocean in doing it..
This bar is one of the paragon ones so should be fairly good.
Team Owner
Joined: Sep 2006
Posts: 31,283
Likes: 4,374
From: Westminster Maryland
Hi Craig,
By looking underneath can you get any idea what's actually been done to that corner in the past and how far would you have to go to get to undamaged fiberglass?
Regards,
Alan


By looking underneath can you get any idea what's actually been done to that corner in the past and how far would you have to go to get to undamaged fiberglass?
Regards,
Alan
Le Mans Master


Joined: Nov 2016
Posts: 9,264
Likes: 951
From: Lake Tahoe, CA
So we test fitted the bumper today. That was a bit of a pain to try and get it even and sitting almost correct.
Would love to have a large wood vise so i could twist it a bit to get it perfect but at the end of the day here is where we got.


This corner has a slight drop that i can't get out without possibly twisting the bar. If I let it sit out a bit further at front it can be made a bit better.
We also noticed that the indented fiberglass curve on this side that goes around the end of the bar is not created properly and curves in way tot soon.
I may just reshape the fiberglass curve and edges to make it look straight :-) May be easier to trick the eye than bend the bar.
Compared to my old bar the ends sit in so much closer so its a big improvement already
Tell me what you think and any tips for adjusting the ends.
Would love to have a large wood vise so i could twist it a bit to get it perfect but at the end of the day here is where we got.
This corner has a slight drop that i can't get out without possibly twisting the bar. If I let it sit out a bit further at front it can be made a bit better.
We also noticed that the indented fiberglass curve on this side that goes around the end of the bar is not created properly and curves in way tot soon.
I may just reshape the fiberglass curve and edges to make it look straight :-) May be easier to trick the eye than bend the bar.
Compared to my old bar the ends sit in so much closer so its a big improvement already
Tell me what you think and any tips for adjusting the ends.

Thread Starter
Melting Slicks
Joined: Apr 2010
Posts: 2,795
Likes: 1,196
From: Canberra Australia
2025 C3 of the Year Finalist - Modified
The guard had been replaced from above the centre of the wheel to the front corner and part of the front apron.
The front corner where the bar bolts had a lot of body filler. Also the small bracket thar goes against the inner glass for the corner bolt was embedded in the glass !!
Also not sure what year corner was used as it has slight different contours.
After I ground that out and glassed it up I think it is fairly strong.
But it only takes it being out by a bit for alignment issues.
I think it is slightly wider than it should be but not by much.
The panel looks ok to the eye it's just if u measure it all you find the differences.
I don't want to do major panel work to fix it and would prefer to finess the the bar brackets etc to get closer.
The old bar must have been bent a bit to fit and that's why the ends were not snug.
I will keep working it.
Last edited by CraigH; Sep 24, 2017 at 05:35 PM.
Thread Starter
Melting Slicks
Joined: Apr 2010
Posts: 2,795
Likes: 1,196
From: Canberra Australia
2025 C3 of the Year Finalist - Modified
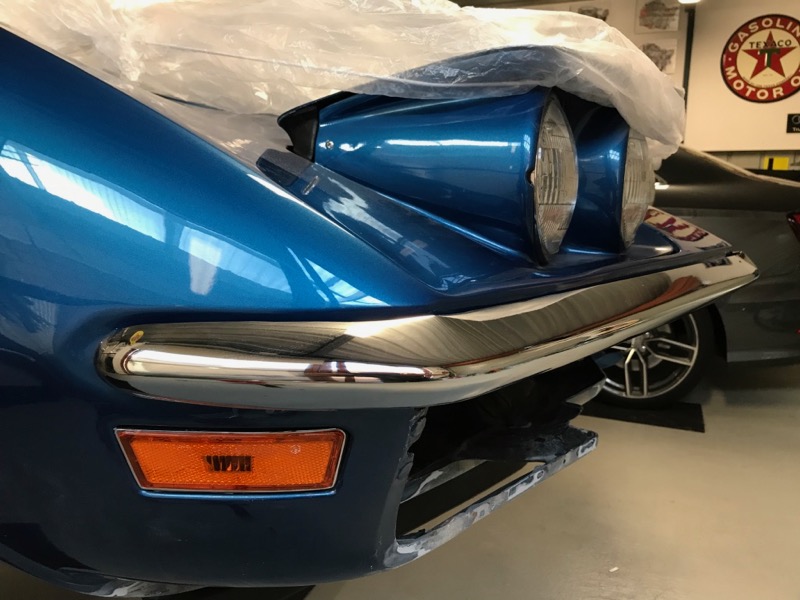
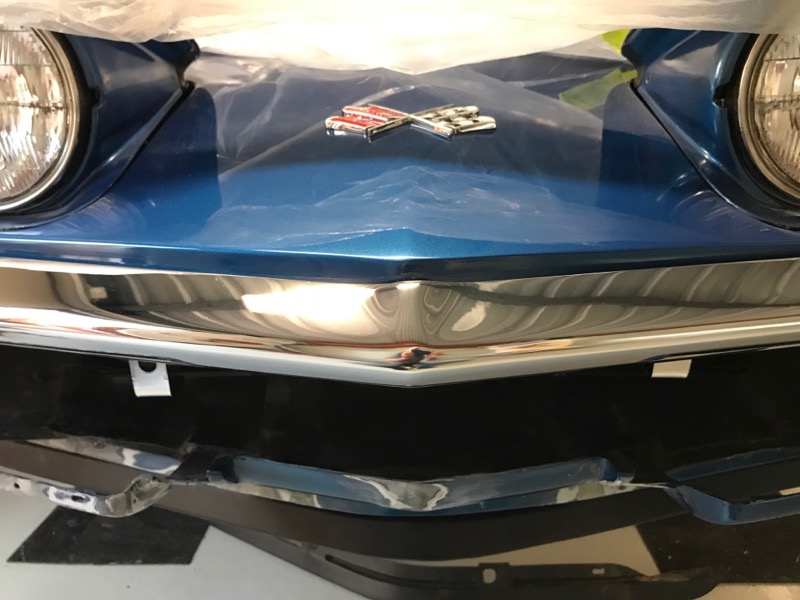
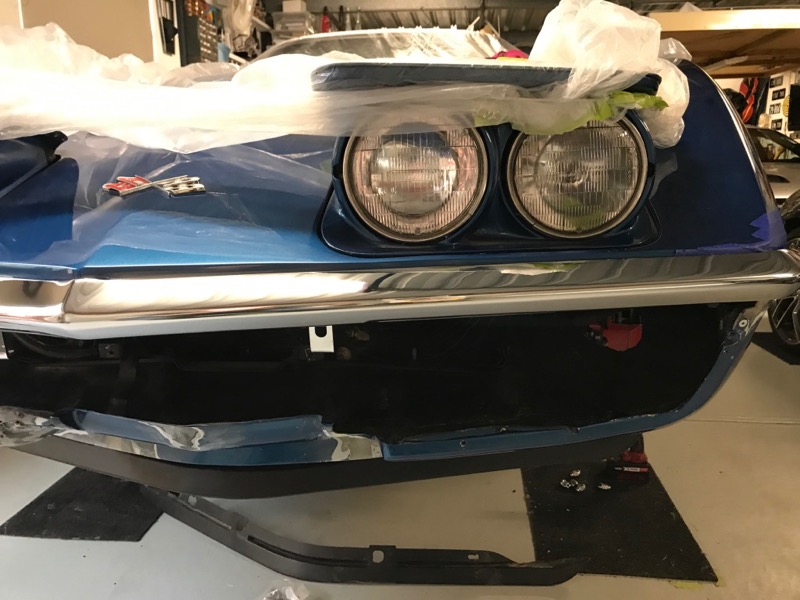
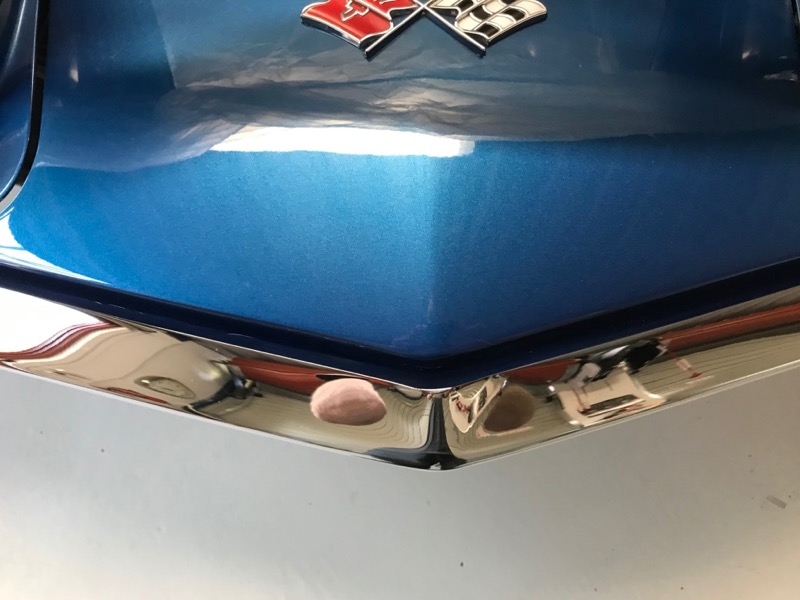
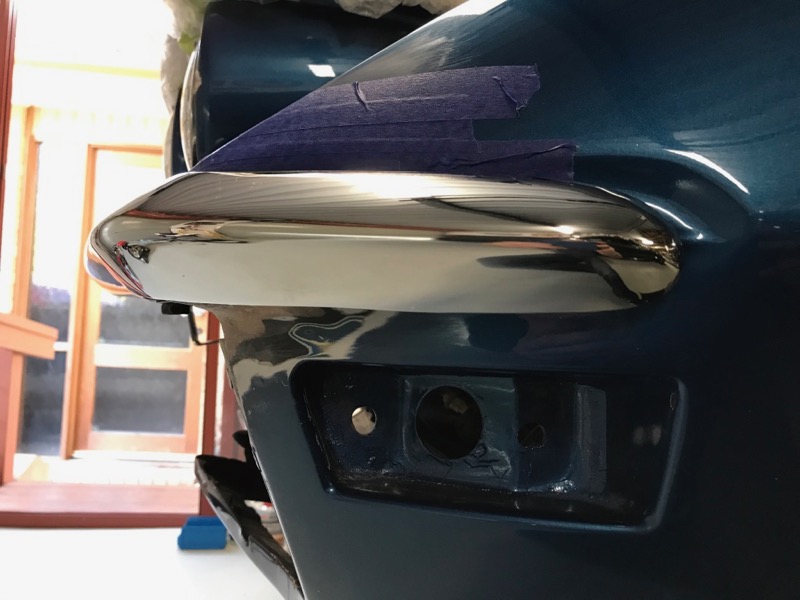
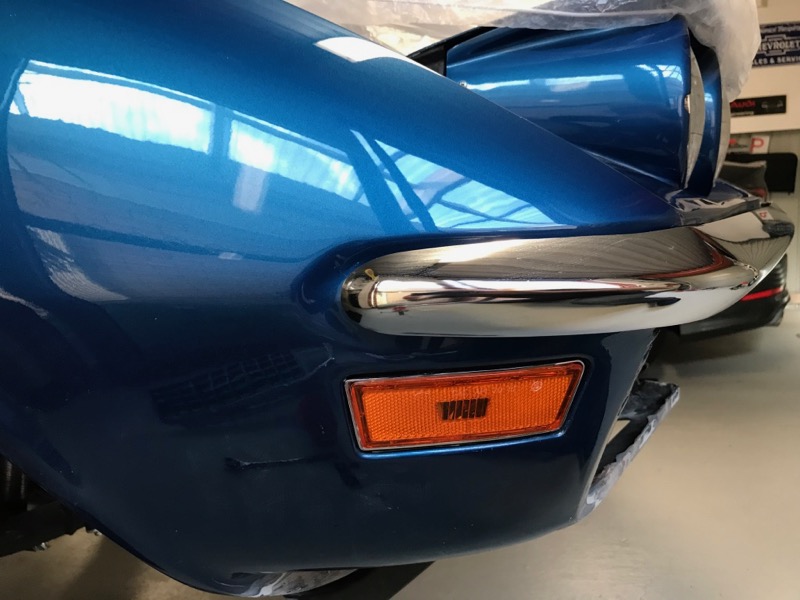
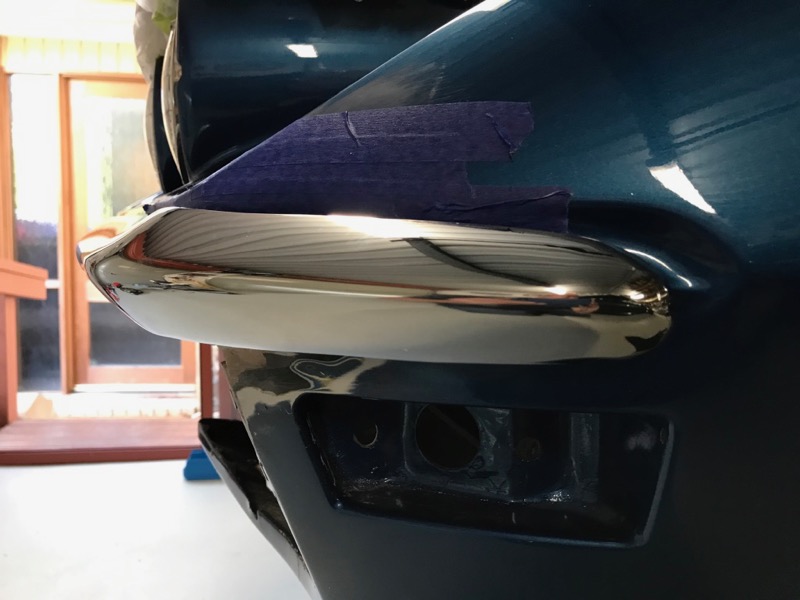
A nights sleep and try again.
By loosening the corner and shimming the top ends I can get it better
This means I have 1-2 mmm more gap but I will experiment a bit more when i get back from a few days away.
Hopefully means i can reshape the pad with fiberglass to get it sit correct and not kick down.
Before
After
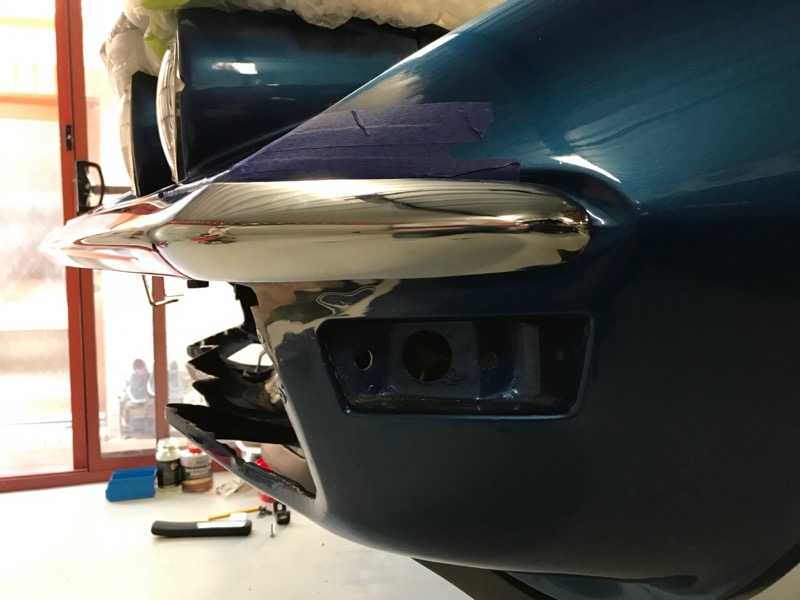
I may well still reshape the fiberglass curve at the end of the bar to match the other side.
Alan i also checked the other side and it still has bonding strips etc so I trust its contours more.
By loosening the corner and shimming the top ends I can get it better
This means I have 1-2 mmm more gap but I will experiment a bit more when i get back from a few days away.
Hopefully means i can reshape the pad with fiberglass to get it sit correct and not kick down.
Before
After
I may well still reshape the fiberglass curve at the end of the bar to match the other side.
Alan i also checked the other side and it still has bonding strips etc so I trust its contours more.
Last edited by CraigH; Apr 10, 2023 at 05:30 AM.
Thread Starter
Melting Slicks
Joined: Apr 2010
Posts: 2,795
Likes: 1,196
From: Canberra Australia
2025 C3 of the Year Finalist - Modified
Out of interest how much for and aft movement is available in the center bumper bracket ?
I have not moved it from the original spot yet but putting it back a few mm's may be worth trying as well.
I have not moved it from the original spot yet but putting it back a few mm's may be worth trying as well.
Thread Starter
Melting Slicks
Joined: Apr 2010
Posts: 2,795
Likes: 1,196
From: Canberra Australia
2025 C3 of the Year Finalist - Modified
Will see what effect that has on the bar.
Team Owner
Joined: Sep 2006
Posts: 31,283
Likes: 4,374
From: Westminster Maryland
Hi Craig,
Remember although the center bumper bracket has some built in adjustment the front crossmember it bolts to has some adjustment too.
The front cross member can be 'tipped' too because of it's attachment to the frame rail extensions.
This can affect the bracket's angle when it meets the center of the bumper.
There are SO many fact actors that affect the fit of the bumper it's pretty difficult to know just what to look at.
Regards,
Alan