


1971 Journey

Thread Starter
Melting Slicks


Joined: Apr 2010
Posts: 2,795
Likes: 1,196
From: Canberra Australia
2025 C3 of the Year Finalist - Modified
Thanks for the comments.
It has been somewhat therapeutic having the Vette away since mid December allowing me to relax and work on other projects.
Cant say I have not been a little anxious but I trust Peter to do a good job.
The blue is "Bridgehampton Blue"
I have seen a fair variation in it on cars and have a set of original 1971 colour samples I picked up a few years back as well.
We are trying to match the "last version" of Bridghampton Blue thats as used on the car a number of years back in the US.
Our starting point, from a paint analyser, is a Suzuki colour
Z7K M3467 Brilliant Blue pearl Suzuki Metallic
My Hood was shot in that colour a few years back and the match was great - missing a little of the green aqua tones from the original but you only noticed it under fluorescent lights.
Peter is doing more tinting today.
Thread Starter
Melting Slicks
Joined: Apr 2010
Posts: 2,795
Likes: 1,196
From: Canberra Australia
2025 C3 of the Year Finalist - Modified
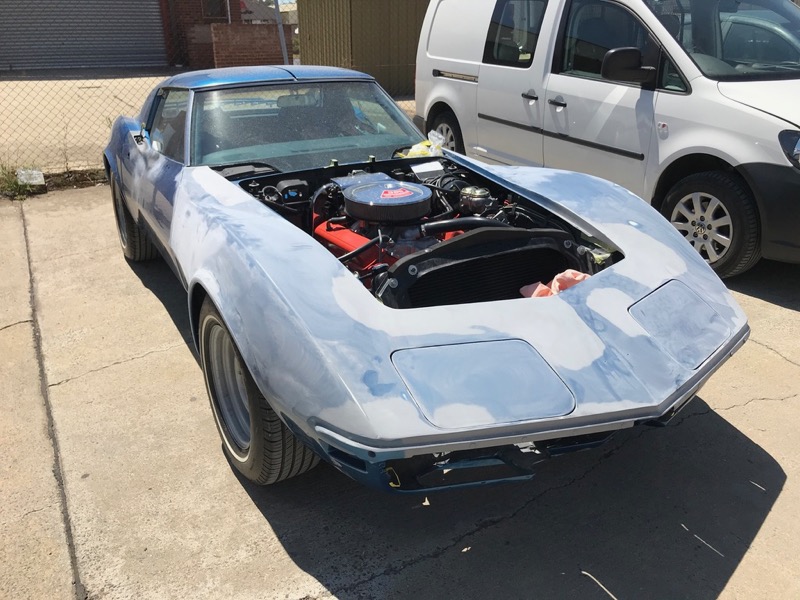
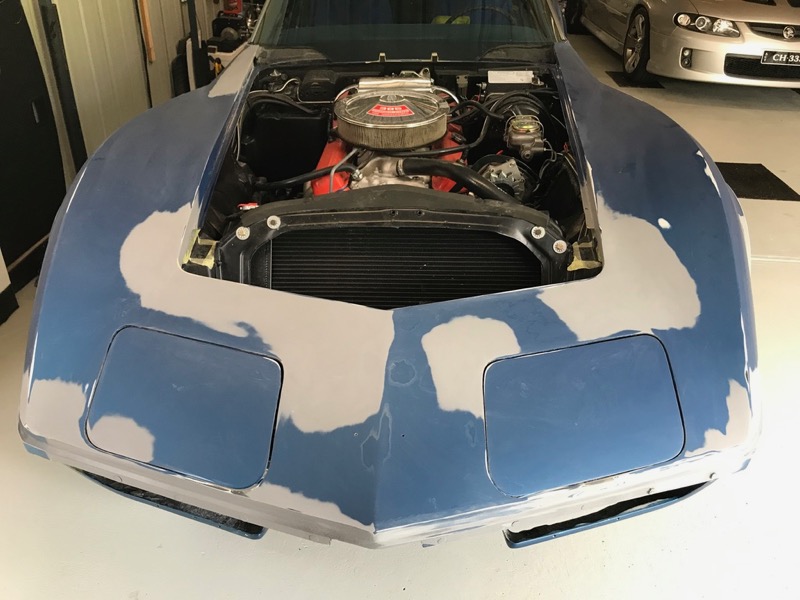
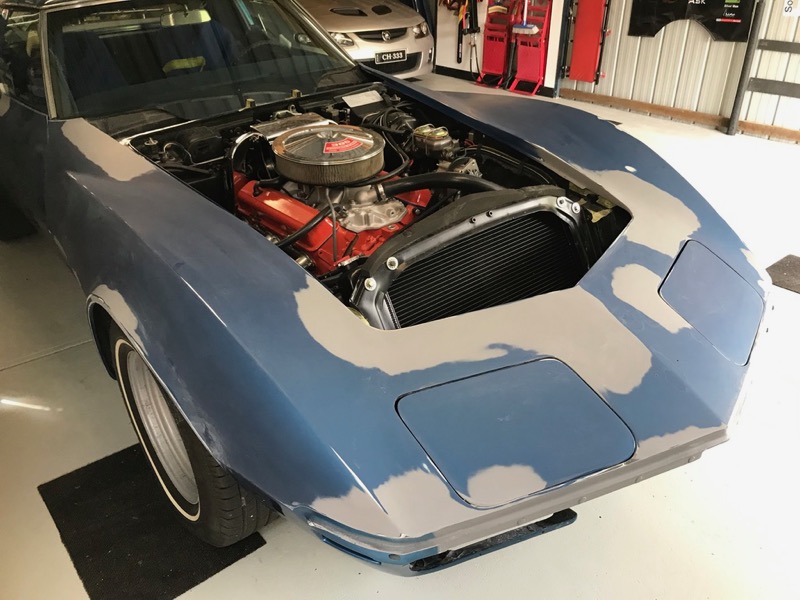
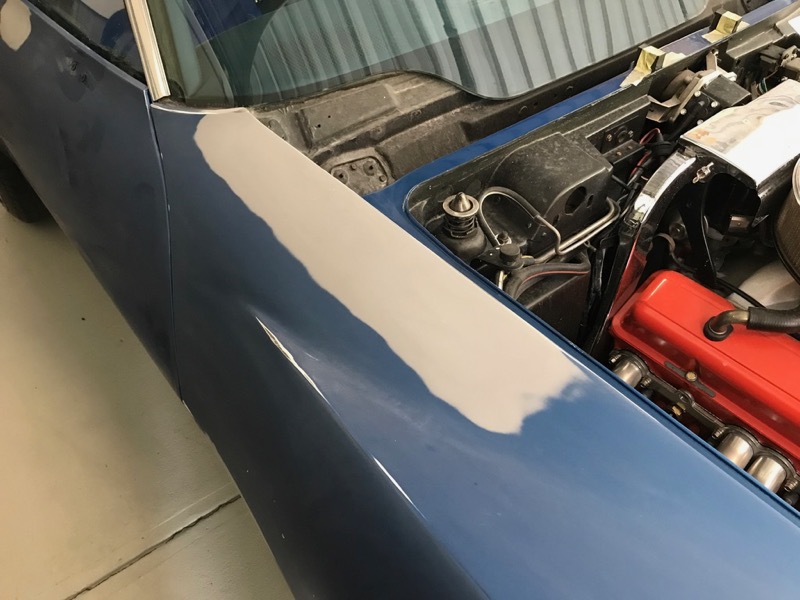
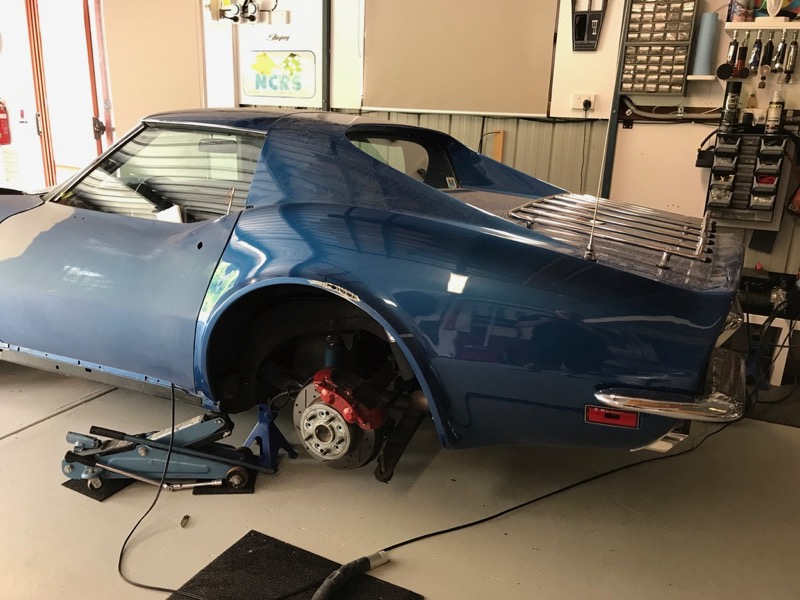
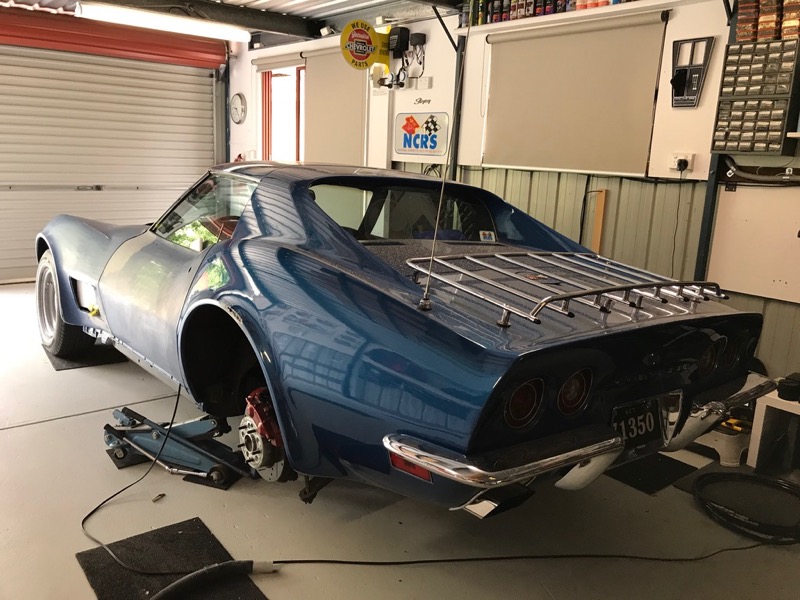
Slowly progressing.
Front end is in process of being rubbed out.
One thing Peter and Graham commented on was that the current clear & colour is very thin. Has been taken back to glass previously but you can cut through the clear and colour so easily
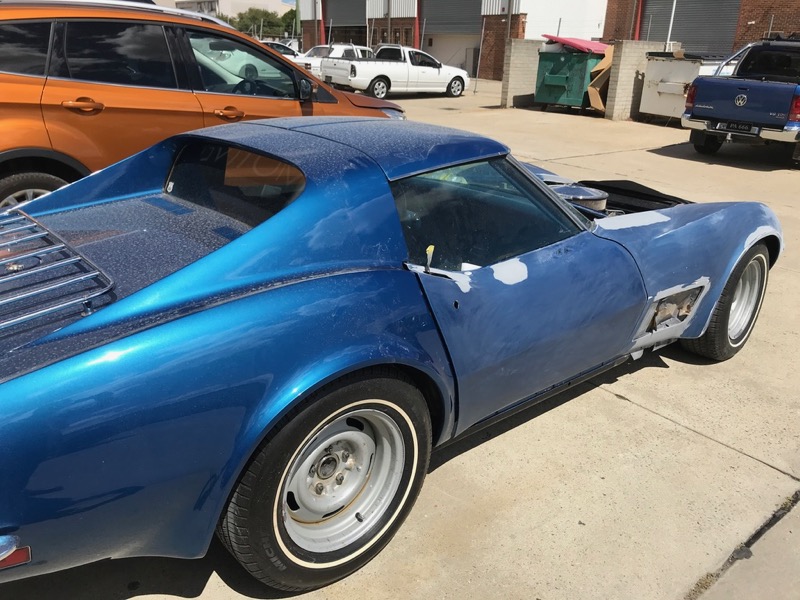
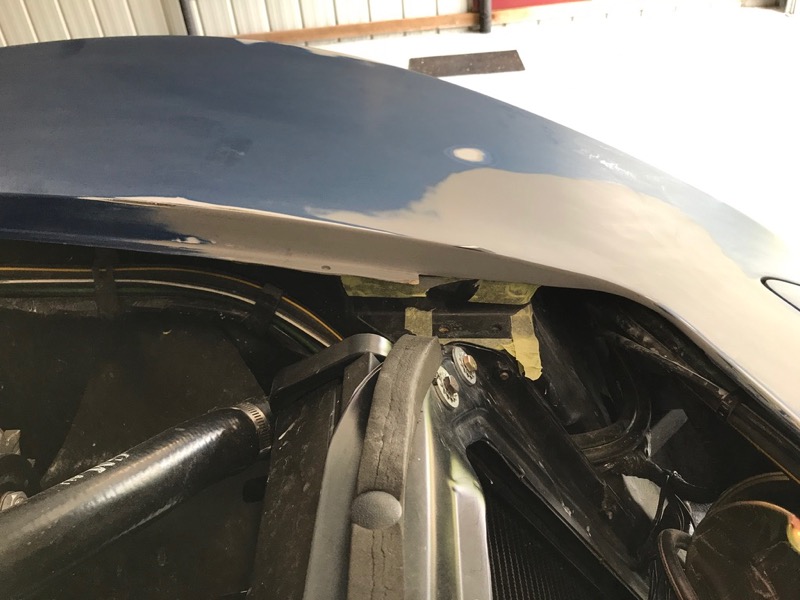
While discussing the blend yesterday we found a hairline crack in the drivers side rear arch lip.
Given the clear will blend back that way I decided to grind it out and glass it up. Hopefully get it done early next week so we can get to paint shortly after.
Front end is in process of being rubbed out.
One thing Peter and Graham commented on was that the current clear & colour is very thin. Has been taken back to glass previously but you can cut through the clear and colour so easily
While discussing the blend yesterday we found a hairline crack in the drivers side rear arch lip.
Given the clear will blend back that way I decided to grind it out and glass it up. Hopefully get it done early next week so we can get to paint shortly after.
Last edited by CraigH; Apr 10, 2023 at 05:43 AM.
Le Mans Master


Joined: Nov 2016
Posts: 9,265
Likes: 951
From: Lake Tahoe, CA
Don't know if this will help for paint mixing, just something I found the other day. Gonna be a beauty for sure. http://paintref.com/paintref/index.shtml

Drifting


Joined: Jul 2012
Posts: 1,255
Likes: 297
From: Slovenia, EU
2017 C3 of Year Finalist
I hope you manage to clean it nice and thorough when the painting is done.
That dust goes everywhere and it stuck to my chasis and engine bay that hard that I can't get it cleaned like I want to.
Otherwise keep it up! Can't wait for the finished car!
That dust goes everywhere and it stuck to my chasis and engine bay that hard that I can't get it cleaned like I want to.
Otherwise keep it up! Can't wait for the finished car!
Thread Starter
Melting Slicks
Joined: Apr 2010
Posts: 2,795
Likes: 1,196
From: Canberra Australia
2025 C3 of the Year Finalist - Modified
Don't know if this will help for paint mixing, just something I found the other day. Gonna be a beauty for sure. http://paintref.com/paintref/index.shtml
When we had it at various points on the vette it showed we had at least 2 variations of the blue on each rear quarter.
On one side its a perfect match just needing a minor amount of red added.
On the other we need a bit more red !!
So after last time it was painted there was a couple of touch ups in one rear quarters.
Overall the Suzuki colour is so close and its what we shot my hood with last time with no extra tinting and it matched great.
Thread Starter
Melting Slicks
Joined: Apr 2010
Posts: 2,795
Likes: 1,196
From: Canberra Australia
2025 C3 of the Year Finalist - Modified
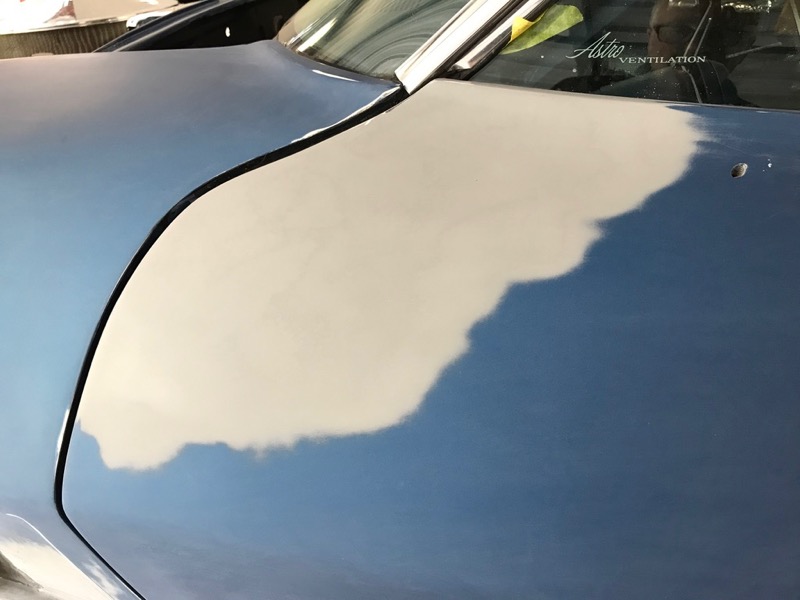
Normally we have the hood area under sheets but we were moving it around etc
It will get a lot of cleaning and a bit of freshen to the engine bay after this.
What worries me the most is the wiring harness and stuff under the nose.
But it can all be brought back - have done it before, its just time
Also windows have been shut most of the time as I added push levers to both doors so the can open them up easily without handles - alternative was windows down !!!!
Also have a set of new cut pile carpets to go in at some stage so not that worried about carpets.
Even though they have been fairly good with keeping it tidy, but it is a panel and paint shop not my garage :-)
Got to keep my eye on the end game.
Team Owner


Joined: Sep 2006
Posts: 31,286
Likes: 4,375
From: Westminster Maryland
Hi Craig,
Very good to hear that there's progress!!!
"its just time"
This is so true! People want to hear that there's some 'detail magic' you spray on and the dust dissappears.
But there's not!
It takes determination!
You seem to be very good getting a car clean!
And now you'll have even more impetus to get it looking the way you'd like after the detailed bodywork and new paint!
Regards,
Alan
Corvette Stories
The Best of Corvette for Corvette Enthusiasts

Top 10 Most Expensive Corvettes Ever Sold on Bring A Trailer
Brett Foote
10 Things Every Corvette Owner Needs (2026 Edition)
Michael S. Palmer
8 Most "Only Corvette Owners Understand" Quirks and Problems
Pouria Savadkouei
10 Reasons the C6 Z06 is Still A Performance Benchmark After 20 Years
Joe Kucinski
How Much Horsepower Every Corvette Engine "LOST" in 1972
Joe Kucinski
Top 10 DOs and DON'Ts for Protecting Your Convertible Top!
Michael S. Palmer
Top 10 Most Explosive Corvettes Ever Made: Power-to-Weight Ratio Ranked!
Joe Kucinski
150 hp to 1,250 hp: Every Corvette Generation Compared by the Specs That Matter
Joe Kucinski
8 Coolest Corvette Pace Cars (and Replicas) of All Time
Verdad Gallardo
Thread Starter
Melting Slicks
Joined: Apr 2010
Posts: 2,795
Likes: 1,196
From: Canberra Australia
2025 C3 of the Year Finalist - Modified
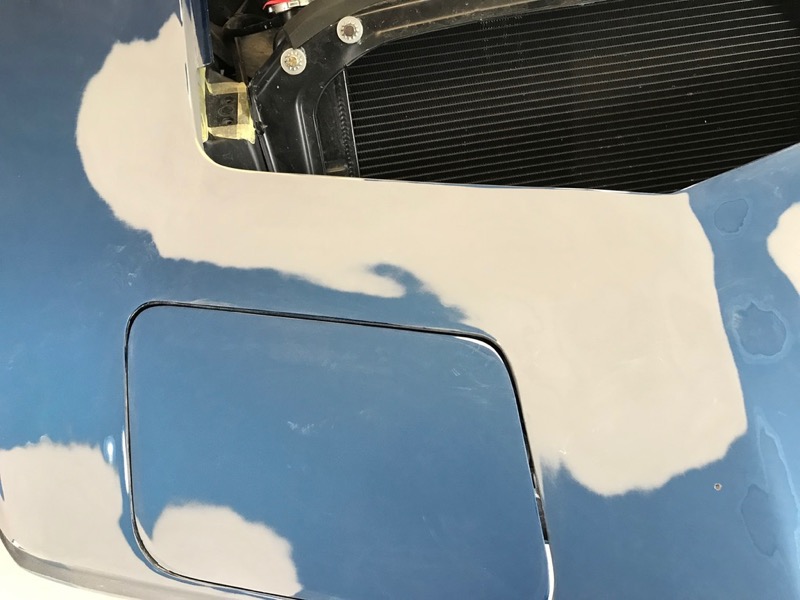
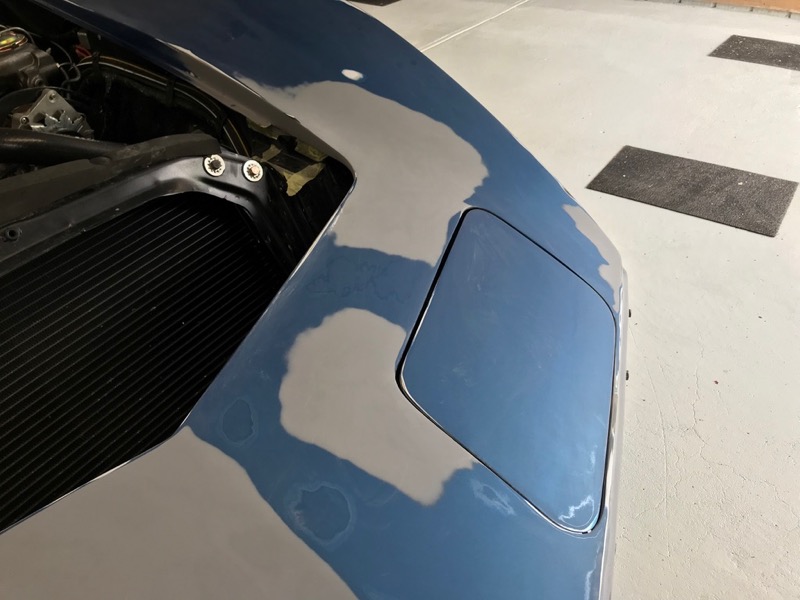
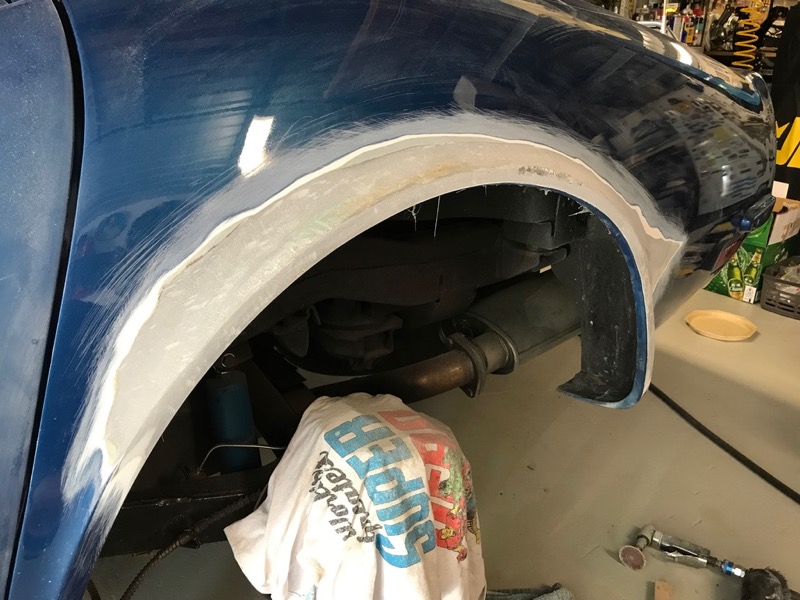
So the good and the bad.
The good is that we have the entire front end back through the doors blocked out and looking good and repairs smoothed in.

The good is that we have the entire front end back through the doors blocked out and looking good and repairs smoothed in.
Last edited by CraigH; Apr 10, 2023 at 05:42 AM.
Thread Starter
Melting Slicks
Joined: Apr 2010
Posts: 2,795
Likes: 1,196
From: Canberra Australia
2025 C3 of the Year Finalist - Modified
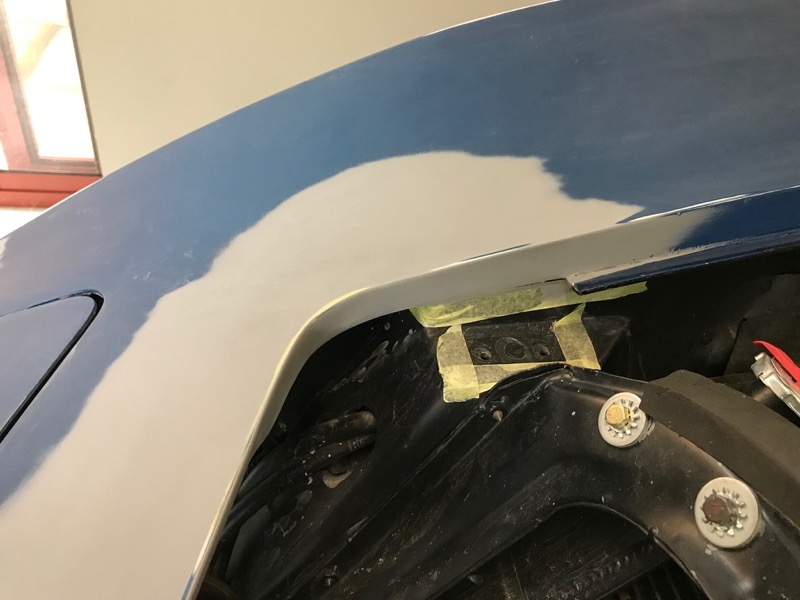
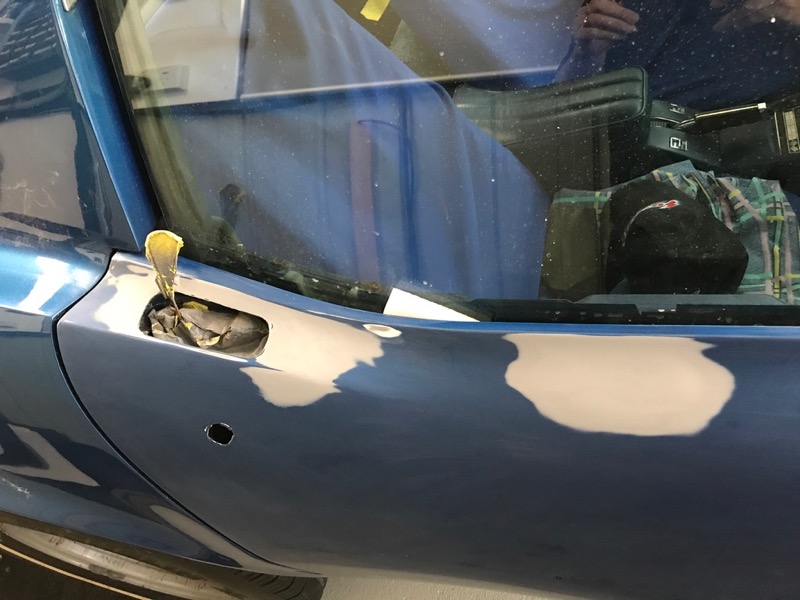
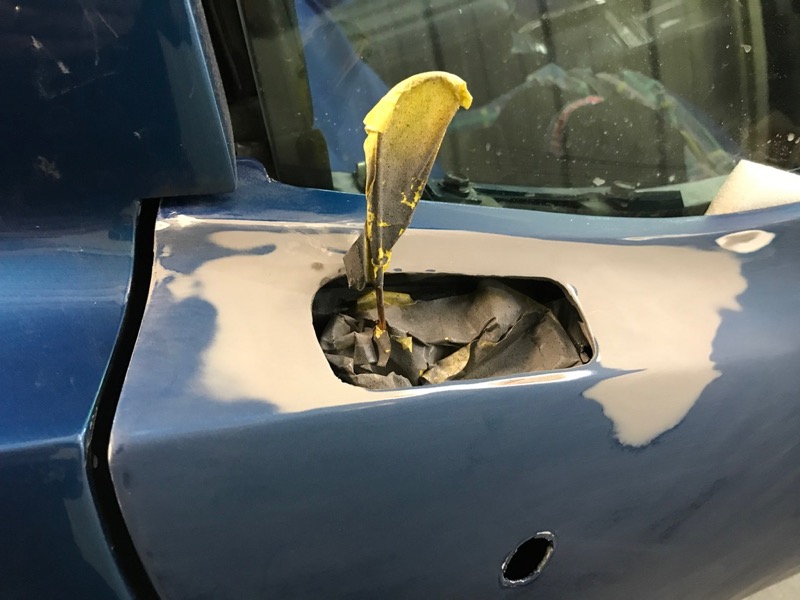
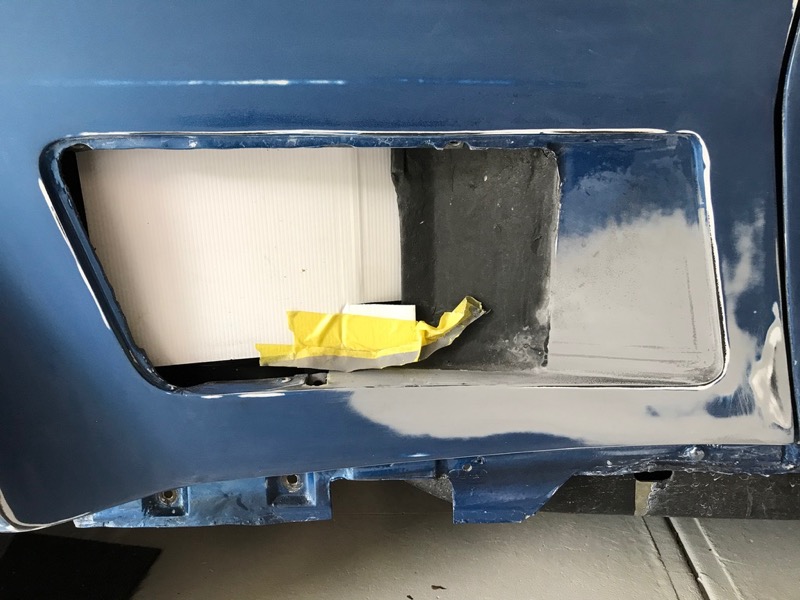
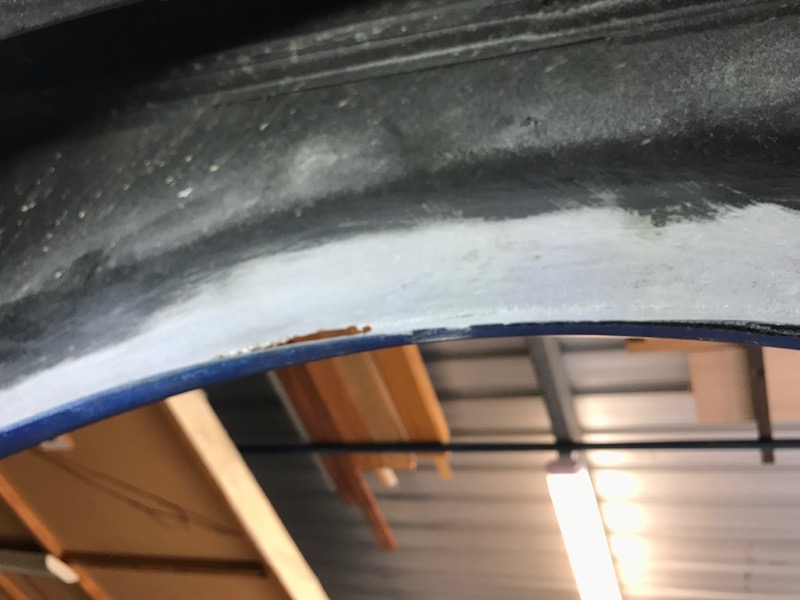
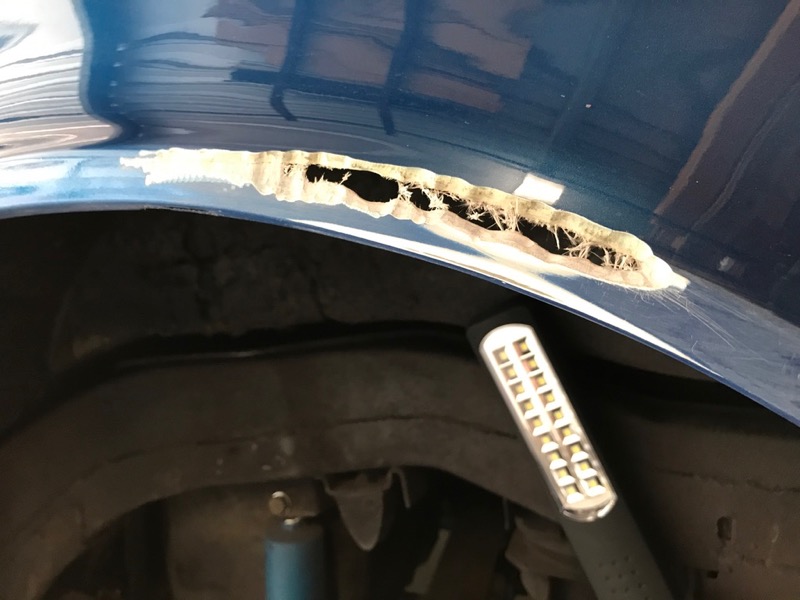
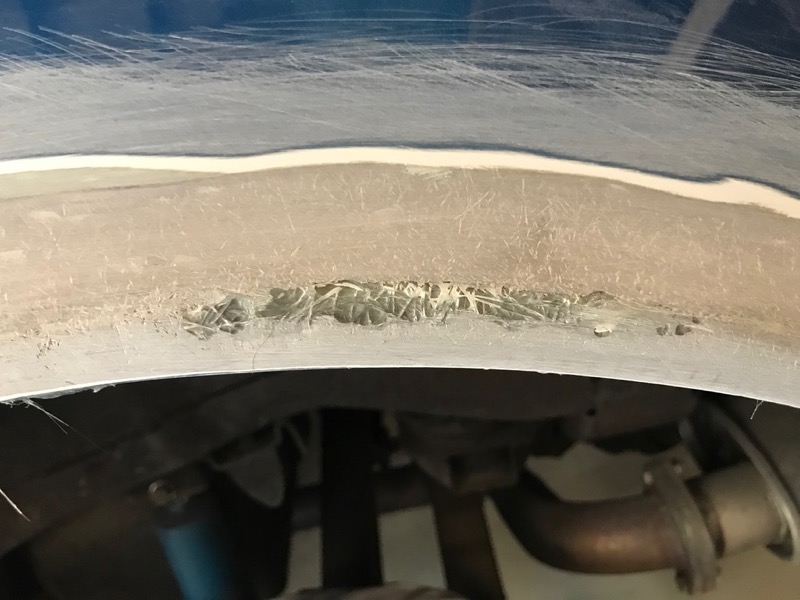
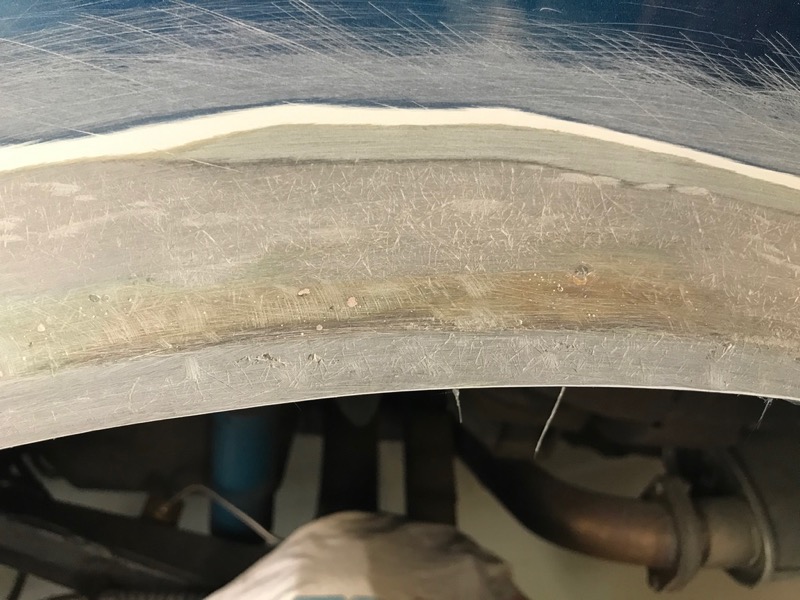
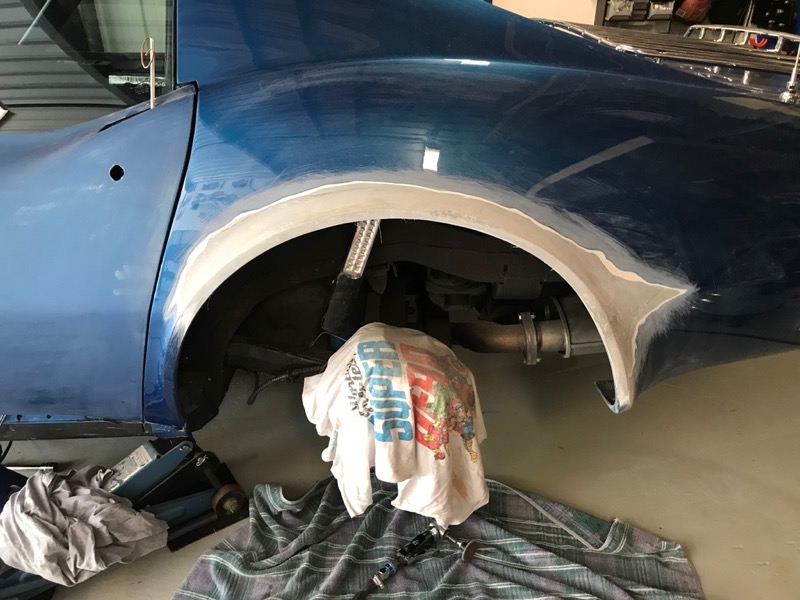
The bad news is the fine crack in the rear guard is more than a fine crack.
Because we want to blend into the rear quarters we don't want to spray over a hairline crack so.......I went into the paint shop and pulled the wheel and had a closer look.
Ok a past repair where they strengthened the rear of the wheel arch lip and filled the outside. sounds normal I suppose....
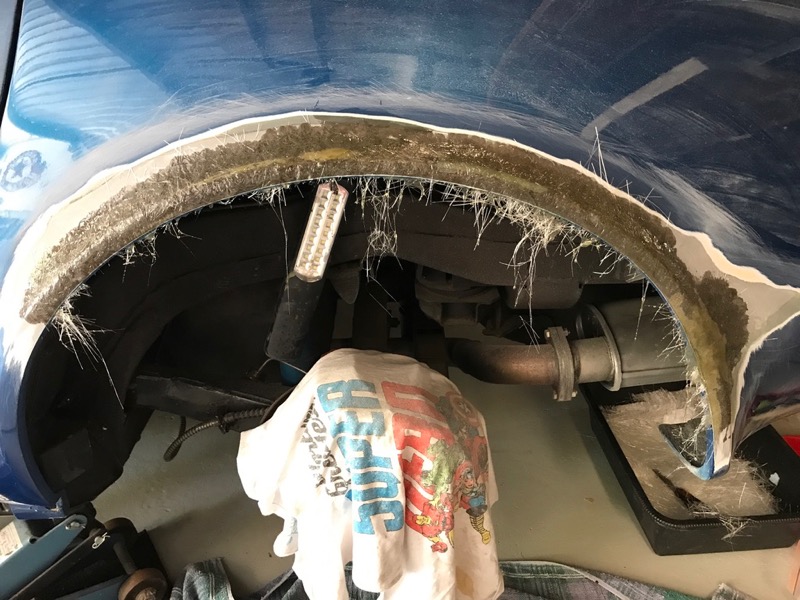
So i started to grind at the glass added to the back and it mostly came off fairly easily.
Would have helped if they had cleaned the dirt off before applying it.
So I decided to take the Vette home and work on it.
Quick trip home as i am only 10 minutes from the shop and I ground all the old repair out from behind the guard.
It was really not too bad with only a few thin spots
Then ground out the hairline crack.
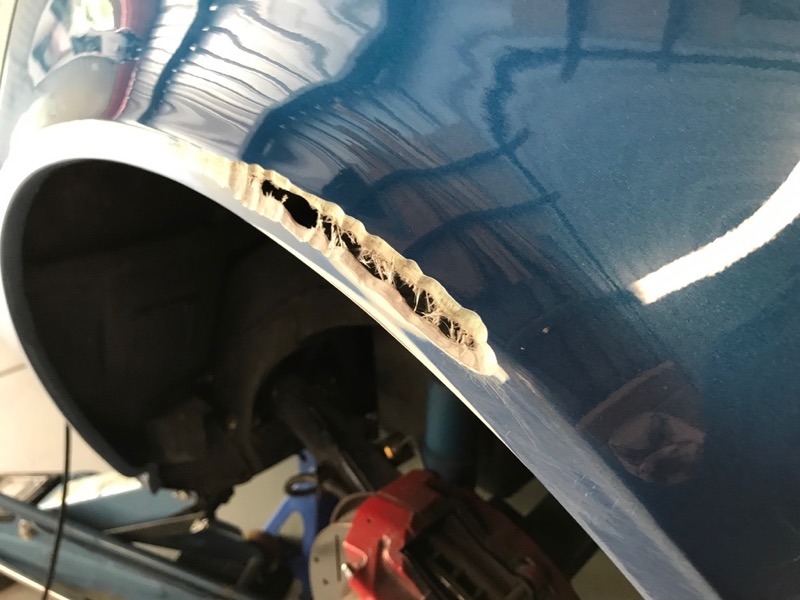
Tomorrow I will lay up the entire inside with new glass to strengthen it then when dry I will grind more of the front out and lay some glass in.
Just a small setback.
Because we want to blend into the rear quarters we don't want to spray over a hairline crack so.......I went into the paint shop and pulled the wheel and had a closer look.
Ok a past repair where they strengthened the rear of the wheel arch lip and filled the outside. sounds normal I suppose....
So i started to grind at the glass added to the back and it mostly came off fairly easily.
Would have helped if they had cleaned the dirt off before applying it.
So I decided to take the Vette home and work on it.
Quick trip home as i am only 10 minutes from the shop and I ground all the old repair out from behind the guard.
It was really not too bad with only a few thin spots
Then ground out the hairline crack.
Tomorrow I will lay up the entire inside with new glass to strengthen it then when dry I will grind more of the front out and lay some glass in.
Just a small setback.
Last edited by CraigH; Apr 10, 2023 at 05:42 AM.

Safety Car


Joined: Jun 2013
Posts: 4,399
Likes: 793
The bad news is the fine crack in the rear guard is more than a fine crack.
Because we want to blend into the rear quarters we don't want to spray over a hairline crack so.......I went into the paint shop and pulled the wheel and had a closer look.
Ok a past repair where they strengthened the rear of the wheel arch lip and filled the outside. sounds normal I suppose....
So i started to grind at the glass added to the back and it mostly came off fairly easily.
Would have helped if they had cleaned the dirt off before applying it.
So I decided to take the Vette home and work on it.
Quick trip home as i am only 10 minutes from the shop and I ground all the old repair out from behind the guard.

It was really not too bad with only a few thin spots
Then ground out the hairline crack.


Tomorrow I will lay up the entire inside with new glass to strengthen it then when dry I will grind more of the front out and lay some glass in.
Just a small setback.
Because we want to blend into the rear quarters we don't want to spray over a hairline crack so.......I went into the paint shop and pulled the wheel and had a closer look.
Ok a past repair where they strengthened the rear of the wheel arch lip and filled the outside. sounds normal I suppose....
So i started to grind at the glass added to the back and it mostly came off fairly easily.
Would have helped if they had cleaned the dirt off before applying it.
So I decided to take the Vette home and work on it.
Quick trip home as i am only 10 minutes from the shop and I ground all the old repair out from behind the guard.
It was really not too bad with only a few thin spots
Then ground out the hairline crack.
Tomorrow I will lay up the entire inside with new glass to strengthen it then when dry I will grind more of the front out and lay some glass in.
Just a small setback.
Very nice work!
RVZIO

Team Owner
Joined: Sep 2006
Posts: 31,286
Likes: 4,375
From: Westminster Maryland
Hi Craig,
I don't think there's ANY downside to finding something that requires more attention at this point because....
from your thread I get the feeling that the idea in your case is to do things right.....
not to see how FAST you can do it.
Carry on!
Regards,
Alan
I don't think there's ANY downside to finding something that requires more attention at this point because....
from your thread I get the feeling that the idea in your case is to do things right.....
not to see how FAST you can do it.
Carry on!
Regards,
Alan

Race Director

Joined: Apr 2009
Posts: 19,294
Likes: 2,754
From: Charlotte NC
From what I can tell and it is a bit hard to tell for sure...but it looks like they had a thick layer of some body filler in the area you ground out.
I am sure you know that IF it is a lot of body filler there...If I may without seeming to be bossy or demanding. I would suggest that you grind out all of the filler where you know you are going to apply your mat and resin. If that is the method you are choosing to fix the exterior.
DUB
Thread Starter
Melting Slicks
Joined: Apr 2010
Posts: 2,795
Likes: 1,196
From: Canberra Australia
2025 C3 of the Year Finalist - Modified
I am glad that I read what you wrote.
From what I can tell and it is a bit hard to tell for sure...but it looks like they had a thick layer of some body filler in the area you ground out.
I am sure you know that IF it is a lot of body filler there...If I may without seeming to be bossy or demanding. I would suggest that you grind out all of the filler where you know you are going to apply your mat and resin. If that is the method you are choosing to fix the exterior.
DUB
I will be grinding out the front more before laying glass up on the outside.
The inside is amazing smooth with no major cracks etc so i think it has just had some damage to the lip.
Once I do some more grinding I will know the extent :-)
Thread Starter
Melting Slicks
Joined: Apr 2010
Posts: 2,795
Likes: 1,196
From: Canberra Australia
2025 C3 of the Year Finalist - Modified
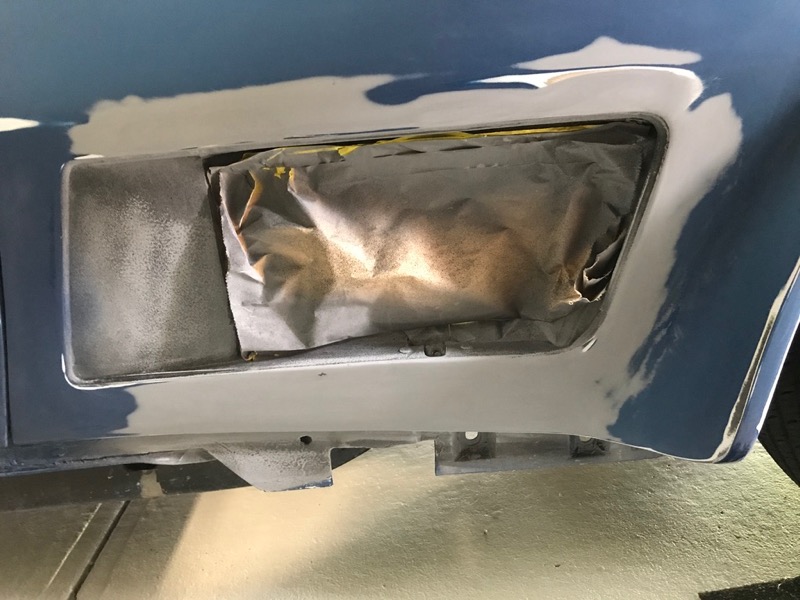
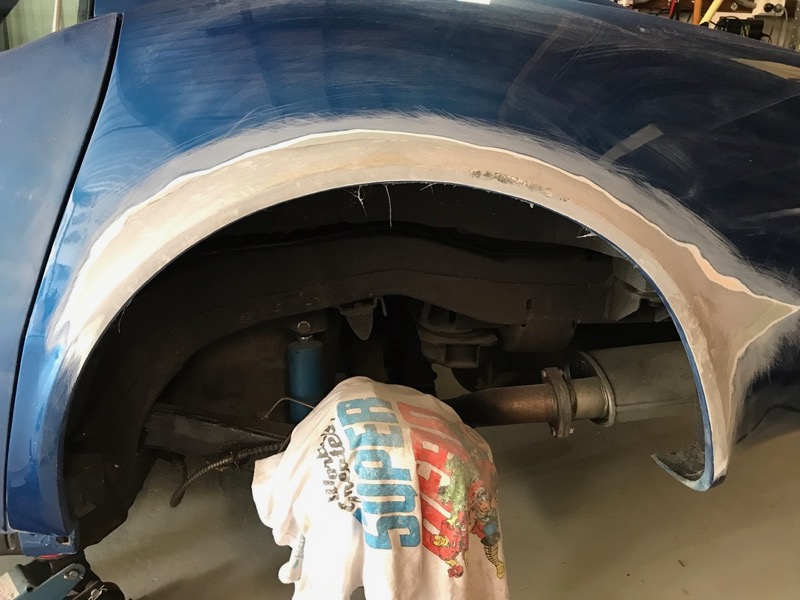
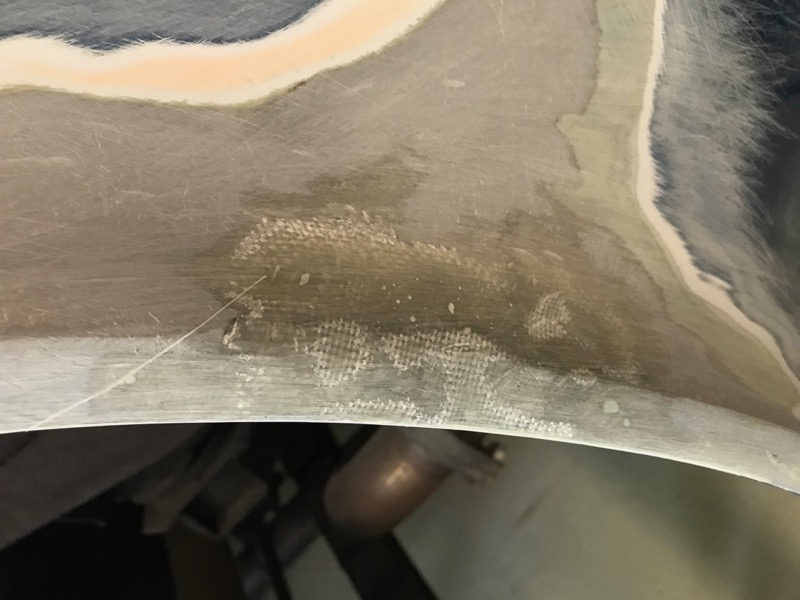
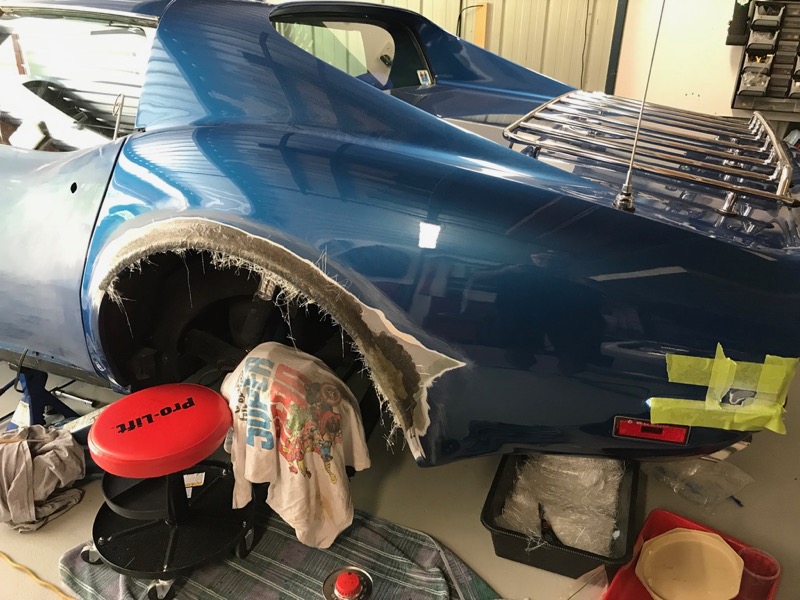
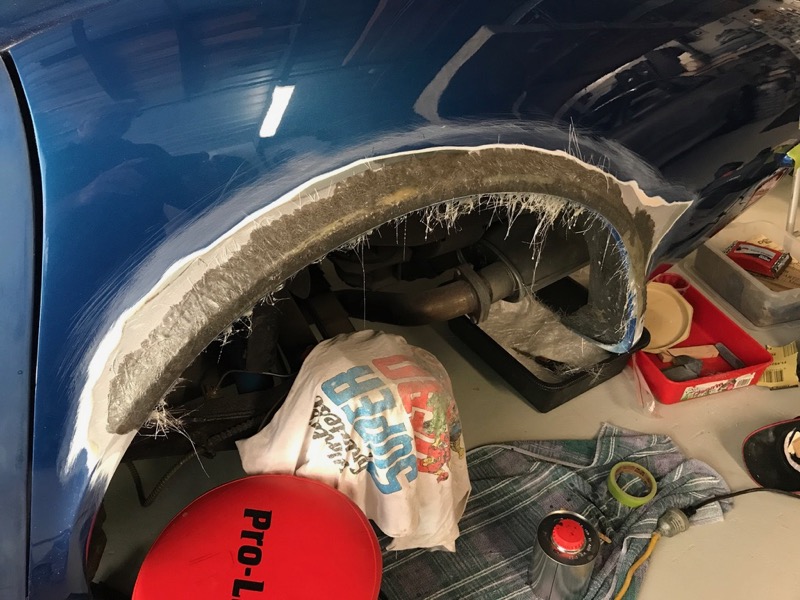
Yesterday I glassed the inside of the wheel arch using strips that went around 60% of the curve and filled the gap where it was cracked.
Now I started sanding back the wheel arch.
Found 3 older repairs and they had built up the arch and lip by a couple of mm's with body filler for a fair bit..
Imagine it is just easier to finish in filler than glass when your on the clock.
 v
v
I then laid up a new glass layer over the entire arch and will start to reshape it when it sets up.
Now I started sanding back the wheel arch.
Found 3 older repairs and they had built up the arch and lip by a couple of mm's with body filler for a fair bit..
Imagine it is just easier to finish in filler than glass when your on the clock.
vI then laid up a new glass layer over the entire arch and will start to reshape it when it sets up.
Last edited by CraigH; Apr 10, 2023 at 05:42 AM.
Burning Brakes

Joined: Sep 2017
Posts: 1,219
Likes: 365
From: Tolland CT
Ugh, I am sorry to hear about the latest development but I for one am glad to watch your progress through this difficult area. I have similar cracks in my project right there and it really helps to see how you handled it so, thank you for your dedication and hard work. Not only to your car but documenting it for us here on the forums.
Race Director
Joined: Apr 2009
Posts: 19,294
Likes: 2,754
From: Charlotte NC
You are correct on the fact that it is easier to apply VPA than it is to laminate.
Being 'on the clock'...at least for me.... is not what controls how I repair a damaged area. I know some people worry about that. They sacrifice quality for speed. NOT ME!
It has everything to do with if the repair is needing to be laminated on the exterior or not....and has nothing to do with time savings or what is easier. I guess years of doing this has shown me what will and will not work.
Because when I laminate...no matter what....if it is on the exterior of a panel. I always undercut the repair slightly and apply a skim coat of VPA on top of it to take out any chance of minute imperfections in the lamination. And I am doing it this way so when I go to apply gelcoat or my primer..I do not have numerous small microscopic pinholes in the laminated area that will now greatly increase in size once the gelcoat or primer hits it. SO there is always going to be some amount of VPA on it anyway.
DUB

Thread Starter
Melting Slicks
Joined: Apr 2010
Posts: 2,795
Likes: 1,196
From: Canberra Australia
2025 C3 of the Year Finalist - Modified
Not that any of this matters.
You are correct on the fact that it is easier to apply VPA than it is to laminate.
Being 'on the clock'...at least for me.... is not what controls how I repair a damaged area. I know some people worry about that. They sacrifice quality for speed. NOT ME!
It has everything to do with if the repair is needing to be laminated on the exterior or not....and has nothing to do with time savings or what is easier. I guess years of doing this has shown me what will and will not work.
Because when I laminate...no matter what....if it is on the exterior of a panel. I always undercut the repair slightly and apply a skim coat of VPA on top of it to take out any chance of minute imperfections in the lamination. And I am doing it this way so when I go to apply gelcoat or my primer..I do not have numerous small microscopic pinholes in the laminated area that will now greatly increase in size once the gelcoat or primer hits it. SO there is always going to be some amount of VPA on it anyway.
DUB
I am more referring to the "on the clock attitude" of the average repair shop that probably did the 3 repairs i found.
They did a skim of normal body filler not VPA.
BTW VPA is not easy to get in Australia as the vendor does not bring it in and it is prohibited from certain shipping methods.
FiberTech seems pretty good for some of the external places where it would have been used.