









 Good choice with the gray accent.

79 Corvette Build Thread

Thread Starter
Pro


Joined: May 2008
Posts: 582
Likes: 9

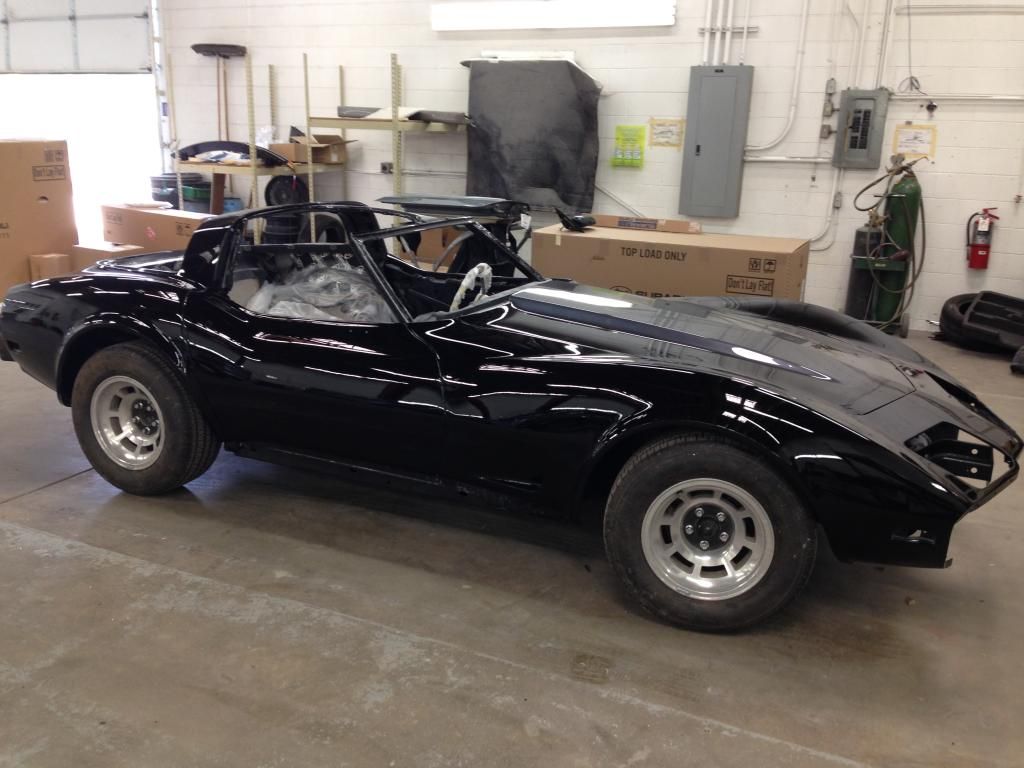
The paint shop is still working on the car. One of the doors had a spot that after they painted the door it looked like a bump. The striped the door, block sanded it and than re painted it, but it came back. So they than grinded into it and discovered that the fiberglass(SMC) was damaged all the way threw. So they re glassed it, block sanded it and painted it for a 3rd time. Its taking longer than expected but only because they want to do it right. No complaints from me on that.
So only thing left to do is they are still working on the rear bumper than they will wet sand and polish the car. I am also going to have then install a new windshield in which they are charging $165 for the glass and install.
Here are the most recent photos, they are with my phone and there was a bad glare.


So only thing left to do is they are still working on the rear bumper than they will wet sand and polish the car. I am also going to have then install a new windshield in which they are charging $165 for the glass and install.
Here are the most recent photos, they are with my phone and there was a bad glare.
Thread Starter
Pro
Joined: May 2008
Posts: 582
Likes: 9
While I am waiting on the car I am working on other parts. I have modified the air cleaner to fit on a Holley carb and still use the stock fresh air ducts. Also I removed the heat riser doors and welded up the holes.


Sand blasted and painted all the head light parts and also the wiper arm parts and painted them.


Sand blasted and painted all the head light parts and also the wiper arm parts and painted them.
Thread Starter
Pro
Joined: May 2008
Posts: 582
Likes: 9
Stopped by the paint shop on Friday and they had a problem with the rear bumper that slowed them down but expect to have it painted on Saturday or Monday. They have also wet sanded the car down to 2000 grit but still needed to go down to 3000 grit and then polish it. Maybe by the end of this weekend the car will be home. Just glad that they are willing to put in so much effort.
Thread Starter
Pro
Joined: May 2008
Posts: 582
Likes: 9
Car is still at the paint shop.........
Ok here is my step by step plan for my alignment.
1. Lay down plywood or masonite shims and level the area that the tires will sit. To do this I am thinking using 18 in squares and a long level.
2. Pull the car unto the level boards and then make sure the suspension height is where I want it.
3. Using string and plumb bobs I am going to attach the string to the front lower control arm at the bolt that holds the front bushing in and at the rear the trailing arm mounts. From this using the plumb bob I will mark the location on the ground at all 4 locations.
4. I will then measure from the marks I just made on the ground and mark the centerline between the marks and again use the plumb bob and string to mark the centerline of the car on the frame.
5. Next run a string from front to rear mounted on jack stands marking the exact center line of the car.
6. Set op a string on each side of the car on jack stands running parallel with the centering.
7. Next I will use a steel rule measuring from the string at the front of the rim and at the back to determine the toe, also I will be able to square up the front to the rear using this set up.
For Camber and caster I was looking at getting the Fast Track gage from Summit Racing. At first I am going to just turn the wheels complete from lock to lock to measure the caster. Eventfully if this all works well for setting my alignment I will invest in turn plates so that I can measure the 20 degrees turn in the steering that from what I have been reading is ideal for measuring caster.
Not sure what specs I am going to use but thinking about starting with this.
front
toe 1/32 in
camber -1/4
caster +4 3/4
rear
toe 1/8 in
camber - 1/2
Ok here is my step by step plan for my alignment.
1. Lay down plywood or masonite shims and level the area that the tires will sit. To do this I am thinking using 18 in squares and a long level.
2. Pull the car unto the level boards and then make sure the suspension height is where I want it.
3. Using string and plumb bobs I am going to attach the string to the front lower control arm at the bolt that holds the front bushing in and at the rear the trailing arm mounts. From this using the plumb bob I will mark the location on the ground at all 4 locations.
4. I will then measure from the marks I just made on the ground and mark the centerline between the marks and again use the plumb bob and string to mark the centerline of the car on the frame.
5. Next run a string from front to rear mounted on jack stands marking the exact center line of the car.
6. Set op a string on each side of the car on jack stands running parallel with the centering.
7. Next I will use a steel rule measuring from the string at the front of the rim and at the back to determine the toe, also I will be able to square up the front to the rear using this set up.
For Camber and caster I was looking at getting the Fast Track gage from Summit Racing. At first I am going to just turn the wheels complete from lock to lock to measure the caster. Eventfully if this all works well for setting my alignment I will invest in turn plates so that I can measure the 20 degrees turn in the steering that from what I have been reading is ideal for measuring caster.
Not sure what specs I am going to use but thinking about starting with this.
front
toe 1/32 in
camber -1/4
caster +4 3/4
rear
toe 1/8 in
camber - 1/2
Corvette Stories
The Best of Corvette for Corvette Enthusiasts

5 Best & 5 Worst Corvette Daily Drivers
Joe Kucinski
The Headlights of Every Corvette Generation Explained
Joe Kucinski
5 Best & 5 Most Overrated Corvette Track Packages of All Time!
Joe Kucinski
Every 2027 Corvette Engine Explained
Joe Kucinski
Designer Imagines A Corvette That Looks More Like a Corvette Than the Corvette
Verdad Gallardo
10 Ugly Corvettes That We Still Kinda Love
Joe Kucinski
Top 10 Most Expensive Corvettes Ever Sold on Bring A Trailer
Brett Foote
10 Things Every Corvette Owner Needs (2026 Edition)
Michael S. Palmer
8 Most "Only Corvette Owners Understand" Quirks and Problems
Pouria Savadkouei


Thread Starter
Pro
Joined: May 2008
Posts: 582
Likes: 9
Today I worked on the head light assemblies. The first one took some time but the second one took no time at all. I also got all of the front bumper braces installed and it is ready for the bumper cover to go. Next I need to finish the wiring for the front and rear lighting and then on to the window trim and weather stripping.



Thread Starter
Pro
Joined: May 2008
Posts: 582
Likes: 9
I have been working on finishing the wiring for the lights. I have the rear finished with the exception of installing the protective sleeves that I will do after testing the system. I am just getting started on the front lighting. I read so articles where people had used relays for the head lights to get more voltage to the lights and also found some charts showing to voltage drop and the percent of light output drop in relation to voltage drop. Any thoughts on this? On my old 71 C10 there is not much voltage drop at the lights and the lights are really bright. The vette always had dim lights but the wiring had insulation that was falling off and it was all corroded so I am hoping that with the new wiring there is little or no voltage drop.
As some may have read before I am using a painless wiring harness. I also ordered many connectors that would have been stock for my car. For the most part it has just been routing the wires and terminating everything. It has been going really well and everything including the fuse box fits well. There are a few things that I am leaving out and that is the dimmer timer for the dome lite that never worked any way, and the intermittent wipers, so just high and low speeds. I hope to not be in the rain with my car anyways. I was without much trouble able to integrate things like the warning buzzer for the lights and the key.
I like that I now have fuse locations built in for items such as electric fans and fuel injection. I also placed the blower motor relay inside the car like my C10. This cleaned up the fire wall, I have less wiring running through the fire wall and in the 16 years that I have had the car I am on my third relay. The relays all had rust inside of them from being exposed to the elements as this type is not sealed.
On a different note I noticed on the right front of the car way down below the right marker light there is a spot that was wet sanded but not polished. I went by the paint shop and they gave me two different types of polish, 3 different polishing wheels for my buffer and a stack of 3M polishing cloths. Also told me that when the car was running bring it in and they will take care of any spot that needed to be polished.
So the town that I currently live in last year was my first 4th of July and they had a really big car show. I had decided that day to set a goal to have my car in this years 4th of July car show. That day is almost here and I still have a lot of work. So I am in Smoky and the Bandit mode…..A long way to go and a short time to get there! With me luck on getting her there and I just did my carshow registration.
As some may have read before I am using a painless wiring harness. I also ordered many connectors that would have been stock for my car. For the most part it has just been routing the wires and terminating everything. It has been going really well and everything including the fuse box fits well. There are a few things that I am leaving out and that is the dimmer timer for the dome lite that never worked any way, and the intermittent wipers, so just high and low speeds. I hope to not be in the rain with my car anyways. I was without much trouble able to integrate things like the warning buzzer for the lights and the key.
I like that I now have fuse locations built in for items such as electric fans and fuel injection. I also placed the blower motor relay inside the car like my C10. This cleaned up the fire wall, I have less wiring running through the fire wall and in the 16 years that I have had the car I am on my third relay. The relays all had rust inside of them from being exposed to the elements as this type is not sealed.
On a different note I noticed on the right front of the car way down below the right marker light there is a spot that was wet sanded but not polished. I went by the paint shop and they gave me two different types of polish, 3 different polishing wheels for my buffer and a stack of 3M polishing cloths. Also told me that when the car was running bring it in and they will take care of any spot that needed to be polished.
So the town that I currently live in last year was my first 4th of July and they had a really big car show. I had decided that day to set a goal to have my car in this years 4th of July car show. That day is almost here and I still have a lot of work. So I am in Smoky and the Bandit mode…..A long way to go and a short time to get there! With me luck on getting her there and I just did my carshow registration.


Thread Starter
Pro
Joined: May 2008
Posts: 582
Likes: 9
Thank you for the encouragement. Tonight after work I finished the wiring for the front and rear lights. Op tested it all and good to go. Also got the rear bumper on but need to get it aligned an then tightened up. On Friday after work plan on getting the front bumper on and then start on the weatherstripping.
Thread Starter
Pro
Joined: May 2008
Posts: 582
Likes: 9
Over the weekend I was able to finish up just about everything on the outside of the car and most of the stuff under the hood. I did discover a few weeks ago that my autoparts store power steering pump did not work so installed a new one and now have power steering. Also my new stainless steel brake line that ran from the front to the rear of the car had a leak at the brass t- fitting on the left side. Took it apart and realized that the flair was not centered. Repaired it and all is working with no leaks. Started installing some of the interior components and did get the dash in, but that was about it.
So I have just a few more days before the 4th of July car show. I still need to finish with the dynamat, wiring for the power locks, power windows, and a few other items such as radio, cig lighter and dome locks. This is with a universal painless wiring harness so its not just plug it in. Then all the parts like carpet, seats and door panels.
I also have to align the car. Still need to get a camber caster gage so this may be a level and tap measure alignment to get to the car show, but its only a few miles.
Considering I am at work 12-14 hours a day I may be taking the car to the show without the interior.
So I have just a few more days before the 4th of July car show. I still need to finish with the dynamat, wiring for the power locks, power windows, and a few other items such as radio, cig lighter and dome locks. This is with a universal painless wiring harness so its not just plug it in. Then all the parts like carpet, seats and door panels.
I also have to align the car. Still need to get a camber caster gage so this may be a level and tap measure alignment to get to the car show, but its only a few miles.
Considering I am at work 12-14 hours a day I may be taking the car to the show without the interior.