


Doorgunner's '68 Convertible Project
Thread Starter
2026 Loser of the Year


Joined: Sep 2013
Posts: 36,607
Likes: 7,053
From: New Or-leens Loo-z-anna
I used hardened lock washers....they really bite when the bolt is torqued/in case they loosen, the French locks are next.
******************EDIT:***************** ** LOOKING BACK...I SHOULD HAVE PLACED ALL 4 ROTORS ON JACK STANDS TO IMITATE THE CAR SITTIN
ON WHEELS ON THE CONCRETE !!!**************************************** ************
I yanked on my bootstraps and made it to the garage (PTSD sucks!)...After the problems that I had with the differential and half-shafts being off-center, I was really concerned about how badly the trailing arms would be out of tolerance/Mike Ward gave me some good advice on what to look for when checking/setting the toe on the arms...ON WHEELS ON THE CONCRETE !!!**************************************** ************
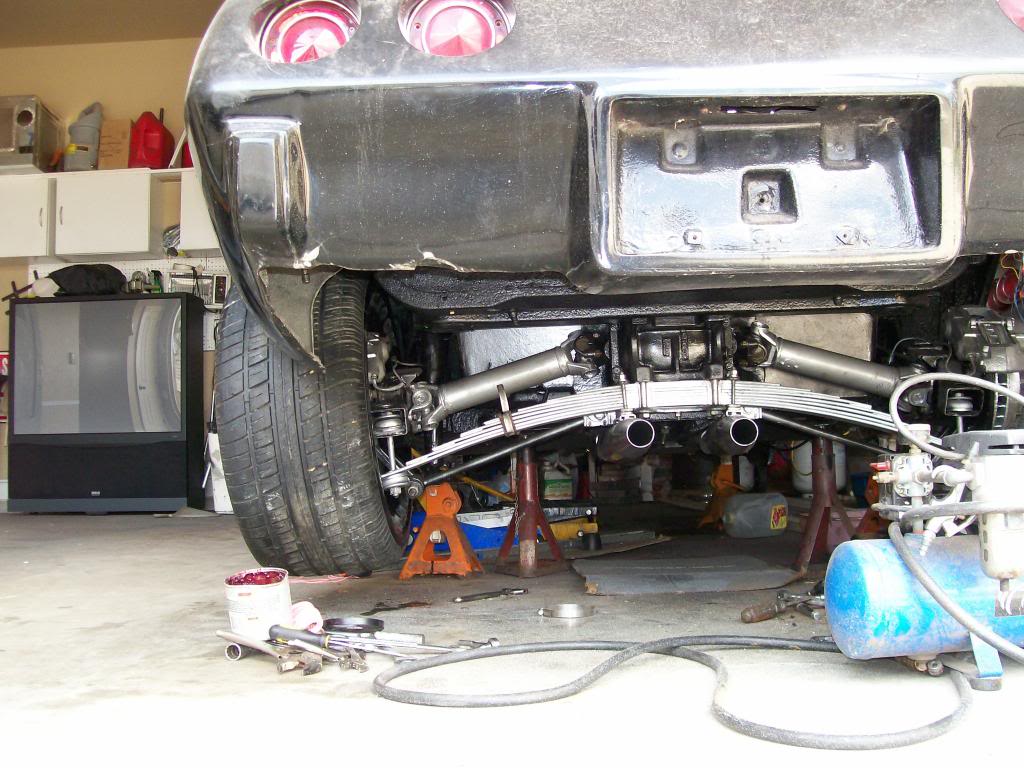
I did a preliminary check on the camber and toe on the driver's wheel. First I supported the car on the rotors/then I leveled the differential crossmember (pay no attention to those greasy chrome Harley Davidson mufflers mounted under the differential....LOL)........
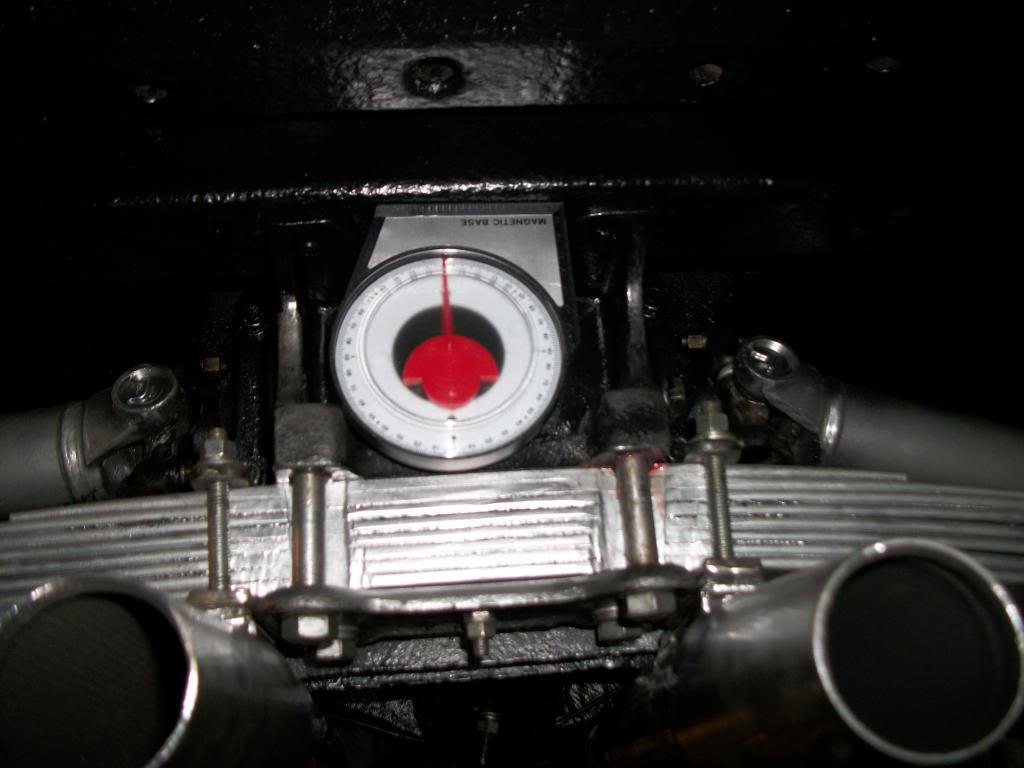
Then I adjusted the camber to +1 degree since the tires weren't ready to be installed yet......
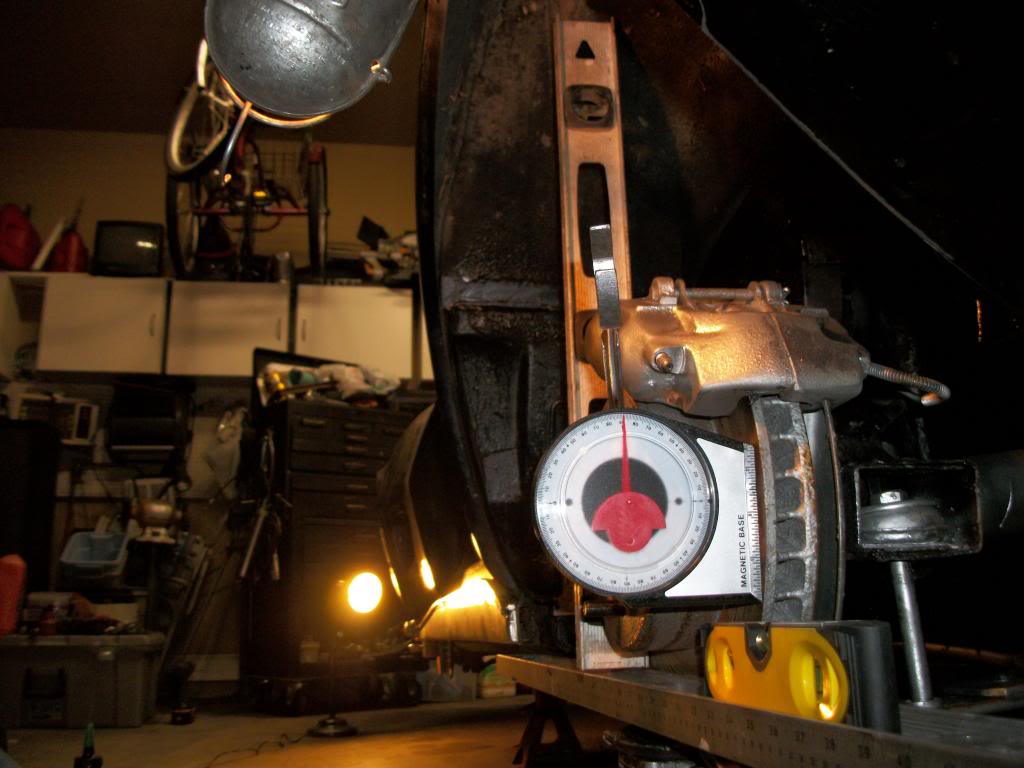
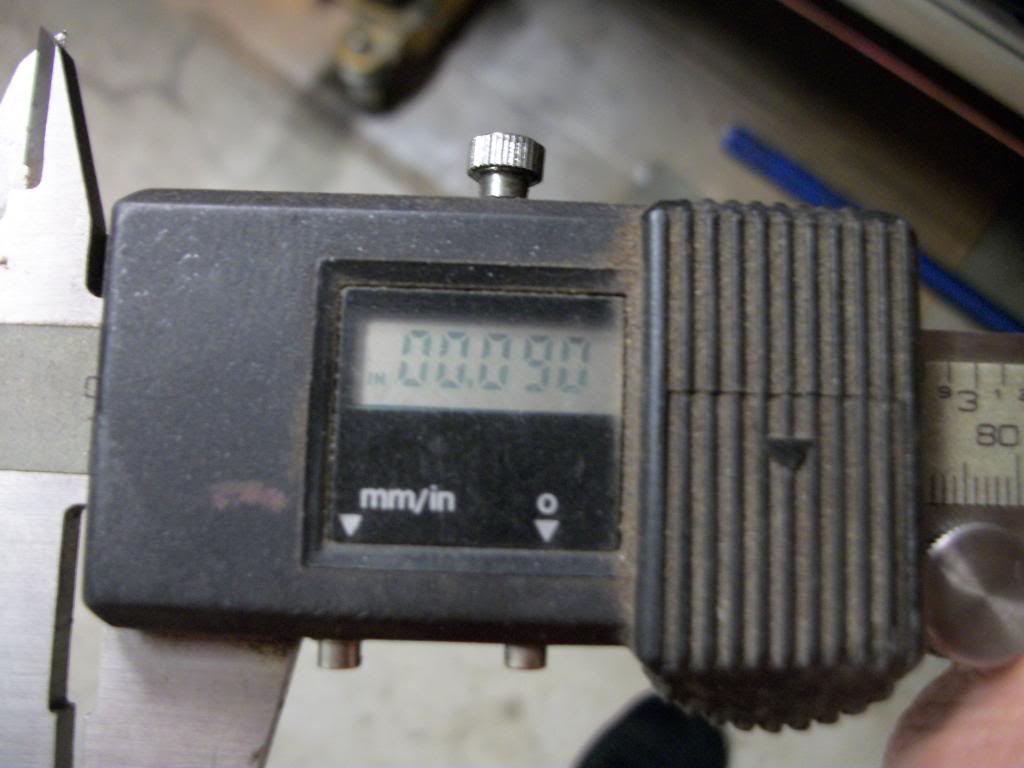
Next I set up a string from front to rear to check the toe.....
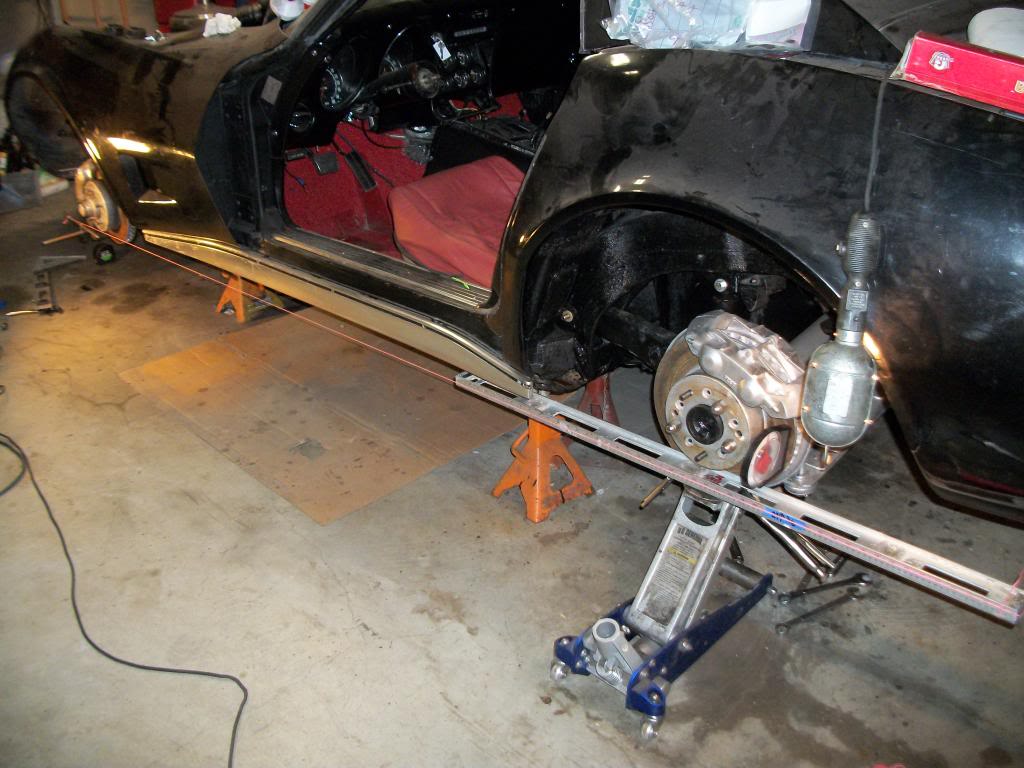
Checking 13" (half the diameter of the wheel) forward of the spindle with dial calipers.....The string showed .090" toe-in Which would be .180" total for both wheels---which is too much---but close enough until the wheels are mounted...(that was a relief considering the toe could be off as much as 3/8" to 7/16"......
Tomorrow I'll try to get the wheels ready and mount them so I can set the camber & toe on the passenger's side, now that I have a good driver's side reference to measure from. Maybe this weekend it will actually be safe to drive around the block!
OOOOPS.....I noticed on the 2nd to last pic, I still need to install the new seat covers and mount the seats to the floorboard.....steering wheel too (the horn contact kit should be delivered tomorrow)
Last edited by doorgunner; May 14, 2023 at 03:46 PM.
Thread Starter
2026 Loser of the Year
Joined: Sep 2013
Posts: 36,607
Likes: 7,053
From: New Or-leens Loo-z-anna
I managed to do a little more before we ran errands in town...the driver's and passenger's side wheels got a good degreasing/sanding outboard and inboard areas/satin-black paint to help the chrome stand out (since 1968, I never did like the green-tinted wheel paint)........

I really didn't care for the extra wide rear tires, but they're too new/too much rubber left on them to replace them (please ignore that hybrid '78 bumper clip---I already have a '68 tail-light clip to replace it!)....
The driver's side suspension passed another test....at the spring's lowest point there was still 1/2" of clearance between the end of the main spring and the inner rim lip on the 8" wide '69 rims......

Next.....install the passengers side wheel and check the clearance....When I received the car the end of the main spring was actually rubbing the inboard wall of the tire when the car turned right into curbed parking lots. This step should be ver-r-ry interesting to see how the clearance works out.
I really didn't care for the extra wide rear tires, but they're too new/too much rubber left on them to replace them (please ignore that hybrid '78 bumper clip---I already have a '68 tail-light clip to replace it!)....
The driver's side suspension passed another test....at the spring's lowest point there was still 1/2" of clearance between the end of the main spring and the inner rim lip on the 8" wide '69 rims......
Next.....install the passengers side wheel and check the clearance....When I received the car the end of the main spring was actually rubbing the inboard wall of the tire when the car turned right into curbed parking lots. This step should be ver-r-ry interesting to see how the clearance works out.
Last edited by doorgunner; Mar 5, 2014 at 04:45 PM.
Thread Starter
2026 Loser of the Year
Joined: Sep 2013
Posts: 36,607
Likes: 7,053
From: New Or-leens Loo-z-anna
I couldn't stand the suspense so I did a trial-fit of the passenger's 8" rim/295 tire, so I shimmed the passenger's side trailing arm last night and temp. installed the wheel.
For a reference: It took (2) 1/4" shims and (1) 1/16" shim.....exactly the same amount as the driver's side trailing arm to remove the side-play on the pivot bolt.
(.562" shim-pack for each arm placed on the inboard side of each arm......which will be changed slightly to get the correct toe on both wheels once the car is off the jack stands and driven around the neighborhood a few times)
The end of the passenger's main leaf had 7/16" clearance from the rim lip while on jackstands---the driver's side had 1/2" clearance.....close enough!
WHEW! I'm glad that worked out well for a rookie!
I'll try to post pics tonight in this same reply as I install shock, wheel, and measure toe.
EDIT: The part arrived...the right-side is complete....the rear wheels are on the concrete after 6 months (of a one-month project... )
)
Note to myself: Finish torquing the (4) leaf spring mounting bolts tonight, now that weight is on the spring assembly.
Then post pics.
RE-EDIT: Sorry about not posting pics....I just got home from visiting my F.I.L. at the hospital.
For a reference: It took (2) 1/4" shims and (1) 1/16" shim.....exactly the same amount as the driver's side trailing arm to remove the side-play on the pivot bolt.
(.562" shim-pack for each arm placed on the inboard side of each arm......which will be changed slightly to get the correct toe on both wheels once the car is off the jack stands and driven around the neighborhood a few times)
The end of the passenger's main leaf had 7/16" clearance from the rim lip while on jackstands---the driver's side had 1/2" clearance.....close enough!
WHEW! I'm glad that worked out well for a rookie!
I'll try to post pics tonight in this same reply as I install shock, wheel, and measure toe.
EDIT: The part arrived...the right-side is complete....the rear wheels are on the concrete after 6 months (of a one-month project...
) Note to myself: Finish torquing the (4) leaf spring mounting bolts tonight, now that weight is on the spring assembly.
Then post pics.
RE-EDIT: Sorry about not posting pics....I just got home from visiting my F.I.L. at the hospital.
Last edited by doorgunner; Mar 6, 2014 at 11:43 AM.
Thread Starter
2026 Loser of the Year
Joined: Sep 2013
Posts: 36,607
Likes: 7,053
From: New Or-leens Loo-z-anna
LOL.....the indicator is 30 years old......the string was used to build my fence behind our house.
Last edited by doorgunner; Mar 21, 2014 at 05:55 PM.
Corvette Stories
The Best of Corvette for Corvette Enthusiasts

Every 2027 Corvette Engine Explained
Joe Kucinski
Designer Imagines A Corvette That Looks More Like a Corvette Than the Corvette
Verdad Gallardo
10 Ugly Corvettes That We Still Kinda Love
Joe Kucinski
Top 10 Most Expensive Corvettes Ever Sold on Bring A Trailer
Brett Foote
10 Things Every Corvette Owner Needs (2026 Edition)
Michael S. Palmer
8 Most "Only Corvette Owners Understand" Quirks and Problems
Pouria Savadkouei
10 Reasons the C6 Z06 is Still A Performance Benchmark After 20 Years
Joe Kucinski
How Much Horsepower Every Corvette Engine "LOST" in 1972
Joe Kucinski
Top 10 DOs and DON'Ts for Protecting Your Convertible Top!
Michael S. Palmer
Thread Starter
2026 Loser of the Year
Joined: Sep 2013
Posts: 36,607
Likes: 7,053
From: New Or-leens Loo-z-anna
The last few days we've been spending time at the hospital with my father-in-law.
I hoping to have the front tires cleaned/painted/mounted with pics tomorrow night.
Well.....the wheels are cleaned/painted.....but not installed........
Another trip to the hospital and returned home too late to accomplish much.....maybe tomorrow....

I hoping to have the front tires cleaned/painted/mounted with pics tomorrow night.
Well.....the wheels are cleaned/painted.....but not installed........
Another trip to the hospital and returned home too late to accomplish much.....maybe tomorrow....
Last edited by doorgunner; Mar 7, 2014 at 11:34 PM.
Drifting

Joined: Aug 2013
Posts: 1,453
Likes: 88
From: Easton Pennsylvania
Looks like we both are building our own version of a C-3 Frankenvette. Cool way to do a wheel alignment by the way. I hadn't seen the string method used in years. Did it myself one or twice back in the day. Gets you really close. 
Thread Starter
2026 Loser of the Year
Joined: Sep 2013
Posts: 36,607
Likes: 7,053
From: New Or-leens Loo-z-anna
Last edited by doorgunner; Mar 9, 2014 at 03:10 PM.
Thread Starter
2026 Loser of the Year
Joined: Sep 2013
Posts: 36,607
Likes: 7,053
From: New Or-leens Loo-z-anna
O.K.........BUT BRACE YOURSELF ....annnnd yes---that's A/T fluid on the concrete from one of the rubber hoses that goes to the aftermarket trans-fluid cooler in front of the radiator

Bats............Maybe/maybe not........
Rookie-Me only "snugged-down" the camber adjusting bolts.....guess what happened the first time that I put it in Drive and gave it some "pedal"............
That would be a correct answer.......the rear suspension squatted down.........those big fat rear tires bowed out about 2" on the concrete.
Ohhh well........at least I stayed in the driveway!
So......back to the garage to replace the trans-cooler hoses (no biggie)....................annnnnnnnnnd. ....................."adjust the camber" again...with a torque wrench this time!
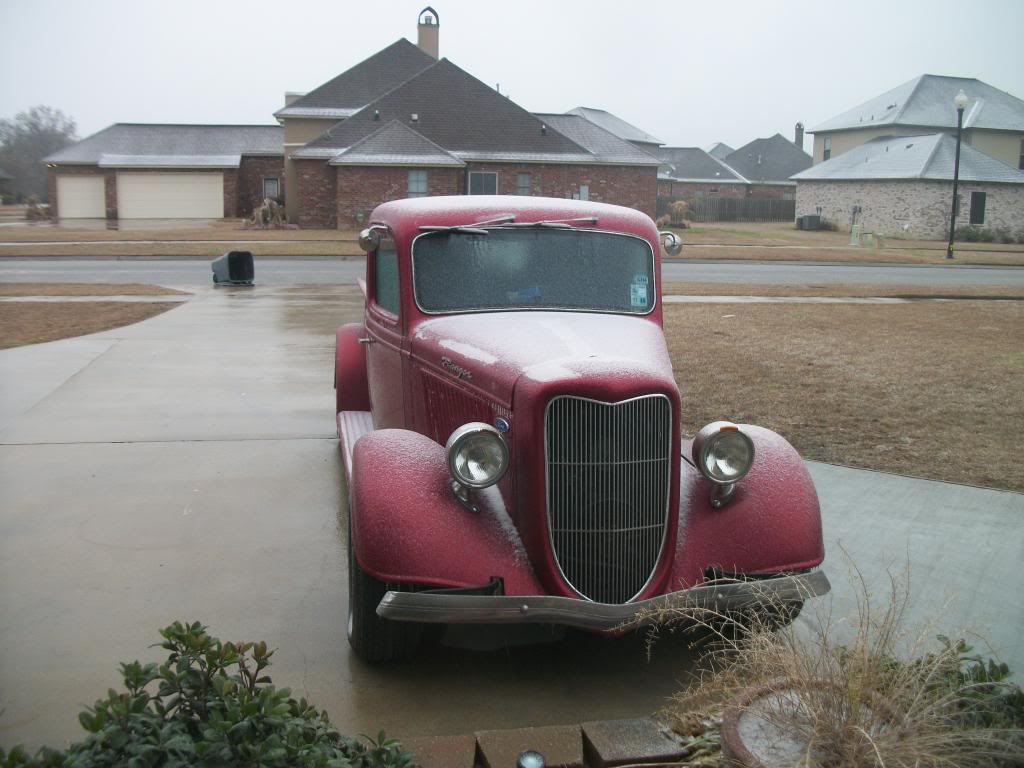
W-H-Y would someone do that to the body of a '68!?!?!?!?!?!?
Last edited by doorgunner; Mar 9, 2014 at 10:45 AM.
Thread Starter
2026 Loser of the Year
Joined: Sep 2013
Posts: 36,607
Likes: 7,053
From: New Or-leens Loo-z-anna

Thread Starter
2026 Loser of the Year
Joined: Sep 2013
Posts: 36,607
Likes: 7,053
From: New Or-leens Loo-z-anna
Here's the story.....brace yourself....(I'm trying to bring the body back to '68 appearance as the project progresses)
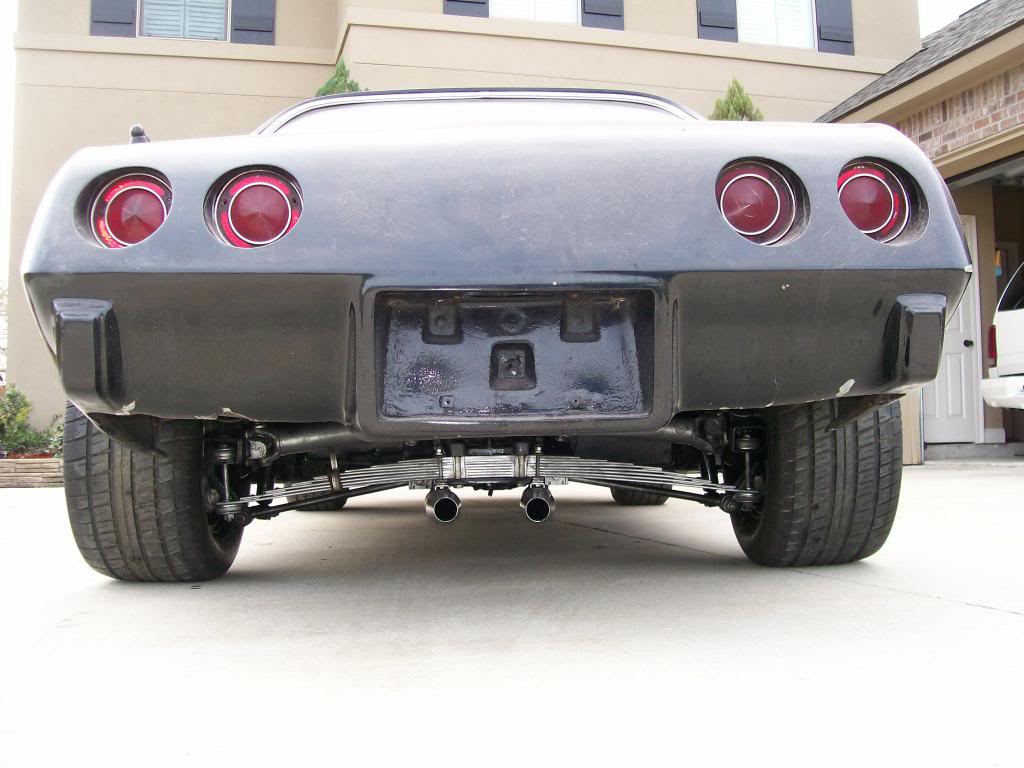
The 2nd owner decided to "update the car"--he removed the original front and rear clips/installed late '70s clips (no exhaust openings in the rear lower valance).
The 3rd owner began working on the car and cut the exhaust pipes off before the differential because they were rusted-out behind the diff. all the way to the mufflers.
Until I decide on side-pipes or mufflers, I have installed two spare chrome Harley Davidson mufflers to quiet the dual exhausts pipes down.
In the meantime,I recently bought a rear clip ('68 tail-light panel).....until I swap out the rear sections and make my exhaust decision, I will leave the Harley mufflers under the car.
And......Rookie-Me found why the camber went out of adjustment while test-driving the car after re-building the suspension....I didn't realize that I needed four of these.......
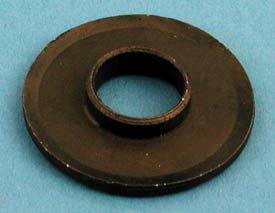
Strut Rod Bushing Caps
I see they have a bolt shoulder to center the bolt and take up slack....they also "bite" to prevent them from slipping when everything is adjusted and torqued down.
The 2nd owner decided to "update the car"--he removed the original front and rear clips/installed late '70s clips (no exhaust openings in the rear lower valance).
The 3rd owner began working on the car and cut the exhaust pipes off before the differential because they were rusted-out behind the diff. all the way to the mufflers.
Until I decide on side-pipes or mufflers, I have installed two spare chrome Harley Davidson mufflers to quiet the dual exhausts pipes down.
In the meantime,I recently bought a rear clip ('68 tail-light panel).....until I swap out the rear sections and make my exhaust decision, I will leave the Harley mufflers under the car.
And......Rookie-Me found why the camber went out of adjustment while test-driving the car after re-building the suspension....I didn't realize that I needed four of these.......
Strut Rod Bushing Caps
I see they have a bolt shoulder to center the bolt and take up slack....they also "bite" to prevent them from slipping when everything is adjusted and torqued down.
Last edited by doorgunner; Mar 21, 2014 at 05:57 PM.
Thread Starter
2026 Loser of the Year
Joined: Sep 2013
Posts: 36,607
Likes: 7,053
From: New Or-leens Loo-z-anna


There.....and I thought that I would just reassemble the rear suspension with the original parts...
Too bad I didn't listen to the members and review the AIM to make sure all the original parts WHERE THERE IN THE FIRST PLACE!
I'm just glad I didn't destroy anything learning that lesson.

Le Mans Master


Joined: Oct 2006
Posts: 6,842
Likes: 285
From: Palmdale CA
Good one! At least you found out about the 'snugging' before it was driving around! Regarding the a/t fluid don't ya hate it, when they do that? It's almost like they've got to mark their spot, somehow! (like mine did, in my ex-wife's perfect-clean white driveway...)