


Doorgunner's '68 Convertible Project
Thread Starter
2026 Loser of the Year


Joined: Sep 2013
Posts: 36,607
Likes: 7,053
From: New Or-leens Loo-z-anna
Sorry, as far as I know, I never received any PM or eMail on this subject.
Now the really bad news. The damper was not designed to be serviced. Since it was a welded construction, (similar to the Corvette power steering assist cylinder), there is no literature that I have found that addresses the internal cylinder components.
It may be similar to shock absorber internal parts. Shock absorber pistons are designed with a safety relief valve that allows fluid to bypass the piston when the piston moves too fast. Such as hitting a pot hole.
It could be that your parts were designed to do the same thing. There are special (take apart) shock absorbers that allow you to calibrate the bypass pressure. Maybe you can find some literature on this subject. It might be helpful.
Jim
Thanks JIM.....(I was just picking about you and the $30 damper/NOT $30 any more!).
It is surely not within the ability of most people to repair a damper, as a metal lathe would be needed to do the job correctly and to re-apply the small knurls (notches) around the welded area.
I think I have discovered how to assemble the piston pieces by lining up the wear marks (shiny spots) where the pieces contacted each other (I wish I had been more careful laying out the pieces as I dis-assembled the cylinder, but with my "condition", I take what I can get.....LOL!)
It may be a few days before I post any results, as I will be on a trip.
Thanks again for responding, Jim S. You are a great Member

Melting Slicks

Joined: Aug 2012
Posts: 3,487
Likes: 83
From: Titusville Florida
Apparently, Jim had better things to do than investigate the failure of a $30 damper....
Does anyone else have info on the damper piston assembly order?
Anyone?
Help.....I've fallen down trying to reassemble my damper piston, and am too disgusted to get up!
BUMP!
I'm starting to get the idea that I might be the only one on this forum who is...................................... ..............................
as Grandma used to say..................................... ................
"touched in the head!"
Thread Starter
2026 Loser of the Year
Joined: Sep 2013
Posts: 36,607
Likes: 7,053
From: New Or-leens Loo-z-anna
Your info is now my Plan B!
Thanks for not raking me over the coals for doing it the difficult way.
Burning Brakes


Joined: Dec 2013
Posts: 997
Likes: 210
From: Schaumburg IL
Thanks JIM.....(I was just picking about you and the $30 damper/NOT $30 any more!).
It is surely not within the ability of most people to repair a damper, as a metal lathe would be needed to do the job correctly and to re-apply the small knurls (notches) around the welded area.
I think I have discovered how to assemble the piston pieces by lining up the wear marks (shiny spots) where the pieces contacted each other (I wish I had been more careful laying out the pieces as I dis-assembled the cylinder, but with my "condition", I take what I can get.....LOL!)
It may be a few days before I post any results, as I will be on a trip.
Thanks again for responding, Jim S. You are a great Member
okay we are all nuts.

Drifting

Joined: Jun 2011
Posts: 1,541
Likes: 268
From: iowa city iowa
2020 Corvette of the Year Finalist (appearance mods)
C3 of Year Winner (appearance mods) 2019
Aaah "the big toe" sgt hulka.
Just wanted to say even if I did I not like corvettes, I would read your posts because they always entertain me.
Just wanted to say even if I did I not like corvettes, I would read your posts because they always entertain me.
Thread Starter
2026 Loser of the Year
Joined: Sep 2013
Posts: 36,607
Likes: 7,053
From: New Or-leens Loo-z-anna
My son Blake, 20 years old had a great sense of humor....so I fight off the sadness by "cutting up" like he would do when I post replies on the Forum.
As for being entertaining......"Stupied is as Stupied does!"


Let me grab a couple cookies and head to the garage to weld that damper barrel back together .
Last edited by doorgunner; Jun 6, 2014 at 06:55 PM.
Corvette Stories
The Best of Corvette for Corvette Enthusiasts

Every 2027 Corvette Engine Explained
Joe Kucinski
Designer Imagines A Corvette That Looks More Like a Corvette Than the Corvette
Verdad Gallardo
10 Ugly Corvettes That We Still Kinda Love
Joe Kucinski
Top 10 Most Expensive Corvettes Ever Sold on Bring A Trailer
Brett Foote
10 Things Every Corvette Owner Needs (2026 Edition)
Michael S. Palmer
8 Most "Only Corvette Owners Understand" Quirks and Problems
Pouria Savadkouei
10 Reasons the C6 Z06 is Still A Performance Benchmark After 20 Years
Joe Kucinski
How Much Horsepower Every Corvette Engine "LOST" in 1972
Joe Kucinski
Top 10 DOs and DON'Ts for Protecting Your Convertible Top!
Michael S. Palmer
Thread Starter
2026 Loser of the Year
Joined: Sep 2013
Posts: 36,607
Likes: 7,053
From: New Or-leens Loo-z-anna
Thanks, F22........................here Ya' go.....have a laugh or three on me.........
Here we go.........................re-assembling and welding the damper barrel-end on

The piston has been set up and bolted to the end of the rod.......

Next, it is about to be inserted into small diameter "inner barrel".....

I am adding gear oil to the "inner barrel" to prevent air cavaties.....
{oooops---forgot to take a pic of the oil being squirted into the inner barrel.....Sorry!}
The thick metal valve gets tapped into the "inner barrel" by using a hammer and punch---not much force is needed.....It is the darker part that has the spring sitting in the top of it......the inner barrel is the shiny tube that is LIGHTLY clamped in the vice.............

Now pay close attention to this step! Do you see how the inner barrel/rod/piston assembly has been inserted into the main (black) barrel?????
Do you see how I am adding the remaining oil between the inner barrel assembly and the outer main barrel??????

Do NOT Add Oil YET!!!!!!!
Silly Rookie me added the oil almost to the top of the outer main barrel-----IT LOOKED GREAT!!!!!!!!!!!!
B U T..........WHEN I STARTED WELDING THE TOP CAP OF THE BARREL TO THE MAIN BARREL, OIL STARTED EXPANDING AND SEEPING OUT OF THE UNWELDED GAP, causing my weld to spit/sputter...
R A T S !!!!!!!!!!!!!!!
NOW.....I realize that I should have not put the oil in before welding
First......I should have drilled a 3/16" diameter hole in the OTHER END OF THE OUTER BARREL about 1/4" from where the "eye" factory weld is so that oil could be added later after the weld was cool.
Had I known this earlier, I would have been spared nearly an hour of "touch-up welding" to seal off all the tiny "pinholes" in my weld created by the heated oil seeping out.......

I should have submerged most of the damper in a bucket of water letting the area that needed to be welded about 1/4" above the water line to keep the barrel and cap cool while being welded.
Anyhow.......I ground down my weld to a smooth ridge around the outer barrel.........................
Then I had to touch up more pinholes with the mig welder...........................RATS!!!!!
So.....theoretically....if I had added the oil LAST......Then welded up the 3/16" diameter oil "filler hole".....the project would have been a lot of F U N.......BUT i DIDN'T AND IT WASN'T

Now....you guys get in your garage and put me to shame by rebuilding a damper the CORRECT WAY the first time!

Last edited by doorgunner; Jun 8, 2014 at 09:39 AM.

Le Mans Master


Joined: Oct 2006
Posts: 6,842
Likes: 285
From: Palmdale CA
The welding was a tough enuff task, without the problem that arose from the oil. But you came up with the oil fill hole idea, while you were dealing with the super mess! That's cool stuff for the next poor sap, that has to deal with that! Good one and as always, great pics and technical advice!
Thread Starter
2026 Loser of the Year
Joined: Sep 2013
Posts: 36,607
Likes: 7,053
From: New Or-leens Loo-z-anna
The welding was a tough enuff task, without the problem that arose from the oil. But you came up with the oil fill hole idea, while you were dealing with the super mess! That's cool stuff for the next poor sap, that has to deal with that! Good one and as always, great pics and technical advice!
Even Rookies stumble upon answers every now and then

Here's a copy from another thread:
So I wanted a much "heavier" oil to stop the serious feedback.
After rebuilding the damper, it requires the same force to be compressed as my new SkyJacker steering stabilizer on my manual box '34 truck (w '93 steering box)....in other words the Vette damper is as good as a 1/2 ton truck damper after being rebuilt with heavier fluid, considering that the Vette barrel diameter is 50% smaller than the truck damper....
And because of the old seals which I could not replace, I needed "thicker oil" to prevent dripping/leaks.
The main mistake that I made was filling the damper with oil before I welded the end-cap onto the outer barrel causing me to spend an extra hour rewelding leaking pinholes
I would rebuild one in a New York second after learning THAT lesson!
(If I only had a metal lathe....I could have used a knurling tool to put the markings onto the barrel over the weld....just like the General did)
Last edited by doorgunner; Jun 8, 2014 at 09:36 AM.


Thread Starter
2026 Loser of the Year
Joined: Sep 2013
Posts: 36,607
Likes: 7,053
From: New Or-leens Loo-z-anna
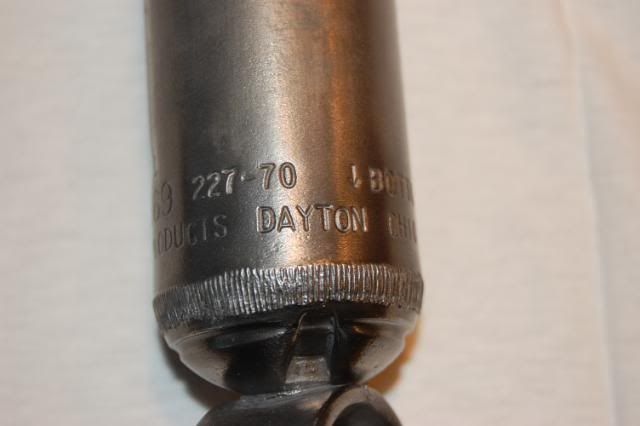
(It's "funny" that a rookie would notice something like that---I guess I learned something being a machinist)
Note: The above info about "one" of the many parts on a Corvette is really one of those "things" that restoration owners have to duplicate that was done wrong.......errrrrrr.....cost effective...similar to the way some parts were never painted/halfway painted--bellhousings/etc. to begin with at the manufacturing plants
Last edited by doorgunner; Jun 8, 2014 at 09:50 AM.
Thread Starter
2026 Loser of the Year
Joined: Sep 2013
Posts: 36,607
Likes: 7,053
From: New Or-leens Loo-z-anna
Duplicate of Fla. vacation thread that I just posted:
Are there any members in the Navarre Beach, Florida area?
I'm stuck here for the week eating great seafood, cruising in my '34 street truck (until the Vette is completed) in all this sunshine with a cool Gulf breeze for the next week..... .....just kidding about the !
I'd like to drive over and see your car(s) if that would be O.K. (I'm on my Nam PTSD meds...and am completely harmless (unless jets fly over from the Naval Station)---then I might start cursing/screaming/etc....

"Mister....You would REALLY do all that?!?!?"
Maybe.....but I can be restrained with little-to-no-effort....


P.M me....
Are there any members in the Navarre Beach, Florida area?
I'm stuck here for the week eating great seafood, cruising in my '34 street truck (until the Vette is completed) in all this sunshine with a cool Gulf breeze for the next week.....
.....just kidding about the !I'd like to drive over and see your car(s) if that would be O.K. (I'm on my Nam PTSD meds...and am completely harmless (unless jets fly over from the Naval Station)---then I might start cursing/screaming/etc....
"Mister....You would REALLY do all that?!?!?"
Maybe.....but I can be restrained with little-to-no-effort....
P.M me....
Thread Starter
2026 Loser of the Year
Joined: Sep 2013
Posts: 36,607
Likes: 7,053
From: New Or-leens Loo-z-anna
I MAY be aquiring a pair of chrome D.D. rear bumpers tomorrow!!!!!!
They will fit perfectly here....(no....not on the wall....Ohhhhhh, O.K.........on the wall for now!)

I will wrap them nicely so my kids can surprise me with them on "Favver's" Day!
They will fit perfectly here....(no....not on the wall....Ohhhhhh, O.K.........on the wall for now!)
I will wrap them nicely so my kids can surprise me with them on "Favver's" Day!
Last edited by doorgunner; Jun 10, 2014 at 09:01 AM.
Thread Starter
2026 Loser of the Year
Joined: Sep 2013
Posts: 36,607
Likes: 7,053
From: New Or-leens Loo-z-anna

The Cavalry has arrived........1960fi is going to bail me out with a set of shiny bumpers!!!!!!!!!
18950
Last edited by doorgunner; Jun 11, 2014 at 04:54 AM.
Thread Starter
2026 Loser of the Year
Joined: Sep 2013
Posts: 36,607
Likes: 7,053
From: New Or-leens Loo-z-anna
Another rookie question..............
First......the info...........
the previous owner installed a rebuilt 1970 350 engine a long lonnnng time ago using the infamous cork gasket which leaked like a sieve and is no more........

SO.......why would this type of exhaust manifolds be on the engine-----other than those are the ones he grabbed first....(I'm not complaining---there is plenty of clearance everywhere because of them)...I don't know if they flow well, but I'm happy with them not leaning against the firewall....

I'm out of town...so can't post a good pic of the heads.
First......the info...........
the previous owner installed a rebuilt 1970 350 engine a long lonnnng time ago using the infamous cork gasket which leaked like a sieve and is no more........
SO.......why would this type of exhaust manifolds be on the engine-----other than those are the ones he grabbed first....(I'm not complaining---there is plenty of clearance everywhere because of them)...I don't know if they flow well, but I'm happy with them not leaning against the firewall....
I'm out of town...so can't post a good pic of the heads.
Last edited by doorgunner; Jun 12, 2014 at 06:14 PM.
Burning Brakes
Joined: Dec 2013
Posts: 997
Likes: 210
From: Schaumburg IL
Another rookie question..............
First......the info...........
the previous owner installed a rebuilt 1970 350 engine a long lonnnng time ago using the infamous cork gasket which leaked like a sieve and is no more........

SO.......why would this type of exhaust manifolds be on the engine-----other than those are the ones he grabbed first....(I'm not complaining---there is plenty of clearance everywhere because of them).......

I'm out of town...so can't post a good pic of the heads.
First......the info...........
the previous owner installed a rebuilt 1970 350 engine a long lonnnng time ago using the infamous cork gasket which leaked like a sieve and is no more........
SO.......why would this type of exhaust manifolds be on the engine-----other than those are the ones he grabbed first....(I'm not complaining---there is plenty of clearance everywhere because of them).......
I'm out of town...so can't post a good pic of the heads.
Thread Starter
2026 Loser of the Year
Joined: Sep 2013
Posts: 36,607
Likes: 7,053
From: New Or-leens Loo-z-anna
Originally Posted by doorgunner
....(I'm not complaining---there is plenty of clearance everywhere because of them).......

I was....I am....thanks for confirmation...
If only some of that leaking oil would have made it's way to the trailing arm pivot bolts and shims!
19200
Last edited by doorgunner; Jun 13, 2014 at 02:05 PM.

Melting Slicks
Joined: Jan 2012
Posts: 3,041
Likes: 505
From: myrtle beach sc
Army
Doorgunner, I think that, that knurling is how the end was welded. Gas tanks are welded that way. The ram's horn exhaust manifolds are suppose to flow better than the log type used on standard Chevy motors. Lou.