When you click on links to various merchants on this site and make a purchase, this can result in this site earning a commission. Affiliate programs and affiliations include, but are not limited to, the eBay Partner Network.
I have a 72 with 60K miles and all original interior. Seat are in perfect condition except that the foam is deteriorating. After sitting in it there is a fine powder showing up on the seats. I've rebuilt seats before but have never replaced the old used covers over new foams. I really want to keep the original seat covers. Has anyone done this and how well did it work? I'm concerned about shrinkage of the vinyl over time. I did put new old stock 50 year old Studebaker seat covers over new foam and it was challenging but with some heat and steam worked well. Those covers were never used or on a car though. Any thoughts or experiences? Thanks
I have a 72 and had the same problem. Upper covers came off easy. When I went to put them back on They ripped right up the back by the release button. I had heated them up and used powder and the rest of the tricks. I had to get new covers.
Hi L,
You're experiencing a pretty common situation.
However it's not the foam bolsters that are deteriorating, it's the sheets of flat 'scrim foam' that were sown into the covers that has turned to pale yellow dust.
I believe I remember someone on the forum stating he's replaced the foam in the seat covers, but I don't think he ever posted any photos of the results.
I believe the only viable but costly remedy is new seat covers.
Regards,
Alan
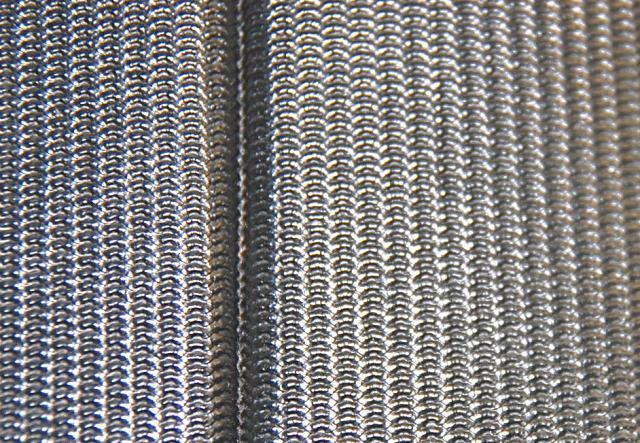
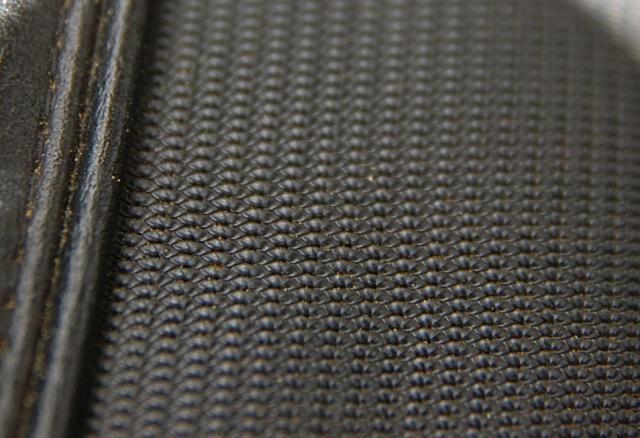
A single sheet of foam sown into the covers to give the pleats their shape.
Hi L,
You're experiencing a pretty common situation.
However it's not the foam bolsters that are deteriorating, it's the sheets of flat 'scrim foam' that were sown into the covers that has turned to pale yellow dust.
I believe I remember someone on the forum stating he's replaced the foam in the seat covers, but I don't think he ever posted any photos of the results.
I believe the only viable but costly remedy is new seat covers.
Regards,
Alan
A single sheet of foam sown into the covers to give the pleats their shape.
I believe you are correct now that I think about how the seat covers are constructed. That foam is like the foam under the fabric on 1980's headliners that crumbles. I think I will live with it for a while. I really wanted to keep the original covers.
Hi L,
The new seat covers that are available are really nicely made... perhaps as nice as the originals.
But, of course there's a 'but'... the comfort-weave material that's typically being used to make the pleated areas of the covers is noticeably different than the original comfort-weave material. The material had a myriad of tiny holes so the vinyl could 'breath'... thus the name.
This matters to only a few folks but has mattered enough so that some folks have found a source for a supply of the original material and are buying yardage to send to the seat cover manufacturer to use on their pair of seats covers.
The details DO matter!
Regards,
Alan
The comfort-weave pattern typically used in reproduction covers.
Didn’t mean to come across as negative, wish you luck , I didn’t have any with my
Installation the stitching did not hold, but my original seats were leather so yours may have better stitching.
Dario
Last edited by dariopop; Jan 16, 2018 at 12:30 AM.
I have re-stuffed the seat cover channels with foam and I have a paper that will tell you exactly how to do it. Send me a PM with your e-mail address if you want it.
Let me add this fact I've found. Now maybe it's just a particular batch of foam I received, but... the new seat foam I installed 5 years ago (along with new vinyl covers) seem to me a LOT HARDER than the original foam. And it's not cold in San Diego either. I can see a certain amount of stiffness showing up, but to my butt and back, it's very noticeable. The new vinyl has something to add to the stiffness, I'm sure. But if I had it to do all over again, I would have kept the old foam, and if damaged a bit in some areas, had a pro patch it with a good match.
I just did what you�re suggesting on my 69. What Alan said is correct. It�s the thin foam in the covers that�s deteriorating. Not the foam itself. That said my covers went back on just fine. I estimate they�re probably 15-20 years old.
I agree that keeping the original seat covers are better than getting new replacements. As Alan said the original is "comfort weave" that actually breathes; also the reason the inside cloth will probably be stained when you take them off.
If you want to save your originals it will mostly cost you time and effort. Your expense for the scrim foam and a new seat cover install kit is a small amount compared to new covers. I did this to one car and was very happy with the results. I would suggest 1/4" scrim foam. Color is not important as it will not be seen.
Think about your actual seat foam on the frame. 60K mi is not a lot, but is the foam compressed so your cover sags? You have to decide whether to replace the seat foam or not. Sometimes with replacement covers and new foam the seat look in-natural, "poofed up" and are to stiff and tall. So, if your driver foam looks good and sits as tall as your passenger foam (which probably had much less use) you may Not want to replace it since the original foam allows for a better finished product.
Alan showed and you agreed that the scrim foam was sewed into pleats under a sheet of cloth. So, once you remove the hardened foam you will have 2 layers of cloth in the channels.
I would suggest you do the removal outside as the dust is sticky and messy; find of like sanding joint compound in your house, it gets all over.
I slit the channels to make the cleaning out of the old and install of the new foam the most practical. For removal it is actually best if the foam is completely hardened; it has the consistency of a cracker or cookie as it will crumble and powder is your hands. Break it up and vacuum it out; I used a shop vac with a long piece of 1" plastic pipe taped onto my vac hose; kind of doing lypo suction. I used a long screwdriver, piece of stiff wire, spatula; anything handy to get in and scrape any foam pieces still on the scrim mostly in the corners. I also cut the cloth and scraped out the foam in the narrow horizontal pleats seen in Alan's picture with the yellow arrows; see my picture with the small tool. Take the time to get it all as a small chuck in a top corner will still turn to dust. I then vac'd the back and front and washed the cover to finish the clean up. The channels on the back measured 2 5/8" wide so I cut the 1/4" thick scrim foam the same and the length the same as actual. This cover is from a 1969. In the picture I only have the 2 long channels to the right stuffed. The picture of the foam started in a channel is not cut to length. Push the correctly cut piece into the long end of your channel then work it into the lower end. I did not find this to be difficult. I used some contact cement on the channel opening to secure the new foam. I do not think the new foam will travel or bunch up after use. You can brush contact cement at the top and bottom of the cloth to soak into the new scrim if you wish, but I think it will stay put when installed without doing that.
Originally Posted by Lark327
I have a 72 with 60K miles and all original interior. Seat are in perfect condition except that the foam is deteriorating. After sitting in it there is a fine powder showing up on the seats. I've rebuilt seats before but have never replaced the old used covers over new foams. I really want to keep the original seat covers. Has anyone done this and how well did it work? I'm concerned about shrinkage of the vinyl over time. I did put new old stock 50 year old Studebaker seat covers over new foam and it was challenging but with some heat and steam worked well. Those covers were never used or on a car though. Any thoughts or experiences? Thanks
Nice pics! I have to redo my seats again because Al Knoch apparently had foam chemical problems and were shipping out harder-than-supposed-to-be foam when I bought mine (frustrating!) They shipped me new ones, but now I have to re-do them. I was thinking of waiting until I could afford new covers, but seeing that you had success cleaning and replacing the foam, maybe i'll do that too!
You must have received and/or read my paper on this restoration (wrote it about 10 years ago). I agree with pretty much everything in your post EXCEPT the thickness of the scrim foam. That needs to be 1/2" thick or the channels will look 'wimpy'.
Thinking about thins makes me wonder about slitting the fabric lengthwise on each pleat, cleaning it thoroughly, laying the foam in place and then closing them up using contact cement. As further insurance You could lay another thin sheet of fabric over the slit and sealed pleats and adhere it with contact cement.
?? Never saw or received your paper. I think 1/2" would be to thick.
Originally Posted by 7T1vette
Toylman...
You must have received and/or read my paper on this restoration (wrote it about 10 years ago). I agree with pretty much everything in your post EXCEPT the thickness of the scrim foam. That needs to be 1/2" thick or the channels will look 'wimpy'.
Hi Alan, I found that the individual pieces fit snug and looked like it should. Sewn as a single sheet is the best, but that would complicate things to the point that it may not make sense since the cover would need a lot of disassembly and professional sewing/assembly.
I actually used a thinner 3/16" foam on my previous restore and it looked the same as the passenger side. I think the 1/4" will look better and I think that is the same as originally used.
If they can find the time, I'd like to see more owners try restoring their original covers. That yellow dust is the reason most get replaced rather than because of wear and tear.
Originally Posted by Alan 71
Hi toyl,
Nice description, instructions, and photos!
Does the fact that the foam is individual pieces rather than a single 'sheet' that's sewn in place have any effect on the finished appearance?
Wow. .What great replies. I will keep my 4 seat re-upholstering comments to myself. I wish I had some of these comments and photos when I was redoing my seats.
I like that you are going to keep the original seat covers. Unfortunately pouring new wine into old wineskins will make them split. So maybe the adage of old applies here and using new foam with old covers will cause them to split also.