


frame off

Thread Starter
Instructor


Joined: Mar 2006
Posts: 227
Likes: 0
From: South East, USA
hi folks - if you were doing a c3 frame off restoration for the first time, what useful items could one BUILD to facilitate that
- so, one thing that occurs is some form of wooden rack into which long somewhat flat body parts (hood, doors, decklid) to avoid just lining them up along the garage wall - has anyone done this? do you have a building plan to share or could walk through the steps?
- what about a dolley of some form to put the body on - I have a 4 post lift, so that seemed like the right place to keep the chasis - again, plans? steps?
- i know there are homemade rotisseries out there - what would be the right specs for a c3 - how would you make it? - do you have to mount something on the body in order to mount the rotisserie there?
any other tips or tricks in terms of storign what you are not working on and otherwise handling the material? - many thanks, ed.
Team Owner


Joined: Sep 2006
Posts: 31,316
Likes: 4,422
From: Westminster Maryland
Ed,
Building a dolly to put the body on is really an important thing, being able to raise it up so you can work under the body in a comfortable position is a big help, too.
I also found that having a large assortment of baggies is critical for storing and keeping track of the zillions of small parts and fasteners.
I used lots of various sized clear plastic storage boxes, too.
I probably had 400 baggies and 50 storage boxes when my 71 was completely apart, plus 3 sets of shelves for things too big to bag or box.
I also spent a lot of time making notes and labels for everything. I also went through a complete turn over from unrestored fasteners and parts in dirty bags to all restored fasteners and parts in clean bags.
I spent 10 years on it, only working on it when I wanted to, doing every thing my self except the chrome plating. I even took the time to learn how to do the zinc, oxide and phosphate plating my self.
It was a great experience and I would do it again in a heart beat if I had another car I cared that much about.
Regards,
Alan
PS; I took and printed about 700 photos along the way.

Racer
Joined: May 2007
Posts: 265
Likes: 1
I found a good circular saw very useful as I was building my gantry to lift the body off my frame.

and also used to cut the wood to make my dolly as well.

Don't underestimate the value of good lighting!
I also found a Drill Doctor really great to keep my drill bits super sharp this helped when I needed to drill out old rusted screws and rivets. Cutting oil (not WD-40) is essential when drilling steel.
The usual a compressor, good impact sockets for the impact wrench, a shop vac and some really good wrenches and a ratchet and sockets.
Doing the body work will be a different matter though, havent started that yet.
and also used to cut the wood to make my dolly as well.
Don't underestimate the value of good lighting!
I also found a Drill Doctor really great to keep my drill bits super sharp this helped when I needed to drill out old rusted screws and rivets. Cutting oil (not WD-40) is essential when drilling steel.
The usual a compressor, good impact sockets for the impact wrench, a shop vac and some really good wrenches and a ratchet and sockets.
Doing the body work will be a different matter though, havent started that yet.
Tech Contributor


Joined: Aug 1999
Posts: 14,384
Likes: 6,408
From: At my Bar drinking and wrenching in Lafayette Colorado
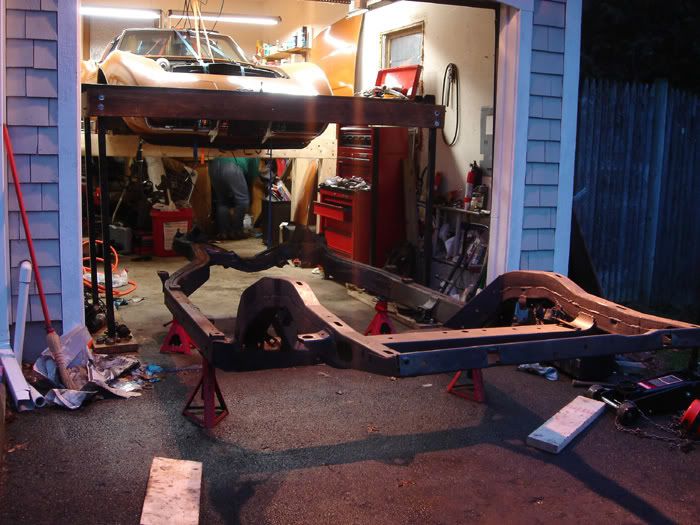
I used a 4-post to pull the body (took less tha 2 hours to do). I then welded up a simple yet effective body dolly. Material was some cheap 2"x2"x1/8" wall steel. I got the casters with swivel lock wheels from Grainger.
Body off the frame and ready to be mounted on the dolly:

Fabrication in process:

The forward support was welded into position with the body on the dolly to assure correct height and interface:

Completed dolly holds the car rigidly enough to open the doors with no body sag:


Forward support detial:

Rear body mount interface:

Body off the frame and ready to be mounted on the dolly:
Fabrication in process:
The forward support was welded into position with the body on the dolly to assure correct height and interface:
Completed dolly holds the car rigidly enough to open the doors with no body sag:
Forward support detial:
Rear body mount interface:
Thread Starter
Instructor
Joined: Mar 2006
Posts: 227
Likes: 0
From: South East, USA
guys - fantastic stuff - so think i am ok for now on tools - have compressor, air tools, sockets, ratchets, etc.
Lars - re the 4 post - so after complete stripping and frame bolts off, you lowered the lift and had the body tied up to a gantry or something?
suppose the chassis is then rolled off the lift, then the body comes down, the dolly built under it?
re the dolly, it seems very cool - as does the wooden one that VT1 built - as i need to practice with the mig welder, maybe that steel dolly would be a place to start - lars - can you send as many pics and perhaps step by step (i'll commit to repost as part of documenting the project) to edlebby@yahoo.com? - in particular, i am curious to know what steel you use - you say "wall steel" - it looks like square tube (or angle iron??) - where exactly do you weld to on the body - and how?? - how are you doing the front and rear angled supports?
separately, would a rotisserie serve the same function as a dolly plus allow rotation? - how do you achieve stiffness in a rotisserie if the doors open or come off? - is there some sort of support you build accross the door opening?
sorry...these are the first of many, many questions - thanks in advance as i prepare to embark on my first project - thanks, ed
p.s. is thread in the right place on the forum?
Thread Starter
Instructor
Joined: Mar 2006
Posts: 227
Likes: 0
From: South East, USA
Ed,
Building a dolly to put the body on is really an important thing, being able to raise it up so you can work under the body in a comfortable position is a big help, too.
I also found that having a large assortment of baggies is critical for storing and keeping track of the zillions of small parts and fasteners.
I used lots of various sized clear plastic storage boxes, too.
I probably had 400 baggies and 50 storage boxes when my 71 was completely apart, plus 3 sets of shelves for things too big to bag or box.
I also spent a lot of time making notes and labels for everything. I also went through a complete turn over from unrestored fasteners and parts in dirty bags to all restored fasteners and parts in clean bags.
I spent 10 years on it, only working on it when I wanted to, doing every thing my self except the chrome plating. I even took the time to learn how to do the zinc, oxide and phosphate plating my self.
It was a great experience and I would do it again in a heart beat if I had another car I cared that much about.
Regards,
Alan
PS; I took and printed about 700 photos along the way.
Building a dolly to put the body on is really an important thing, being able to raise it up so you can work under the body in a comfortable position is a big help, too.
I also found that having a large assortment of baggies is critical for storing and keeping track of the zillions of small parts and fasteners.
I used lots of various sized clear plastic storage boxes, too.
I probably had 400 baggies and 50 storage boxes when my 71 was completely apart, plus 3 sets of shelves for things too big to bag or box.
I also spent a lot of time making notes and labels for everything. I also went through a complete turn over from unrestored fasteners and parts in dirty bags to all restored fasteners and parts in clean bags.
I spent 10 years on it, only working on it when I wanted to, doing every thing my self except the chrome plating. I even took the time to learn how to do the zinc, oxide and phosphate plating my self.
It was a great experience and I would do it again in a heart beat if I had another car I cared that much about.
Regards,
Alan
PS; I took and printed about 700 photos along the way.
Thread Starter
Instructor
Joined: Mar 2006
Posts: 227
Likes: 0
From: South East, USA
separately, space will be very tight - if you were to store parts outside, what would it take? - one of those snap together plastic sheds? - i am thinking here of large parts such as hood, decklid, perhaps doors - if in the garage, I will have to come up with a very clever way to use vertical space - any thoughts? - thanks ed
Corvette Stories
The Best of Corvette for Corvette Enthusiasts

5 Best & 5 Worst Corvette Daily Drivers
Joe Kucinski
The Headlights of Every Corvette Generation Explained
Joe Kucinski
5 Best & 5 Most Overrated Corvette Track Packages of All Time!
Joe Kucinski
Every 2027 Corvette Engine Explained
Joe Kucinski
Designer Imagines A Corvette That Looks More Like a Corvette Than the Corvette
Verdad Gallardo
10 Ugly Corvettes That We Still Kinda Love
Joe Kucinski
Top 10 Most Expensive Corvettes Ever Sold on Bring A Trailer
Brett Foote
10 Things Every Corvette Owner Needs (2026 Edition)
Michael S. Palmer
8 Most "Only Corvette Owners Understand" Quirks and Problems
Pouria Savadkouei
Thread Starter
Instructor
Joined: Mar 2006
Posts: 227
Likes: 0
From: South East, USA
quick couple of questions: how are you suspending your hood? - it looks like you have some other body parts on the wall - did you build a little ledge? something else? - is it okay for these parts to support their weight in a way in which they were not designed - that is, the hood is normally supported all around its edges - if one lays it on its side...does that warp it or mishape it in some way? - thanks, ed


Team Owner
Joined: Sep 2006
Posts: 31,316
Likes: 4,422
From: Westminster Maryland
Ed,
I used all kinds of tags and labels that I found at Staples and Office Depot. I used a pen called a Sharpie, it didn't seem to bleed from the grease ,etc.
On the wiring harnesses I used little cardboard tags with strings attached. Since I'm color blind I put a label card on every connection and socket. It took a lot of time as I took the harnesses out but it was really easy putting the harnesses back in 5 years later.
I also bagged every bolt , nut and screw in such a way that they all went back in the same position as when the car was built. You really have to be crazy to do this. My wife just shakes her head.
I also came up with a system of putting things together in logical groups so I could find a part or screw or washer when I needed to for some reason.
I worked on the car for about 5 years before I actually started putting anything back together.
I realize this way of restoring a car is pretty wacko, but for me learning how to do things and doing everything was the fun.
Now that its finished I go down in the basement sometimes and just look at it because I can't believe it's a real car again.
Regards,
Alan
Thread Starter
Instructor
Joined: Mar 2006
Posts: 227
Likes: 0
From: South East, USA
alan - it was something like the cardboard tags with wire that i was thinking of - but instead of cardstock, some kind of plastic tag that will take the ink from the sharpie - i'll look around and post what i find.
hwc - thanks for that - this makes sense in that you are putting the pull on a part that is welded on and takes weight normally - that seems to make more sense than laying it on its side (for anyone that does that...pls don't take that as a slight) in that an edge that normally does not take weight wouldn't have to - simple solution, but thanks for that!
what do you guys think about this for a rotisserie...anyone tried something like this? - given the low price of engine stands at harbor freight...???
http://www.ponypics.com/spitfire/bodytub.html
Tech Contributor
Joined: Aug 1999
Posts: 14,384
Likes: 6,408
From: At my Bar drinking and wrenching in Lafayette Colorado
Lars - re the 4 post - so after complete stripping and frame bolts off, you lowered the lift and had the body tied up to a gantry or something?
I am curious to know what steel you use - you say "wall steel" - it looks like square tube (or angle iron??) - where exactly do you weld to on the body - and how??
I am curious to know what steel you use - you say "wall steel" - it looks like square tube (or angle iron??) - where exactly do you weld to on the body - and how??
As noted above, I used 2x2x1/8" wall steel, and it took about 2 hours to fabricate complete. You don't weld it to the body. Gravity, still working well, holds the body to the dolly.

Thread Starter
Instructor
Joined: Mar 2006
Posts: 227
Likes: 0
From: South East, USA
You don't need to do a "complete stripping." You just pull the bumpers, brackets, ragjoint coupler, master cylinder, e-brake cable and body bolts. It takes about an hour to prep it for pull. Not sure what you mean by using a "gantry." You pull the body bolts and lift the body off with the lift. There is no need to tie it down - we have something called gravity here in Colorado that keeps it firmly on the lift... The frame is rolled out, and the body is lowered onto the dolly for processing.
As noted above, I used 2x2x1/8" wall steel, and it took about 2 hours to fabricate complete. You don't weld it to the body. Gravity, still working well, holds the body to the dolly.
As noted above, I used 2x2x1/8" wall steel, and it took about 2 hours to fabricate complete. You don't weld it to the body. Gravity, still working well, holds the body to the dolly.
Tech Contributor
Joined: Aug 1999
Posts: 14,384
Likes: 6,408
From: At my Bar drinking and wrenching in Lafayette Colorado
if you were to store parts outside, what would it take? - one of those snap together plastic sheds? - i am thinking here of large parts such as hood, decklid, perhaps doors - if in the garage, I will have to come up with a very clever way to use vertical space - any thoughts? - thanks ed
Thread Starter
Instructor
Joined: Mar 2006
Posts: 227
Likes: 0
From: South East, USA
hi guys - started to slowly get into the 70 project car - first thing i did...only because it was the most accessible...was to take off the right side rocker cover molding - happily surprised to find some stenciling there - some rust over it so still a little hard to make out the numbers.
Questions:
1. What would be a good way to remove rust without disturbing the stenciling (seems to be yellow) underneath?
2. What would be the correct (as in how it came from the factory) way to restore those moldings - are they chrome? - stanless steel? - hard for me to tell - are they repopped? - or is this an item that needs to be replated? - and the black stripe? - what kind of paint is that...looks like a matte black of some sort?
Many thanks, ed


Drifting


Joined: May 2007
Posts: 1,491
Likes: 2
From: North Royaton Ohio
hi folks - if you were doing a c3 frame off restoration for the first time
