


Differential Raising
Melting Slicks


Joined: Dec 2015
Posts: 3,181
Likes: 732
From: Texas City, TX Texas
I am staying with BASICALLY the stock setup, with Van Steel offset trailing arms, coil overs, and adjustable camber rods. I want to raise the diff like you did. Will raising the diff make it harder for me to make adjustments? I am doing this mostly for cosmetics; I want to lower the car for the way it looks, don't plan to race it, but the 20 year old who will be doing the work on the car may want to...
Burning Brakes


Joined: Nov 2004
Posts: 1,193
Likes: 176
From: Hillsborough NC
I am staying with BASICALLY the stock setup, with Van Steel offset trailing arms, coil overs, and adjustable camber rods. I want to raise the diff like you did. Will raising the diff make it harder for me to make adjustments? I am doing this mostly for cosmetics; I want to lower the car for the way it looks, don't plan to race it, but the 20 year old who will be doing the work on the car may want to...
For the adjustable camber strut rods, I would suggest making a plate to cover the mounting slot on the center bracket with a pre-drilled hole at the lowest point possible for the strut-rod to mount and weld it to the bracket. That way you don't ever have to worry about it moving. Since you have the adjustable rods, you don't need a slot in the mounting bracket as that was to allow the cam bolt to move the mount point for adjustments. Think I remember something in Chevy Performance manual about locating this mount point lower than stock for better geometry as well.
Good luck!
Melting Slicks
Joined: Dec 2015
Posts: 3,181
Likes: 732
From: Texas City, TX Texas
I got a spare crossmember so I can do this modification while the car is still together and it will be ready to install, less down time. how thick is the plate you put on top for re-inforcement?
Burning Brakes
Joined: Nov 2004
Posts: 1,193
Likes: 176
From: Hillsborough NC

I'm not sure how you would do this on a crossmember out of the car. When I did it, I used 1/4 inch thick plate cut into the circles to fit in the top hat holes. I bolted the rear to the crossmember, set it in place, then inserted the plates and bolted them to the chassis to hold them. I then set the rear end angle equal and opposite to my transmission angle to set the driveline angle correctly. Once set, I tack welded the plates to the crossmember, dropped the assembly and finished the weld. I'm not sure you can estimate both the correct depth in the holes to weld the plates at, and the angle so the rear is aligned without the parts actually being in the car. Remember, you will be solid mounting it, so really need to build the angle into the mounts.
W/respect to the pinion front rubber mount, I did have to mod mine slightly to re-position the holes and re-weld it. I have not heard of anyone else mentioning this, so it could be something specific to my setup.
Melting Slicks
Joined: Dec 2015
Posts: 3,181
Likes: 732
From: Texas City, TX Texas
I cut the notch last night. I was planning to keep the rubber mounts at either end of the crossmember. All I am really doing is lowering the car for cosmetic reasons, don't plan on racing it. The car has probably never had any of the bushings, tie rod ends, ball joints, etc. replaced and it still handles better than any other car I've ever owned(except maybe an '89 WS6 Formula Firebird I owned 20 years ago, it was worn out too!). I have all new stuff ready to put in once I get it up on the lift(installing the lift is another project!). I see what you are saying about tacking everything in place to get the driveshaft/pinion angle right. That is what I will do. I still have the original crossmember in case I screw up!
Corvette Stories
The Best of Corvette for Corvette Enthusiasts

Top 10 Most Expensive Corvettes Ever Sold on Bring A Trailer
Brett Foote
10 Things Every Corvette Owner Needs (2026 Edition)
Michael S. Palmer
8 Most "Only Corvette Owners Understand" Quirks and Problems
Pouria Savadkouei
10 Reasons the C6 Z06 is Still A Performance Benchmark After 20 Years
Joe Kucinski
How Much Horsepower Every Corvette Engine "LOST" in 1972
Joe Kucinski
Top 10 DOs and DON'Ts for Protecting Your Convertible Top!
Michael S. Palmer
Top 10 Most Explosive Corvettes Ever Made: Power-to-Weight Ratio Ranked!
Joe Kucinski
150 hp to 1,250 hp: Every Corvette Generation Compared by the Specs That Matter
Joe Kucinski
8 Coolest Corvette Pace Cars (and Replicas) of All Time
Verdad GallardoTeam Owner


Joined: Apr 1999
Posts: 21,953
Likes: 1,445
From: Reno Nevada
2024 C3 of the Year Finalist- Modified
I got rid of the end rubber mounts and went solid disk. Front and rear rubber suspension snubbers have been gone for 30+ rears. My differential front snubber is a machined aluminum disk just to set the driveline angle. I had real problems with wheel hop. So bad that I thought that I would have to let off the gas to keep from breaking something. The cure is the raised and solidly mounted diff, Smart struts, big rear springs,3/4 inch spring end sway bar, and QA1 dual adjust shocks.
In this picture I was taking out the rear end putting in my spare diff with the HD rear end cover. So the sway and exhaust is already removed. The way that the cross member is mounted raised the diff. @ 3/4 inches.
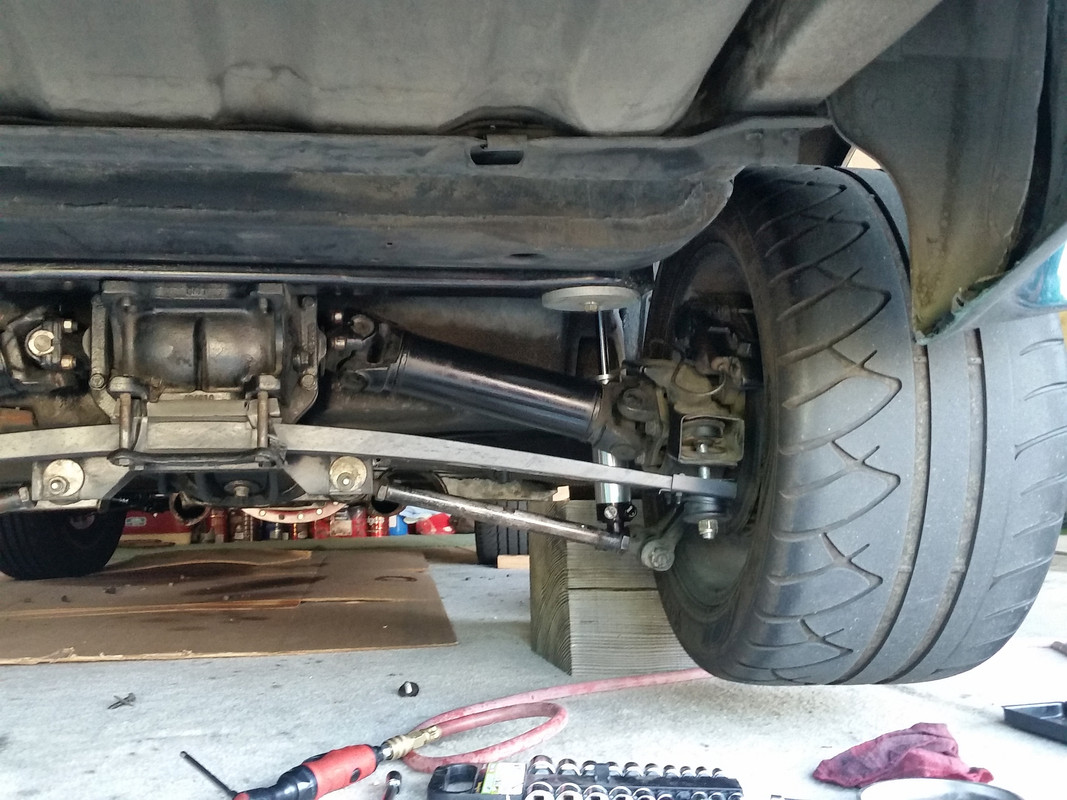
In this picture I was taking out the rear end putting in my spare diff with the HD rear end cover. So the sway and exhaust is already removed. The way that the cross member is mounted raised the diff. @ 3/4 inches.
Burning Brakes
Joined: Nov 2004
Posts: 1,193
Likes: 176
From: Hillsborough NC
I cut the notch last night. I was planning to keep the rubber mounts at either end of the crossmember. All I am really doing is lowering the car for cosmetic reasons, don't plan on racing it. The car has probably never had any of the bushings, tie rod ends, ball joints, etc. replaced and it still handles better than any other car I've ever owned(except maybe an '89 WS6 Formula Firebird I owned 20 years ago, it was worn out too!). I have all new stuff ready to put in once I get it up on the lift(installing the lift is another project!). I see what you are saying about tacking everything in place to get the driveshaft/pinion angle right. That is what I will do. I still have the original crossmember in case I screw up!
Just occurred to me that if you are doing it out of the car, I would suggest taking some kind of measurement to determine how much room you have between the rear end and the body. Mine was extremely tight in terms of clearances. You don't want to make the notch too deep and have the rear hit the body.
Last edited by SLVRSHRK; Aug 12, 2022 at 10:29 AM.
Melting Slicks
Joined: Dec 2015
Posts: 3,181
Likes: 732
From: Texas City, TX Texas
I'm not gonna take any chances, I will check the angles, tack it up, then pull it back out for welding. For now I can have all the re-inforcement done, just leave the part with the mounting holes for last.