


Headlamp Replacement
Thread Starter
Race Director


Joined: Feb 2006
Posts: 12,239
Likes: 19
From: Chino CA
I bought Halogen headlamps for my '74.
What all is involved in changing them ? I would assume it's pretty straight forward - but being a Corvette...
Do I need to pull the engine ?
A full body-off ?
Some kind of rain-dance ???
How many beers ?


No..seriously, some pics or tips anyone ?
Otherwise I'll just crack a beer and have at it...

What all is involved in changing them ? I would assume it's pretty straight forward - but being a Corvette...
Do I need to pull the engine ?
A full body-off ?
Some kind of rain-dance ???
How many beers ?
No..seriously, some pics or tips anyone ?
Otherwise I'll just crack a beer and have at it...
Safety Car


Joined: Jun 2004
Posts: 4,652
Likes: 80
From: Lakeland Florida
I dont know about the halogen light connection, but for regular light replacement it is pretty easy and straight forward.
1. The lights need to be in the up position.
2. Remove the shield that goes around the headlights. I think there are 4 small screws for this.
3. There is a chrome/stainless ring that goes around each light. This is held in place with very small screws. They may be rusted in place. I stripped out two of these trying to get the bezels off.
4. After removing the chrome bezels plan on spending another 30 minutes to clean and repolish them. After all they are out of the car and you wouldnt want to put back dirty parts.
5. Pull out the lights and disconnect from the wiring harness.
6. Reinstall the lights, bezel and shield.
7. For the light alignment, I think you can get to the adjustment screws with the shield in place. If I can remember correctly the shield will have small slots where the alignment screws are.
kdf
Thread Starter
Race Director
Joined: Feb 2006
Posts: 12,239
Likes: 19
From: Chino CA
I dont know about the halogen light connection, but for regular light replacement it is pretty easy and straight forward.
1. The lights need to be in the up position.
2. Remove the shield that goes around the headlights. I think there are 4 small screws for this.
3. There is a chrome/stainless ring that goes around each light. This is held in place with very small screws. They may be rusted in place. I stripped out two of these trying to get the bezels off.
4. After removing the chrome bezels plan on spending another 30 minutes to clean and repolish them. After all they are out of the car and you wouldnt want to put back dirty parts.
5. Pull out the lights and disconnect from the wiring harness.
6. Reinstall the lights, bezel and shield.
7. For the light alignment, I think you can get to the adjustment screws with the shield in place. If I can remember correctly the shield will have small slots where the alignment screws are.
kdf
1. The lights need to be in the up position.
2. Remove the shield that goes around the headlights. I think there are 4 small screws for this.
3. There is a chrome/stainless ring that goes around each light. This is held in place with very small screws. They may be rusted in place. I stripped out two of these trying to get the bezels off.
4. After removing the chrome bezels plan on spending another 30 minutes to clean and repolish them. After all they are out of the car and you wouldnt want to put back dirty parts.
5. Pull out the lights and disconnect from the wiring harness.
6. Reinstall the lights, bezel and shield.
7. For the light alignment, I think you can get to the adjustment screws with the shield in place. If I can remember correctly the shield will have small slots where the alignment screws are.
kdf
Thank you ! THAT'S what I was looking for...!
Team Owner


Joined: Sep 2006
Posts: 31,273
Likes: 4,366
From: Westminster Maryland
Hi jlr,
If you follow kdf's directions this is what you'll see when you take the shield (headlight bezel) off.
You can see the stainless steel rings, and the screws that hold it and the lamps in place.
Not a difficult job at all.
Regards,
Alan


If you follow kdf's directions this is what you'll see when you take the shield (headlight bezel) off.
You can see the stainless steel rings, and the screws that hold it and the lamps in place.
Not a difficult job at all.
Regards,
Alan
Thread Starter
Race Director
Joined: Feb 2006
Posts: 12,239
Likes: 19
From: Chino CA
(Note my sarcastic thoughts from above...!)
Thanks guys...looks like a 2 beer job !


Drifting

Joined: Mar 2007
Posts: 1,574
Likes: 155
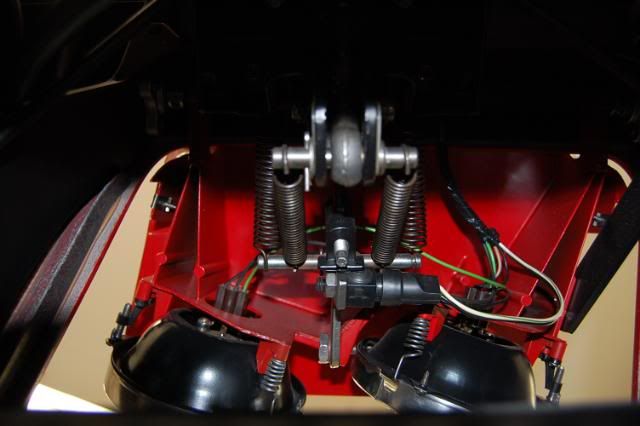
Will those bolts on the side of the housing adjust how the door sits when the headlight doors are down?
My passenger side headlight sits slightly below flush when closed and I need to adjust it up
Corvette Stories
The Best of Corvette for Corvette Enthusiasts

Top 10 Most Expensive Corvettes Ever Sold on Bring A Trailer
Brett Foote
10 Things Every Corvette Owner Needs (2026 Edition)
Michael S. Palmer
8 Most "Only Corvette Owners Understand" Quirks and Problems
Pouria Savadkouei
10 Reasons the C6 Z06 is Still A Performance Benchmark After 20 Years
Joe Kucinski
How Much Horsepower Every Corvette Engine "LOST" in 1972
Joe Kucinski
Top 10 DOs and DON'Ts for Protecting Your Convertible Top!
Michael S. Palmer
Top 10 Most Explosive Corvettes Ever Made: Power-to-Weight Ratio Ranked!
Joe Kucinski
150 hp to 1,250 hp: Every Corvette Generation Compared by the Specs That Matter
Joe Kucinski
8 Coolest Corvette Pace Cars (and Replicas) of All Time
Verdad GallardoTeam Owner
Joined: Sep 2006
Posts: 31,273
Likes: 4,366
From: Westminster Maryland
Hi K,
The 'stop' for the closed position is a 'bolt', it's hex headed, with a hex shank, and about 2 inches long.
It mounts in-between the 4 springs. You can see the shank end of it in the very center of this picture. It's just above the micro switch.
There are various things that influence how the door fits when closed, but this is the first thing I'd check.
Good Luck!
Regards,
Alan
Thread Starter
Race Director
Joined: Feb 2006
Posts: 12,239
Likes: 19
From: Chino CA
Hi K,
The 'stop' for the closed position is a 'bolt', it's hex headed, with a hex shank, and about 2 inches long.
It mounts in-between the 4 springs. You can see the shank end of it in the very center of this picture. It's just above the micro switch.
There are various things that influence how the door fits when closed, but this is the first thing I'd check.
Good Luck!
Regards,
Alan
The 'stop' for the closed position is a 'bolt', it's hex headed, with a hex shank, and about 2 inches long.
It mounts in-between the 4 springs. You can see the shank end of it in the very center of this picture. It's just above the micro switch.
There are various things that influence how the door fits when closed, but this is the first thing I'd check.
Good Luck!
Regards,
Alan
Drifting
Joined: Mar 2007
Posts: 1,574
Likes: 155
Hi K,
The 'stop' for the closed position is a 'bolt', it's hex headed, with a hex shank, and about 2 inches long.
It mounts in-between the 4 springs. You can see the shank end of it in the very center of this picture. It's just above the micro switch.
There are various things that influence how the door fits when closed, but this is the first thing I'd check.
Good Luck!
Regards,
Alan
The 'stop' for the closed position is a 'bolt', it's hex headed, with a hex shank, and about 2 inches long.
It mounts in-between the 4 springs. You can see the shank end of it in the very center of this picture. It's just above the micro switch.
There are various things that influence how the door fits when closed, but this is the first thing I'd check.
Good Luck!
Regards,
Alan


Safety Car
Joined: Jun 2004
Posts: 4,652
Likes: 80
From: Lakeland Florida
Im not sure if they wont interchange, but I know the tabs are not symmetrical and they seem to only line up one way. Maybe the left and right side will not interchange. Now I can see that happening because they may be mirror images of each other on tab position.
kdf
kdf
Team Owner

Joined: Jan 2006
Posts: 37,637
Likes: 3,118
From: Crossville TN
Is the current drawn by the halogen bulbs similar to that of the regular bulbs? If so, there is no concern about wiring/fuses. If the halogens draw much more current, there is a need to evaluate and/or upgrade the wiring and fuse (or fusible-link) before 'doing the deed'.
Thread Starter
Race Director
Joined: Feb 2006
Posts: 12,239
Likes: 19
From: Chino CA
Is the current drawn by the halogen bulbs similar to that of the regular bulbs? If so, there is no concern about wiring/fuses. If the halogens draw much more current, there is a need to evaluate and/or upgrade the wiring and fuse (or fusible-link) before 'doing the deed'.
Team Owner
Joined: Sep 2006
Posts: 31,273
Likes: 4,366
From: Westminster Maryland
Hi,
The black 'cups' are all different. Each has a letter embossed in it. They need to be returned to the right location.
Looking from the front of the car they are C B D A.
Regards,
Alan
The black 'cups' are all different. Each has a letter embossed in it. They need to be returned to the right location.
Looking from the front of the car they are C B D A.
Regards,
Alan
Last edited by Alan 71; Mar 10, 2011 at 06:08 PM.
Thread Starter
Race Director
Joined: Feb 2006
Posts: 12,239
Likes: 19
From: Chino CA