




My Personal Paint Thread

Pro


Joined: Nov 2009
Posts: 667
Likes: 7
From: Milpitas Calyfornua

Safety Car

Joined: Sep 2012
Posts: 4,688
Likes: 41
From: Palm Harbor, Florida

Thread Starter
Melting Slicks

Joined: Feb 2006
Posts: 3,428
Likes: 5
From: Japan

Ya...they(NASA) had two little jeep surreys that would wait on the sides of the runway for it, and when it landed they would drive up alongside and fasten these wheels to the wingtips so they wouldn't drag on the ground...interesting

Safety Car


Joined: May 2004
Posts: 4,351
Likes: 1,579
From: los altos hills california
They also had great airshows. I worked at Lockheed and the Blue Angels would practice on Fridays. It felt like they came right by my window. We would sneak up on the roof to watch.
Google Moffett Hanger One images if you want to see a real birdcage. The exterior is completely stripped off. Disposition unknown!
Google Moffett Hanger One images if you want to see a real birdcage. The exterior is completely stripped off. Disposition unknown!
Thread Starter
Melting Slicks
Joined: Feb 2006
Posts: 3,428
Likes: 5
From: Japan
That's kind of depressing, Ignatz...Moffett was my first Navy duty station; I spent a year with VP-31 in Hangar One. Is that how it still looks or has it been completely torn down now?
Safety Car
Joined: May 2004
Posts: 4,351
Likes: 1,579
From: los altos hills california
Nothing lasts for ever. I think people are trying to save it but the money and who pays are in contention. I sort of remember that Larry Ellison wanted in so he could keep his airplane(s?) there. Nobody in the gov has take responsibility best I know. I'm not an authority on this. It's still up.
Thread Starter
Melting Slicks
Joined: Feb 2006
Posts: 3,428
Likes: 5
From: Japan
Pre-Christmas Update
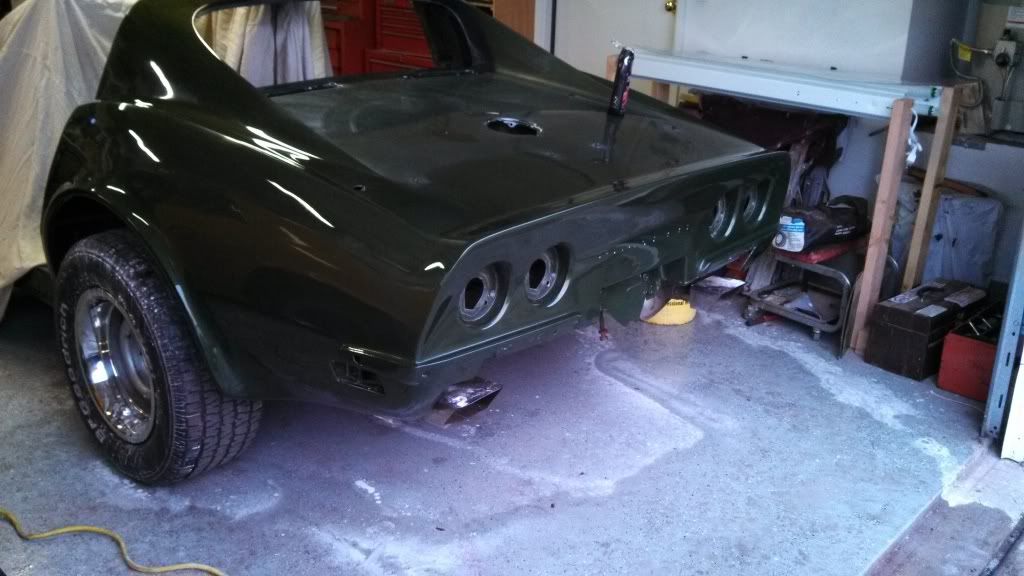
...Finally started color sanding and polishing the body last Saturday; did a few honey-doos and then got to the Vette in the afternoon. Was hoping to get most of Sunday to finish, but at 6:30 wifey asked me to take her to Emergancy because her foot hurt like the poopers...about 2 pm I finally got home, got unwound, and got back to work on the car.
Parts of it are spectacular, but no matter how badly I ground on the rear deck I just couldn't seem to get through ALL of the orange peel, and the tops of the rear fenders also show some 'mottled' appearance where I can't really tell if I've gone through the clear or what, but it just doesn't look right and I'm afraid to sand on it anymore. I will post up a couple pics of that tonight so you guys can tell me what you think, but as it stands right now I think I'll probably be re-sanding the rear deck and re-clearing the fender tops and rear deck to get the right finish. It worked really well on the driver's door, so at this point it really seems like a viable option.
Anyway, for what it's worth, here's the latest...
(before)

(after)
Fire Away!!
Parts of it are spectacular, but no matter how badly I ground on the rear deck I just couldn't seem to get through ALL of the orange peel, and the tops of the rear fenders also show some 'mottled' appearance where I can't really tell if I've gone through the clear or what, but it just doesn't look right and I'm afraid to sand on it anymore. I will post up a couple pics of that tonight so you guys can tell me what you think, but as it stands right now I think I'll probably be re-sanding the rear deck and re-clearing the fender tops and rear deck to get the right finish. It worked really well on the driver's door, so at this point it really seems like a viable option.
Anyway, for what it's worth, here's the latest...
(before)
(after)
Fire Away!!

Drifting


Joined: Aug 2003
Posts: 1,868
Likes: 13
From: Mascoutah IL
Dave--
Looks great from the pictures... How many coats of clear did you shoot (wet coats)??? What progression of grits have you gone through??? Hope you don't have to re-shoot...
Long arduous process to sand, buff and polish... Certainly can be the most stressful step as you are "Almost Done!!!" An "oops" now will be very painful...
Rogman
Looks great from the pictures... How many coats of clear did you shoot (wet coats)??? What progression of grits have you gone through??? Hope you don't have to re-shoot...
Long arduous process to sand, buff and polish... Certainly can be the most stressful step as you are "Almost Done!!!" An "oops" now will be very painful...
Rogman
Corvette Stories
The Best of Corvette for Corvette Enthusiasts

Top 10 Most Explosive Corvettes Ever Made: Power-to-Weight Ratio Ranked!
Joe Kucinski
150 hp to 1,250 hp: Every Corvette Generation Compared by the Specs That Matter
Joe Kucinski
8 Coolest Corvette Pace Cars (and Replicas) of All Time
Verdad Gallardo
Top 10 Corvette Engines RANKED by Peak Torque (70+ Years of Muscle!)
Joe Kucinski
Corvette ZR1X Will Be Pacing the Indy 500, And Could Probably Race, Too!
Verdad Gallardo
Top 10 Corvettes Coming to Mecum Indy 2026!
Brett Foote
Top 10 C9 Corvette MUST-HAVES to Fix These C8 Generation Flaws!
Michael S. Palmer
10 Revolutionary 'Corvette Firsts' Most People Don't Know
Joe Kucinski
5 Reasons to Upgrade to an LS6-Powered Corvette; 5 Reasons to Stay LT2
Michael S. Palmer
Melting Slicks


Joined: Jul 2000
Posts: 2,107
Likes: 14
From: Lancaster PA
birdsmith,
I think I read that when you recleared the door due to sanding through you didn't rebase. You will probably get better results if you spot in the base over the sanded through area bridging over the broken edge of clear.
If the broken edge should lift you may have to spot seal it first, then spot the base and reclear the entire panel.
This way you won't see a color difference or ring where it was sanded through.
Good luck
I think I read that when you recleared the door due to sanding through you didn't rebase. You will probably get better results if you spot in the base over the sanded through area bridging over the broken edge of clear.
If the broken edge should lift you may have to spot seal it first, then spot the base and reclear the entire panel.
This way you won't see a color difference or ring where it was sanded through.
Good luck
Thread Starter
Melting Slicks
Joined: Feb 2006
Posts: 3,428
Likes: 5
From: Japan
birdsmith,
I think I read that when you recleared the door due to sanding through you didn't rebase. You will probably get better results if you spot in the base over the sanded through area bridging over the broken edge of clear.
If the broken edge should lift you may have to spot seal it first, then spot the base and reclear the entire panel.
This way you won't see a color difference or ring where it was sanded through.
Good luck
I think I read that when you recleared the door due to sanding through you didn't rebase. You will probably get better results if you spot in the base over the sanded through area bridging over the broken edge of clear.
If the broken edge should lift you may have to spot seal it first, then spot the base and reclear the entire panel.
This way you won't see a color difference or ring where it was sanded through.
Good luck
Thread Starter
Melting Slicks
Joined: Feb 2006
Posts: 3,428
Likes: 5
From: Japan
Dave--
Looks great from the pictures... How many coats of clear did you shoot (wet coats)??? What progression of grits have you gone through??? Hope you don't have to re-shoot...
Long arduous process to sand, buff and polish... Certainly can be the most stressful step as you are "Almost Done!!!" An "oops" now will be very painful...
Rogman
Looks great from the pictures... How many coats of clear did you shoot (wet coats)??? What progression of grits have you gone through??? Hope you don't have to re-shoot...
Long arduous process to sand, buff and polish... Certainly can be the most stressful step as you are "Almost Done!!!" An "oops" now will be very painful...
Rogman
I went around the car four times. I will have a minor confession to make at the end of the thread, but suffice to say I had a little problem with orange peel. Every time I had shot base/clear in the past, though, I had problems with runs and solvent pop which is especially infuriating, so I was happy to have four good coats of orange-peely clear which could be sanded smooth. I'll drop a couple more pics of the fender tops tonight (between the top crease and the sail panel) where there is this wierd kinda moonscape-lookin' finish. I'm afraid to keep sanding on it for fear that it's already through the clear, but if I get enough consensus that it isn't I'll go ahead and sand it level and polish it...more to come.
Melting Slicks
Joined: Jul 2000
Posts: 2,107
Likes: 14
From: Lancaster PA
Spot sealing is done all the time in the collision industry. It means just applying sealer to a small area such as a primered or repaired area. You try to keep it as small as possible to just cover the repaired area and taper the spray edges. This gives you a uniform finish over the repaired area onto the clear coated area. Usually after flashing dry the painter will apply the basecoat to just cover the sealer and taper out to an undetectable blend. If the sealer blend edges are a little rough you can lightly sand them with 6-800 grit before the basecoat.
If you think you have sanded through your clear but are not sure, take a look at the sanding sludge and see if is showing any color. If your still sanding clear it will be white.
Good Luck
If you think you have sanded through your clear but are not sure, take a look at the sanding sludge and see if is showing any color. If your still sanding clear it will be white.
Good Luck


Thread Starter
Melting Slicks
Joined: Feb 2006
Posts: 3,428
Likes: 5
From: Japan
2 More Pics...
Here is one ea. shot of the R/H and L/H rear fender top respectively...not the greatest pictures but they do show the strangely 'mottled' appearance of the clearcoat...I'm just wondering if I sand that out, is there gonna be clearcoat underneath? Ideas/ comments/ suggestions?
(RH side)

(LH side)

...Thanks again all. I'll be off work until after New Year's after tonight so [hopefully] I can get some real work done on this thing, like get the rest of the car color sanded and buffed...that would be nice
(RH side)
(LH side)
...Thanks again all. I'll be off work until after New Year's after tonight so [hopefully] I can get some real work done on this thing, like get the rest of the car color sanded and buffed...that would be nice
Drifting
Joined: Aug 2003
Posts: 1,868
Likes: 13
From: Mascoutah IL
Dave--
While I agree not the best pictures, it still looks like peel to me... Is this something you can "live with???" I probably know the answer, but thought I'd ask... You run the risk of breaking through if you take the sanding deeper... I would definitely put some tape on the sharp edge of the top of the quarter panel when sanding/buffing... Only you know how much clear you shot in this area, and how much you've sanded off so far compared with the rest of the car... This looks like an area that could accumulate extra clear because of the angles...
Have you showed the pictures to the guys that sold you the clear??? Be interested in their take...
Sorry can't be more definitive... Craig will probably chime in today to provide a pro's perspective...
Might also be worth a PM/call to DUB, BarryGa and/or Markids for their take...
Rogman
While I agree not the best pictures, it still looks like peel to me... Is this something you can "live with???" I probably know the answer, but thought I'd ask... You run the risk of breaking through if you take the sanding deeper... I would definitely put some tape on the sharp edge of the top of the quarter panel when sanding/buffing... Only you know how much clear you shot in this area, and how much you've sanded off so far compared with the rest of the car... This looks like an area that could accumulate extra clear because of the angles...
Have you showed the pictures to the guys that sold you the clear??? Be interested in their take...
Sorry can't be more definitive... Craig will probably chime in today to provide a pro's perspective...
Might also be worth a PM/call to DUB, BarryGa and/or Markids for their take...
Rogman
Safety Car
Joined: Sep 2012
Posts: 4,688
Likes: 41
From: Palm Harbor, Florida
If it were me, with 4 coats of clear as you stated, with the first one being dry(which I think is standard) that leaves three more coats. Those last three I think is fair to say were some what dry as well, due to the orange peel. So in my opinion, the total amount of clear is really not a lot. Further sanding in an effort to achieve a glass finish definitely runs the risk of sanding through the clear. So, if it were me(which its not) I would learn to live with some orange peel and not having a show car finish.

Melting Slicks
Joined: Aug 2012
Posts: 3,487
Likes: 83
From: Titusville Florida
If it were me, with 4 coats of clear as you stated, with the first one being dry(which I think is standard) that leaves three more coats. Those last three I think is fair to say were some what dry as well, due to the orange peel. So in my opinion, the total amount of clear is really not a lot. Further sanding in an effort to achieve a glass finish definitely runs the risk of sanding through the clear. So, if it were me(which its not) I would learn to live with some orange peel and not having a show car finish.

Safety Car
Joined: Sep 2012
Posts: 4,688
Likes: 41
From: Palm Harbor, Florida
yes, as long as its "scuffed" with something like 1000 grit, just a lot of work, almost like starting over since he has already buffed, has to do a lot of taping off also
Melting Slicks
Joined: Jul 2000
Posts: 2,107
Likes: 14
From: Lancaster PA
Like Rogman stated it comes down to what are you willing to live with or how smooth do you want it? I would not apply more clear unless you have a very flat sanded and smooth surface. And to get that you may well go through and have to apply more base like I stated earlier.
Putting the first coat of clear on dry is not how the pros do it. As you have learned the first coat sets the course for how the following coats will look. A wet coat on top of a dry coat will not reflow it. It will just keep making larger orange peel as it builds up.
Even if you have 4 coats with deep peel, the millage(thickness) of the clear at the bottom of the peel is not that thick. You can block the top of the peel off and if you can stop sanding before hitting the very bottom of the peel you shouldn't go through, although as you work up to finer grits and compound you still will continue to remove a small amount of clear.
Another thing to consider is even if you don't go through but the millage of clear is very thin it will not have much integrity against UV rays and general durability will be weaker than it should be.
Good luck,
Craig
Putting the first coat of clear on dry is not how the pros do it. As you have learned the first coat sets the course for how the following coats will look. A wet coat on top of a dry coat will not reflow it. It will just keep making larger orange peel as it builds up.
Even if you have 4 coats with deep peel, the millage(thickness) of the clear at the bottom of the peel is not that thick. You can block the top of the peel off and if you can stop sanding before hitting the very bottom of the peel you shouldn't go through, although as you work up to finer grits and compound you still will continue to remove a small amount of clear.
Another thing to consider is even if you don't go through but the millage of clear is very thin it will not have much integrity against UV rays and general durability will be weaker than it should be.
Good luck,
Craig
Thread Starter
Melting Slicks
Joined: Feb 2006
Posts: 3,428
Likes: 5
From: Japan
Like Rogman stated it comes down to what are you willing to live with or how smooth do you want it? I would not apply more clear unless you have a very flat sanded and smooth surface. And to get that you may well go through and have to apply more base like I stated earlier.
Putting the first coat of clear on dry is not how the pros do it. As you have learned the first coat sets the course for how the following coats will look. A wet coat on top of a dry coat will not reflow it. It will just keep making larger orange peel as it builds up.
Even if you have 4 coats with deep peel, the millage(thickness) of the clear at the bottom of the peel is not that thick. You can block the top of the peel off and if you can stop sanding before hitting the very bottom of the peel you shouldn't go through, although as you work up to finer grits and compound you still will continue to remove a small amount of clear.
Another thing to consider is even if you don't go through but the millage of clear is very thin it will not have much integrity against UV rays and general durability will be weaker than it should be.
Good luck,
Craig
Putting the first coat of clear on dry is not how the pros do it. As you have learned the first coat sets the course for how the following coats will look. A wet coat on top of a dry coat will not reflow it. It will just keep making larger orange peel as it builds up.
Even if you have 4 coats with deep peel, the millage(thickness) of the clear at the bottom of the peel is not that thick. You can block the top of the peel off and if you can stop sanding before hitting the very bottom of the peel you shouldn't go through, although as you work up to finer grits and compound you still will continue to remove a small amount of clear.
Another thing to consider is even if you don't go through but the millage of clear is very thin it will not have much integrity against UV rays and general durability will be weaker than it should be.
Good luck,
Craig
With the rear deck, the clear at least appears thick enough that I can re-sand the worst spots in about three or four localized areas (say,1500-2000-Trizact) and then repolish the whole deck...I feel pretty safe with that; and last Sunday's emergency room trip sort of contributed to it.
With the fender tops, THEY look eerily similar to what I saw on the driver's door and headlight door just before I started sanding into clear. As such, I'm pretty hesitant to go to the bottom of those two spots... Would it work to sort of 'dust' that part of the car with, say, 800 and then clean, mask, and apply a couple more localized clearcoats?
I COULD let them go; it would still be an overall amazing car to look at in the sunlight, but there's just that nagging knowledge that it's not quite as good as it could have been and if I'm gonna fix it sooner is better than later.
I do get what you're saying about clearcoat application, but my neighbor/painter/friend helped me with shooting a couple repairs on a friend's car about a year ago and he showed me the dry-wet-wetter method, which worked better than anything I had yet tried and prevented the solvent pop and runs that I had been experiencing. I had previously found that solvent pop doesn't sand out, and runs get full of air so that if you can 'cut' them down they still don't look right. I can live with peel, because as long as there's SOMETHING at the bottom of those little craters you can polish it out. I'm just not quite positive that there's something at the bottom of these, and even though I made four trips around the car it is still possible that I might have repeated the same mistake four times...
One thing for sure, with y'all's help I have learned a LOT through this whole process, and it really has made it worthwhile. Maybe we can all meet in some small-town bar in the middle of the country one day after this and share a couple pitchers...thanks again all...