


My Personal Paint Thread

Thread Starter
Melting Slicks


Joined: Feb 2006
Posts: 3,428
Likes: 5
From: Japan
BTW, I've painted several cars over the years and the procedure I always used was get the car to a 220 finish, apply filler & primer, sand that to a 320 finish, then apply topcoat. Never had any failures. By contrast, I did have problems with blistering the last time I painted the Vette when (it seems) water got through some cracks in the paint and down into the exposed glass fibers where it expanded and raised the paint, which is why I stripped it all off...
Race Director


Joined: Sep 1999
Posts: 11,361
Likes: 383
From: Plano TX
Well, yes, a factory panel before paint was smooth. We used a few NOS panels when we did my '71. But we roughed them up with 80 grit before primer. Everything I've ever heard warns that any smoother than 80 grit is likely to have issues.
The warning about cutting into the panel when stripping is valid. You especially risk edges and beauty lines. But I've also seen C3s that looked like a washboard down the sides (DA sander).
But that's for stripping/working the panel. Still should be roughened up before primer. I'd be real worried about paint flaking with the fiberglass at 320. The C3 body flexes quite a bit.
BTW, what are you doing for the seams?
Thread Starter
Melting Slicks
Joined: Feb 2006
Posts: 3,428
Likes: 5
From: Japan
Zwede, just from running my hands down the seams they feel really smooth in all but a couple small spots and the only disbond that I could find is where the 'chin' panel in front is spliced to the RF fender. I will likely dig the filler out of there and re-bond it.
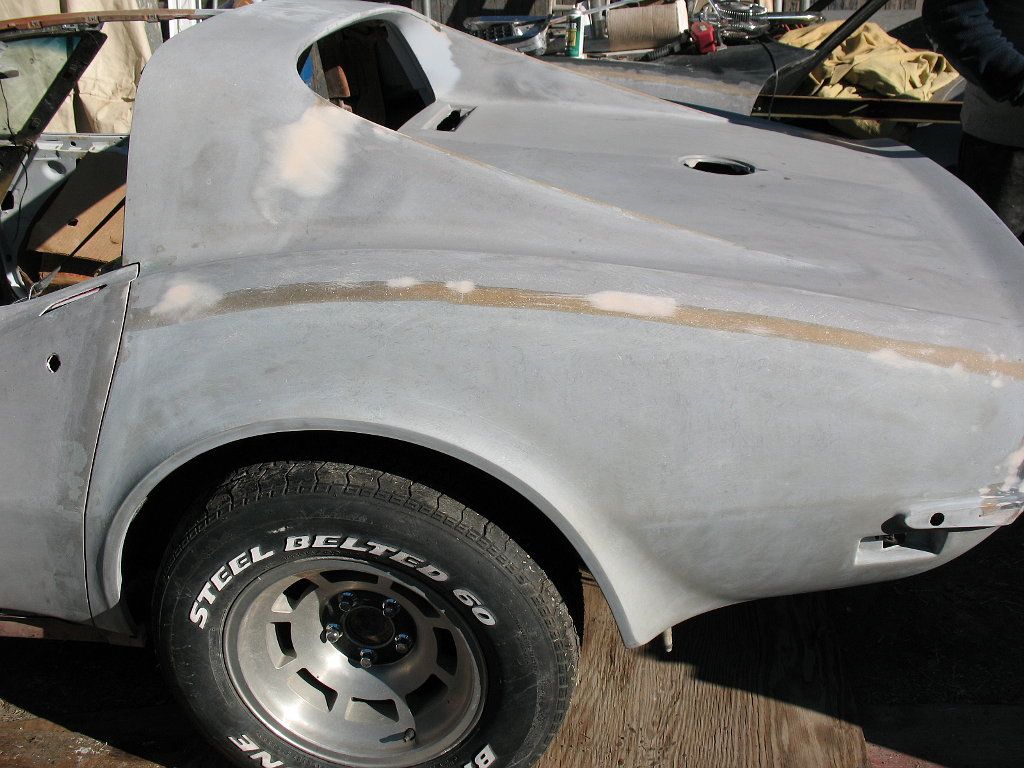
One of the main reasons I started this thread was to solicit info from guys like you who have experience in these matters, so I'm glad you piped up, but this 80 grit business is really scaring me...when I first started sanding last May I began with one of the tops and 80 grit in my DA...it blew right through all 7 or 8 layers of existing paint so fast that I put that sucker away for fear of damaging something and started with the shaving and stripping instead. I used 320 at the end because Walmart or Home Depot didn't sell any wet sandpaper that was rougher- ideally I would have used 220 which would have cut faster and left a rougher finish.
When you say 80 grit are you talking in a DA or by hand? An 80 grit finish with a DA isn't really that rough, but sanding by hand with rocks that big can really tear some stuff up! I cut through the primer/sealer by hand with 60 in order to get down to the factory topcoat but after that it was either stripper or 320 wet sanding because just going through the primer/sealer with the 60 grit was cutting all the way through the topcoat and down into the glass. Even though the general finish is now 320 there are shallow 60-grit scratches all over the car right now from doing it that way...
I'll be using epoxy primer and my paint vendor assures me that it will bond pretty well- he DID seem a little nervous about the 320 finish also so I suppose I could go back over the car with, say, 220 (that's what he recommended but he's not a Corvette expert).
You sound as though you know whereof you speak, so any input you can give here would be of great value...hopefully I'll be laying paint here in about a month so I want to make sure everything is correct before then-if I'm doing this all wrong now would be the time to find out!!
Race Director
Joined: Sep 1999
Posts: 11,361
Likes: 383
From: Plano TX
First let me specify my experience, because I'm not a pro. I worked alongside a pro during the restoration of my '71. We replaced pretty much all the body panels except doors, t-tops, hood and one fender. We worked it to where it was in primer, blocksanded and ready for top coat. We then took it to a painter who shot color and clear and polished it.
Now here's the car right before the first primer was applied:
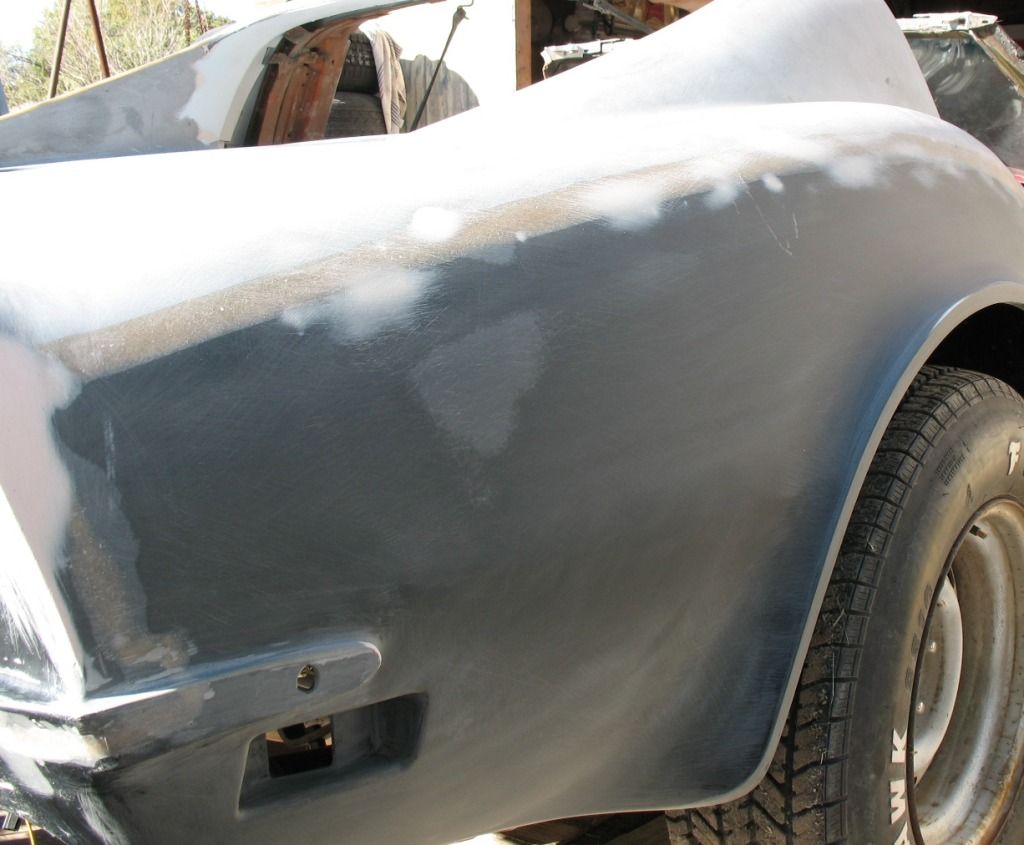
As for the 80 grit: hand sanding (on a rubber block) only! No DA! And it's a scuff, you're not trying to remove material, you just want to give the primer something to bite on to. You have to be careful with your motions, sand towards edges, never over them. You can see this behind the wheel, notice how the beauty line halfway down the quarter is almost untouched. For the inversely curved areas like fender flares, or the area behind the door handle, you can use a full soda can wrapped in 80 instead of the block.
We glassed all the seams which is also visible in the picture. It's quite a lot of extra work, but those seems will never ever show:

And also a pet-peeve area of mine: The fit between the rear top of the door and the quarter. Getting it to where the door and quarter look like they came off a solid piece really makes the car IMO:
As for epoxy primer, I haven't used it but understand it is very thin. You will need something thicker to block. We used PPG K36 which is a 2k urethane primer straight on the fiberglass. It builds enough to block.
Now here's the car right before the first primer was applied:
As for the 80 grit: hand sanding (on a rubber block) only! No DA! And it's a scuff, you're not trying to remove material, you just want to give the primer something to bite on to. You have to be careful with your motions, sand towards edges, never over them. You can see this behind the wheel, notice how the beauty line halfway down the quarter is almost untouched. For the inversely curved areas like fender flares, or the area behind the door handle, you can use a full soda can wrapped in 80 instead of the block.
We glassed all the seams which is also visible in the picture. It's quite a lot of extra work, but those seems will never ever show:
And also a pet-peeve area of mine: The fit between the rear top of the door and the quarter. Getting it to where the door and quarter look like they came off a solid piece really makes the car IMO:
As for epoxy primer, I haven't used it but understand it is very thin. You will need something thicker to block. We used PPG K36 which is a 2k urethane primer straight on the fiberglass. It builds enough to block.
Drifting


Joined: Aug 2003
Posts: 1,868
Likes: 13
From: Mascoutah IL
Zwede's car is a work of art... Everytime I call Mike (Tracdogg2) to get some advice, he almost always tells me a story about all the work that went into Zwede's car to make it look perfect...
Rogman
Rogman
Race Director
Joined: Sep 1999
Posts: 11,361
Likes: 383
From: Plano TX
This picture shows the surface needed for good primer adhesion. You can see a criss-cross pattern. Convex surfaces were done with 80 grit on a rubber block. Concave with a full soda can wrapped in the same 80 grit. All by hand, a machine risks taking too much material off.
Thread Starter
Melting Slicks
Joined: Feb 2006
Posts: 3,428
Likes: 5
From: Japan
You may yet make an 80 grit believer out of me Zwede...a positive in what I've already done is that I have just barely cut down to the glass surface with 320 paper so to put an 80 grit 'tooth' on it would be relatively easy at this point. The paint on your Vette is REALLY nice...makes your argument quite persuasive. Again, thanks for the info Zwede!
Corvette Stories
The Best of Corvette for Corvette Enthusiasts

Top 10 Most Expensive Corvettes Ever Sold on Bring A Trailer
Brett Foote
10 Things Every Corvette Owner Needs (2026 Edition)
Michael S. Palmer
8 Most "Only Corvette Owners Understand" Quirks and Problems
Pouria Savadkouei
10 Reasons the C6 Z06 is Still A Performance Benchmark After 20 Years
Joe Kucinski
How Much Horsepower Every Corvette Engine "LOST" in 1972
Joe Kucinski
Top 10 DOs and DON'Ts for Protecting Your Convertible Top!
Michael S. Palmer
Top 10 Most Explosive Corvettes Ever Made: Power-to-Weight Ratio Ranked!
Joe Kucinski
150 hp to 1,250 hp: Every Corvette Generation Compared by the Specs That Matter
Joe Kucinski
8 Coolest Corvette Pace Cars (and Replicas) of All Time
Verdad Gallardo
Thread Starter
Melting Slicks
Joined: Feb 2006
Posts: 3,428
Likes: 5
From: Japan
Hauled the doors down out of the rafters, stripped the inner shells and laid a coat of self-etching primer on them...


...They still had all the yellow paint on their insides so it was a little bit of a job getting that off. As shown in the second picture I used that gnarly-looking black wheel in my electric drill to get most of the paint off, then got what I couldn't reach with that with a 3" scotch-brite pad in a die grinder. What I couldn't reach with THAT I got with some little 60-grit cartridge rolls on a small arbor. I initially tried some stripper on it but that was making a gooey mess as it inevitably tends to do so I gave up on that idea and went back to the power tools. I only have a 115v 27 gallon compressor, fine for light jobs but I try to keep using it down to a minimum because of the horrible screaming noise.
Next it's rip the carpet out and start on the headlight doors...
Last edited by birdsmith; Apr 15, 2012 at 11:46 PM.
Racer

Joined: Apr 2012
Posts: 289
Likes: 37
From: Boulder, CO
I dread getting that far into my doors, but seeing that final pic...
I originally wanted to do a quick paint to get the car looking better, but especially after following this thread, I want to take it all the way and do it right. Keep up the good work, its an inspiration.
I originally wanted to do a quick paint to get the car looking better, but especially after following this thread, I want to take it all the way and do it right. Keep up the good work, its an inspiration.
Thread Starter
Melting Slicks
Joined: Feb 2006
Posts: 3,428
Likes: 5
From: Japan
I dread getting that far into my doors, but seeing that final pic...
I originally wanted to do a quick paint to get the car looking better, but especially after following this thread, I want to take it all the way and do it right. Keep up the good work, its an inspiration.
I originally wanted to do a quick paint to get the car looking better, but especially after following this thread, I want to take it all the way and do it right. Keep up the good work, its an inspiration.
In your case you've already got the paint off so you might as well give the car what it deserves- I'm sure you won't regret it!
Thread Starter
Melting Slicks
Joined: Feb 2006
Posts: 3,428
Likes: 5
From: Japan
Rog, this is getting a little creepy...apparently last night when I was replying to your thread you were replying to mine. Seems like sunday nights are party time on this forum!!
Thread Starter
Melting Slicks
Joined: Feb 2006
Posts: 3,428
Likes: 5
From: Japan
Slowly beginning to turn the corner on this thing...spent the day disassembling one headlight assembly, cleaning parts, and repainting same. There are literally NO media blasting facilities here in the Temecula Valley which leaves me with few options for de-scuzzifying parts at this point, so I just took the whole mess apart and soaked the parts in muriatic acid for a couple hours. This does work but it's nasty, smelly stuff and I still had to go back to the trusty old wire wheel to finish them off. I sprayed all the parts with Rustoleum self-etching primer then sprayed them black with Krylon black barbeque paint.
As for the headlight doors and frames, I'm just gonna have to go and find a sandblaster SOMEWHERE. I can DA the paint off the top of the doors but the insides and the frames are just too complex so that's just how it's gonna have to be. When that happens I will paint the frames and the door insides then loosely assemble them for eventual re-fitting to the car when I start painting.
I broke off a couple screws while taking them apart, so I'm gonna have to go and pony up for some 8-32 Heli-Coils too. Grrrr...
In the past few months I have seen a couple "Rebuilding headlight assembly" threads...if any of yopu guys could float a couple pics of correct-appearing headlight assemblies it would be appreciated at this point!
Drifting
Joined: Aug 2003
Posts: 1,868
Likes: 13
From: Mascoutah IL

Drifting
Joined: Aug 2003
Posts: 1,868
Likes: 13
From: Mascoutah IL
Slowly beginning to turn the corner on this thing...spent the day disassembling one headlight assembly, cleaning parts, and repainting same. There are literally NO media blasting facilities here in the Temecula Valley which leaves me with few options for de-scuzzifying parts at this point, so I just took the whole mess apart and soaked the parts in muriatic acid for a couple hours. This does work but it's nasty, smelly stuff and I still had to go back to the trusty old wire wheel to finish them off. I sprayed all the parts with Rustoleum self-etching primer then sprayed them black with Krylon black barbeque paint.
As for the headlight doors and frames, I'm just gonna have to go and find a sandblaster SOMEWHERE. I can DA the paint off the top of the doors but the insides and the frames are just too complex so that's just how it's gonna have to be. When that happens I will paint the frames and the door insides then loosely assemble them for eventual re-fitting to the car when I start painting.
I broke off a couple screws while taking them apart, so I'm gonna have to go and pony up for some 8-32 Heli-Coils too. Grrrr...
In the past few months I have seen a couple "Rebuilding headlight assembly" threads...if any of yopu guys could float a couple pics of correct-appearing headlight assemblies it would be appreciated at this point!
Rogman
Safety Car

Joined: Oct 2006
Posts: 3,930
Likes: 15
From: Calgary Alberta
Well, yes, a factory panel before paint was smooth. We used a few NOS panels when we did my '71. But we roughed them up with 80 grit before primer. Everything I've ever heard warns that any smoother than 80 grit is likely to have issues.
The warning about cutting into the panel when stripping is valid. You especially risk edges and beauty lines. But I've also seen C3s that looked like a washboard down the sides (DA sander).
But that's for stripping/working the panel. Still should be roughened up before primer. I'd be real worried about paint flaking with the fiberglass at 320. The C3 body flexes quite a bit.
BTW, what are you doing for the seams?
The warning about cutting into the panel when stripping is valid. You especially risk edges and beauty lines. But I've also seen C3s that looked like a washboard down the sides (DA sander).
But that's for stripping/working the panel. Still should be roughened up before primer. I'd be real worried about paint flaking with the fiberglass at 320. The C3 body flexes quite a bit.
BTW, what are you doing for the seams?
80 grit is recommended for filler. If you know how to use a DA, you can strip a vette with one. I've seen it done, usually it gets slick sand afterwards anyhow, and reblocked. If you let the body sit for a very long time, which you did, 80 grit before primer is okay. However, if you don't let it sit for a long time, it will sink into the 80 grit scratches. You can spray slicksand on 80 grit scratches and it will not sink at all. That is the beauty of the product. It has almost zero solvents in it, which is the main problem with todays primers. Do not reduce the slicksand at all - spray it right out of the can.
Follow your products tech sheet and you will be fine.
Thread Starter
Melting Slicks
Joined: Feb 2006
Posts: 3,428
Likes: 5
From: Japan
Well, I finally finished SOMETHING today. The last few weeks have been maddening because I just haven't been able to get any time to spend on the car, but today I finally got the last few headlight bits painted and put back together...
(BEFORE)

(AFTER)


I did manage to find a source for blasting that didn't cost me anything, so I blasted the doors and frames. Everything else was soaked overnight in muriatic acid, then washed off, primed with rustoleum self-etching primer then painted with either semi-gloss black or Dupli-color Cast Coat, depending on which was closer to the original color. I did the vacuum pots by just scrubbing them real good in my solvent tank and spraying the cans with clear enamel.
Also, during the rebuilding process I managed to strip out three screws, lost a pivot bolt, and broke a 'headlight on' switch, so I put 8-32 Heli-Coils in the stripped holes (they actually had broken-off screws in them which I had to drill through) and just ordered replacements for the switch and bolt.
There have been a few posts lately about home plating systems where guys have yellow-cadmium plated the headlight buckets, springs, and other stuff but I could certainly tell that that finish isn't factory. Looks way cool but not factory, and my goal here isn't show car but just to get it reasonably clean and close to original. It is 1000% better than the rusty, scuzzy, greasy mess that it was so me vewwwy happy. Good night all and thanks for looking!
(BEFORE)
(AFTER)
I did manage to find a source for blasting that didn't cost me anything, so I blasted the doors and frames. Everything else was soaked overnight in muriatic acid, then washed off, primed with rustoleum self-etching primer then painted with either semi-gloss black or Dupli-color Cast Coat, depending on which was closer to the original color. I did the vacuum pots by just scrubbing them real good in my solvent tank and spraying the cans with clear enamel.
Also, during the rebuilding process I managed to strip out three screws, lost a pivot bolt, and broke a 'headlight on' switch, so I put 8-32 Heli-Coils in the stripped holes (they actually had broken-off screws in them which I had to drill through) and just ordered replacements for the switch and bolt.
There have been a few posts lately about home plating systems where guys have yellow-cadmium plated the headlight buckets, springs, and other stuff but I could certainly tell that that finish isn't factory. Looks way cool but not factory, and my goal here isn't show car but just to get it reasonably clean and close to original. It is 1000% better than the rusty, scuzzy, greasy mess that it was so me vewwwy happy. Good night all and thanks for looking!
Last edited by birdsmith; May 7, 2012 at 01:02 AM.