C3 Tech/Performance V8 Technical Info, Internal Engine, External Engine, Basic Tech and Maintenance for the C3 Corvette
Sponsored by:
Sponsored by:

bumps across front nose

Thread Tools
 
Search this Thread
 
Old Jul 31, 2011 | 08:09 PM
  #1  
Dan H.'s Avatar
Dan H.
Thread Starter
Drifting
10 Year Member
 
Joined: Oct 2010
Posts: 1,873
Likes: 134
From: Bushkill Twp. PA
St. Jude Donor '17
Default bumps across front nose

How does one fix this? I have a feeling this is a real expensive question to ask.....

Reply
Old Jul 31, 2011 | 08:40 PM
  #2  
dar322's Avatar
dar322
Burning Brakes
15 Year Member
All Eyes On Me
Liked
Loved
 
Joined: Oct 2007
Posts: 1,086
Likes: 22
From: Crystal Lake IL
St. Jude Donor '12-'13
Default

eventually the experts will chime in and elaborate on the rivets popping thru.
Reply
Old Jul 31, 2011 | 08:44 PM
  #3  
Faster Rat's Avatar
Faster Rat
Melting Slicks
 
Joined: May 2009
Posts: 3,079
Likes: 314
2024 C3 of the Year Finalist - Unmodified
Default

Use the forum search tool. This subject was discussed a few weeks ago, months ago, years ago.....
Reply
Old Aug 1, 2011 | 04:58 AM
  #4  
Belgian1979vette's Avatar
Belgian1979vette
Melting Slicks
 
Joined: Mar 2002
Posts: 2,164
Likes: 7
From: Beringen
Default

Originally Posted by Dan H.
How does one fix this? I have a feeling this is a real expensive question to ask.....

As probably has been told a million times before. These are the alu rivits corroding an popping the paint up. Grinding, removing, and then depending on whether or not you want to stay original, put in new rivets that will corrode again over time. (you got to love the car.

If not trying to stay original, grinding, removing the rivets and glueing the bar in place.

Anyhow, you get to repaint the car, unless you stick with the bumps as per original.
Reply
Old Aug 1, 2011 | 05:54 AM
  #5  
Alan 71's Avatar
Alan 71
Team Owner
15 Year Member
Active Streak: 120 Days
Community Influencer
Top Answer: 5
 
Joined: Sep 2006
Posts: 31,235
Likes: 4,326
From: Westminster Maryland
Default

Hi Dan
Looks like a NICE car!
Since the rest of your car looks so good I wouldn't worry about the appearance of the rivets. The rivet bumps seem to be most obvious on dark colors, and in certain light.
I've found that very original cars show the rivets even if there is no rust on the support bar or oxidation on the aluminium rivets themselves.
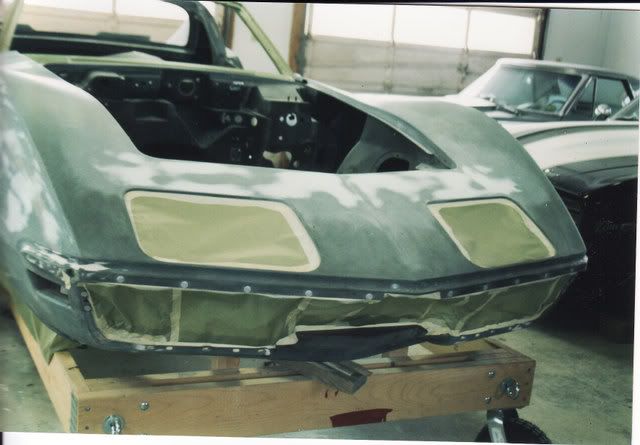
Some people view the bumps as a badge of honor. Here's a picture of a repair of rivets that weren't rusty or too 'lumpy'. It was being done only because the car was being painted.
I think I'd first get a good look at the headlight support bar under the fiberglass hood surround to see if rust is present before deciding what if anything to do.
Regards,
Alan

Reply
Old Aug 1, 2011 | 03:31 PM
  #6  
BBCorv70's Avatar
BBCorv70
Melting Slicks
15 Year Member
Liked
Loved
Community Favorite
 
Joined: Apr 2007
Posts: 3,189
Likes: 111
From: Tolland CT
Default

I'm preparing to have this fixed on my 70.

Two ways to fix this. You could simply sand the bumps down and repaint though quite often they'll come back over time.

Other option is to remove the rivets and glue the reinforcement bar on as later models were built.

A new bar and bonding strip go for about $200 from Paragon.

Local shop offered to do the job for $700 providing I buy the parts and provide as much labor as I can. I'll need to remove the headlight assys etc.

I'd guess the whole job may come out to around $1000.
Reply
Old Aug 1, 2011 | 04:17 PM
  #7  
Easy Mike's Avatar
Easy Mike
Team Owner
Supporting Lifetime
20 Year Member
 
Joined: Jun 2000
Posts: 38,923
Likes: 1,481
From: Southbound
Cruise-In II Veteran
Default

Remove headlight header bar and bonding strip. Drill out the rivet heads holding the bar to the bonding strip.

Reinstall.

Sounds simple enough but it's a big job.

Reply
Old Aug 1, 2011 | 04:49 PM
  #8  
Willcox Corvette's Avatar
0Willcox Corvette
Former Vendor
 
Joined: Aug 2006
Posts: 76,656
Likes: 1,851
From: Jeffersonville Indiana 812-288-7103
St. Jude Donor '08-'09-'10-'11-'12-'13-'14-'15
Default

Originally Posted by Easy Mike
Remove headlight header bar and bonding strip. Drill out the rivet heads holding the bar to the bonding strip.

Reinstall.

Sounds simple enough but it's a big job.

Mike-

We used to remove the bonding strips with the header... but we changed that a few years back.

You guys will see why in this new file I just finished! Take it easy on me I've not proof read it. This thread popped up this weekend and we just did this job last Monday.

Corvette Headlamp Header Bar Installation 1968-1982
http://willcoxcorvette.com/repairand...lp.php?hID=322

Now as you may guess, I'm NOT a huge fan of drilling the top of the surround panel to remove the rivets. It is not the proper way to do this repair and will come back to haunt you. IMHO

Willcox Inc.

Last edited by Willcox Corvette; Aug 1, 2011 at 04:52 PM.
Reply
Corvette Stories

The Best of Corvette for Corvette Enthusiasts

story-0

8 Most "Only Corvette Owners Understand" Quirks and Problems

 Pouria Savadkouei
story-1

10 Reasons the C6 Z06 is Still A Performance Benchmark After 20 Years

 Joe Kucinski
story-2

How Much Horsepower Every Corvette Engine "LOST" in 1972

 Joe Kucinski
story-3

Top 10 DOs and DON'Ts for Protecting Your Convertible Top!

 Michael S. Palmer
story-4

Top 10 Most Explosive Corvettes Ever Made: Power-to-Weight Ratio Ranked!

 Joe Kucinski
story-5

150 hp to 1,250 hp: Every Corvette Generation Compared by the Specs That Matter

 Joe Kucinski
story-6

8 Coolest Corvette Pace Cars (and Replicas) of All Time

 Verdad Gallardo
story-7

Top 10 Corvette Engines RANKED by Peak Torque (70+ Years of Muscle!)

 Joe Kucinski
story-8

Corvette ZR1X Will Be Pacing the Indy 500, And Could Probably Race, Too!

 Verdad Gallardo
story-9

Top 10 Corvettes Coming to Mecum Indy 2026!

 Brett Foote
Old Aug 2, 2011 | 04:35 AM
  #9  
Danish Shark's Avatar
Danish Shark
Burning Brakes
15 Year Member
Liked
Loved
Community Favorite
 
Joined: Aug 2008
Posts: 878
Likes: 55
From: Deep South Denmark
Default

Originally Posted by Willcox Corvette
Mike-

We used to remove the bonding strips with the header... but we changed that a few years back.

You guys will see why in this new file I just finished! Take it easy on me I've not proof read it. This thread popped up this weekend and we just did this job last Monday.

Corvette Headlamp Header Bar Installation 1968-1982
http://willcoxcorvette.com/repairand...lp.php?hID=322

Now as you may guess, I'm NOT a huge fan of drilling the top of the surround panel to remove the rivets. It is not the proper way to do this repair and will come back to haunt you. IMHO

Willcox Inc.
I agree, thats how I did it, except I just drilled the part of the rivets that come through the header bar (making sure not to drill through the rivets) and was then able to remove the header bar.
After that I did it the same way as Willcox, though I did fill the holes left by the rivets (making sure not to put too much filler in there so the bumps won't reappear) before gluing the headerbar back on.

The fiberglass guys I have talked to all agree, there is no way to fill a hole in a fiberglass panel without it eventually reappearing.

I am happy see you post this Willcox. When I tried explaining this the last time I got flamed by people claiming that some of the new magical fiberglass panel hole filling materials you guys in the US have probably just hadn't made it to Europe yet ;-)

Last edited by Danish Shark; Aug 2, 2011 at 04:57 AM.
Reply
Old Aug 3, 2011 | 12:24 PM
  #10  
BBCorv70's Avatar
BBCorv70
Melting Slicks
15 Year Member
Liked
Loved
Community Favorite
 
Joined: Apr 2007
Posts: 3,189
Likes: 111
From: Tolland CT
Default

Originally Posted by Willcox Corvette
We used to remove the bonding strips with the header... but we changed that a few years back.
Why did you opt not to replace the bonding strip? I didn't see mention of the reason for this change in the document. Maybe I missed it?
Reply
Old Aug 3, 2011 | 12:30 PM
  #11  
zwede's Avatar
zwede
Race Director
25 Year Member
Loved
Community Favorite
Top Answer: 1
 
Joined: Sep 1999
Posts: 11,360
Likes: 382
From: Plano TX
Default

Originally Posted by k_moisen
The fiberglass guys I have talked to all agree, there is no way to fill a hole in a fiberglass panel without it eventually reappearing.
How would it re-appear if you fill it with resin & mat?
Reply
Old Aug 3, 2011 | 02:08 PM
  #12  
Rontech's Avatar
Rontech
Instructor
 
Joined: Oct 2006
Posts: 127
Likes: 0
From: Monroe Washington
Default Corrosion bumps

Let's not forget that aluminum and steel are dissimilar metals. When these two metals are put together, they will react, and there will be corrosion. I believe that the factory used the aluminum for ease of assembly and to save weight. It is my opinion that GM was not concerned about the long term effects. By the time problems arose, the vehicles would then be out of warranty. They probably didn't expect that many of them would be around 40 or 50 years later! While restoring my 1970, I replaced my fasteners with titanium or steel - but then I'm not going concourse.

Good luck in the fight against corrosion.

Ron
Reply
Old Aug 3, 2011 | 02:53 PM
  #13  
Chuck72's Avatar
Chuck72
Le Mans Master
20 Year Member
Liked
Loved
Community Favorite
 
Joined: Nov 2004
Posts: 7,850
Likes: 142
From: Tampa, Fl.
Default

Originally Posted by BBCorv70
Why did you opt not to replace the bonding strip? I didn't see mention of the reason for this change in the document. Maybe I missed it?

Leaving the existing bonding strips in place will help you locate the new header bar, which, of course, is installed after all the aluminum rivets are removed.
Chuck
Reply
Old Aug 3, 2011 | 03:52 PM
  #14  
Willcox Corvette's Avatar
0Willcox Corvette
Former Vendor
 
Joined: Aug 2006
Posts: 76,656
Likes: 1,851
From: Jeffersonville Indiana 812-288-7103
St. Jude Donor '08-'09-'10-'11-'12-'13-'14-'15
Default

Originally Posted by zwede
How would it re-appear if you fill it with resin & mat?
The expansion and contraction ratio of the resin and mat is different than that of the press molded fiberglass, or SMC injected material. This alone will cause it to change over time.

There are other factors that play in to this such as the sun heat, and the materials used drying down after finish. In the end a hole will be seen. Or check me on this.. I'll say it has been my experience.
Reply
Old Aug 3, 2011 | 04:02 PM
  #15  
Willcox Corvette's Avatar
0Willcox Corvette
Former Vendor
 
Joined: Aug 2006
Posts: 76,656
Likes: 1,851
From: Jeffersonville Indiana 812-288-7103
St. Jude Donor '08-'09-'10-'11-'12-'13-'14-'15
Default

Originally Posted by BBCorv70
Why did you opt not to replace the bonding strip? I didn't see mention of the reason for this change in the document. Maybe I missed it?
It just makes the job easier, and there is very little chance of cracking the upper surround panel. When you remove the bonding strip you get a flimsy upper surround panel that can easily crack. When you leave the bonding strip in the car it gives you witness marks for installing the new metal support.

There are keys to a successful installation. 1) Make sure all the rivets are removed. 2). When you bond the header in make sure not to squeeze all the glue out. 3) Make sure you clamp over the pimple and it will compress in the new epoxy below it.

If you look at the tool we use you'll notice the sides are ground sharp. It really on takes a few pops with a small hammer to cut the old rivet out.

Willcox
Reply
Old Aug 3, 2011 | 04:20 PM
  #16  
zwede's Avatar
zwede
Race Director
25 Year Member
Loved
Community Favorite
Top Answer: 1
 
Joined: Sep 1999
Posts: 11,360
Likes: 382
From: Plano TX
Default

Originally Posted by Willcox Corvette
In the end a hole will be seen. Or check me on this.. I'll say it has been my experience.
[knock on wood] So far it has not been my experience. We didn't have to fill the brace holes as we replaced the surround and the new one was just bonded in without rivets. But there were other areas where resin & mat were used. No sign of anything popping up yet though.
Reply
Old May 10, 2020 | 07:49 PM
  #17  
lynnbilodeau's Avatar
lynnbilodeau
Advanced
15 Year Member
All Eyes On Me
 
Joined: Aug 2006
Posts: 75
Likes: 28
Default

Resurrecting an old thread. I have a 70 LT-1. It was painted in 1980, original Marroon color. Not a great paint job, so I may end up painting it again. Don't really know for sure. I am planning to rebuild the original motor and re seal the original trans. I am not that worried about the imperfect paint for now. Would just like to drive it around and have fun in it.

Although they don't show in these pics, I have the bumps across the nose piece. I tried to open the link to the article on the Wilcox site: Corvette Headlamp Header Bar Installation 1968-1982'

Couldn't get it to open. Also, could not find it on the web site. Would like to see a good tutorial on this before I start the work.

Any help is appreciated. Here is my car with its "little brother".


Reply

Get notified of new replies

To bumps across front nose

Old May 11, 2020 | 12:23 AM
  #18  
7T1vette's Avatar
7T1vette
Team Owner
15 Year Member
Community Builder
Community Influencer
Top Answer: 5
 
Joined: Jan 2006
Posts: 37,637
Likes: 3,117
From: Crossville TN
Default

You don't want to mess with those 'bumps' unless you are planning a complete repaint on the car. If there are no breaks in the paint above them, they are sealed and all is well (for the present). The aluminum rivets used in that assembly are slowly oxidizing and 'growing'. It causes no damage, except for expanding the paint surface a bit.

Some folks keep those 'bumps' intact just to show that the paint is original to the car. (Hopefully, no one repainted the car without fixing those pesky rivets.)
Reply
Old May 11, 2020 | 10:48 AM
  #19  
John 65's Avatar
John 65
Le Mans Master
20 Year Member
Liked
Loved
Community Favorite
 
Joined: Dec 2003
Posts: 5,381
Likes: 416
From: N J
Default

Plenty of past threads, a quick search will provide lots of great info. With a little bit of luck those
bumps just might smooth back out and relax like when I did mine.

To remove header, a friend shortened and welded back together this small starret key hole saw.


Its less than 1 1/2" long, plus the pilot. Pulled the pilot down enough so it wont come out the top of the car. Used a small 90 degree
drill and it was able to get to all the rivets in the header. Then cleaned and roughed up the fiberglass strip that the header
was mounted to, along with the header itself, screwed in the mixing tip and applied Lord-Fusor metal to fiberglass adhesive in a dual tube small caulking
gun to the metal header.

Before final removal mark a few spots on the header and the car to make sure it goes back into exactly
the same location it was removed from. Before it gets bonded back up there, go to harbor freight and pick
up plenty of clamps. Use them to clamp the bar into position and on the top side to clamp wood strips over all those bumps.

Hard to believe.... but when the clamps and wood were removed, the bumps were gone like they were never there.

Reply
Old May 11, 2020 | 10:58 AM
  #20  
Peterbuilt's Avatar
Peterbuilt
Le Mans Master
15 Year Member
 
Joined: Aug 2006
Posts: 7,425
Likes: 1,559
From: mount holly NC
2025 c3 ('74-'82) of the Year Finalist - Unmodified
2019 C3 of Year Finalist (appearance mods)
Default

This is how Phantom Works removed the 'ring of pearls.


Reply


All times are GMT -4. The time now is 01:17 PM.

story-0
8 Most "Only Corvette Owners Understand" Quirks and Problems

Slideshow: These are the quirks, annoyances, and oddly lovable problems that every Corvette owner eventually learns to live with.

By Pouria Savadkouei | 2026-05-28 09:31:39


VIEW MORE
story-1
10 Reasons the C6 Z06 is Still A Performance Benchmark After 20 Years

Slideshow: 10 reasons why the C6 Z06 is still a performance benchmark after 20 years.

By Joe Kucinski | 2026-05-27 17:20:09


VIEW MORE
story-2
How Much Horsepower Every Corvette Engine "LOST" in 1972

Slideshow: How much horsepower every Corvette engine lost in 1972.

By Joe Kucinski | 2026-05-27 16:54:53


VIEW MORE
story-3
Top 10 DOs and DON'Ts for Protecting Your Convertible Top!

Slideshow: How to Protect A Convertible Top: 10 DOs & DON'Ts

By Michael S. Palmer | 2026-04-03 00:00:00


VIEW MORE
story-4
Top 10 Most Explosive Corvettes Ever Made: Power-to-Weight Ratio Ranked!

Slideshow: The 10 most explosive Corvettes ever built based on power-to-weight ratio.

By Joe Kucinski | 2026-05-20 07:23:03


VIEW MORE
story-5
150 hp to 1,250 hp: Every Corvette Generation Compared by the Specs That Matter

Slideshow: From C1 to C8 we compare every Corvette generation by the numbers.

By Joe Kucinski | 2026-05-12 16:54:12


VIEW MORE
story-6
8 Coolest Corvette Pace Cars (and Replicas) of All Time

Slideshow: Some Corvette pace cars became collectible legends, while others perfectly captured the look and attitude of their era.

By Verdad Gallardo | 2026-05-11 09:50:51


VIEW MORE
story-7
Top 10 Corvette Engines RANKED by Peak Torque (70+ Years of Muscle!)

Slideshow: Ranking the top 10 Corvette engines by torque output.

By Joe Kucinski | 2026-05-05 11:58:09


VIEW MORE
story-8
Corvette ZR1X Will Be Pacing the Indy 500, And Could Probably Race, Too!

Slideshow: A Corvette pace car nearly matching IndyCar speeds sounds exaggerated, until you look at the numbers.

By Verdad Gallardo | 2026-05-04 20:03:36


VIEW MORE
story-9
Top 10 Corvettes Coming to Mecum Indy 2026!

Among a rather large group of them.

By Brett Foote | 2026-05-04 13:56:44


VIEW MORE