

Interior trim gap '72

Thread Starter
Melting Slicks


Joined: Sep 2006
Posts: 2,814
Likes: 469
From: Wichita Kansas
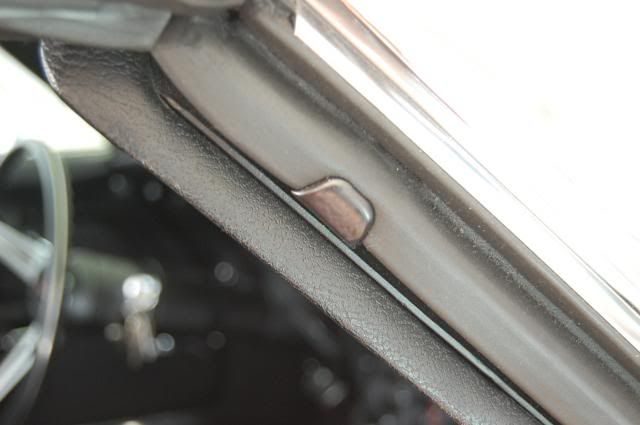
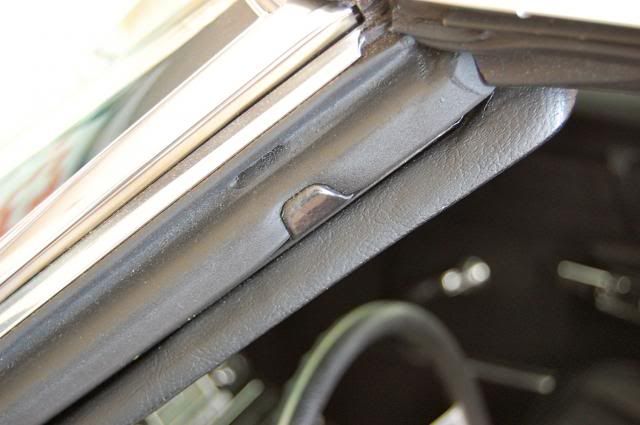
I have wondered for as long as I have had my car, if this condition is correct. There is a space of about a half inch between the forward rubber window seals and the corresponding interior trim piece. Seems odd it would be like that, almost like something is missing or installed incorrectly. The gap is highlighted by the arrows in the attache pic; it is in both left and right sides. Is this just the way it supposed to be? Thanks.


Race Director


Joined: Apr 2009
Posts: 19,294
Likes: 2,754
From: Charlotte NC
YES...the windshield pillar post moldings can be very slightly adjusted. This adjustment will not close the gap. When I am working on one...I want to make sure the area where the front T-top latch will operate without hitting the interior molding...and also fit up with the top center interior trim. The gap at the weatherstrip track ...is what it is....because the pillar post trim stops against the pillar post frame piece....and stops it from getting closer to the weatherstrip track.
DUB
DUB
Team Owner


Joined: Sep 2006
Posts: 31,266
Likes: 4,361
From: Westminster Maryland
Hi k,
I believe there can be quite an improvement in the reveal between the a-pillar soft trim and the weatherstrip retainer.
It at least should have a uniform reveal it's entire length. Are the top screws in place on the soft trim?
My thought is that it's the soft trim could be the problem, not the weatherstrip.
Check the screws at top of the a-pillar trim, and the velcro type fasteners on the back side of the trim and on the a-pillar itself.
Good Luck!
Regards,
Alan

Team Owner
Joined: Sep 2006
Posts: 31,266
Likes: 4,361
From: Westminster Maryland
Hi k,
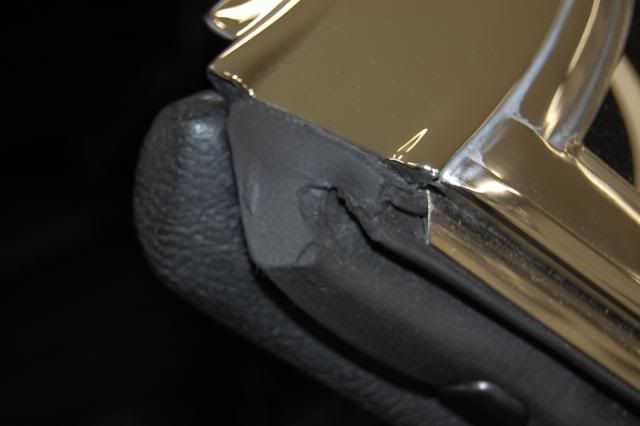
I came back and looked at your pictures again and am now leaning towards it being a weatherstrip problem.
I can't see that the weatherstrip retainer is even in place and the top of the weatherstrip (where the roof panel weatherstrip meets it) doesn't seem to be configured correctly.
So???
Regards,
Alan
Thread Starter
Melting Slicks
Joined: Sep 2006
Posts: 2,814
Likes: 469
From: Wichita Kansas
Hi k,
I came back and looked at your pictures again and am now leaning towards it being a weatherstrip problem.
I can't see that the weatherstrip retainer is even in place and the top of the weatherstrip (where the roof panel weatherstrip meets it) doesn't seem to be configured correctly.
So???
Regards,
Alan
 I also have new weather strip to install there.
Last edited by kansas123; May 15, 2014 at 05:30 PM. Reason: omitted part of answer
Race Director
Joined: Apr 2009
Posts: 19,294
Likes: 2,754
From: Charlotte NC
kansas123,
Knowing that the molding originally was steel backed. You can try to heat up the vinyl with a heat gun and really warm it up and try to shape it by twisting it...and test fit it as you go until you find what makes you happy.
Trying to get the two "velcro" plastic retainers to actually catch and hold is REALLY FUN. Sometimes that is a loosing battle.
DUB
Race Director


Joined: Feb 1999
Posts: 19,659
Likes: 34
From: Lenoir City Tennessee
Ci 6, 8 & 10 Veteran
St. Jude Donor '05-'06-'07-'08-'09-'10-'11-'12-'13-'14-'15
Mine have a similar gap to the OP's. Mine are aftermarket replacements and I just assumed that awful was because of that. I have often though of removing the trim and trying to bend it slightly to close the gap. Just another in the list of stuff I need to do.

