


Cutting coils=rocket science?

Thread Starter
Racer


Joined: Apr 2014
Posts: 406
Likes: 22
From: Lyons Colorado
After searching this forum for "cut front coils" I've noticed a few things. One is that there is no agreement or consistency on whether the cut the top or bottom coils, in fact when people have talked about cutting their coils they rarely refer to which end they cut. What I've taken away from reading endless posts on this is that the reason for the inconsistent results is that no one does it the same way as anyone else. The one thing that I've figured out from all this is to take it half a coil at a time until achieving the desired result, although which end to take half a coil from is anybody's guess. In my car with an LS1 it definitely needs done because of the 130 or so pounds that is no longer there.
Melting Slicks


Joined: Apr 2002
Posts: 2,337
Likes: 14
From: Norfolk VA
What size is your wheel/tire combination? Are the springs still on the car? The only way you will know if you have stock springs is to remove one. It's not rocket science, it's your choice which end you choose to cut. Stock springs are longer than aftermarket springs. If you don't feel comfortable cutting them, you can buy 550 springs from any of the Corvette vendors. Most who buy them are satisfied with the ride height and handling.
Last edited by Oldguard 7; May 24, 2014 at 11:06 PM.
2026 Loser of the Year


Joined: Sep 2013
Posts: 36,595
Likes: 7,043
From: New Or-leens Loo-z-anna
After searching this forum for "cut front coils" I've noticed a few things. One is that there is no agreement or consistency on whether the cut the top or bottom coils, in fact when people have talked about cutting their coils they rarely refer to which end they cut. Same here...from what I've learned---if the coil spring is a variable rate spring, the coils on one end will be closer together. I'm thinking that cutting coils off the "tightly wound end" will make a "softer" spring/cutting coils off the other end will make a firmer coil spring. What I've taken away from reading endless posts on this is that the reason for the inconsistent results is that no one does it the same way as anyone else. The one thing that I've figured out from all this is to take it half a coil at a time until achieving the desired result, After studying the upper coil spring pocket/lower coil spring pocket....I have learned that the pockets are designed to fit the ends of the spring---cutting half a coil will cause the spring to NOT sit correctly in the pocket it was designed to fit although which end to take half a coil from is anybody's guess See above comment . In my car with an LS1 it definitely needs done because of the 130 or so pounds that is no longer there.
Below is a "before" pic of the fender height.......
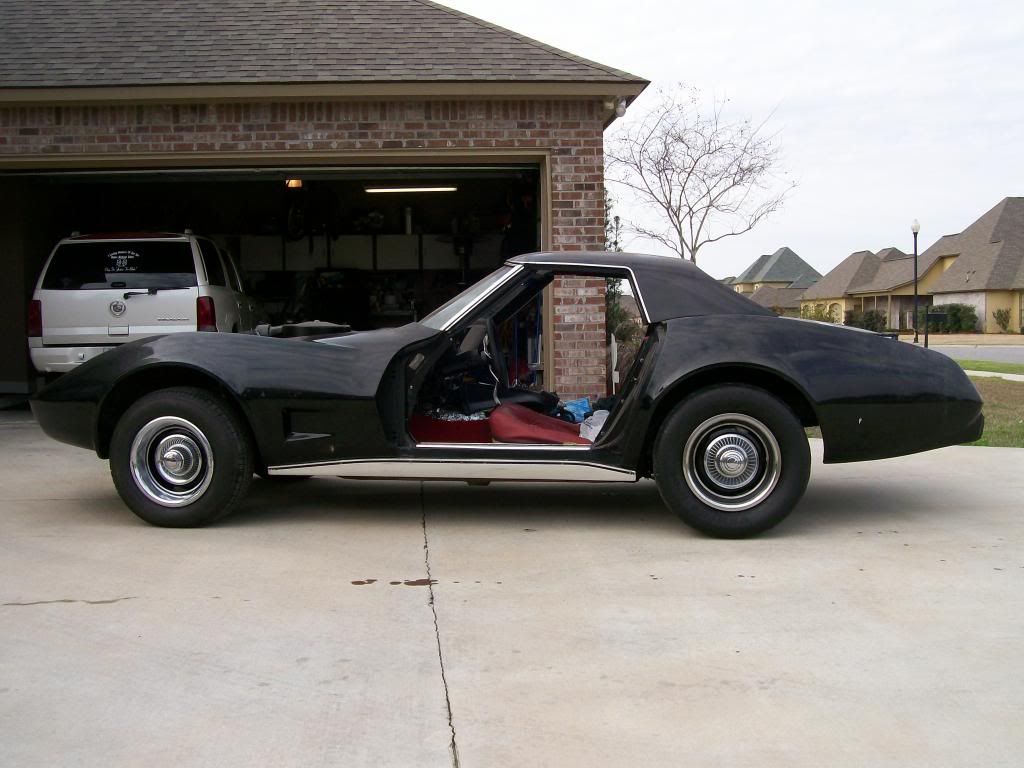
The first coil was cut from the tightly wound end....after re-installing the spring (without shocks on the car).....the car had the same amount of "bounce" as before the cut.....I cut 1 full "wrap" so the spring would re-install into the upper and lower spring pockets correctly......(notice that the other loosely-wound end of the spring is shaped to sit "flatly in the frame pocket---If I were to cut from that end, I would have to 're-bend" the end of the coil to be "flat")

I will post more pics tomorrow of the new changes.
Last edited by doorgunner; May 24, 2014 at 02:18 AM.

Drifting

Joined: Mar 2011
Posts: 1,886
Likes: 9
By cutting the coil from the tightly wrapped end of the spring, you have not affected the spring rate or ride height as much as if you had cut from the other end. The stock springs are variable rate, to offer a soft ride but good handling.. The closely wound coils are designed to stack tightly on the one end, and offer a soft rate at regular ride height. As the spring compresses further, the more widely spaced coils begin to compress, and exhibit a higher rate, thereby increasing the roll stiffness at that point of wheel travel.
Thread Starter
Racer
Joined: Apr 2014
Posts: 406
Likes: 22
From: Lyons Colorado
Since I am a rookie....don't take my findings as facts. Use them to try and make some sense of the process. (I have been known to get my facts confused....LOL) The front end of my '68 sits 29" from the ground to the lip of the front fender---much too high. I removed one "coil" from the "tightly wound" end of the spring which reduced the fender height 3/4".......I will remove another coil tomorrow from the same end, and also 2 coils from the other spring to see how the car will sit with both front springs the same length....(removing another coil could likely cause a much larger drop in the height of the fender than the 3/4" it dropped after the first coil was removed....this is where things get dicey!! I hope this info helps you....maybe we can both post here to provide some info that will make more sense to others.
Below is a "before" pic of the fender height.......
The first coil was cut from the tightly wound end....after re-installing the spring (without shocks on the car).....the car had the same amount of "bounce" as before the cut.....I cut 1 full "wrap" so the spring would re-install into the upper and lower spring pockets correctly......(notice that the other loosely-wound end of the spring is shaped to sit "flatly in the frame pocket---If I were to cut from that end, I would have to 're-bend" the end of the coil to be "flat")
I will post more pics tomorrow of the new changes.
Le Mans Master


Joined: Oct 2010
Posts: 6,936
Likes: 848
From: melbourne florida
2023 C3 of the Year Finalist - Modified
mine sat at over 29" after i added aluminum heads etc. i just put the VBP 550 lb springs and cut 3/4 of a coil , it dropped that front end exactly where i wanted it. definitely a lowered look. if you don't want it that low maybe a 1/4 coil would do you well.

Melting Slicks


Joined: Oct 2002
Posts: 2,317
Likes: 111
From: St Louis MO
Here's one approach I've taken... Look at the spacing between the coils with the suspension fully settled at both the top and bottom. Since the load on the spring will remain the same, one would expect that the height of the control arm drop would be the distance between the cut coil; however, since the wheel is roughly twice the distance from the control arm pivot as the center of the spring, the drop height will be roughly twice the distance of the loaded cut coil.
Since the spring pockets are indented for the end of the spring to keep it from moving in the pocket, I don't recommend fractions of a coil.
Since the spring pockets are indented for the end of the spring to keep it from moving in the pocket, I don't recommend fractions of a coil.
2026 Loser of the Year
Joined: Sep 2013
Posts: 36,595
Likes: 7,043
From: New Or-leens Loo-z-anna
This is some good info, I didn't know that they were variable rate and that was the reason for the unevenly spaced coils, this makes it pretty important which end you cutTrue....but the First "wrap" that I cut off from the tightly-wound end seemed to make no difference in the firmness when I "bounced" the front end several times with my weight--I would expect to notice a difference in firmness after cutting off a Second wrap . I know there's a hole in the lower control arm that the tip of the spring goes into, it sounds like there's another one in the upper spring pocket? Or is it a depression that matches the shape of the spring It seems that on my '68 there is a deep depression that is angled to match the end of the spring in Both pockets? In either case it seems that you're limited to cutting in one coil sections for proper fit, which affects the decision of which end to cut based on how much you want it to drop.....So, you are NOT limited to cutting from one end only---JUST BE CAREFUL/ DO BOTH SIDES OF THE SUSPENSION THE SAME WAY AND REMEMBER THAT THE "UNALTERED SIDE WILL HOLD THE CAR UP SOME UNTIL IT IS ALSO CUT/MODIFIED........ you CAN cut the coil spring from either end getting different "drop" results/without using the rebending method If you cut off a wrap from the larger spaced end of the spring, you can heat a spot about 4-5" from the end of the spring and re-bend it to have the "flat" appearance by submerging all but the last wrap in a container of cold water, and then bending the final 4-5" flat against the rest of the spring to match the OEM look---but it's a tricky thing to do . I've read that you can expect a 2 inch drop if you cut one coil from the widely spaced end I can see how that would happen---but you need to study the spring pocket to make sure the "New" end of the coil spring will sit decently in the pocket without having to "heat/reshape the end of the spring . Mine sets at 29 inches from the floor to the lip, (it's actually 28 5/8 but it has a 235/60 15 which is the wrong size tire and I'm going to put the correct size on which will bring up to about 29 inches) so I'd like at least an inch drop if not an inch and a half After the First cut and removal of one wrap from the closely-wound end---the car dropped 3/4" once the spring was re-installed and AFTER I DROVE THE CAR AROUND THE NEIGHBORHOOD AND OVER SEVERAL BUMPS...but the 3/4" was barely noticeable . If I'm limited to cutting in one coil increments then it would seem I can only cut from the top of the spring, which I actually like since the ride would be relative unchanged. Doorgunner, if you got a 3/4 inch drop by cutting a coil from the top of the spring, are you expecting a further drop after driving the car as some have suggested Definately drive the car to get the spring to "settle"....but it seems to me that if the coil spring is cut a full wrap, the spring does not need to "settle much" because you can properly seat it in the spring pockets. I can see how much settling would occur if the spring was not set in the pockets correctly or had a partial wrap cut off, then the spring had to "work it's way into a "comfortable position"?
Reference: The front suspension sat 4-5" high also, before cutting off the coil springs to lower it 3".....

The shocks are what make the final adjustment on the ride quality...cheap shocks=rough ride...since I wanted a "smooth ride" and was not concerned about sport-driving much, I intalled Monroe SensaTrac shocks, causing the truck to ride similar to a car. I can see how SPORT shocks would cause a much firmer ride even with "slightly soft" coil springs. But, those who prefer better handling whic a Vette was designed for, the shocks recommended the most on this forum by expert members should be considered (I needed to "adjust" my vehicles to a smoother ride because of damaged discs in my spine).
It's time for me to go to the garage/cut one more coil off the driver's side spring......I think I'll cut from the larger spaced end to get a larger drop, and will not "rebend" the end of the coil spring .....I'll do the passenger's side spring the same way that I am cutting the driver's-side spring.....then post pics after I drive the car a couple miles over some bumps to make sure the suspension is settled (of course I'll re-align the front suspension myself, then bring the car to an alignment shop to have the alignment "finished correctly".
Last edited by doorgunner; May 24, 2014 at 12:07 PM.
Corvette Stories
The Best of Corvette for Corvette Enthusiasts

Top 10 Most Expensive Corvettes Ever Sold on Bring A Trailer
Brett Foote
10 Things Every Corvette Owner Needs (2026 Edition)
Michael S. Palmer
8 Most "Only Corvette Owners Understand" Quirks and Problems
Pouria Savadkouei
10 Reasons the C6 Z06 is Still A Performance Benchmark After 20 Years
Joe Kucinski
How Much Horsepower Every Corvette Engine "LOST" in 1972
Joe Kucinski
Top 10 DOs and DON'Ts for Protecting Your Convertible Top!
Michael S. Palmer
Top 10 Most Explosive Corvettes Ever Made: Power-to-Weight Ratio Ranked!
Joe Kucinski
150 hp to 1,250 hp: Every Corvette Generation Compared by the Specs That Matter
Joe Kucinski
8 Coolest Corvette Pace Cars (and Replicas) of All Time
Verdad Gallardo
Le Mans Master
Joined: Oct 2010
Posts: 6,936
Likes: 848
From: melbourne florida
2023 C3 of the Year Finalist - Modified
the best rule of thumb for how much to cut off a coil spring came for a guy who made springs for over 60 years. he told me measure the height at the top of the wheel well, decide how much drop you want , remove the spring and measure it, mark the spring with the amount you want dropped and cut it. in other words shorten the springs overall length the amount of drop you want. But, variable rate springs should be cut on the widely spaced end. he also said that if you need more than 2 1/2 inches a new spring would probably be better.
he also said that if you need more than 2 1/2 inches a new spring would probably be better.
2026 Loser of the Year
Joined: Sep 2013
Posts: 36,595
Likes: 7,043
From: New Or-leens Loo-z-anna
the best rule of thumb for how much to cut off a coil spring came for a guy who made springs for over 60 years. he told me measure the height at the top of the wheel well, decide how much drop you want , remove the spring and measure it, mark the spring with the amount you want dropped and cut it. in other words shorten the springs overall length the amount of drop you want. But, variable rate springs should be cut on the widely spaced end. he also said that if you need more than 2 1/2 inches a new spring would probably be better.
he also said that if you need more than 2 1/2 inches a new spring would probably be better.Le Mans Master
Joined: Feb 2011
Posts: 5,943
Likes: 61
From: Southern NH
the best rule of thumb for how much to cut off a coil spring came for a guy who made springs for over 60 years. he told me measure the height at the top of the wheel well, decide how much drop you want , remove the spring and measure it, mark the spring with the amount you want dropped and cut it. in other words shorten the springs overall length the amount of drop you want. But, variable rate springs should be cut on the widely spaced end. he also said that if you need more than 2 1/2 inches a new spring would probably be better.
he also said that if you need more than 2 1/2 inches a new spring would probably be better.
2026 Loser of the Year
Joined: Sep 2013
Posts: 36,595
Likes: 7,043
From: New Or-leens Loo-z-anna
I made the second cut on the driver's side coil spring......took the car thru the neighborhood over some nice bumps...
The fender to tire clearance is about 3/4" higher than I am aiming for....
BUT LET'S REMEMBER THAT i STILL HAVE TO REMOVE/CUT/RE-INSTALL THE PASSENGER'S SIDE COIL SPRING..............WHICH WILL CAUSE THE DRIVER'S SIDE OF THE CAR TO SETTLE MORE.
I'll post pics with more details in about an hour.
NOTE: This time the whole process was less than one hour from start.....to test drive....to measuring the fender after the suspension settled.
2026 Loser of the Year
Joined: Sep 2013
Posts: 36,595
Likes: 7,043
From: New Or-leens Loo-z-anna
My car was at 29" floor-to-fender lip....I cut 2 wraps off the "open end" of the coil spring.......now the driver's side of the car is very close to what I want in clearance above the tire (still need to modify the other--passenger's spring)
That's probably why the unofficial rule is to "Cut a little off at a time"....so we don't end up ruining a good coil spring.
( The camber and toe "went bizerk" on the passenger's wheel....needs LOTS of adjustment....LOL)
That's probably why the unofficial rule is to "Cut a little off at a time"....so we don't end up ruining a good coil spring.
( The camber and toe "went bizerk" on the passenger's wheel....needs LOTS of adjustment....LOL)
Last edited by doorgunner; May 24, 2014 at 02:37 PM.
2026 Loser of the Year
Joined: Sep 2013
Posts: 36,595
Likes: 7,043
From: New Or-leens Loo-z-anna
O.K.
I'm a Rookie......bear with me....
USE JACKSTANDS/BE CAREFUL/SPRINGS BITE!
I found from forum members that leaving the wheel on the car makes it easier (which doesn't sound right...LOL)........ I jacked the car....jackstand under frame......jacked lower control arm.....removed the shock......removed nut & loosened tierod with pickle fork......lowered control arm....pulled wheel away a feel inches.....loosened end caps on lower control arm shaft to allow control arm to settle to floor....pried spring out of lower arm and removed from chassis...

Here is a pick looking up into the spring pocket....notice to the left/inside edge of the top coil.....is a 3/8" hole I drilled with a 1& 1/4" long bolt inserted into the hole to hold the top of the spring in the pocket when re-installing the spring......this bolt keeps the upper spring from binding/refusing to stay in the spring pocket depression...

The spring is removed with a prybar ( FIRST...remove the rubber bump-stop to keep from damaging it)......Here is a pic of the " upper spring alignment bolt that I installed....

Here's a pic of the 1st and 2nd cut and changes that the cuts made/the measurements aren't exact...

Here's a measurement after the spring is re-in stalled and the car is driven to settle the suspension.....

I'll post more pics after I remove the passenger's spring and modify it (I hope all of the above makes some sense, since I did not do a step-by-step explanation--assuming that members have read threads about the topic).
I'm a Rookie......bear with me....
USE JACKSTANDS/BE CAREFUL/SPRINGS BITE!
I found from forum members that leaving the wheel on the car makes it easier (which doesn't sound right...LOL)........ I jacked the car....jackstand under frame......jacked lower control arm.....removed the shock......removed nut & loosened tierod with pickle fork......lowered control arm....pulled wheel away a feel inches.....loosened end caps on lower control arm shaft to allow control arm to settle to floor....pried spring out of lower arm and removed from chassis...
Here is a pick looking up into the spring pocket....notice to the left/inside edge of the top coil.....is a 3/8" hole I drilled with a 1& 1/4" long bolt inserted into the hole to hold the top of the spring in the pocket when re-installing the spring......this bolt keeps the upper spring from binding/refusing to stay in the spring pocket depression...
The spring is removed with a prybar ( FIRST...remove the rubber bump-stop to keep from damaging it)......Here is a pic of the " upper spring alignment bolt that I installed....
Here's a pic of the 1st and 2nd cut and changes that the cuts made/the measurements aren't exact...
Here's a measurement after the spring is re-in stalled and the car is driven to settle the suspension.....
I'll post more pics after I remove the passenger's spring and modify it (I hope all of the above makes some sense, since I did not do a step-by-step explanation--assuming that members have read threads about the topic).
Last edited by doorgunner; May 24, 2014 at 03:30 PM.

Racer
Joined: Jul 2010
Posts: 283
Likes: 1
From: The Netherlands EUR
I am going to change my 15" original wheels for some 18" alloys and i want to lower the car also.
The discussion about cutting springs always interested me because there are so many different opinions about a simple mechanical device as a coil spring.
The way i look at it: (*)
A coil spring is nothing more than a coiled torsion bar, just like the ones you have in your front and rear suspension, and it functions under the same principles.
The stiffness (stiffness: how much deflection under a certain load) of a torsion bar is only set by thickness and length. Think of a torsion bar with one end rigid and a torque load on the other end and it is not so hard to figure out that a thinner and longer torsion bar will turn more under the same load than a shorter and thicker one.
Back to the coil spring, this is just the same torsion bar but coiled into a spiral. Spring geometry/stiffness is stated as the result of wire thickness, number of coils and coil diameter. The last two are just another way of designating bar length.
So a spring which more coils is softer than the same spring with lesser coils, and a spring with a bigger coil diameter is softer than the same spring with a smaller diameter, simple mechanics.
Cutting one coil of the spring will reduce its number of working coils so the spring becomes stiffer.
A modern rising rate spring has a progressively wound coil, our Vettes have dual rate springs (looking at the picture above) meaning one half of the spring the coils are wound tighter than the other end. The tight coil end is softer than the end which the coils are more spaced. Normally the "soft" end handles minor bumps smoothening the ride out as mentioned above but under heavy compression the soft tight coils all stack up so they do not contribute to the spring anymore so the number of operating coils is reduced, firming up the spring!
So it does make a huge difference if you cut one end or the other.
And about the ride height: If you cut one inch off, the spring becomes one inch shorter and a bit stiffer. But the spring is not positioned at your wheel, but much more inside. I don't know the exact ratio but if your spring is roughly positioned in the middle between the wheel and the lower control arm connection point, any 1" cut will allow the wheel, which has twice the distance, to travel 2".
(*) meaning: my personal opinion.
Last edited by rene040269; May 24, 2014 at 05:08 PM.


