


removing radiator
Thread Starter
Racer

Joined: Dec 2011
Posts: 284
Likes: 4
From: Philadelphia Pennsylvania
The radiator & condenser are the only things left preventing me from completing my cam change. I can't get the damned radiator out. All the bolts are disconnected, hoses disconnected, etc. The top brackets are removed so it is just sitting in place. I was able to push it up from the bottom about 5in but it won't go any further. It won't rock/rotate at all. It feels like it is pinched between the foam pads on the front side and the shroud on the engine bay side. I can't remove the shroud because it hits the top of the control arms. I have somebody else helping me and we can't get it to move any further. Even if I do get it out I'm not sure how it would go back in for the same reasons.
Any ideas?


Any ideas?

Race Director


Joined: Apr 2009
Posts: 19,294
Likes: 2,754
From: Charlotte NC
YES...I know how to do this and know what I am writing about.
MARK and REMOVE THE HOOD. No way around it.
On the sides of your radiator support...where it is bolts to your inner skirts. REMOVE THE TOP 2 ON EACH SIDE. You (obviously) can get them from INSIDE the wheel wells.
NOW...loosen but DO NOT REMOVE the bottom bolts for the radiator support.
NOW...the 2 LARGE bolts (5/8" socket required) that hold the radiator support to the BOTTOM of the front impact bar...LOOSEN THEM VERY WELL. You will notice an angle bracket that JOINS the radiator support to the impact bar. In most cases..I do not have to remove this angle bracket....but sometimes I DO...and sometimes I have to loosen all 4 bolts.
NOW....you pull towards the front of the car and this will tilt the radiator support. When I am doing this by myself...when I tilt the radiator support forwards...I take one of the bolts that I took out of the SIDES of the radiator support and stick it in the TOP hole...So when I let go of the radiator support...it will STOP on this bolt and still be tilted forward. Once that has been done on BOTH sides...the radiator WILL COME OUT...but you might have to remove the side foam seals to help you out.
I ALSO have the fan should pulled back towards the engine and it may tilt a little further out at the TOP.
Then it is a matter of lifting it evenly fora little bit...and then angling the drivers side up more so you can get the bottom tube out from round the control arm and shroud..
This is a fun job and I can do them by myself...so I know you can to do this.
When going back in here is a VERY HELPFUL TIP. I cut a large piece of thick cardboard...and drape it over the top of the radiator and make sure that the cardboard goes all the way to the BOTTOM of BOTH sides(front and rear) of the radiator. THEN..I use string and tie the cardboard to the radiator in 2 places...making it tight as possible and NOT able to move around so you have good control/grip. TRUST ME...IT IS WORTH THE TIME.. This is so when I an dropping the new radiator back in...I do not have to worry about damaging the core...and when I get it in...I cut the strings and pull out the cardboard so i can finish up its installation.
DUB
Race Director
Joined: Apr 2009
Posts: 19,294
Likes: 2,754
From: Charlotte NC
Le Mans Master


Joined: Jun 2006
Posts: 6,400
Likes: 1,226
From: Tampa Florida
With the hood off, I still prefer to R&R the radiator, shroud, support frame as one unit. I've done it both ways and the one unit method was much easier. This way was recommended by fellow forum members.
Race Director
Joined: Apr 2009
Posts: 19,294
Likes: 2,754
From: Charlotte NC
And knowing that the front support for the radiator support for a 1971 is NOT the same as the 1973 and later . That alone changes the dynamics of this process.
DUB
Corvette Stories
The Best of Corvette for Corvette Enthusiasts

Top 10 Most Expensive Corvettes Ever Sold on Bring A Trailer
Brett Foote
10 Things Every Corvette Owner Needs (2026 Edition)
Michael S. Palmer
8 Most "Only Corvette Owners Understand" Quirks and Problems
Pouria Savadkouei
10 Reasons the C6 Z06 is Still A Performance Benchmark After 20 Years
Joe Kucinski
How Much Horsepower Every Corvette Engine "LOST" in 1972
Joe Kucinski
Top 10 DOs and DON'Ts for Protecting Your Convertible Top!
Michael S. Palmer
Top 10 Most Explosive Corvettes Ever Made: Power-to-Weight Ratio Ranked!
Joe Kucinski
150 hp to 1,250 hp: Every Corvette Generation Compared by the Specs That Matter
Joe Kucinski
8 Coolest Corvette Pace Cars (and Replicas) of All Time
Verdad GallardoBurning Brakes


Joined: Oct 2003
Posts: 1,090
Likes: 74
From: New Carlisle IN
I just came in the house to research this exact same question. I had removed my radiator in my 73 with no issues. The one in my 76 is giving me fits because of the control arm bolts and the shroud. The 73 has a different shroud and it came out with no issues.
I actually have to get my radiator out and have it repaired because of the control arms. On my drivers side arm, the front bolt that holds the bushing in had backed out. This caused the control arm to slip off the shaft. It hit the shroud and the shroud punctured a very tiny hole in the radiator. I have new bushings to go in the control arm and will replace them when the radiator is out being repaired.
I actually have to get my radiator out and have it repaired because of the control arms. On my drivers side arm, the front bolt that holds the bushing in had backed out. This caused the control arm to slip off the shaft. It hit the shroud and the shroud punctured a very tiny hole in the radiator. I have new bushings to go in the control arm and will replace them when the radiator is out being repaired.
Drifting

Joined: May 2012
Posts: 1,353
Likes: 44
From: Calgary Alberta
I just came in the house to research this exact same question. I had removed my radiator in my 73 with no issues. The one in my 76 is giving me fits because of the control arm bolts and the shroud. The 73 has a different shroud and it came out with no issues.
I actually have to get my radiator out and have it repaired because of the control arms. On my drivers side arm, the front bolt that holds the bushing in had backed out. This caused the control arm to slip off the shaft. It hit the shroud and the shroud punctured a very tiny hole in the radiator. I have new bushings to go in the control arm and will replace them when the radiator is out being repaired.
I actually have to get my radiator out and have it repaired because of the control arms. On my drivers side arm, the front bolt that holds the bushing in had backed out. This caused the control arm to slip off the shaft. It hit the shroud and the shroud punctured a very tiny hole in the radiator. I have new bushings to go in the control arm and will replace them when the radiator is out being repaired.
It would be half the job on my 70, I can tell just by looking at it.
Thread Starter
Racer
Joined: Dec 2011
Posts: 284
Likes: 4
From: Philadelphia Pennsylvania
Damn, I was hoping I could avoid removing the hood. Ah well, off she goes.
Thanks for all the details, guys. I can't wait to get this back on the road while it is still nice outside.
Thanks for all the details, guys. I can't wait to get this back on the road while it is still nice outside.
Thread Starter
Racer
Joined: Dec 2011
Posts: 284
Likes: 4
From: Philadelphia Pennsylvania
My radiator looks to be in great shape so I definitely don't want to damage it. It looks grimy in the pictures but its really only the bottom support bracket that has rust. I will probably clean the rust off the bracket and paint it, too.
Race Director
Joined: Apr 2009
Posts: 19,294
Likes: 2,754
From: Charlotte NC
The blueish-green residue I see on the right tank below the radiator cap where the tank and the core are soldered.... is NOT a GOOD SIGN.
Obviously it is your call....but my 'take' on it is ...when it is out...have it thoroughly checked. because nothing would be worse if you have to due it in a month or two again.
DUB
Last edited by DUB; Oct 6, 2014 at 06:08 PM.

Le Mans Master
Joined: May 2008
Posts: 9,063
Likes: 2,736
2022 C3 of the Year Finalist - Modified
Is there anything about a 77 NON A/C car that would make it less important to remove the hood. I fully appreciate the idea that removing the hood makes it easier, but removing the hood appears to me to be a great way to damage the paint. The clearance at ithe front of the hood is less than 1/8 inch on both sides, and I just see it not going well.
What am I missing. Can you put the radiator in first, then the shroud? It has been so long since removed it all I forgot.
What am I missing. Can you put the radiator in first, then the shroud? It has been so long since removed it all I forgot.
Race Director
Joined: Apr 2009
Posts: 19,294
Likes: 2,754
From: Charlotte NC
The odds that the shroud will go in AFTER you put the radiator is is about a million to one. It does not work that way. I do not cut the shroud or modify it in any way.
Paint gets damaged when precautionary measures are NOT employed.
All I can say is to use masking tape to protect your panel edges. If you do the removal of the hood and re-installation...you do not need a lot of tape to the 'potential' contact area where the paint can get damaged is very small when the hood is raised. So masking the entire hood is not required....in my opinion. I have a trick I use...but common sense comes to play here to figure it out. NO way paint can get damaged unless a person is incompetent...and should NOT be doing this if they are. Most people today are in a hurry they rarely take time to THINK.
I know I can put a radiator in a 1978-1982 without pulling the hood....but the core is no where as wide as the earlier years.
DUB
Le Mans Master
Joined: May 2008
Posts: 9,063
Likes: 2,736
2022 C3 of the Year Finalist - Modified
The odds that the shroud will go in AFTER you put the radiator is is about a million to one. It does not work that way. I do not cut the shroud or modify it in any way.
Paint gets damaged when precautionary measures are NOT employed.
All I can say is to use masking tape to protect your panel edges. If you do the removal of the hood and re-installation...you do not need a lot of tape to the 'potential' contact area where the paint can get damaged is very small when the hood is raised. So masking the entire hood is not required....in my opinion. I have a trick I use...but common sense comes to play here to figure it out. NO way paint can get damaged unless a person is incompetent...and should NOT be doing this if they are. Most people today are in a hurry they rarely take time to THINK.
I know I can put a radiator in a 1978-1982 without pulling the hood....but the core is no where as wide as the earlier years.
DUB
Paint gets damaged when precautionary measures are NOT employed.
All I can say is to use masking tape to protect your panel edges. If you do the removal of the hood and re-installation...you do not need a lot of tape to the 'potential' contact area where the paint can get damaged is very small when the hood is raised. So masking the entire hood is not required....in my opinion. I have a trick I use...but common sense comes to play here to figure it out. NO way paint can get damaged unless a person is incompetent...and should NOT be doing this if they are. Most people today are in a hurry they rarely take time to THINK.
I know I can put a radiator in a 1978-1982 without pulling the hood....but the core is no where as wide as the earlier years.
DUB
But, I will do what is best. I have no interest in damaging my new Dewitts radiator, not even on minor bump will be acceptable. Thanks.
Pro


Joined: Jan 2010
Posts: 533
Likes: 18
From: Boca Raton Florida
When you have the radiator out, it's a good time to carefully check the radiator support. Mine didn't look bad when it was in the car but once I pulled it there was obviously very little left. It's an expensive part but having the radiator moving around is probably going to make it look cheap. Here's a view from the top:
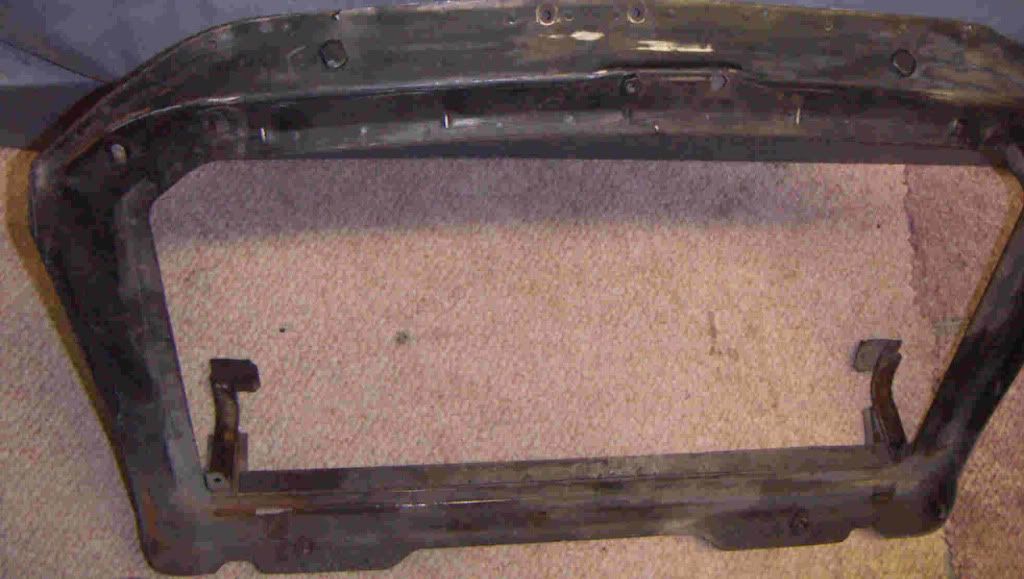
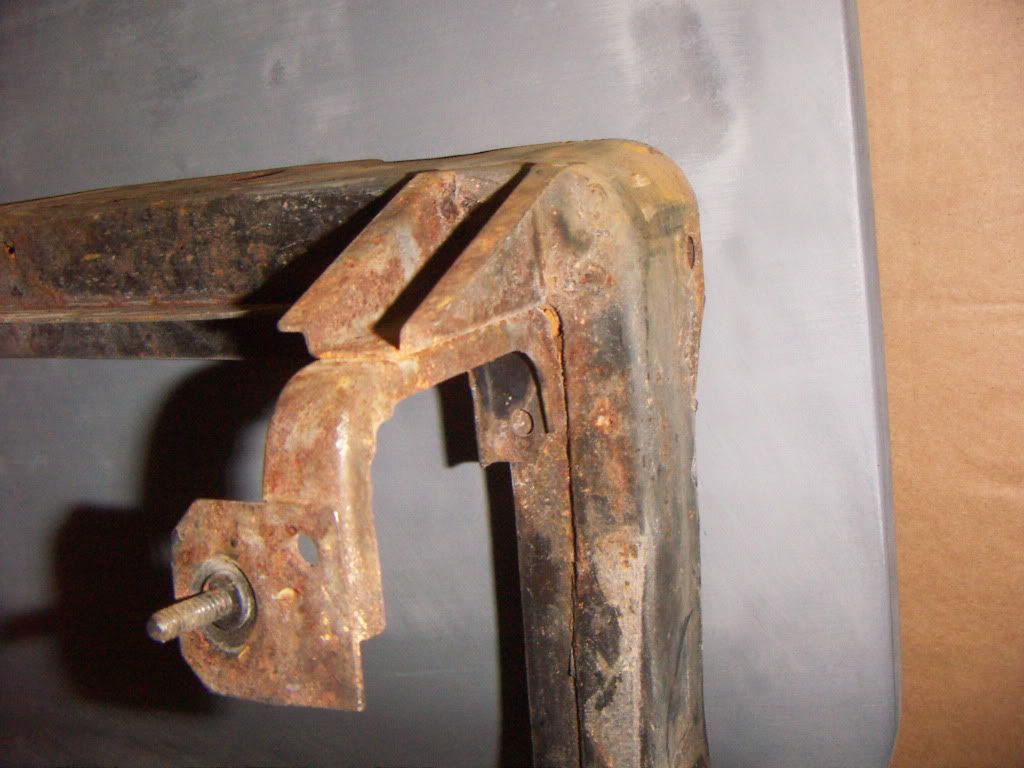
From the bottom, the driver side was rusty but I thought I could sand blast the rust and give it a couple of coats of epoxy primer:
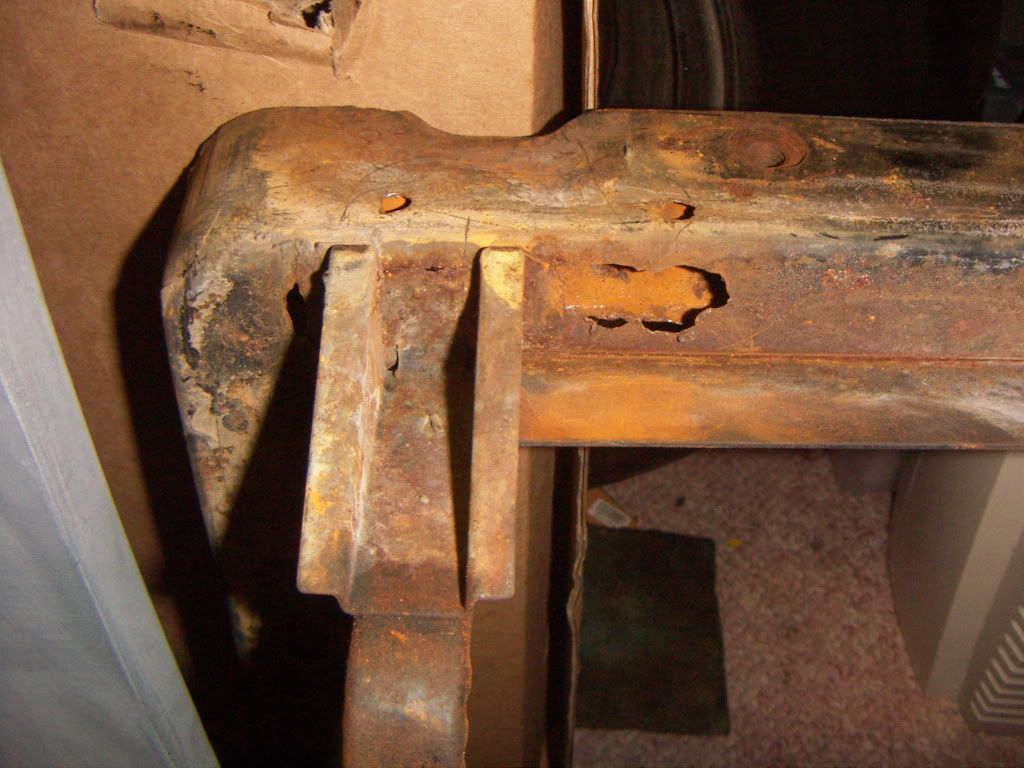
The passenger side was where the weeping petcock provided the perfect amount of dampness. Once I started poking, it was obvious I was going to be spending a lot of time replacing the rotted metal:
From the bottom, the driver side was rusty but I thought I could sand blast the rust and give it a couple of coats of epoxy primer:
The passenger side was where the weeping petcock provided the perfect amount of dampness. Once I started poking, it was obvious I was going to be spending a lot of time replacing the rotted metal:
Thread Starter
Racer
Joined: Dec 2011
Posts: 284
Likes: 4
From: Philadelphia Pennsylvania
I got it out. It was a huge pain. I had to take the hood off to get the condenser loose. Had to loosen all the support bracket bolts so the bracket would move towards the engine compartment enough to get at the last condenser bolt which is very low on the passenger side and couldn't be accessed even with a u-joint socket wrench. I also had to disconnect the ridgid a/c hose on the low driver's side so the condensor would be able to swing out of the way far enough to get the cam out. The system had already been drained previously so no leak.
I will have to take a closer look at my rad. It seemed okay but if it isn't sound I'd much rather just replace it now than have to pull it again in the future. I was planning to blow it out with compressed air at least.
this fitting prevented condenser from moving around

this screw was attaching the condenser to the bracket and was very inaccessible

radiator out. The inside looks really clean but this side has dirt and debris

the whole point of this

I will have to take a closer look at my rad. It seemed okay but if it isn't sound I'd much rather just replace it now than have to pull it again in the future. I was planning to blow it out with compressed air at least.
this fitting prevented condenser from moving around
this screw was attaching the condenser to the bracket and was very inaccessible
radiator out. The inside looks really clean but this side has dirt and debris
the whole point of this
Race Director
Joined: Apr 2009
Posts: 19,294
Likes: 2,754
From: Charlotte NC
This rot in the radiator support is common and more than likely NOT due to a leaking petcock. Yours actually looks very good versus to some I have pulled out. Water gets down in the radiator support and lays in that bottom channel.
I would still have the radiator checked....that green residue would have me driving over to the radiator shop I use...but that is just me.
The bottom bolts for the condenser are a ROYAL PAIN....especially with those Corvettes with the round impact bar/vacuum reservoir tube.
DUB
I would still have the radiator checked....that green residue would have me driving over to the radiator shop I use...but that is just me.
The bottom bolts for the condenser are a ROYAL PAIN....especially with those Corvettes with the round impact bar/vacuum reservoir tube.
DUB