
Help with a Starter on a 71, how to properly align?
 05-16-2015, 04:37 PM
#1
Drifting

Thread Starter

Hey all,
I had the starter off when I was doing some work two years back. Not knowing there were shims and a proper alignment to installing a starter, I just put it back together. Now when I start it, sometimes I'll get a grind and spin not catching the flywheel. Other times it catches like normal and starts the car.
Does anyone have an instruction on how to properly shim and set a starter? I looked through the chassis service manual and I cannot find a procedure. I can find how to take a starter apart, but not how to install one. Want to get this installed correctly so I limit any damage to whats already been done.
I've been getting a C5Z ready for track days all winter and my 71 took a back seat. Its nice now here in the northeast and my Z06 is ready for some track time, so I want to get the LT-1 ready for some summer events.
Thank you
Dan

 05-16-2015, 05:04 PM
#3
Team Owner

Member Since: Sep 2006
Location: Westminster Maryland
Posts: 30,173
Likes: 0
Received 2,878 Likes
on
2,515 Posts

Hi Dan,
Interestingly the St.Louis plant didn't use any shims when installing the starters on the engines while getting them ready to meet up with the chassis.
I'm not sure why that was, neither am I suggesting you shouldn't use any, but it seems the proper starter for the application (engine spec) didn't require any.
Regards,
Alan
05-16-2015, 05:17 PM
#4
Drifting
Thread Starter
I did replace the solenoid when I had the starter out. Basically one of the posts broke off when I was trying to remove the wires.
05-16-2015, 05:19 PM
#5
Drifting
Thread Starter
Hi Dan,
Interestingly the St.Louis plant didn't use any shims when installing the starters on the engines while getting them ready to meet up with the chassis.
I'm not sure why that was, neither am I suggesting you shouldn't use any, but it seems the proper starter for the application (engine spec) didn't require any.
Regards,
Alan
Interestingly the St.Louis plant didn't use any shims when installing the starters on the engines while getting them ready to meet up with the chassis.
I'm not sure why that was, neither am I suggesting you shouldn't use any, but it seems the proper starter for the application (engine spec) didn't require any.
Regards,
Alan
Thank you for your response. I thought I had kept track of the parts really well when I took my car apart. I didn't feel like I had any leftovers. But some time ago i had inquired about this and the response i got was to put the same number of shims it had back in and it should be fine. I'm pretty certain the starter had never been off. Car is low miles and the parts appeared to be originals.
05-16-2015, 07:42 PM
#6
Race Director

Did you torque the starter bolts? Mine made noise but it turned out I just hadn't torqued the bolts enough. Once I did it worked perfectly.
Otherwise the procedure is to engage the bendix by using a screwdriver to pull it out, and then a paperclip should just be able to slide between the gears.
Otherwise the procedure is to engage the bendix by using a screwdriver to pull it out, and then a paperclip should just be able to slide between the gears.
05-16-2015, 08:01 PM
#7
Safety Car


In my experience with starters not aligning was usually a bent bolt. Take the bolts out and roll them on a flat surface. The slightest wobble with throw off your starter. Torquing them will help if there's a slight almost unnoticeable bend in them but they are cheap and most GM dealers still have them in stock.
05-16-2015, 08:53 PM
#8
Le Mans Master


Do you have the proper GM starter bolts with the knurl on them making them slightly oversize? I have never had a problem with starter alignment using the factory bolts and a housing in good condition. If the holes on your starter nose are ovalized from having the incorrect bolts on them....all bets are off!
05-17-2015, 07:52 AM
#10
Burning Brakes


Agree with the above two posts. I've never seen shims from the factory, they may exist but are rare. definitely check for bent starter bolts. and make sure they are correct starter bolts, not just regular bolts. Starter bolts are knurled for stated reasons. Also make sure the housing isn't trashed and the holes aren't ovaled out. If above is all good, then you've got another issue. normally shims are used to move the pinion gear away from the flexplate, so if you think the gear is spinning and not engaging, it's more likely something with the starter. like spinning without kicking out (bad solenoid), etc.
05-17-2015, 01:35 PM
#11
Drifting
Thread Starter
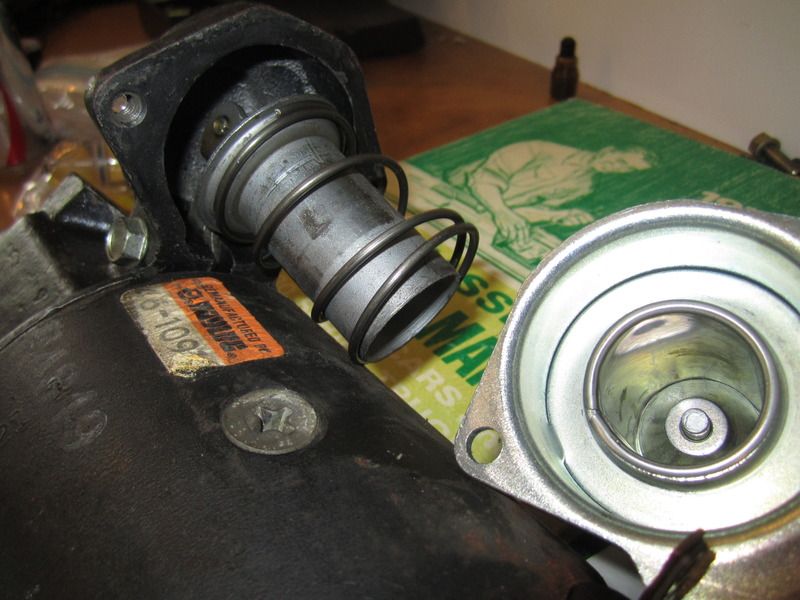
Was able to pull it off and take some pics.
Bolts are the knurled bolts that were referenced. They are also straight, I rolled them on the bench and they don't wobble. Assembly Manual shows these two bolts at 25-30 ft-lbs, removing these I'd say they were around that. Broke loose with some effort, but didn't have to attack it.
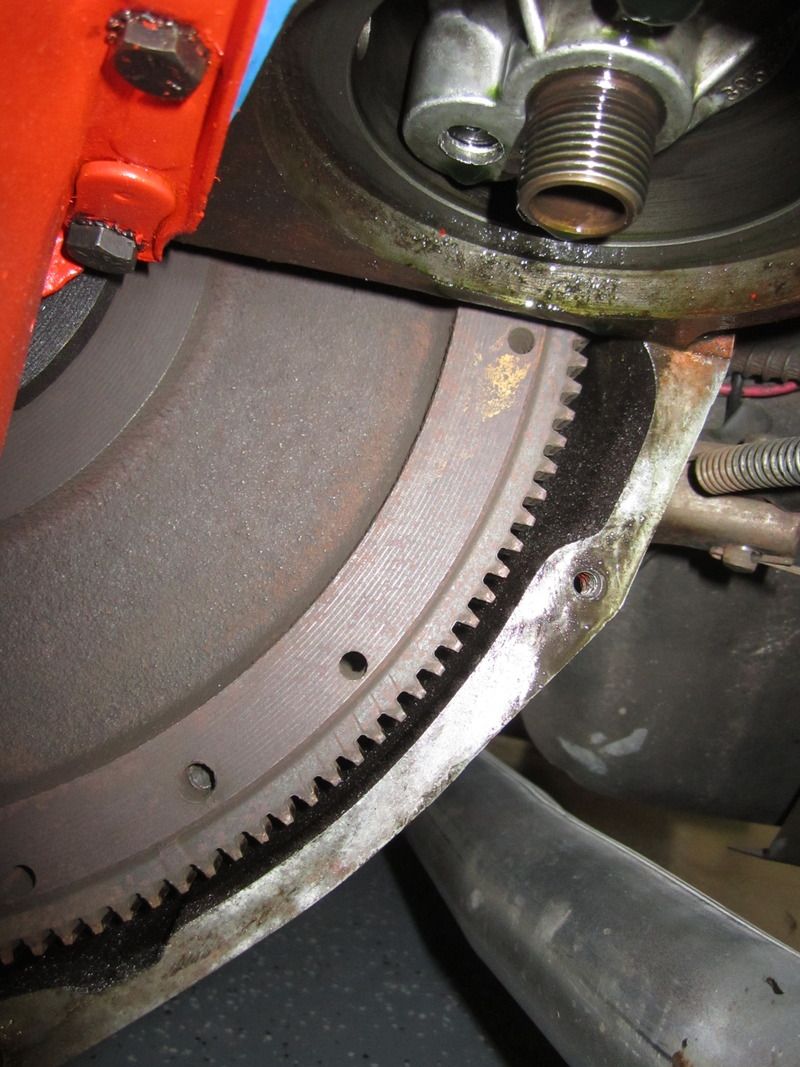
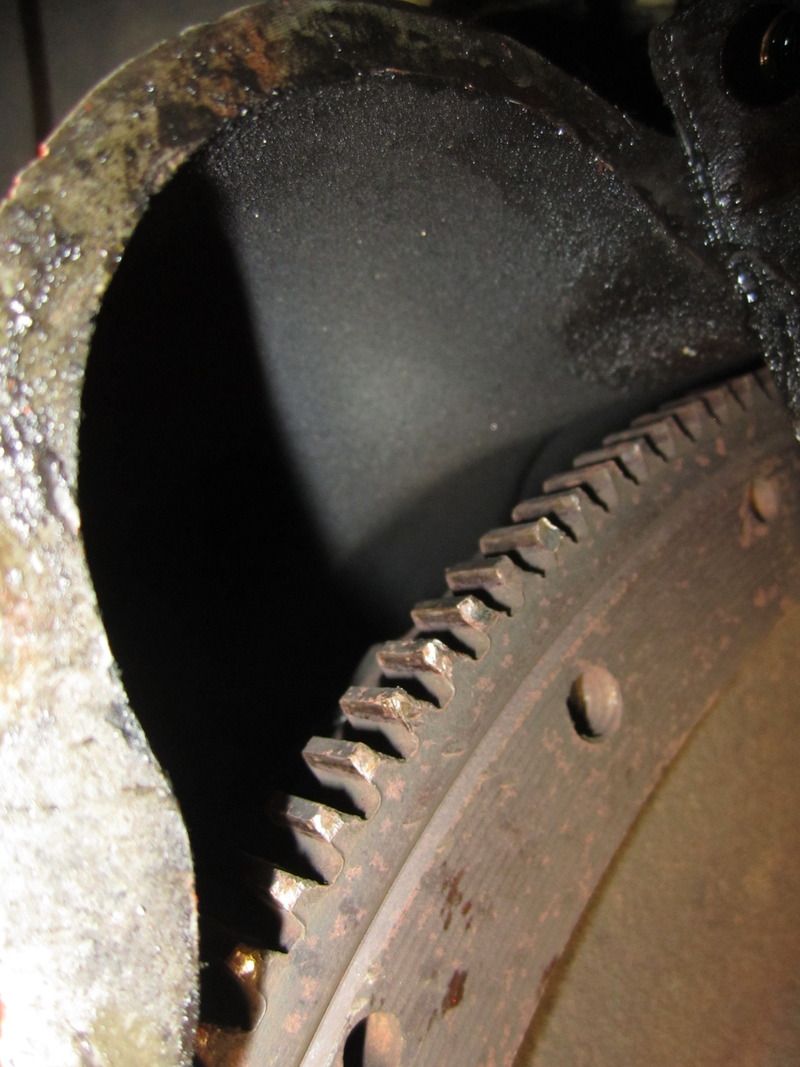
Some teeth on the flywheel are chipped at the edge where the starter motor would engage. It doesn't look like any damage on the outside of the teeth. Makes me think the mesh is to close versus to far apart. I don't see how anything would adjust here.
I had replaced the solenoid when i first had it apart. I didn't do anything but just unbolt and replace.
Kinda scratching my head here, would appreciate your perspective and advice.
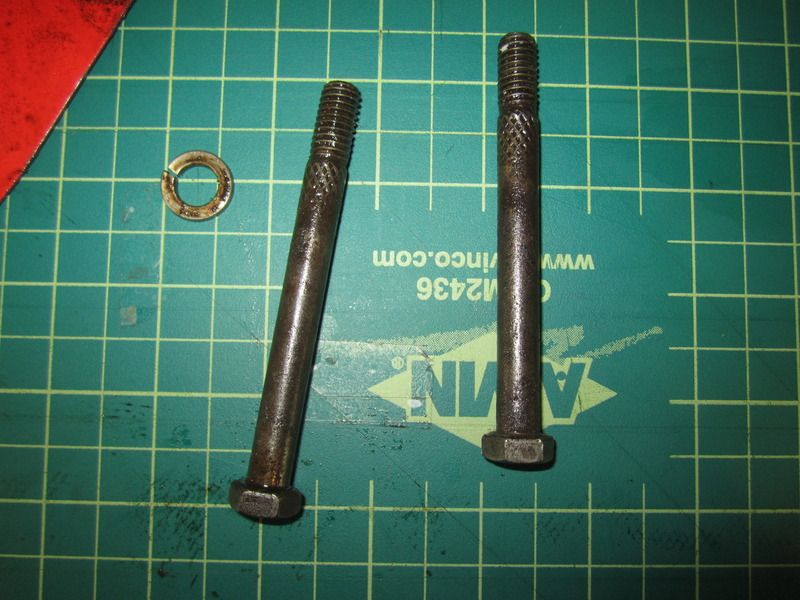

Bolts are the knurled bolts that were referenced. They are also straight, I rolled them on the bench and they don't wobble. Assembly Manual shows these two bolts at 25-30 ft-lbs, removing these I'd say they were around that. Broke loose with some effort, but didn't have to attack it.
Some teeth on the flywheel are chipped at the edge where the starter motor would engage. It doesn't look like any damage on the outside of the teeth. Makes me think the mesh is to close versus to far apart. I don't see how anything would adjust here.
I had replaced the solenoid when i first had it apart. I didn't do anything but just unbolt and replace.
Kinda scratching my head here, would appreciate your perspective and advice.


 05-17-2015, 08:14 PM
#13
Burning Brakes
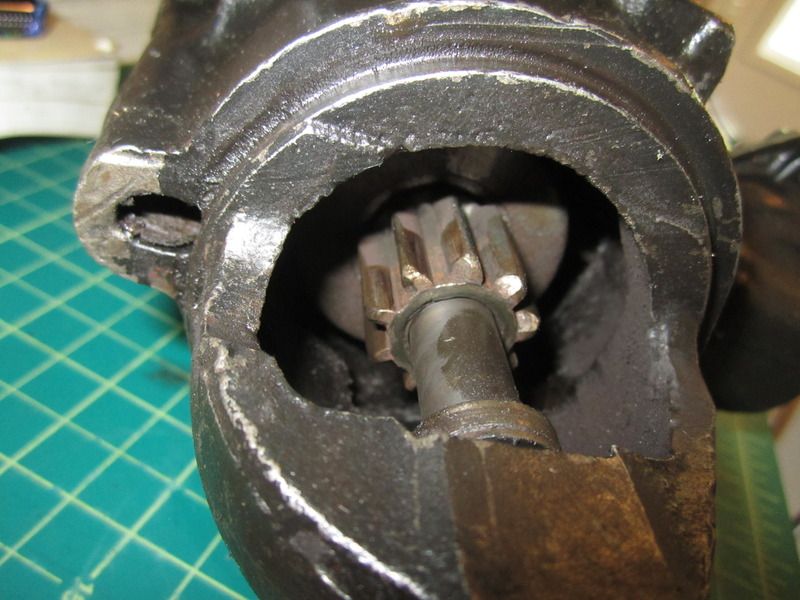
yes this. put starter on without solenoid. manually move the bendix in and out to see what's happening there. don't over torque the starter bolts and deform the nose...
can't see from your pic what the nose bushing looks like. lately, the rebuilds from parts stores have been really crappy. used to be able to get a good one for $20, now adays you may need to swap 2 or 3 before you get a good one.
can't see from your pic what the nose bushing looks like. lately, the rebuilds from parts stores have been really crappy. used to be able to get a good one for $20, now adays you may need to swap 2 or 3 before you get a good one.
05-18-2015, 12:54 PM
#14
Drifting
Thread Starter
yes this. put starter on without solenoid. manually move the bendix in and out to see what's happening there. don't over torque the starter bolts and deform the nose...
can't see from your pic what the nose bushing looks like. lately, the rebuilds from parts stores have been really crappy. used to be able to get a good one for $20, now adays you may need to swap 2 or 3 before you get a good one.
can't see from your pic what the nose bushing looks like. lately, the rebuilds from parts stores have been really crappy. used to be able to get a good one for $20, now adays you may need to swap 2 or 3 before you get a good one.
Was trying to think how I would see anything, I'll be able to move the bendix easily set up this way.
Also found my starter has a "remanufactured" sticker on it. So if it was replaced at one point, it may have needed some adjustment.
I won't be able to work on it until next weekend. I'll post up my progress then.
05-18-2015, 08:55 PM
#15
Race Director
Thank you,
Was trying to think how I would see anything, I'll be able to move the bendix easily set up this way.
Also found my starter has a "remanufactured" sticker on it. So if it was replaced at one point, it may have needed some adjustment.
I won't be able to work on it until next weekend. I'll post up my progress then.

You will have to remove the inspection cover.
05-18-2015, 10:50 PM
#16
Race Director
# one, nothing wrong with the starter
# two, only one starter is correct for both 71 and 72 Vette engines, BB or SB...
# 3, most important is that they do NOT use shims...moving the drive away from the teeth of the ring gear only makes the problem worse......
# 4 solution, You need a new $20.00 ring gear
Unfortunately to replace it requires removal of bunch of parts...A cold chisel knocks it off and heat by a torch on the new gear and just drop in on...A local auto parts company like ours was should be able to handle the job...it's a simple installation on the ring gear.....
Have fun, and a few
Last edited by Ironcross; 05-18-2015 at 11:20 PM.
05-20-2015, 12:53 PM
#17
Le Mans Master
Member Since: Oct 2002
Location: Las Vegas - Just stop perpetuating myths please.
Posts: 7,098
Received 373 Likes
on
356 Posts

Thx for the pix Dan as they really help. Well the correct thing to do is replace the ring gear but ya know ive made use of a lot worse than that. And i think u could touch it up with a file if concerned. Where your at know it dont cost a dime more to use what u have to see if it will function as is. If not then u know what to do.
Anyways for clearancing the starter Zwede already covered it for the teeth. But u need a pinion to flywheel/ring gear clearance to and its something like 0.050" (please look it up for yourself).
Well i do something a bit different to check the clearance as i leave the solenoid on and disconnect the short heavy wire/tang from the solenoid to the motor. That way i can connect my small batt charger to the solenoid batt stud (batt wire disconnected to). Then all i have to do is touch any small gauge wire as a jumper wire from the large solenoid stud to the "S" terminal stud on the solenoid. This will extend the bendix gear w/o turning the starter motor and u can chack your clearances/fit. U may want to use clips on the jumper wire as once disconnected the gear should retract (unless its stuck - oh yes that happens plenty to).
Whew thats enough for me. Good luck.
09-18-2015, 04:16 PM
#18
Drifting
Thread Starter
Hello all,
Thought I would reward those that use the search function and add some closure to this thread. I picked up a new starter and starter bolts from Napa. I found that the new starter bolts were much tighter in the mounting holes than the old starter and bolts were. The old ones slipped through without catching and the new ones bit into the starter. This combo of new parts was inexpensive and it solved the problem. I have not had any grinds since the install and everything appears to be working fine.
One word of caution if you are doing this same job. I found that the inspection cover did not go straight back into place by the crankshaft. When I put the permatex on the rear part of the oil pan seal it squeezed some out into where the inspection cover goes. When putting the cover back into place, that squeezed out permatex pushed the cover forward and it knocked against where the flywheel meets the crankshaft. The fix was easy, I cut back the squeezed sealant and knocked the corners off the inspection cover with a grinder. The part that sucked was realizing it all had to be taken back apart to fix it. I was very defeated hearing the clunk clunk clunk and left the car sitting for a couple weeks before digging back into it.
Hope this helps someone!
Dan
The following users liked this post:
Duke94 (12-09-2020)