When you click on links to various merchants on this site and make a purchase, this can result in this site earning a commission. Affiliate programs and affiliations include, but are not limited to, the eBay Partner Network.
I have every service manual for my 77 and I still am having problems installing my new springs. I bought Moog replacement springs. They are a few inches shorter which I thought would make them easier to install. I have read many threads regarding installation and it appears that everybody has a different way to do it.
What's the easiest best way to do it? One thing that perplexes me is the constant mention of spring orientation in the upper pocket using the inspection hole and a screwdriver. Well.. on my 1977 there is a definite orientation for the spring in the lower control arm but the upper has nothing. The inspection hole isn't even near the coil spring end. It appears to me that the lower spring end is supposed to sit in the obvious stop in the lower control arm and the upper just ends up where it ends up. Any help would be appreciated. I tried for hours yesterday to install the coil springs with no luck. I wasn't using a spring compressor.
The orientation to the lower control arm is the only one to be concerned about. Use the "threaded bar thru the shock hole" technique to compress the spring. You MUST use a safety chain.
The orientation to the lower control arm is the only one to be concerned about. Use the "threaded bar thru the shock hole" technique to compress the spring. You MUST use a safety chain.
I tried the threaded rod through the shock hole. The problem with that is when I thread the bar through the upper shock hole it hits the spring and is not even close to being in the correct position to exit out of the bottom of the lower control arm. Its totally at the wrong angle. Anyway.... whats the difference between that method and just jacking up the lower control arm?
This is the method I planned on using. I can't get it to work because the upper spring won't slide inboard into the upper pocket. I tried kicking it and I don't want to use a pry bar because everything is freshly painted. I just can't figure out how to install new springs without totally scratching everything up.
I don't know why you are having problem with the threaded rod going
through the spring. That is the way I reinstalled my springs. As said
above, you definitely need to contain the spring because it will do
a lot of damage if it comes out under pressure.
I also used the floor jack to help.
Donnie
Last edited by DonnieP73; Nov 16, 2015 at 09:14 AM.
I don't know why you are having problem with the threaded rod going
through the spring. That is the way I reinstalled my springs. As said
above, you definitely need to contain the spring because it will do
a lot of damage if it comes out under pressure.
I also used the floor jack to help.
Donnie
When you did this did you have the upper spring in place and the lower kicked outboard at an angle or the other way around? I was trying this method with the bottom of the spring correctly positioned in the lower control arm. When the spring is in that position the upper is way outboard and the coils are hitting the outer edge of the upper spring pocket. Because of this.. when I drop the rod down the shock hole it goes about half way down and hits the coil spring. Its not even close to the lower hole where it needs to come out.
Hi jgc,
You're right, without the spring compressed into the lower a-arm at least some distance the spring comes up into the frame pocket at such an angle that it hits the side of the pocket before it can seat properly in the frame pocket.
This is the reason some folks find pulling the spring up INTO the pocket quite far and then raising the lower a-arm into position seems to work.
You've had various good advice so I won't offer any more.
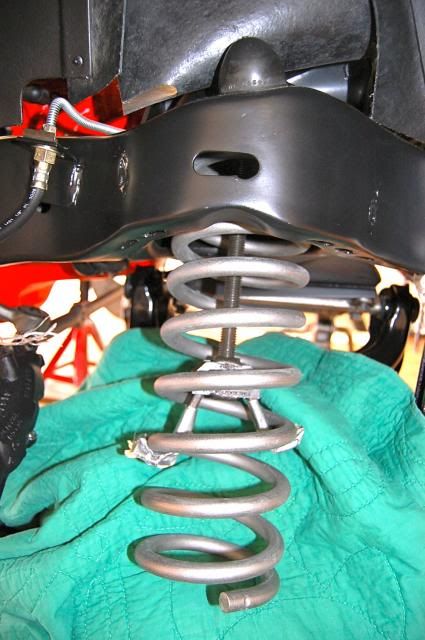
I'll just add two pictures showing the spring pulled into the frame pocket so you can see the short length of the spring that needs to extend from the pocket in order seat the spring in the lower arm.
Good Luck!
Regards,
Alan
Here's the spring seated in the pocket but NOT compressed.. note the length.
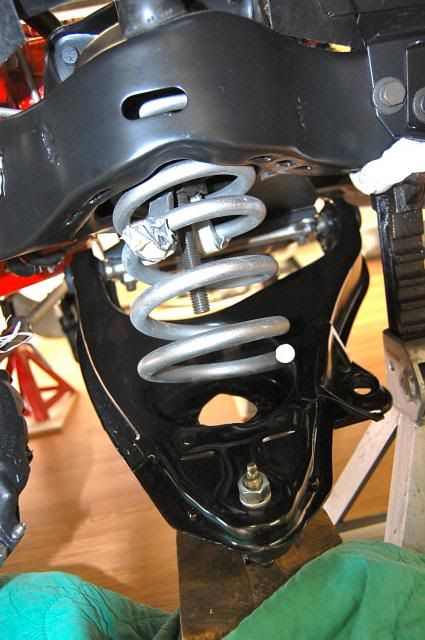
Here's the spring compressed into the pocket but still not quite ready to raise the lower a-arm.. note the length.
I have every service manual for my 77 and I still am having problems installing my new springs. I bought Moog replacement springs. They are a few inches shorter which I thought would make them easier to install. I have read many threads regarding installation and it appears that everybody has a different way to do it.
What's the easiest best way to do it? One thing that perplexes me is the constant mention of spring orientation in the upper pocket using the inspection hole and a screwdriver. Well.. on my 1977 there is a definite orientation for the spring in the lower control arm but the upper has nothing. The inspection hole isn't even near the coil spring end. It appears to me that the lower spring end is supposed to sit in the obvious stop in the lower control arm and the upper just ends up where it ends up. Any help would be appreciated. I tried for hours yesterday to install the coil springs with no luck. I wasn't using a spring compressor.
Get a 5/8 fine thread rod with 4 nuts and a couple large washers .The 5/8 fits perfect through shock hole .Make sure you have the lower arm far enough down to start spring in .If you have a bearing shop there take the rod in an get a bearing with hole that fits rod and it will turn the nuts easier .On the bottom I use a 3 way puller head and double up the nuts for safety .Make sure spring end is in proper location 'If new springs are shorter they may have given you Big Block springs which is going to change ride height
Done this many times with all length springs .I posted pictures a while back on the forum .I got everything I needed at Fastnail
Wes
Last edited by 530planeman; Nov 16, 2015 at 09:48 AM.
Just food for thought...but with the MOOG springs you can almost guarantee that it will sit too high......
Chances are you will need to remove a coil from them to get a satisfactory ride height......
Thing that stinks is you do not know for sure until it is in and settled....
I can tell you they go in much easier with one coil removed. From other threads I have read here....that seems to be what most people end up doing.....and it is what I did on my 69' BB car.
I did not need a compressor to install them after a coil was removed.
Hi jgc,
You're right, without the spring compressed into the lower a-arm at least some distance the spring comes up into the frame pocket at such an angle that it hits the side of the pocket before it can seat properly in the frame pocket.
This is the reason some folks find pulling the spring up INTO the pocket quite far and then raising the lower a-arm into position seems to work.
You've had various good advice so I won't offer any more.
I'll just add two pictures showing the spring pulled into the frame pocket so you can see the short length of the spring that needs to extend from the pocket in order seat the spring in the lower arm.
Good Luck!
Regards,
Alan
Here's the spring seated in the pocket but NOT compressed.. note the length.
Here's the spring compressed into the pocket but still not quite ready to raise the lower a-arm.. note the length.
I get it. I need to get one of those compressors. So basically.. you are compressing the spring UP into the pocket and once its compressed enough the lower control arm can be jacked up and the coil will fit into the lower control arm pocket correctly. Then I can install my steering knuckle and shock.
Hi j,
Once the spring is far enough in the upper pocket the lower a-arm can be manually lifted into position.
I put a couple blocks of wood under the a-arm to hold it up while I attach and tighten the spindle in place.
I've done this more than a few times and the thing I learned is that the further the spring can be compressed the more straight forward raising the lower arm can be.
I've had times that I hadn't/couldn't compress the spring enough so had to unbolt the a-arm from it's frame mount and raise it straight up, (not swing) into place, support it in place, and then bolt it at the frame and spindle.
I know someone who had a coil spring fly…. and that has made me overly careful about being safe. Securing the spring take extra time and effort but is worth it.
Regards,
Alan
Just food for thought...but with the MOOG springs you can almost guarantee that it will sit too high......
Chances are you will need to remove a coil from them to get a satisfactory ride height......
Thing that stinks is you do not know for sure until it is in and settled....
I can tell you they go in much easier with one coil removed. From other threads I have read here....that seems to be what most people end up doing.....and it is what I did on my 69' BB car.
I did not need a compressor to install them after a coil was removed.
Jebby
I hope you are wrong about that. The Moog springs I bought are part # 5758 and they are supposed to be stock ride height. I will say that they are MUCH shorter than the stock springs I removed. I called them about that and they said its because the bar diameter is larger than stock. All the pictures I have seen online with these coil springs look pretty much like a stock ride height.
Hi j,
Once the spring is far enough in the upper pocket the lower a-arm can be manually lifted into position.
I put a couple blocks of wood under the a-arm to hold it up while I attach and tighten the spindle in place.
I've done this more than a few times and the thing I learned is that the further the spring can be compressed the more straight forward raising the lower arm can be.
I've had times that I hadn't/couldn't compress the spring enough so had to unbolt the a-arm from it's frame mount and raise it straight up, (not swing) into place, support it in place, and then bolt it at the frame and spindle.
I know someone who had a coil spring fly�. and that has made me overly careful about being safe. Securing the spring take extra time and effort but is worth it.
Regards,
Alan
Alan- I'm going to be removing/re-installing the stock springs shortly during my re-build of the front A arms. I was planning to use both ends of the coil spring compressor to put the spring back in so that it could be maneuvered into place and then slowly released. Is there an advantage to using just the one end and pulling it on the top thru the shock hole? How do you rotate the spring to get it correctly into the lower spring seat pocket? RA
Hi j,
What made you think/decide that you NEEDED to replace your springs?
Regards,
Alan
Cosmetics. I replaced everything on my front suspension and since everything his now so clean looking or new I figured having new springs would look better. My stock 37 year old springs are horrifying looking and it cost more to get them sand blasted than to just buy new ones. I figured that 37 year old crusty and rusty springs can't possibly be better than brand new Moog ones.
I did a bunch of research before I bought them from Rock Auto and I certainly hope they aren't going to jack up my front end.
This is the method I planned on using. I can't get it to work because the upper spring won't slide inboard into the upper pocket. I tried kicking it and I don't want to use a pry bar because everything is freshly painted. I just can't figure out how to install new springs without totally scratching everything up.
JG- by now you have had a lot of good advice. I just want to pipe in about the safety issue. Without the spring securely held in place with a good spring compressor, there is the real risk of it slipping and flying out and damaging either your freshly painted components or your hands, fingers, etc. I saw a spring fly 30 feet across the garage a few years ago when someone tried to use a jack to compress the spring and had it almost in place..........boing!!!!! Corvette front springs are about 300 lbs for each inch you compress them. Does not take too much to get over half a ton of force waiting to go somewhere. RA
Alan- I'm going to be removing/re-installing the stock springs shortly during my re-build of the front A arms. I was planning to use both ends of the coil spring compressor to put the spring back in so that it could be maneuvered into place and then slowly released. Is there an advantage to using just the one end and pulling it on the top thru the shock hole? How do you rotate the spring to get it correctly into the lower spring seat pocket? RA
There is no room to use both sides of the compression. The wind up touching with not enough spring compression for reinstall.
I used the rod provided with the kit. Slide it though and threaded the lower claws. Then added a few washes to to the top so it would turn easier. Very simple and clean way to hold the spring in place under tension.
Hi RA,
I started out many years ago using the spring compressor in it's intended way (all the pieces).
I found it difficult to compress the spring enough and still have the 2 parts of the spring compressor NOT hit one or other of the pockets when I went to install it.
I think this is why I, and others, have gone to the threaded rod method since it really doesn't interfere with the pockets in any way while the spring is being pulled into the pocket/being compressed.
I still find this to be an unpleasant job because I tend to damage the finish on the frame, a-arm, or spring when I do it.
Here's something else you may have to look forward to… now that I'm old I find I don't really have the strength to easily compress the spring anymore, so it's become QUITE a tough job for me. I have resorted to using a 3/4" drive socket wrench with a 1' long piece of pipe on it which gives me leverage I need, but with everything installed in the compartment I can only turn it about 1/4 of a turn before the pipe hits something or is in a position I can't reach it with any strength.
Good Luck!
Regards,
Alan
Hi RA,
I started out many years ago using the spring compressor in it's intended way (all the pieces).
I found it difficult to compress the spring enough and still have the 2 parts of the spring compressor NOT hit one or other of the pockets when I went to install it.
I think this is why I, and others, have gone to the threaded rod method since it really doesn't interfere with the pockets in any way while the spring is being pulled into the pocket/being compressed.
I still find this to be an unpleasant job because I tend to damage the finish on the frame, a-arm, or spring when I do it.
Here's something else you may have to look forward to� now that I'm old I find I don't really have the strength to easily compress the spring anymore, so it's become QUITE a tough job for me. I have resorted to using a 3/4" drive socket wrench with a 1' long piece of pipe on it which gives me leverage I need, but with everything installed in the compartment I can only turn it about 1/4 of a turn before the pipe hits something or is in a position I can't reach it with any strength.
Good Luck!
Regards,
Alan
Alan- I kinda thought that was the reason I have another spring compressor that fastens on the outside of the spring, which is OK for some cars, but not for the Corvette, since the two threaded rods hit the frame and spring tower. I guess I'll have another custom made tool. You should see some of the contraptions I had to make when working on my RX-7, instead of buying the special factory tool for a couple hundred bucks. I hear you about the pipe on the end of the wrench. I've always heard them referred to as a "persuader". I have one three feet long. RA
Would this compressor work? I can rent it from Autozone for free. The threaded shaft is 12" long. I only need to use the one claw which is all this tool has. I don't need to use that large flat piece.