


68 Actuator relay locations

Thread Starter
Instructor

Joined: Aug 2016
Posts: 172
Likes: 2
Howdy!
I'm trying to retrofit a vacuum system from scratch into a car that has had square lights fitted and the headlight door removed in the past...
Any chance someone could post a couple of photos showing where their relays are actually fitted?
Looking under the nose of my car - I can only see 2 bolt holes - which don't look right for the relay... and - is it ONE relay? some of the diagrams online seem to suggest one relay per headlight!
for the headlight actuator - there appears to be a spot on the wheel arch that looks about right - but it'd be good to confirm if i could!
Many thanks for your help
david
Team Owner


Joined: Sep 2006
Posts: 31,283
Likes: 4,373
From: Westminster Maryland
Hi david
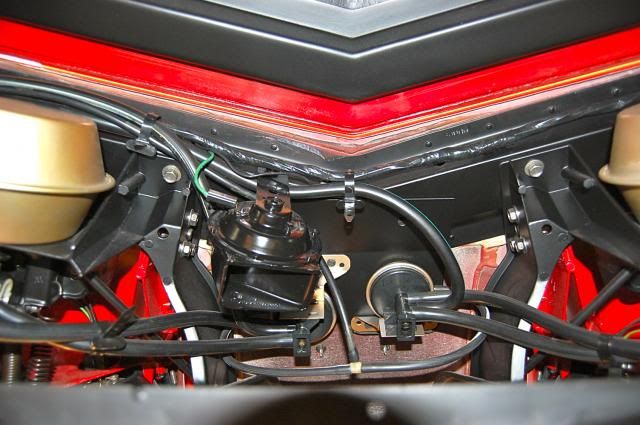
I believe the 68 cars had a single relay that served both headlight actuators.
"Ts" in the hoses leaving the relay were used to allow one relay to control two actuators.
The relay was mounted to the underside of the headlight reinforcement bar in the space between the headlights.
Regards,
Alan
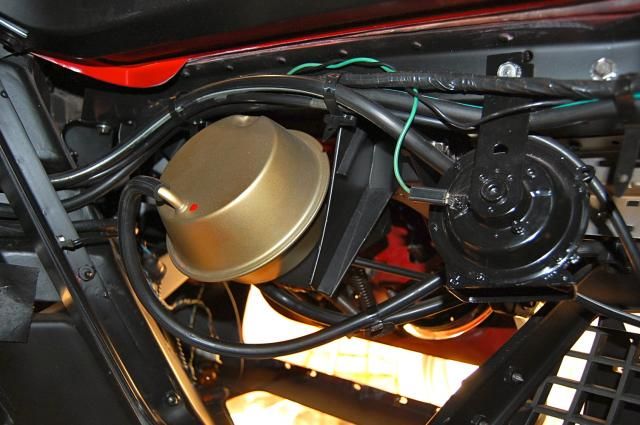
This is a photo of a 71 headlight vacuum set up. I post it ONLY to help you in the RELATIVE position of things.
Even with a single relay you'll still have a large red stripe and green stripe hose running to each actuator.

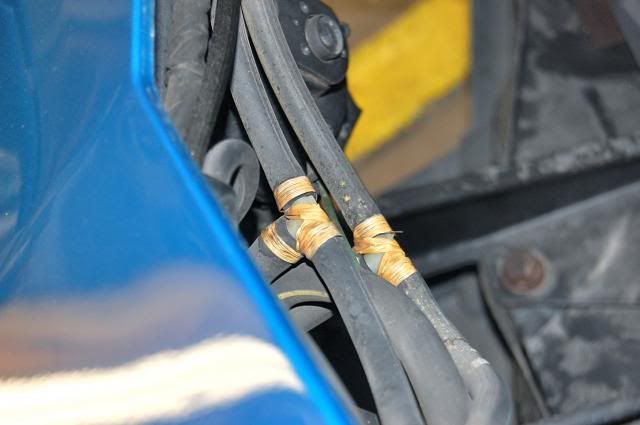
An example of the 'T' used. (This is a 69 car.)
I believe the 68 cars had a single relay that served both headlight actuators.
"Ts" in the hoses leaving the relay were used to allow one relay to control two actuators.
The relay was mounted to the underside of the headlight reinforcement bar in the space between the headlights.
Regards,
Alan
This is a photo of a 71 headlight vacuum set up. I post it ONLY to help you in the RELATIVE position of things.
Even with a single relay you'll still have a large red stripe and green stripe hose running to each actuator.
An example of the 'T' used. (This is a 69 car.)
Last edited by Alan 71; Dec 9, 2016 at 08:07 AM.
Safety Car


Joined: May 2008
Posts: 3,753
Likes: 721
From: Lafayette Louisiana
My 68 only has 1 headlight actuator mounted in the center of the nose header support bar.
My 68 wiper door has one actuator mounted on the passenger fender wheel on the inside the engine compartment.
Suggest you get an AIM (Assembly Instruction Manual) for the 68 Corvette, invaluable information. Check ebay or one of the Corvette vendors, should be about $25 or so.
Also, if you check some of the Corvette vendor catalogs they have great info on what and where things go. And I am thinking a lot of their catalog dwgs come straight out of the AIM.
Hope this helps
Last edited by 20mercury; Dec 9, 2016 at 11:12 AM.
Team Owner


Joined: Jun 2000
Posts: 38,923
Likes: 1,482
From: Southbound
Cruise-In II Veteran

Race Director


Joined: Apr 2009
Posts: 19,294
Likes: 2,754
From: Charlotte NC
YES...the 1968 only used ONE headlight actuator relay.
It is mounted in the center of the support for your top hood surround ...basically in the same area that Alan shows in his photos. The fasteners show be a 10-24 machine screw if I am not mistaken.
The actuator relay for the wiper door is mounted to the backside of the right inner skirt.
DUB
It is mounted in the center of the support for your top hood surround ...basically in the same area that Alan shows in his photos. The fasteners show be a 10-24 machine screw if I am not mistaken.
The actuator relay for the wiper door is mounted to the backside of the right inner skirt.
DUB
Corvette Stories
The Best of Corvette for Corvette Enthusiasts

Top 10 Most Expensive Corvettes Ever Sold on Bring A Trailer
Brett Foote
10 Things Every Corvette Owner Needs (2026 Edition)
Michael S. Palmer
8 Most "Only Corvette Owners Understand" Quirks and Problems
Pouria Savadkouei
10 Reasons the C6 Z06 is Still A Performance Benchmark After 20 Years
Joe Kucinski
How Much Horsepower Every Corvette Engine "LOST" in 1972
Joe Kucinski
Top 10 DOs and DON'Ts for Protecting Your Convertible Top!
Michael S. Palmer
Top 10 Most Explosive Corvettes Ever Made: Power-to-Weight Ratio Ranked!
Joe Kucinski
150 hp to 1,250 hp: Every Corvette Generation Compared by the Specs That Matter
Joe Kucinski
8 Coolest Corvette Pace Cars (and Replicas) of All Time
Verdad GallardoPro


Joined: Feb 2014
Posts: 607
Likes: 122
Are you dead set on vacuum? The reason I ask is that with the help of Richard454 on this site, I converted mine over to electric for less than 200.00 when it was all said and done. My engine produces very little vacuum at idle and you need at least 12" of vacuum to make the system work well. Mine had issues to begin with on the system. Works great now.
Thread Starter
Instructor
Joined: Aug 2016
Posts: 172
Likes: 2
Are you dead set on vacuum? The reason I ask is that with the help of Richard454 on this site, I converted mine over to electric for less than 200.00 when it was all said and done. My engine produces very little vacuum at idle and you need at least 12" of vacuum to make the system work well. Mine had issues to begin with on the system. Works great now.
I did consider going down the electric route when i realised i was having to start from scratch... and yes - it was originally the high prices cost of most of the electric conversion kits that put me off..
That said, I'm now thinking that i'd like to retain some originality where I can... and the quirks of the vacuum system are an original element!
In the case that I do have vacuum issues (it's a concern - see my other thread!) - I think prefer to spend some money to get a quiet-ish little vacuum pump to support the system rather than scrap it off. Perhaps i'm losing the plot/going nuts!

Team Owner

Joined: Jan 2006
Posts: 37,637
Likes: 3,118
From: Crossville TN
If the electric headlamp actuation method was better, Chevy would have stayed with the stuff used on the C2 cars. Interesting how they opted for vacuum AFTER the C2 'electric headlamp' venture.
Vacuum system is cheaper, more reliable, and easier/less costly to repair. Downside......most folks won't take a little time to learn how it works, so they're lost on how to work with it.
So.....let's throw money and time at the problem!!! Time to re-engineer what worked well for 30+ years........
Vacuum system is cheaper, more reliable, and easier/less costly to repair. Downside......most folks won't take a little time to learn how it works, so they're lost on how to work with it.
So.....let's throw money and time at the problem!!!
Time to re-engineer what worked well for 30+ years........


