
Body Mount - Fiberglass Cracking
 12-21-2016, 06:26 PM
#21
Race Director


 12-21-2016, 06:28 PM
#22
Race Director


YEP...I KNOW all about the 'fun' you had getting them back in and bucked. LOOKS VERY GOOD Roger!!!
DUB
The following users liked this post:
SB64 (12-21-2016)
12-21-2016, 06:29 PM
#23
Team Owner

Member Since: Sep 2006
Location: Westminster Maryland
Posts: 30,173
Likes: 0
Received 2,878 Likes
on
2,515 Posts

Hi Jim,
While I saw a small assortment of rivet 'heads' used on my car, I think I saw only 2 different 'set' sides.
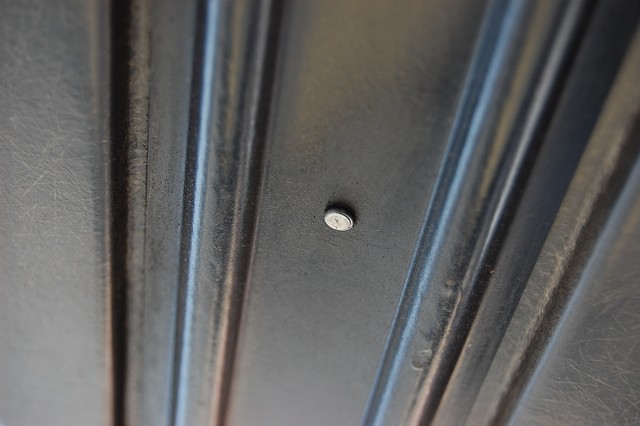
The most typical, and seemingly used everywhere, was the simple 'mushroom' set.
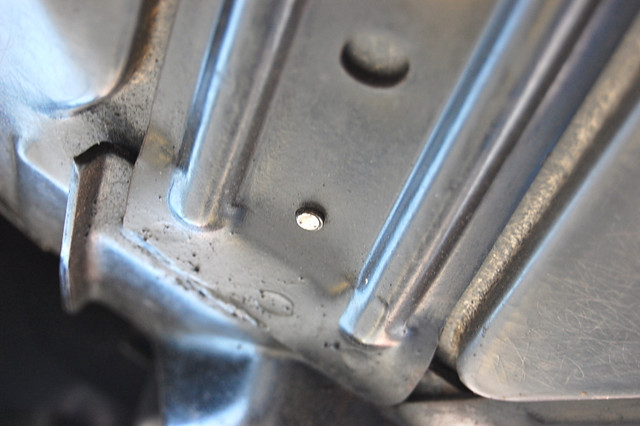
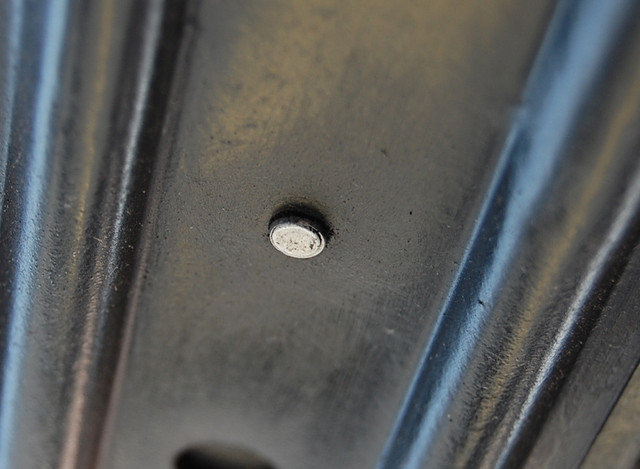
However, on the support strap for the spare tire tub, the rivets, while having the typical large flat head, have a very precise and consistent shape to the 'set' side.
????
Regards,
Alan
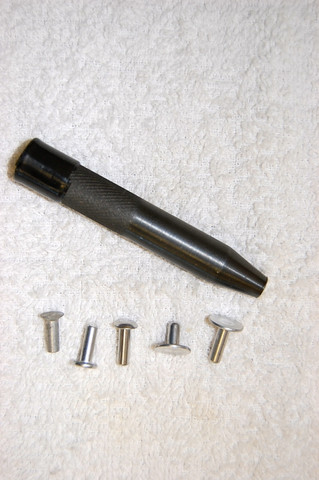
I'm curious about these?
While I saw a small assortment of rivet 'heads' used on my car, I think I saw only 2 different 'set' sides.
The most typical, and seemingly used everywhere, was the simple 'mushroom' set.
However, on the support strap for the spare tire tub, the rivets, while having the typical large flat head, have a very precise and consistent shape to the 'set' side.
????
Regards,
Alan
I'm curious about these?
Last edited by Alan 71; 12-21-2016 at 06:33 PM.
12-21-2016, 06:57 PM
#24
Race Director
I would bet that the rivets on the spare tire carrier were smashed by a machine. So it would make it a one-man job.
At Fruehauf we had some awesome pneumatic and hydraulic rivet setting tools that a person could use to smash the rivets on specif areas of the trailer. And thus...the 'bucking bar' portion of the tool was made a specific way for how ever the engineers wanted the rivet to be smashed. Some rivets were smashed flat...some and a domed look to them like what GM kinda has in some areas.
DUB
12-21-2016, 09:29 PM
#25
Racer

Thread Starter
For the SMC vs not SMC. My car is a '78 SA.
I am going to use bolts. I don't care so much about what the factory did. Everything else is modified on the car; I intend to autocross.
I'm just trying to get the reproduction reinforcement bracket to fit nicely and line up with the old rivet holes, which it does not.
I was going to use 3/16 bolts because that's what fits. Will that be strong enough? Or should I drill them out and use 1/4"?
12-22-2016, 08:32 AM
#26
Instructor


For the SMC vs not SMC. My car is a '78 SA.
I am going to use bolts. I don't care so much about what the factory did. Everything else is modified on the car; I intend to autocross.
I'm just trying to get the reproduction reinforcement bracket to fit nicely and line up with the old rivet holes, which it does not.
I was going to use 3/16 bolts because that's what fits. Will that be strong enough? Or should I drill them out and use 1/4"?
I am going to use bolts. I don't care so much about what the factory did. Everything else is modified on the car; I intend to autocross.
I'm just trying to get the reproduction reinforcement bracket to fit nicely and line up with the old rivet holes, which it does not.
I was going to use 3/16 bolts because that's what fits. Will that be strong enough? Or should I drill them out and use 1/4"?
12-22-2016, 08:39 AM
#27
Instructor
From what I was told by a customer/friend who actually built the top hood surrounds for the 1975-1982 Corvettes. That the resin used in the process was not polyester based....thus...not the same as the earlier Corvettes....thus a different type of resin and adhesive is needed.
I did not work at molding plant. I worked at the Charlotte assembly plant building the trailers themselves. Which the only reason I mentioned it was due to I do a lot about using solid rivets and bucking them.
Any color of what??? You lost me on this.
If you are strictly commenting on the old archive photo of the assembly worker working on the Corvette underbody/rear tub area.
I agree. That era of Corvette is not SMC. But the original thread starter's Corvette is SMC.
An SMC panel is slick as glass on both sides and is a gray color often times with dark streaks running through it making it look like marble.
The panels from the earlier Corvettes are not as slick and actually will have a very, very light texture to them...and the fibers.... as like has been mentioned....are consistently different.
DUB
You are welcome to call me at 440-812-2189 to discuss.
12-22-2016, 08:41 AM
#28
Instructor
Hi Jim,
While I saw a small assortment of rivet 'heads' used on my car, I think I saw only 2 different 'set' sides.
The most typical, and seemingly used everywhere, was the simple 'mushroom' set.
However, on the support strap for the spare tire tub, the rivets, while having the typical large flat head, have a very precise and consistent shape to the 'set' side.
????
Regards,
Alan
I'm curious about these?
Please call me if you wish to discuss. 440-812-2189
Jim
12-22-2016, 07:04 PM
#29
Race Director
Another idea that might help would be to put a urethane adhesive between the reinforcement and the fiberglass underbody. That would make all the surfaces to nest together plus a good adhesion. Then you can rivet or bolt. Make sure you install large washers on the inside of the underbody. I would think that 3/16 would be fine, but for peace of mind, go to 1/4.
 with adding an adhesive....as long as the surfaces are prepped correctly for the adhesive to have any worth and actually adhere.
 The size of fastener is up to you when you bolt the gusset to the body.
BUT what gives me more concern is the caged nut that the body bolt screwed into. I KNOW that GM used the caged square nut for 19 years.
But when I do repairs in this area...and the caging is rusted to pieces...and the nut was shot. When I go back in.... I cut a plate of steel that fits in the bottom of this #4 mount area on the inside....then I add large washer...and then a lock washer and nut. This is so when I get it all tight....that square plate I fitted to the inside of this area is now covering the entire bottom surface area.....and NOT just the surface that the original square nut covered.
DUB
12-24-2016, 01:33 PM
#30
Racer
Thread Starter
with adding an adhesive....as long as the surfaces are prepped correctly for the adhesive to have any worth and actually adhere. The size of fastener is up to you when you bolt the gusset to the body.
BUT what gives me more concern is the caged nut that the body bolt screwed into. I KNOW that GM used the caged square nut for 19 years.
But when I do repairs in this area...and the caging is rusted to pieces...and the nut was shot. When I go back in.... I cut a plate of steel that fits in the bottom of this #4 mount area on the inside....then I add large washer...and then a lock washer and nut. This is so when I get it all tight....that square plate I fitted to the inside of this area is now covering the entire bottom surface area.....and NOT just the surface that the original square nut covered.
DUB
Yeah, the cage and nut came out in pieces so I plan on just using a bolt like you say.
What's the best way to prep the surface for the adhesive?
I appreciate it. Thanks.
12-24-2016, 07:02 PM
#31
Race Director
Some want scuffing...some want grinding and good scratches...some want bare steel with good grind marks...while some want an epoxy primer on the steel...so...it depends.
The preparation of surfaces can be different due (as briefly explained above) to the chemical make-up of the adhesive...so their is NO BLANKET statement that covers all adhesives. Need to know what you are using.
And if you know what you are using...it might be best to contact their tech department and get that information from them. Because unless I know it right off the top of my head..I would have to call them and find out and then relay that information to you....SO..I am sure you are quite capable in contacting them yourself....and even have teh tech department go online and get to this thread so they can actually see what you are doing...so the correct adhesive and be used....just in case....a new/better formula has been developed that is not in the mainstream yet but can be obtained.
DUB
The following users liked this post:
bmans vette (12-27-2016)