When you click on links to various merchants on this site and make a purchase, this can result in this site earning a commission. Affiliate programs and affiliations include, but are not limited to, the eBay Partner Network.
Hi Db,
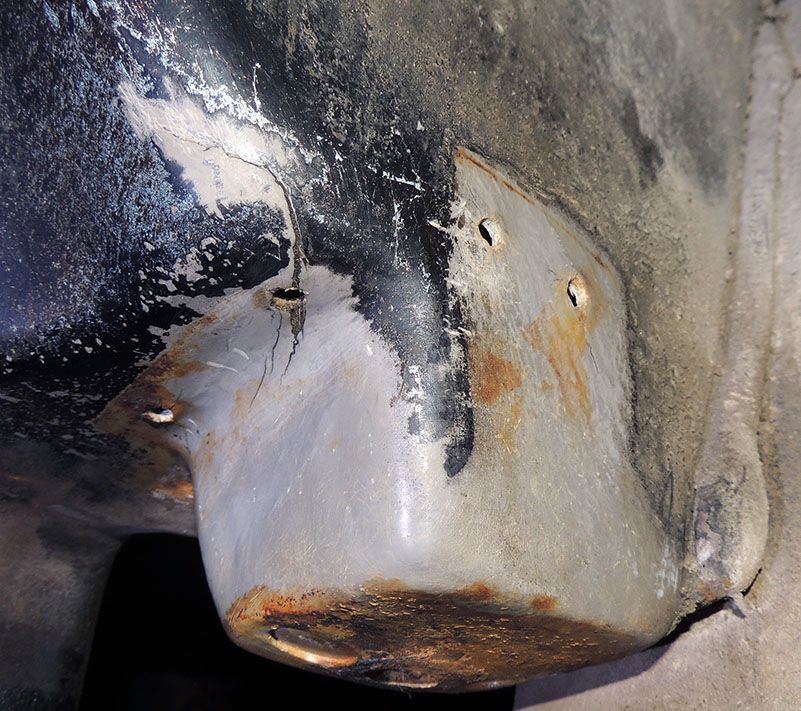
I think that's a crack in the resin only and caused by a 'resin-rich' lay-up that was often seen in that area of the underbody because of the tight radiuses needed to create that configuration.
I'd fill the crack with a little resin.
Regards,
Alan
Hi Db,
I think that's a crack in the resin only and caused by a 'resin-rich' lay-up that was often seen in that area of the underbody because of the tight radiuses needed to create that configuration.
I'd fill the crack with a little resin.
Regards,
Alan
Hi Alan,
I think that you are correct. I once worked for the company that made the rear underbody and many of the other Corvette parts. Those are made with the preform process. Chopped fiberglass is blown against a perforated screen that was the shape of the part. A vacuum is then pulled on the screen. Once the fiberglass is blown on the screen , a binder is sprayed to hold everything together. The preform part is then removed from the screen and delivered to the molding area. Those parts were molded on match metal steel molds heated to about 300 degrees F. Resin was poured over the preform in strategic areas and the preform and the resin was put in the mold. The mold was closed and a part was formed. Resin rich areas were predominate in those areas if the glass preform wasn't formed properly. We always tried to get extra glass in those areas so the glass wouldn't bridge over the corners which caused the resin rich condition. Molded Fiber Glass in Ashtabula, Ohio is still making rear underbodies for Corvette, but with the SMC process.
Keep in mind....this body panel is SMC and the appropriate resin made for SMC DOES make a difference if you are really looking to fix this...instead of just putting something in the crack that might stay a while.
Keep in mind....this body panel is SMC and the appropriate resin made for SMC DOES make a difference if you are really looking to fix this...instead of just putting something in the crack that might stay a while.
I do not feel it is a severe structural problem.
DUB
I was going to use what i can get at the Canadian Tire here, which is Bondo's polyster resin.
Hi Db,
I think either material will be satisfactory in this case.
If you don't need the resin for any other repairs in the work you're doing then the smaller amount would be more cost effective.
I'd give some thought to the decision to use bolts to reinstall the reinforcement�. while it's one possibility, it's a dead giveaway that a repair has been done.
Does that matter to you, or to this car?
Regards,
Alan
Keep in mind....this body panel is SMC and the appropriate resin made for SMC DOES make a difference if you are really looking to fix this...instead of just putting something in the crack that might stay a while.
I do not feel it is a severe structural problem.
DUB
DUB, I am not sure what year this Corvette is, but I just looked under my 1972 LT1 and the rear underbody is made from the preform process and not SMC (sheet molding compound). Both processes use fiberglass and polyester resin and both processes are made in heated steel matched metal molds. The preform process produces a much stronger product as the glass is evenly distributed and doesn't flow during molding where the SMC process flows glass and resin to form the part, thus setting up flow lines etc. I believe that all underbodies up to and including the C4 used the preform process.
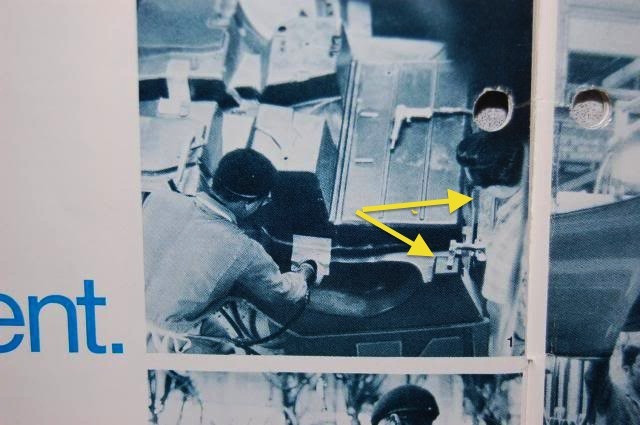
Hi b72,
I've been curious about this photo for a long time.
It 'appears' the #4 re-inforcement is in place.
Did the worker standing there 'set' the rivets?
If so, how were they 'bucked'?
Is there a fixture below that holds the rivets? Is there a person under there?
What's laying on the reinforcement? Is it a fixture holding the reinforcement in place?
????
Regards,
Alan
I am surprised at the angle the body is on that the sack of rivets doesn't spill over. You can see they are moving that way. It's hard to tell but is that some sort of bracket holding the #4 reinforcement, I don't recall seeing anything like that on the car .
R
The Corvette in this thread is made out of SMC. The color is a dead give away. Light gray and can look like marble.
On SMC ....an epoxy resin is required. Polyester resin 'might' work for a while....but I do know if the proper process of prep is performed...the epoxy resin will work.
Originally Posted by Alan 71
Hi b72,
I've been curious about this photo for a long time.
It 'appears' the #4 re-inforcement is in place.
Did the worker standing there 'set' the rivets?
If so, how were they 'bucked'?
Is there a fixture below that holds the rivets? Is there a person under there?
What's laying on the reinforcement? Is it a fixture holding the reinforcement in place?
????
Regards,
Alan
Riveting on the front wall and rear wall of countless Fruehauf trialers on the main assembly line back in my youth. 'Bucking' a rivet and be done on only two ways.
As many of us know. The aluminum rivets GM used is a soft aluminum rivet for a reason...and this is for ease in 'bucking'...but still be a very strong method of fastening. The rivets I used at the plant are JUST LIKE what GM used...in regards to the metallurgy. I can tell teh rivet is the correct 'softness' by simply trying to cut it with a pair of side cutters.
With that said...'bucking' a rivet can be done where the 'bucking bar' which is a heavy piece of metal that the person can hold against the flat head of a rivet...it that is how the head is designed. And then the person on the other side with the air hammer and correct rivet set in the air hammer them will begin to hammer the rivet and smash it.
SO...if a person is wanting to have the smashed side to the rivet that is visible to be like what GM did...then the tool that I use is a rivet set that will create that look I want. If the head of the rivet is a rounded dome type....I have a tool that fits a that so neither the head gets damaged and the bucked portion looks factory.
This job could be done by one person...especially if GM had a solid metal piece of metal that would fit inside the 'pocket' and bolt where the body mount bolt goes and thus it holds the heads of the rivets firmly against the fiberglass/SMC so one man can go around and buck the rivets. I have unique custom made pieces like this because I have to buck rivets by myself. And I do not have arms that are ten feet long.
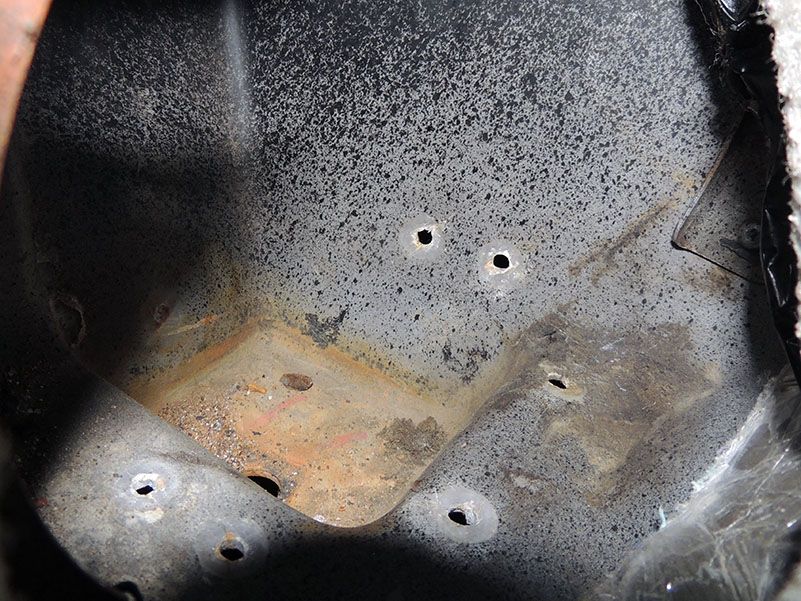
IF a person chooses to use any other type of fastener to hold this #4 gusset in place. Just make sure you use large enough washers so the fastener of your choosing as more surface area to pull against the body material if machine screws are chosen for this. I KNOW I would NOT use the regular style blind pop rivets you can easily get from a hardware store. There are some rivet designs that are super stout. I used them at the plant.
The Corvette in this thread is made out of SMC. The color is a dead give away. Light gray and can look like marble.
On SMC ....an epoxy resin is required. Polyester resin 'might' work for a while....but I do know if the proper process of prep is performed...the epoxy resin will work.
Riveting on the front wall and rear wall of countless Fruehauf trialers on the main assembly line back in my youth. 'Bucking' a rivet and be done on only two ways.
As many of us know. The aluminum rivets GM used is a soft aluminum rivet for a reason...and this is for ease in 'bucking'...but still be a very strong method of fastening. The rivets I used at the plant are JUST LIKE what GM used...in regards to the metallurgy. I can tell teh rivet is the correct 'softness' by simply trying to cut it with a pair of side cutters.
With that said...'bucking' a rivet can be done where the 'bucking bar' which is a heavy piece of metal that the person can hold against the flat head of a rivet...it that is how the head is designed. And then the person on the other side with the air hammer and correct rivet set in the air hammer them will begin to hammer the rivet and smash it.
SO...if a person is wanting to have the smashed side to the rivet that is visible to be like what GM did...then the tool that I use is a rivet set that will create that look I want. If the head of the rivet is a rounded dome type....I have a tool that fits a that so neither the head gets damaged and the bucked portion looks factory.
This job could be done by one person...especially if GM had a solid metal piece of metal that would fit inside the 'pocket' and bolt where the body mount bolt goes and thus it holds the heads of the rivets firmly against the fiberglass/SMC so one man can go around and buck the rivets. I have unique custom made pieces like this because I have to buck rivets by myself. And I do not have arms that are ten feet long.
IF a person chooses to use any other type of fastener to hold this #4 gusset in place. Just make sure you use large enough washers so the fastener of your choosing as more surface area to pull against the body material if machine screws are chosen for this. I KNOW I would NOT use the regular style blind pop rivets you can easily get from a hardware store. There are some rivet designs that are super stout. I used them at the plant.
DUB
Dub,
What molding plant did you work assembling fruehauf trailers?
You can use any color you want with either preform or SMC.
Those underbodies in that era did not use SMC.
Take a close look at the glass fibers and don't worry about the color. SMC will not have a fiber orientation like we are seeing in the picture.
Hi b72,
I've been curious about this photo for a long time.
It 'appears' the #4 re-inforcement is in place.
Did the worker standing there 'set' the rivets?
If so, how were they 'bucked'?
Is there a fixture below that holds the rivets? Is there a person under there?
What's laying on the reinforcement? Is it a fixture holding the reinforcement in place?
????
Regards,
Alan
Hi Alan,
That underbody is laying in a fixture.
The fixture holding the reinforcement looks like a Destaco clamp.
I also see a riveting gun laying on the underbody.
There has to be a backing plate to hold the rivet while the rivet is being formed. They used different shape forming tools to form the rivet, depending upon the requirement.
I replaced those reinforcements on my Corvette when I restored it.
I had my wife hold a block of steel at the head of the rivet and I had a special riveting tool to form the rivet. I shaped the riveting tool to duplicate the original rivet.
Jim
Hard to see the rivets and yes difficult to do but it can be done. For me I ma just trying to keep things as close to original as I can during these modern times. Just another way! They look like pop rivets but they are not.
RVZIO
DUB, I am not sure what year this Corvette is, but I just looked under my 1972 LT1 and the rear underbody is made from the preform process and not SMC (sheet molding compound). Both processes use fiberglass and polyester resin and both processes are made in heated steel matched metal molds. The preform process produces a much stronger product as the glass is evenly distributed and doesn't flow during molding where the SMC process flows glass and resin to form the part, thus setting up flow lines etc. I believe that all underbodies up to and including the C4 used the preform process.
From what I was told by a customer/friend who actually built the top hood surrounds for the 1975-1982 Corvettes. That the resin used in the process was not polyester based....thus...not the same as the earlier Corvettes....thus a different type of resin and adhesive is needed.
Originally Posted by blade072
Dub,
What molding plant did you work assembling fruehauf trailers?
I did not work at molding plant. I worked at the Charlotte assembly plant building the trailers themselves. Which the only reason I mentioned it was due to I do a lot about using solid rivets and bucking them.
Originally Posted by blade072
You can use any color you want with either preform or SMC.
Any color of what??? You lost me on this.
Originally Posted by blade072
Those underbodies in that era did not use SMC.
If you are strictly commenting on the old archive photo of the assembly worker working on the Corvette underbody/rear tub area.
I agree. That era of Corvette is not SMC. But the original thread starter's Corvette is SMC.
Originally Posted by blade072
Take a close look at the glass fibers and don't worry about the color. SMC will not have a fiber orientation like we are seeing in the picture.
An SMC panel is slick as glass on both sides and is a gray color often times with dark streaks running through it making it look like marble.
The panels from the earlier Corvettes are not as slick and actually will have a very, very light texture to them...and the fibers.... as like has been mentioned....are consistently different.