


Best order to assemble dash?
Thread Starter
Drifting


Joined: Aug 1999
Posts: 1,451
Likes: 84
From: Round Rock TX
I'm going to be reinstalling center gauge cluster, shift console, and parking brake cluster. Unfortunately I'm not the one that took it apart. Is there a best practice order to assemble? I'm guessing the parking brake console is last.
I'm not going to put the passenger side dash in yet as I'm waiting for speakers to arrive.
I'm not going to put the passenger side dash in yet as I'm waiting for speakers to arrive.
Team Owner


Joined: Jun 2000
Posts: 38,923
Likes: 1,482
From: Southbound
Cruise-In II Veteran
Center cluster with gauges and wiring connections; trim screws installed but loose.
Console with HVAC and electrical connections. Nuts on the two studs under the center cluster installed but loose.
E-brake console fitted and bolt installed but not torqued.
Check fit of all, then tightened the trim screws. I usually leave the e-brake console bolt until last.
The AIM shows the installation of all of this, but not in a specific order of installation.
Team Owner


Joined: Sep 2006
Posts: 31,280
Likes: 4,372
From: Westminster Maryland
Hi D,
I put the parking brake console in first, then the shifter console, (where it sits determines how the center gauge cluster fits in the opening between the dash pads), then left side dash, next the center gauge cluster, and lastly the right side dash.
The function of all the controls and gauges must be checked as you install them because you lose the access to them as you continue with the installation.
All the fasteners must be started but not tightened as you install the pieces� nothing should be tightened until everything is in place.
Then the fasteners should be tightened gradually and in sequence while the alignment between all the parts is adjusted properly.
The top of the center gauge bezel is EXTREMELY easy to break while trying to get things aligned! BE CAREFUL!!!! DON'T PUSH ON IT TO GET IT TO ALIGHN WITH THE UPPER DASH PAD!!!!!!
Regards,
Alan
Former Vendor
Joined: Aug 2006
Posts: 76,656
Likes: 1,853
From: Jeffersonville Indiana 812-288-7103
St. Jude Donor '08-'09-'10-'11-'12-'13-'14-'15
Center cluster with gauges and wiring connections; trim screws installed but loose.
Console with HVAC and electrical connections. Nuts on the two studs under the center cluster installed but loose.
E-brake console fitted and bolt installed but not torqued.
Check fit of all, then tightened the trim screws. I usually leave the e-brake console bolt until last.
The AIM shows the installation of all of this, but not in a specific order of installation.

We generally install the wires to the center cluster and let sit there.... Like Alan said, be careful you don't break the thin area of the center dash bezel.
Then we install the center console, the parking brake console (slide and the front extension). You don't want to install the parking console before you install the shift console, you may need leverage off the parking brake handle assembly if it's a new forward console. We then install the center dash bezel, the passenger side dash pad and then we install the wiper switch plate and the top of the center console. The last two are in no particular order.
Don't forget the hidden bolt in the back of the parking brake console either, it gets installed from within the rear storage compartment. (some people leave this bolt out, we don't).
Willcox
Last edited by Willcox Corvette; Dec 29, 2016 at 10:19 AM.
Thread Starter
Drifting
Joined: Aug 1999
Posts: 1,451
Likes: 84
From: Round Rock TX
My center gauge cluster was broke so have to swap in the new one that I've had for months. The previous owner removed the shift console, parking brake cover, and laid forward the cluster. The drivers side is untouched, and the passenger side dash is waiting on my replacement speakers. This likely will be my project for today or will hook up the heater hoses. I'm saving connecting the various AC lines till last, but trying to ensure access isn't impeded as I go. I only have one original line, still need to test the original expansion valve, otherwise everything else is new or rebuilt (POA valve calibrated to 134a)

Race Director


Joined: Apr 2009
Posts: 19,294
Likes: 2,754
From: Charlotte NC
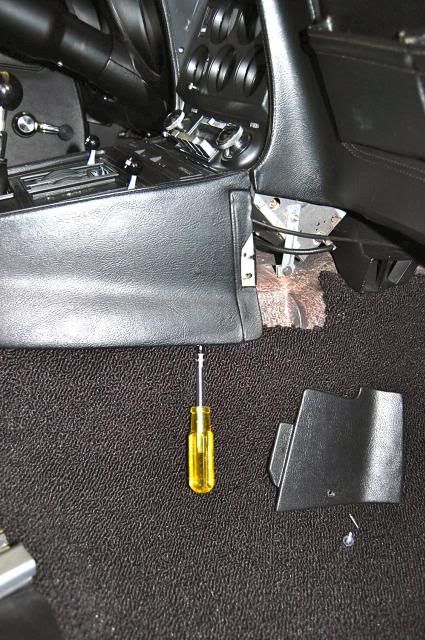
I may be out of line...but in your photo...it looks like you are missing the defroster duct.
Before you install any of this...I would advise you test your vacuum system for your HAVC ducts....that is if you care where the air comes out.
And I personally install the gauge cluster to the shifter console BEFORE I slide it in it final place. This is due to the two nuts that hold the gauge cluster to the shifter console. If the car is an A/C car with the vacuum harness...that left nut on the gauge cluster can be a 'bear' to get to and tighten. So..if this means I do not have any wiring or oil pressure tube connected to the gauge cluster...so be it. I connect them when I am sliding it up into position.
I also AGREE...be careful on your new gauge cluster. And actually...I bond steel plates in where they are known to break to give that are a lot of strength. When completed...you will never see the reinforcement plates I bonded in.
ALSO..make sure you pre-install your wiper switch housing before you get to far. They can be a ROYAL pain in the backside if you try to do it with it installed in the dash and then realize you have to fight with it to get it to remotely fit.
DUB
Thread Starter
Drifting
Joined: Aug 1999
Posts: 1,451
Likes: 84
From: Round Rock TX
DUB, I checked all the lines, vacuum doors (push/pull where applicable), etc. it's been a interesting process, especially when I wasn't the one that took it apart and trying to figure out how things fit together. I think I invented a few words when putting the radiator tank (big block with AC) on.
I'm stuck due to missing screws. I thought I had them all, but found that to be false when starting to put it together. I got the parking brake housing, and shift console placed and kind of held in place.
I'm stuck due to missing screws. I thought I had them all, but found that to be false when starting to put it together. I got the parking brake housing, and shift console placed and kind of held in place.
Corvette Stories
The Best of Corvette for Corvette Enthusiasts

Top 10 Most Expensive Corvettes Ever Sold on Bring A Trailer
Brett Foote
10 Things Every Corvette Owner Needs (2026 Edition)
Michael S. Palmer
8 Most "Only Corvette Owners Understand" Quirks and Problems
Pouria Savadkouei
10 Reasons the C6 Z06 is Still A Performance Benchmark After 20 Years
Joe Kucinski
How Much Horsepower Every Corvette Engine "LOST" in 1972
Joe Kucinski
Top 10 DOs and DON'Ts for Protecting Your Convertible Top!
Michael S. Palmer
Top 10 Most Explosive Corvettes Ever Made: Power-to-Weight Ratio Ranked!
Joe Kucinski
150 hp to 1,250 hp: Every Corvette Generation Compared by the Specs That Matter
Joe Kucinski
8 Coolest Corvette Pace Cars (and Replicas) of All Time
Verdad Gallardo
Race Director
Joined: Apr 2009
Posts: 19,294
Likes: 2,754
From: Charlotte NC
As long as when you use your HVAC control and check for MAX A/C...and the other vacuum pods...it is wise to make sure they all work.
I assume that you did do this and ALL pods work correctly...including the right inside air pod and the one under your top hood surround in the cowl area on the right side.
I recently posted a few threads on 1969 I was working on and what I ran into.
DUB
I assume that you did do this and ALL pods work correctly...including the right inside air pod and the one under your top hood surround in the cowl area on the right side.
I recently posted a few threads on 1969 I was working on and what I ran into.
DUB
Advanced

Joined: Mar 2002
Posts: 56
Likes: 4
From: Apple Valley Ca.
I may be out of line...but in your photo...it looks like you are missing the defroster duct.
Before you install any of this...I would advise you test your vacuum system for your HAVC ducts....that is if you care where the air comes out.
And I personally install the gauge cluster to the shifter console BEFORE I slide it in it final place. This is due to the two nuts that hold the gauge cluster to the shifter console. If the car is an A/C car with the vacuum harness...that left nut on the gauge cluster can be a 'bear' to get to and tighten. So..if this means I do not have any wiring or oil pressure tube connected to the gauge cluster...so be it. I connect them when I am sliding it up into position.
I also AGREE...be careful on your new gauge cluster. And actually...I bond steel plates in where they are known to break to give that are a lot of strength. When completed...you will never see the reinforcement plates I bonded in.
ALSO..make sure you pre-install your wiper switch housing before you get to far. They can be a ROYAL pain in the backside if you try to do it with it installed in the dash and then realize you have to fight with it to get it to remotely fit.
DUB
Before you install any of this...I would advise you test your vacuum system for your HAVC ducts....that is if you care where the air comes out.
And I personally install the gauge cluster to the shifter console BEFORE I slide it in it final place. This is due to the two nuts that hold the gauge cluster to the shifter console. If the car is an A/C car with the vacuum harness...that left nut on the gauge cluster can be a 'bear' to get to and tighten. So..if this means I do not have any wiring or oil pressure tube connected to the gauge cluster...so be it. I connect them when I am sliding it up into position.
I also AGREE...be careful on your new gauge cluster. And actually...I bond steel plates in where they are known to break to give that are a lot of strength. When completed...you will never see the reinforcement plates I bonded in.
ALSO..make sure you pre-install your wiper switch housing before you get to far. They can be a ROYAL pain in the backside if you try to do it with it installed in the dash and then realize you have to fight with it to get it to remotely fit.
DUB
Thanks Rey S.
Thread Starter
Drifting
Joined: Aug 1999
Posts: 1,451
Likes: 84
From: Round Rock TX
Dub I checked all the pods and lines. That plenum one works as well, thankfully since it looks like a chore to get to. I checked them from the control panel to ensure each side could pull vacuum from there.
Still need to put the nuts on the underside of the cluster. I can't get my hands in there so will have to be creative.
Still need to put the nuts on the underside of the cluster. I can't get my hands in there so will have to be creative.
Le Mans Master

Joined: Aug 2006
Posts: 7,427
Likes: 1,560
From: mount holly NC
2025 c3 ('74-'82) of the Year Finalist - Unmodified
2019 C3 of Year Finalist (appearance mods)
Dub I checked all the pods and lines. That plenum one works as well, thankfully since it looks like a chore to get to. I checked them from the control panel to ensure each side could pull vacuum from there.
Still need to put the nuts on the underside of the cluster. I can't get my hands in there so will have to be creative.
Still need to put the nuts on the underside of the cluster. I can't get my hands in there so will have to be creative.
https://www.boltdepot.com/Coupling_n...teel_18-8.aspx
Advanced
Joined: Mar 2002
Posts: 56
Likes: 4
From: Apple Valley Ca.
Race Director
Joined: Apr 2009
Posts: 19,294
Likes: 2,754
From: Charlotte NC
I then begin to get the A/C control plate to get up in place because it is laying there...and then I begin to install all wiring and such for the gauge cluster....becasue is it still slightly away from where it needs to be....and I also deal with the front fiberoptics if needed.
Using the swivel socket as shown does work...but the left side is a royal pain....at least for me it is....which is why do it in the manner I described and....for me....it goes faster and I do not have to worry about those nuts. the vacuum harness for the duct system...and fiber optic harness and any otehr wiring harnesses for components that are under the left side nut...make it a bear to install.
And I preform the SAME process on a NON-A/C car where I have the cables for the kick plate area vents.
DUB
Instructor
Joined: Jul 2012
Posts: 186
Likes: 6
From: Lebanon Junction KY
I am sort of in the same situation, I took my car apart 4 years ago and am beginning to do the interior. Only thing is I only have put the heater box and the steering column in. I needed the information already shared but back up a couple of steps. I'm thinking upper dash pad/speakers, defrost duct and then what's been discussed here. Would that be about correct? Also I seem to have read that you have to drop the steering column for the left side dash install, is this correct?
Sorry to hijack the thread but I was just searching and ran across this. I just need the previous steps. BTW I still have the rear window and windshield out. I'm thinking I can go ahead with the rear but hold on the windshield till the dash is all in.
Advice welcome.
Thanks
Mark Potter
Sorry to hijack the thread but I was just searching and ran across this. I just need the previous steps. BTW I still have the rear window and windshield out. I'm thinking I can go ahead with the rear but hold on the windshield till the dash is all in.
Advice welcome.
Thanks
Mark Potter
Team Owner
Joined: Sep 2006
Posts: 31,280
Likes: 4,372
From: Westminster Maryland
Hi Mark,
Yes, you can wait to install the windshield until the dash is completely finished.
I like to put the upper dash pad in first along with the speakers and defroster duct as you described.
Yes, the steering column does need to be 'dropped' in order to move the left side dash pad into position. The bolts at the column support need to be removed, but the bolts at the firewall plate only need to be loosened.
Be SURE to support the weight of the column so it's not on the plate at the firewall or on the rag joint.
Be cautious as you install the left side pad and center gauge cluster bezel so that you don't damage anything� there's lot's going on behind them.
Good Luck!
Regards,
Alan
Instructor
Joined: Jul 2012
Posts: 186
Likes: 6
From: Lebanon Junction KY
Hi Mark,
Yes, you can wait to install the windshield until the dash is completely finished.
I like to put the upper dash pad in first along with the speakers and defroster duct as you described.
Yes, the steering column does need to be 'dropped' in order to move the left side dash pad into position. The bolts at the column support need to be removed, but the bolts at the firewall plate only need to be loosened.
Be SURE to support the weight of the column so it's not on the plate at the firewall or on the rag joint.
Be cautious as you install the left side pad and center gauge cluster bezel so that you don't damage anything� there's lot's going on behind them.
Good Luck!
Regards,
Alan
Yes, you can wait to install the windshield until the dash is completely finished.
I like to put the upper dash pad in first along with the speakers and defroster duct as you described.
Yes, the steering column does need to be 'dropped' in order to move the left side dash pad into position. The bolts at the column support need to be removed, but the bolts at the firewall plate only need to be loosened.
Be SURE to support the weight of the column so it's not on the plate at the firewall or on the rag joint.
Be cautious as you install the left side pad and center gauge cluster bezel so that you don't damage anything� there's lot's going on behind them.
Good Luck!
Regards,
Alan
Team Owner
Joined: Sep 2006
Posts: 31,280
Likes: 4,372
From: Westminster Maryland
Hi Mark,
(This is for a no a/c car.) (An a/c car doesn't have the kick panel vet controls)
I think it's best to get the console in first, then the install the small 'frame' that the heater/defroster controller mounts in to the console.
Hook up the Bowden cable for the controller's hot/cold function and the Bowden cables for the kick panel vent doors.
Then hook make the electrical connections for the lighter and then position the shifter plate on the console.
If it's a 4 speed install the shifter boot and then finally screws for the shifter console plate.
Be sure the heater/defroster control, the Bowden cables, and the lighter and it's light are operating properly before putting the shift plate screws in.
Regards,
Alan