


Anybody Have Ideas?
Thread Starter
Melting Slicks


Joined: Sep 2016
Posts: 2,230
Likes: 984
From: Wauconda IL

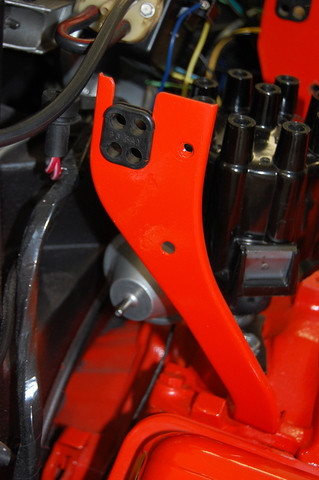
Just finished my winter project today (Edelbrock E-Street Cylinder Heads). Just finished timing the engine and I discovered a minor issue with distributor vacuum canister and the right hand ignition shield bracket. Only thing I can come up with is buying a new bracket and drilling a hole or reclock the distributor. I'd rather not reclock the distributor if I can do something else. Anyone have any ideas?
Burning Brakes


Joined: Oct 2013
Posts: 1,114
Likes: 520
From: McClellandtown, Pa.
Hey Sunflower,
To me it doesn't look like you have the correct right side shield bracket. Even though I have a 73' I'm pretty sure the 72' bracket was the same. It's curved to let the vacuum hose clear. Is that an edelbrock intake?
Just a thought. Here's a pic of mine?
Tooch
To me it doesn't look like you have the correct right side shield bracket. Even though I have a 73' I'm pretty sure the 72' bracket was the same. It's curved to let the vacuum hose clear. Is that an edelbrock intake?
Just a thought. Here's a pic of mine?
Tooch
Last edited by Tooch1; Mar 26, 2017 at 05:30 PM. Reason: Corrected info!
Burning Brakes
Joined: Oct 2013
Posts: 1,114
Likes: 520
From: McClellandtown, Pa.
Yes, I see it now. He's using the correct bolt. Maybe the bracket change will work for him. Made the correction above.....I'm slipping Alan

Last edited by Tooch1; Mar 26, 2017 at 05:31 PM.
Corvette Stories
The Best of Corvette for Corvette Enthusiasts

Top 10 Most Expensive Corvettes Ever Sold on Bring A Trailer
Brett Foote
10 Things Every Corvette Owner Needs (2026 Edition)
Michael S. Palmer
8 Most "Only Corvette Owners Understand" Quirks and Problems
Pouria Savadkouei
10 Reasons the C6 Z06 is Still A Performance Benchmark After 20 Years
Joe Kucinski
How Much Horsepower Every Corvette Engine "LOST" in 1972
Joe Kucinski
Top 10 DOs and DON'Ts for Protecting Your Convertible Top!
Michael S. Palmer
Top 10 Most Explosive Corvettes Ever Made: Power-to-Weight Ratio Ranked!
Joe Kucinski
150 hp to 1,250 hp: Every Corvette Generation Compared by the Specs That Matter
Joe Kucinski
8 Coolest Corvette Pace Cars (and Replicas) of All Time
Verdad GallardoBurning Brakes
Joined: Oct 2013
Posts: 1,114
Likes: 520
From: McClellandtown, Pa.
His is facing more forward than ours, using the end of the valve cover as a guide..
I just sent you a PM!
Tooch
Last edited by Tooch1; Mar 26, 2017 at 05:45 PM.
Thread Starter
Melting Slicks
Joined: Sep 2016
Posts: 2,230
Likes: 984
From: Wauconda IL

Pro

Joined: Dec 2014
Posts: 699
Likes: 46
From: Charlotte NC
No, of course not. Lifting the dizzy to re clock it 1 or 2 teeth doesn't change anything, just have to re set the timing. Keep in mind the oil shaft WILL NOT BE LINED UP so it won't drop back in. Stick a long screwdriver down there and move the shaft a little.

Thread Starter
Melting Slicks
Joined: Sep 2016
Posts: 2,230
Likes: 984
From: Wauconda IL
I just had a lightbulb moment. So, if I move all the wires at the distributor cap 1 tower counter clockwise, mark the side of the distributor housing with the new location of #1 tower, pull dizzy and turn rotor 1 or 2 teeth clockwise, drop the dizzy so rotor lines up with the new #1 tower, I should be good to go. Correct?
Race Director


Joined: Oct 2008
Posts: 19,224
Likes: 1,672
From: Long Island
I just had a lightbulb moment. So, if I move all the wires at the distributor cap 1 tower counter clockwise, mark the side of the distributor housing with the new location of #1 tower, pull dizzy and turn rotor 1 or 2 teeth clockwise, drop the dizzy so rotor lines up with the new #1 tower, I should be good to go. Correct?
Doesn't matter where the rotor actually is... for illustration..
looking at a clock - if the rotor pointed to 6 oclock, rotate the distributor so 6 goes to 7's (o'clock) position. now move the wire at # 7 position to #6 and the rotor still points to #6. follow all the way around wire by wire and you are good to go. #8 (o'clock) wire position to #7 (o'clock) ..... last will be 6 to 5.
Last edited by BLUE1972; Mar 27, 2017 at 09:57 PM.


Drifting

Joined: Aug 2015
Posts: 1,939
Likes: 477
From: NSW, Australia
C3 of Year Finalist (track prepared) 2019
NO - you don't have to pull the distributor, just turn / move it 1 plug wire clockwise and move the wires I wire counterclockwise. The rotor will be on the same wire as before the move.
Doesn't matter where the rotor actually is... for illustration..
looking at a clock - if the rotor pointed to 6 oclock, rotate the distributor so 6 goes to 7's (o'clock) position. now move the wire at # 7 position to #6 and the rotor still points to #6. follow all the way around wire by wire and you are good to go. #8 (o'clock) wire position to #7 (o'clock) ..... last will be 6 to 5.
Safety Car

Joined: Oct 2007
Posts: 3,729
Likes: 267
From: Austin Texas
Corvette of the Year Winner 2017
2016 C3 of Year Finalist
the right way would be pull dist. advance 1 tooth and retime.
the easy way, leave dist. seated then rotate all plug wires, 1 plug over.
loosen dist. and rotate 1 plug over.
con's : your plug wires will not be in the expected place for next mechanic.
Pro : easy way you do not have to pull the Dist.
the easy way, leave dist. seated then rotate all plug wires, 1 plug over.
loosen dist. and rotate 1 plug over.
con's : your plug wires will not be in the expected place for next mechanic.
Pro : easy way you do not have to pull the Dist.