


headlight switch
Team Owner


Joined: Sep 2006
Posts: 31,270
Likes: 4,362
From: Westminster Maryland
Hi l,
Welcome!
The switch is quite difficult to replace because gaining access to it is involved.
You need access to the back of it for the electrical connection and the vacuum hose connections.
Folks generally unbolt the steering column from it bracket under the dash pad and let it come down several inches.
This allows the dash pad to be unscrewed (7 screws) and lowered 2 or 3 inches.
You'll have a better look at the switch then.
There's a small brass colored 'button' on the side of the switch which needs to be depressed so the **** and shaft can be pulled out.
The switch bezel on the front of the dash pad can then be unscrewed and removed which allows the switch to be removed.
You can then replace the switch.
BE VERY CAREFUL that the vacuum hoses are replaced in the same position on the new switch
After testing the switches operation the dash pad and steering column can be moved back into their proper position.
Be careful and take your time.
Good Luck!
Regards,
Alan
Steering column bolts.
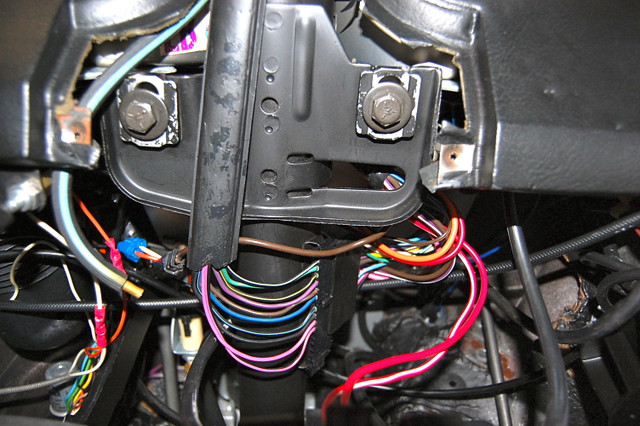
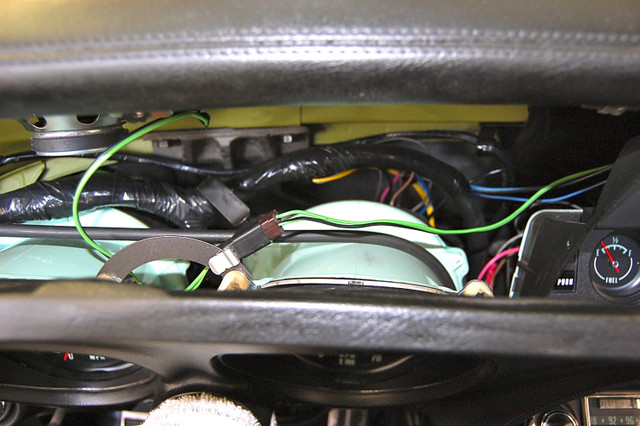
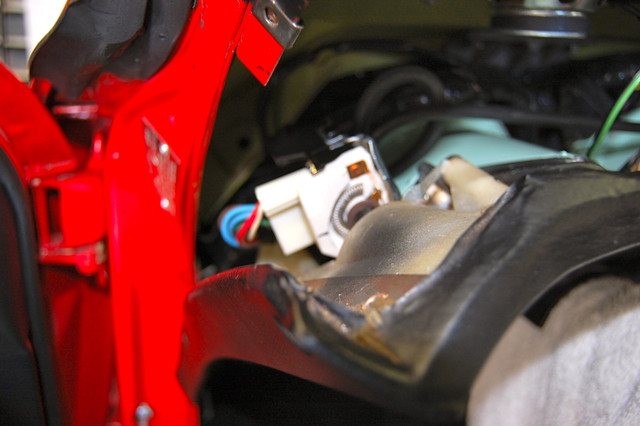
Access to the switch with the dash pad lowered.

Welcome!
The switch is quite difficult to replace because gaining access to it is involved.
You need access to the back of it for the electrical connection and the vacuum hose connections.
Folks generally unbolt the steering column from it bracket under the dash pad and let it come down several inches.
This allows the dash pad to be unscrewed (7 screws) and lowered 2 or 3 inches.
You'll have a better look at the switch then.
There's a small brass colored 'button' on the side of the switch which needs to be depressed so the **** and shaft can be pulled out.
The switch bezel on the front of the dash pad can then be unscrewed and removed which allows the switch to be removed.
You can then replace the switch.
BE VERY CAREFUL that the vacuum hoses are replaced in the same position on the new switch
After testing the switches operation the dash pad and steering column can be moved back into their proper position.
Be careful and take your time.
Good Luck!
Regards,
Alan
Steering column bolts.
Access to the switch with the dash pad lowered.
Last edited by Alan 71; Jul 16, 2017 at 07:18 AM.

Racer


Joined: Jan 2013
Posts: 251
Likes: 33
Try a google search. There is a good Corvette magazine article with step by step instructions. Also use the search feature of the forum as many others over the years have asked the same question. Lots of luck. Russ
Last edited by rberman999; Jul 16, 2017 at 08:50 AM.
Burning Brakes


Joined: Oct 2013
Posts: 1,114
Likes: 520
From: McClellandtown, Pa.
Hi,
The FIRST thing you should do is disconnect the battery. Then follow Alan's directions and you should be good to go. Any time you work on the wiring in the car make sure to disconnect the battery first to eliminate any chance of shorting something out.
Jimmy
The FIRST thing you should do is disconnect the battery. Then follow Alan's directions and you should be good to go. Any time you work on the wiring in the car make sure to disconnect the battery first to eliminate any chance of shorting something out.
Jimmy

Safety Car


Joined: May 2001
Posts: 4,757
Likes: 1,647
From: Fairfax Virginia
This thread sure makes me appreciate my 1968 with the key on the dashboard!
Alan, you are a very good person with your knowledge and the way that you help others with it. I thank you!
Good Luck out there guys!
Alan, you are a very good person with your knowledge and the way that you help others with it. I thank you!
Good Luck out there guys!
Safety Car
Joined: Sep 2013
Posts: 4,355
Likes: 2,633
From: Draper Utah
Headlight Switch � How to Replace
I replaced the headlight switch and vacuum hoses in my 1970 Corvette, it was not nearly as big as job as some make it out to be. I did this write up after I finished to help others.
Disconnect the battery.
Removed the A/C duct from under dash. Mine just slide out but I believe there is supposed to be a screw holding it in. I don't know what's under a non A/C cars dash.
Remove the drivers side kick panel (couple of screws).
Drop the steering column by removing the two bolts under the dash pad. This will allow the steering column to lower about 2".
Remove all the dash pad screws, this allows the dash pad to slide out and down to gain access to the headlight switch. You should have a couple of inches of space to work with from the left side. Be careful with the dash pad as it's brittle and will break easy. If you need more room you could remove the steering column bolts at the firewall and gain a little more room, I didn't have to do this.
At this point you should be able to reach in with a set of needle nose pliers and unplug the vacuum hoses.
Next unplug the electrical connection.
Next you remove the headlight switch ****, and there is a trick to it. Pull the headlight **** to the ON position. Reach under the switch and there is a small button. Push the button in and than you can pull the **** the rest of the way out. This is really easy if you have a new switch in your hand to see where the button is located.
After the **** is removed you will see a big retainer nut that can be removed with a large flat blade screw driver. Once the retainer nut is removed the headlight switch will slide out.
I also replaced my vacuum control lines at this time. I broke off a golf tee and plugged the new line to the old line. I than reached under the dash and pulled the new line through using the old line. I took about 10 minutes to replace the vacuum hoses.
I replaced the entire headlight switch and vacuum hoses in about an hour and I'd never done it before.
I bought a quality made in the USA switch as I didn't want to do this again. It cost about twice what the crappy Chinese switch cost.
Corvette Stories
The Best of Corvette for Corvette Enthusiasts

Top 10 Most Expensive Corvettes Ever Sold on Bring A Trailer
Brett Foote
10 Things Every Corvette Owner Needs (2026 Edition)
Michael S. Palmer
8 Most "Only Corvette Owners Understand" Quirks and Problems
Pouria Savadkouei
10 Reasons the C6 Z06 is Still A Performance Benchmark After 20 Years
Joe Kucinski
How Much Horsepower Every Corvette Engine "LOST" in 1972
Joe Kucinski
Top 10 DOs and DON'Ts for Protecting Your Convertible Top!
Michael S. Palmer
Top 10 Most Explosive Corvettes Ever Made: Power-to-Weight Ratio Ranked!
Joe Kucinski
150 hp to 1,250 hp: Every Corvette Generation Compared by the Specs That Matter
Joe Kucinski