When you click on links to various merchants on this site and make a purchase, this can result in this site earning a commission. Affiliate programs and affiliations include, but are not limited to, the eBay Partner Network.
Thanks Kevin,
Heading back to the garage, I will use my biggest hammer I have and go hard on it.
Just wanted to make sure I was doing it correctly.
Sounds like the ball joints will be destroyed in the process, oh well.
Hi V71,
If it's any consolation�...the ball joints have already been replaced at some time so it's not as though you might damage the originals.
It's often just the rubber boot that gets damaged because the fork pinches it against the joint.
Good Luck!
Regards,
Alan
Thanks Alan,
Yes, the ball joints look like about the only thing on this car that has been replaced in the last 10 or 20 years.
Anyhow, success!
Spring out, steering knuckle off and upper control arm removed.
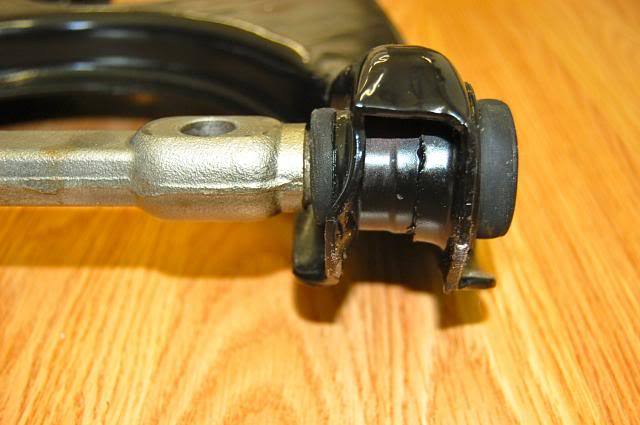
I now just can't get the lower control arm out. (see bottom picture) I soaked this bolt that holds the lower control arm... can I just hammer it through from below now that the nut is off.
Is it threaded into the (cross shaft - don't know what its called)
I can't seem to budge it even with my air tools. The nut came off easily from below but the bolt will not budge.
Don't hit it!
there is a procedure to "press" it out using a C-clamp and a socket that will fit over the head. you don't want to damage the tight fit into the frame. You should find this in a search of the lower control arm threads. I have a print out of the instructions at home that I got from Global West Suspension. You could try their site too. or other suspension suppliers. VanSteel, VBandP, Maybe Wilcox has a tech article on this.
You may be thinking of the bolts for the upper control arm shaft. The picture of the problem bolt is the rear bolt for the lower shaft, it should be a slip fit, but it's rusted in the shaft. Soak it with your favorite rust penetrant and try an impact wrench to twist it loose, the shaft is not threaded. You may have to heat the shaft to get the rusted hole to expand and turn loose of the bolt.
Yep,
It's the bottom control arm rear bolt.
I didn't think it would be threaded since non of the others were not.
I will soak it overnight and try the impact wrench again tomorrow.
My guess is that it has been on for 48 years.
Thanks for all the help everyone.
Pete
For anyone else doing lower control arms that have never been removed...
I heated the lower shaft for about 2 minutes with a cheap propane torch kit (18 dollars at the local lumber yard) after soaking with WD40 overnight. THANKS 75
Then put on the air wrench both forward and backwards and it freed up!
Lower control arm is now removed so i will move to the other side and start removing the bushings before I send them out to be sandblasted.
Thanks All
Well done. I'll be using your struggle as my tutorial.
Hey Alan,
Was away for a week out of town.
Yep that was just a part of the bushings. The entire suspension has now been removed. The front right side took 3 sessions, of about 3 hours each including the session to remove the control arms bushings on the bench. I just used a small drill and and drilled out the rubber and it was fairly easy and didn't seem to damage anything.
First time tackling anything like a suspension.
This morning I removed the left front and took about 3 hours in total for everything.
I ended up using a pickle fork on the ball joints and fount that I had to grind off about 1/2 of an inch on the two ends of the pickle fork so that when I hit it, it did not strike the frame as it released the ball joints.
Thanks for all the great help from everyone.
Very much appreciated.
Pete
I noticed I still have the green tag on my left front spring with a number on it that looks original from 50 years ago.
Is that a bit unusual or is it common to find them.
In others words, shall I just toss it in the trash?
All parts will be off to the sand blaster soon.
I don’t have a page on how we actually do the suspension change out… but I’ll add to this post a bit so possibly someone down the road will know.
(And before I start, you don’t need a lift to do this).
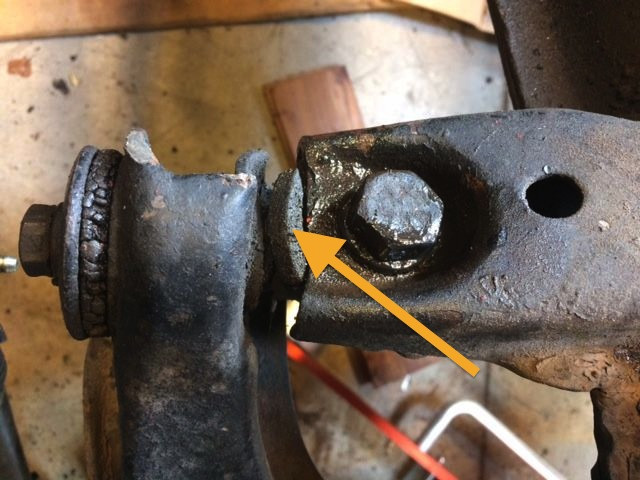
When we do the front suspension on a car we put the car on our lift, remove the wheels, the brakes and then we loosen both the upper and lower ball joint nuts to the point where they are full threaded and level with the end of the stud. At this point (while under spring load) we smack the spindle support with a large hammer. In most cases this will release the joint from the support due to the spring pressure. Having the arms under load from the spring really makes this job easier.
When you smack the support, watch the gap between the nut and the support you’ll see it close when the joint is loose. In most cases this is all you need to do… If the joint doesn’t release from the support then we go to the pickle fork but rarely. What you are doing is using the spring tension as a way to release the joint from the support.
Once we have both joints loose we then lower the car and place a jack stand on the forward side of the A-arm. Doing this catches the A-arm and uses the cars weight to release the tension created by the spring. When you do it this way it presses the spring and allows us to remove the lower arm shaft bolts. We then remove the bolts from the lower shaft and slowly raise the car which frees the spring tension. (reverse this process to install making sure the spring is seated in the lower arm properly).
It’s pretty easy and we don’t use any type of compressor to remove springs. I hate spring compressors and justifiably so…. (When I was a kid I had one break on me and an A-arm almost took my head off but that’s another story). You don’t have to have a lift to use this method, just a jack and a jack stand.
The write up I did on the spring compressor on a budget works perfectly too. The only reason I did that write up was for doing springs on a frame off restoration where you don’t have the engine or body weight and I’ll add these comments to that same thread on my tech page after I post this.
Be smart people, use the weight of the car when you do these suspension jobs and be safe.
Hi Pete,
I also agree about the wisdom in using a spring compressor of some type.
I've had good success using the giant hex head bolt and just the bottom of a pretty typical store bought compressor.
Install the rod down through the shock absorber hole in the frame and attach the bottom go the compressor as low down as possible.
This location allows you to much of the spring up into the pocket in the frame.
Once the lower a-arm is free of the spring pressure it can easily be removed.
You do need to be VERY careful with the spring while it's compressed because it stores a tremendous energy.
Most folks recommend using a length of heavy chain to secure the spring to the frame.
Good Luck!
Regards,
Alan
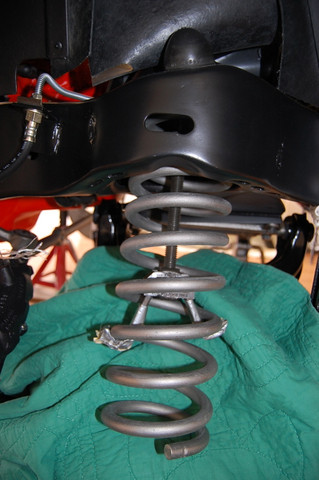
Here's a photo showing the 'hardware' in place getting ready to pull the spring back up into the frame pocket in order to put the bottom a-arm back on. The chain isn't in place yet!
Alan, Could you describe to me "the use of the chain for safety", chain size & where to attach it on the spring & frame. I think I know but.....it never hurts to ask.
Thank you.
From: Some days your the dog and some days your the hydrant.
Royal Canadian Navy
Originally Posted by Willcox Corvette
I don�t have a page on how we actually do the suspension change out� but I�ll add to this post a bit so possibly someone down the road will know.
(And before I start, you don�t need a lift to do this).
When we do the front suspension on a car we put the car on our lift, remove the wheels, the brakes and then we loosen both the upper and lower ball joint nuts to the point where they are full threaded and level with the end of the stud. At this point (while under spring load) we smack the spindle support with a large hammer. In most cases this will release the joint from the support due to the spring pressure. Having the arms under load from the spring really makes this job easier.
When you smack the support, watch the gap between the nut and the support you�ll see it close when the joint is loose. In most cases this is all you need to do� If the joint doesn�t release from the support then we go to the pickle fork but rarely. What you are doing is using the spring tension as a way to release the joint from the support.
Once we have both joints loose we then lower the car and place a jack stand on the forward side of the A-arm. Doing this catches the A-arm and uses the cars weight to release the tension created by the spring. When you do it this way it presses the spring and allows us to remove the lower arm shaft bolts. We then remove the bolts from the lower shaft and slowly raise the car which frees the spring tension. (reverse this process to install making sure the spring is seated in the lower arm properly).
It�s pretty easy and we don�t use any type of compressor to remove springs. I hate spring compressors and justifiably so�. (When I was a kid I had one break on me and an A-arm almost took my head off but that�s another story). You don�t have to have a lift to use this method, just a jack and a jack stand.
The write up I did on the spring compressor on a budget works perfectly too. The only reason I did that write up was for doing springs on a frame off restoration where you don�t have the engine or body weight and I�ll add these comments to that same thread on my tech page after I post this.
Be smart people, use the weight of the car when you do these suspension jobs and be safe.
I was waiting for someone to bring the potential danger of using spring compressors. I wouldn't use one because its just one more tool that can fail with disastrous outcomes. Using the described method above is a safer way of doing spring removal because its under your control and not the spring compressor. And use a chain through the spring attached to the frame, just in case.
the last pic. right below where the fork is. hit the side of the knuckle straight in at the angle the camera is looking at the knuckle HARD with a 1 lb hammer. it is a tapered press fit, and the shock will pop it loose. also doesn't kill the ball joint or the rubber boots. those look like they were already redone... leave the castle nut on in case you miss... edit; got to the bottom of page 1 and didn't realize it wasn't last post in the thread. month and a half ago. but it is still the way to release tapered press fit pins without a fork.
Last edited by derekderek; Nov 26, 2017 at 07:24 PM.