When you click on links to various merchants on this site and make a purchase, this can result in this site earning a commission. Affiliate programs and affiliations include, but are not limited to, the eBay Partner Network.
T-Tops will not go back in correctly...What's next!!!
As this car is "New" to me...I removed the T-Tops to check windshield frame condition and now they won't go back on?? They seemed to look okay prior to removal...but now after attempting to carefully place them back, I have a 3/4" gap between them??
I researched online about measuring the roof lines X-dimension and the birdcage is spot on. I also came across some information about loosening all hardware and ensuring weatherstripping is not getting pinched along the inside edge.
There seems to be a corner where the weatherstripping is getting folded into the gap on the inside back corner. Also, the alignment pins will have to be moved outboard a little.
Does anyone have experience adjusting these and have a technique of using a plastic putty knife or something to prevent the weatherstripping from folding down into inside edge of the T-bar?
never had any problems with mine, even after changing out the weather seals, sure you put the windshield trim on correctly?? do you have an AIM to look at?
Hi B-R,
What year is your car?
The roof panel design changed for 78 production.
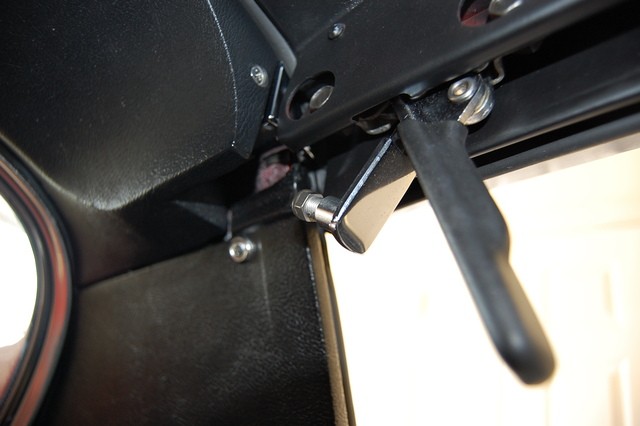
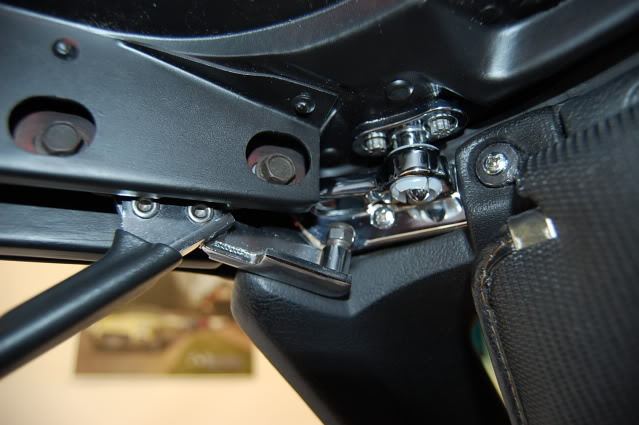
For 68-72 cars the adjustments at the 4 corners of each panel determine the fit of the panel. (see photos)
The panel should slip into place with little or no pressure on the weather strip. It's the 2 locks... one outer/front and one outer/rear... that apply pressure to the weatherstrip and create the seal.
The space between the 2 panels can vary from car to car.... it's the fit at the front corner of the windshield header and the rear corner at the halo that determine the space between the panels.
What do these 2 areas look like on your car?
Regards,
Alan
This quirky little car is really starting to annoy!!!!
Attempting to loosen the alignment pins the screws on the PS were completely frozen. I sprayed them with Liquid Wrench a few days ago to let them soak and walla...They moved slightly and then both heads broke off! Now, no alignment pin on the PS. Also, there are screws or something rattling around inside inside both tps in the vacant area between the sandwiched pieces. So new question; How do you get inside the panels to rebuild and remove the junk?
As for the alignment with DS pin loose enough to move freely and the PS completely missing...This is the best I can get with about 20#'s of side force.
Yuck! Maybe some blue duct tape will remedy the situation. Beginning to see why none of those resto-shows on Speed Channel never mess with Vettes!
Hi,
Both panels need to be moved toward the center of the car. The right side needs to be moved more than the left side.
There are 4 places on the panel where the adjustments are made.
All must be loose to begin with so that the panel can be easily moved into proper position in order to have the desired gaps.
Regards,
Alan
Carefully drill a hole to allow what ever is in the roof panels to be shaken out.
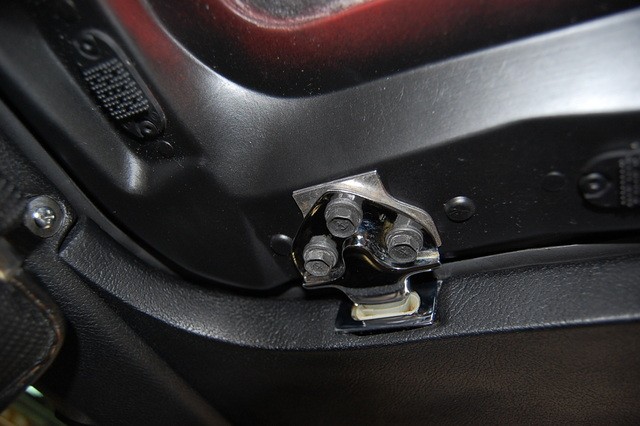
This is the 'receiver' for the wedge. Note the nylon bushing in it.
This is the 'wedge' that fits in the receiver. Turning the wedge moves the roof panel forward and rearward.
Loosening the screws allows the wedge to move left and right which controls the fit at the halo and the gap between the roof panels.
Loosen the 2 12 point bolts to move the pin. This moves the corner of the roof panel left and right and forward and rearward.
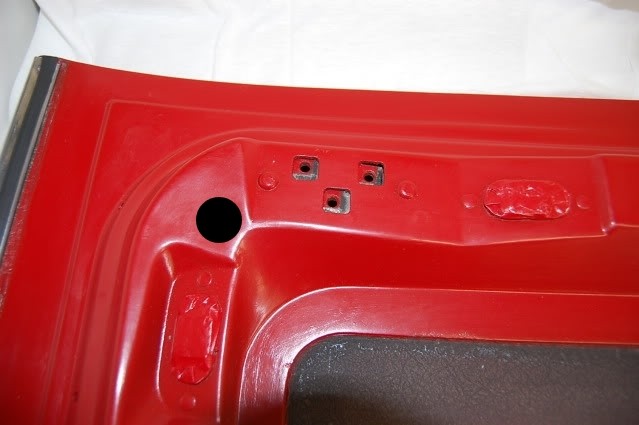
Loosen the bolts on the tongues to allow the panels to move toward the center of the car to close the gap between them.
BUT, they have done corvettes!!!! a 63(member on this forum) had his car finished by Garage Squad. A 68(?) was done by Wheeler Dealer. Another corvette was done on another show ( tackled the job of the popping rivets between the headlights((did it wrong, but who cares))). Same show took a 63 convert and made a hard top look like a split window coupe.
Thanks Alan for the great pics and the detailed info! Where did you get the new chrome hardware? Also, which corner did you drill the access hole...with a spade bit or hole saw?
Hi BR,
I had the original hardware (except for the latches/locks which didn't need to be restored) re-plated while I was restoring my car. (Librandi near Harrisburg Pa. did the work... it's really quite beautifully done).
I used a spade bit. You need to be careful to chose a location that has enough depth to keep the 'spike' away from the outer skin of the roof panel and that will be completely hidden when the soft trim is put back in place.
It's usually the little pins on the weather-strip that break off and fall inside that rattle around.
You have to be real careful when removing the weather strip not to break the pins.
I used a Milwaukee M12 dremmel type tool with a 3/16 diameter diamond bit, only it stick down 3/8 and routed a small 3/8 hole. Then used a plastic pipe on the vacuum to suck out the debris.
Last edited by BLUE1972; 01-14-2018 at 09:14 PM.
Reason: hate auto spell
It's usually the little pins on the weather-strip that break off and fall inside that rattle around.
You have to be real careful when removing the weather strip not to break the pins.
I used a Milwaukee M12 dremmel type tool with a 3/16 diameter diamond bit, only it stick down 3/8 and routed a small 3/8 hole. Then used a plastic pipe on the vacuum to suck out the debris.
I put a small enough hole that I can fix the hole quickly...due to most of the time the headliners are not out and I am doing just the w/strip replacement.
****somewhat related comment****
One of the dreaded jobs I kinda hate is messing with the T-top headliners. Especially when a few of the mounts have let go but others are still stuck like crazy. 99% of the time I run into super huge globs if the glue GM used with the Velcro pads and trying to get it to release without damaging the headliner is a ROYAL PAIN. Warped factory T-top liners are just one of those things that some people may not understand are really FUN to get back and stay where they need to. Trying to save the origianls that are already messed up may cost so much more than buying some of the aftermarket ones and installing them. Especially if a person is paying someone else to try to save the origianls. Obviously ...a DIY'er at home spending numerous hours on them may be worth it.
BUT, they have done corvettes!!!! a 63(member on this forum) had his car finished by Garage Squad. A 68(?) was done by Wheeler Dealer. Another corvette was done on another show ( tackled the job of the popping rivets between the headlights((did it wrong, but who cares))). Same show took a 63 convert and made a hard top look like a split window coupe.

 01-07-2018, 08:39 PM


 They seemed to look okay prior to removal...but now after attempting to carefully place them back, I have a 3/4" gap between them??


 I put a small enough hole that I can fix the hole quickly...due to most of the time the headliners are not out and I am doing just the w/strip replacement.