When you click on links to various merchants on this site and make a purchase, this can result in this site earning a commission. Affiliate programs and affiliations include, but are not limited to, the eBay Partner Network.
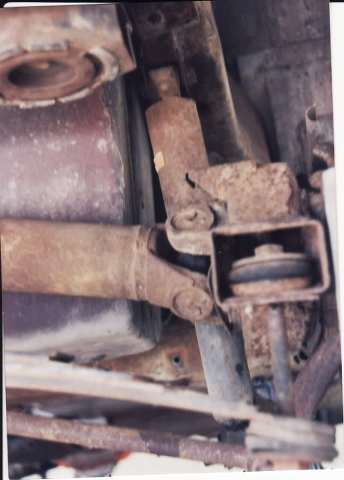
Searching around the forums, I see a lot of posts about people restoring there cars, replacing parts, or buying new. Sometimes, buying new isnt in the budget, and that is my case. I am working with a 1978 L-48 with non original 350 sbc. I am looking for a good how to on basic part restoration for things under the hood. For my particular case, I am currently redoing my entire front suspension. Obviously I went with all new bushings, re-use and refurb is not an option for me there (and now to p#$@ some people off... I WENT POLY!!) The parts I am going to reuse, however, are the pitman arm, control arms, sway bar,brake dust cover and associated parts, and a few other odds and ends. So, with those parts in mind, how would you get the grime off, do you use a wire brush? What is your favorite re-paint product? How many coats? I dont think powder coat will be in my budget, unfortunately (unless its way cheaper than I am thinking).
Thanks for the opinions! Lets keep it civil!
Also, bear in mind that I dont have a huge fancy shop like a lot of people. I am working with basic, cheap tools. I only have a small portable air compressor so air tools are out of the question for me.
From: Some days your the dog and some days your the hydrant.
Royal Canadian Navy
Good choice on the poly! If your on a budget, wire brush the reusable parts, clean with solvent and spray paint them the colour of your choosing. KISS!
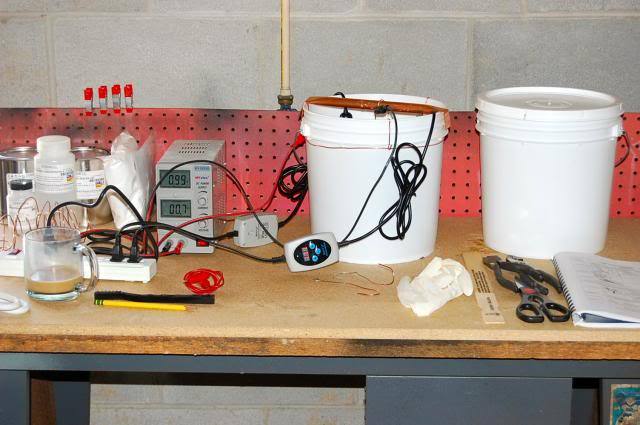
Years ago, I made a home made cleaning tank that utilizes a two anode plate system and a center hanging rod.
You suspend the part in the tank, apply a battery charger and it will pull the grime, paint and everything else off the suspension parts. We use a combination of sodium hydroxide (Lye) and sodium bi-carbonate (soda ash as the electrolyte) and water in a plastic drum to do this.
What is neat about this is that the cost is minimal to make and you can put the arms in the tank once it's hot and in a few hours they are spotless with a black **** on them. Once done you remove the part from the tank and then clean the **** off with water. While you can probably take the suspension parts and blast them, my guys can be working on something else while the parts are cleaning.
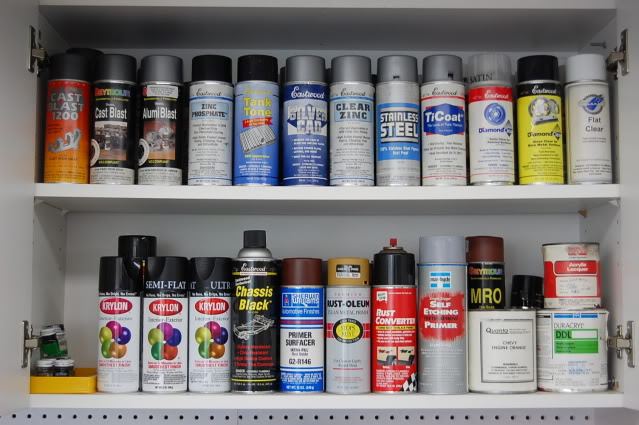
As far as what we paint with, since we do this often and because the cost is cheaper when you do this in bulk, we don't use rattle cans. We prime and paint with a semi gloss black enamel paint out of a gun... So there might be one off options that others will offer up and work just as well for you.
Years ago, I made a home made cleaning tank that utilizes a two anode plate system and a center hanging rod.
You suspend the part in the tank, apply a battery charger and it will pull the grime, paint and everything else off the suspension parts. We use a combination of sodium hydroxide (Lye) and sodium bi-carbonate (soda ash as the electrolyte) and water in a plastic drum to do this.
What is neat about this is that the cost is minimal to make and you can put the arms in the tank once it's hot and in a few hours they are spotless with a black **** on them. Once done you remove the part from the tank and then clean the **** off with water. While you can probably take the suspension parts and blast them, my guys can be working on something else while the parts are cleaning.
As far as what we paint with, since we do this often and because the cost is cheaper when you do this in bulk, we don't use rattle cans. We prime and paint with a semi gloss black enamel paint out of a gun... So there might be one off options that others will offer up and work just as well for you.
You can get an angle grinder at Harbor Freight for $20. Put a wire wheel on it, and do some serious cleaning. Eye protection and long sleeves are a must. Hand brushing will work you to death.
I use petrol to wash off most of the grease and grime then sand what I can with a orbital sander and wire brush and do the rest by hand then etch prime and top coat with a good quality paint .4 hrs to hand sand the surge tank brackets ,it just takes time.
Cleans the rust and soil off everything. Electrolysis has been around for years. Small battery charger, bucket , washing soda, water piece of copper wire and away you go.
Use a pressure washer (or go to the quarter car wash) to knock the heavy stuff off. Then spray GUNK degreaser on the parts and let them set a bit. Again, shoot with P/W or at car wash. Use lacquer thinner or other solven to do a 'finish' wipe down...or use hot water and dish detergent to wash them. Then rinse and dry.
Test the looseness of any pivot joints (knuckles) before you go to that trouble. If the joint is loose, replace it. Before re-installation, I shoot such parts with appropriate metal-color paint and/or clear lacquer, so they won't rust in the future.
Last edited by 7T1vette; Mar 31, 2018 at 09:03 PM.
Just keep in mind the diff between reconditioning and beautifying parts. You can get good results with rustoleum and a brush. Also do youtube on home powder coating. There are decent, inexpensive set-ups available. Some guys buy a 50 buck oven on craigslist to keep powder coat out of spousal unit's oven...
Hi VV,
Restoring parts is often a good decision for several reasons:
As you mention... it keeps the COST down.
The original 'hard' parts and fasteners on the car are often superior to the parts and fasteners than can now be purchased.
You're sure of the fit of the original parts.
There is a certain PLEASURE and SATISFACTION in the restoration process.
I found that I can clean things very well using various combinations of engine degreaser, full strength Simple Green, Evapo-Rust, plastic paint scrapers of various shapes and sizes, hand held wire brushes, and wire wheels on a drill motor and bench grinder. What agents and sequence needs to be used depends on the particular part or the area of the car you're working on.
Remember that many parts will begin to rust immediately once they're clean, so you need to be prepared to coat them in some way.
There are clear products that can prevent rust, various paints, and plating.
So, give 'restoration' a try....you just might enjoy it and it's likely your wallet will too.
Regards,
Alan
Just keep in mind the diff between reconditioning and beautifying parts. You can get good results with rustoleum and a brush. Also do youtube on home powder coating. There are decent, inexpensive set-ups available. Some guys buy a 50 buck oven on craigslist to keep powder coat out of spousal unit's oven...
I powdercoated everything that would fit into an old kitchen oven. If you are doing a lot of restoration it will be much cheaper and more durable. Initially, my sandblast cabinet was a cardboard box with a glass plate and holes cut in it. I got an old oven for free. The sandblast unit is about $120 and the eastwood gun was $110. Powder is $10/lb +/- a pound and a pound goes a long way. Grit for the blaster is $9 for 50 lbs at Tractor supply.
Good paint is extremely expensive when you consider thinners, catalysts and cleaners.
Use the correct Arm and Hammer if you do electrolysis, one, well both types will clean, but one gives off a dangerous gas. Off the top of my head there are sodium carbonate and sodium bi-carbonate. I think the later is the one not to use. I'd have to go to the shop and see which I have, that I use.
Lots of good replies and suggestions! Thanks everyone! Keep them coming, we can turn this into a resource with many viable options.. as for me, im still undecided on which route to take. I think electrolysis might be a winner, but its daunting looking from the outside in.
Last edited by VirginiaVette78; Apr 1, 2018 at 10:11 AM.
Reason: Spelling
Use a pressure washer (or go to the quarter car wash) to knock the heavy stuff off. Then spray GUNK degreaser on the parts and let them set a bit. Again, shoot with P/W or at car wash. Use lacquer thinner or other solven to do a 'finish' wipe down...or use hot water and dish detergent to wash them. Then rinse and dry.
Test the looseness of any pivot joints (knuckles) before you go to that trouble. If the joint is loose, replace it. Before re-installation, I shoot such parts with appropriate metal-color paint and/or clear lacquer, so they won't rust in the future.
I did just get a shiny new pressure washer for christmas
Incase anyone was wondering, I went Electrolysis. Here is my set up (Shout out to everyone for the tips and tricks on how to make one!) Keep the suggestions coming in though, lets make this an all encompassing thread.
My total cost for this build was ~$25. I already had an old tub laying around and a battery charger.
1. Go to Lowes, HD, or your favorite Hardware store, buy 2 short spans of rebar
2. Get some copper wire as well as STEEL wire, in my research, I found that you dont want to use stainless steel. Dont ask me why, im an engineer, not a chemist!
3. Get some Arm and Hammer Super Washing Soda (I had to get this from Walmart, my Lowes didnt have it in stock)
4. Get a good wire brush for after the process to finish cleaning. Everything I bought from Lowes/Wal Mart (I had an old tub laying around)
Drill 2 holes into 2 different corners of your bucket (to hold the rebar against the sides) 2 holes in 2 different sides
Tie your rebar in. Small piece of copper wire to tie each rebar to each side
Along the outside of your bucket, run copper wire between the two pieces of rebar (its important that the copper is not IN the water bucket) Tie the pieces of rebar together using copper wire
Now, take a piece of wood, wrap the steel wire around it and create a place for you to hook up the parts underneath and a place to attach a negative terminal to the top... BOOM you are done!
If you guys see that i did anything wrong, PLEASE CORRECT IT. I would rather not go up in smoke when i put some parts in this bad boy.
I use petrol to wash off most of the grease and grime...
Me too. Its way cheaper than solvent, carb cleaner, or spray cans of engine degreaser. Anything that doesn't come off you then use the more expensive and heavier duty cleaners on and it doesn't take anywhere near as much.
My only concern with this is the flammability of the gasoline, so any such cleaning I do outside in the middle of a driveway or something in the unlikely event of an accidental small fire. Having been on fire once I'm pretty paranoid about it now although I suppose many, if not most, solvents, engine degreasers, etc. are flammable too.
Hi VV,
Restoring parts is often a good decision for several reasons:
As you mention... it keeps the COST down.
The original 'hard' parts and fasteners on the car are often superior to the parts and fasteners than can now be purchased.
You're sure of the fit of the original parts.
There is a certain PLEASURE and SATISFACTION in the restoration process.
I found that I can clean things very well using various combinations of engine degreaser, full strength Simple Green, Evapo-Rust, plastic paint scrapers of various shapes and sizes, hand held wire brushes, and wire wheels on a drill motor and bench grinder. What agents and sequence needs to be used depends on the particular part or the area of the car you're working on.
Remember that many parts will begin to rust immediately once they're clean, so you need to be prepared to coat them in some way.
There are clear products that can prevent rust, various paints, and plating.
So, give 'restoration' a try....you just might enjoy it and it's likely your wallet will too.
Regards,
Alan
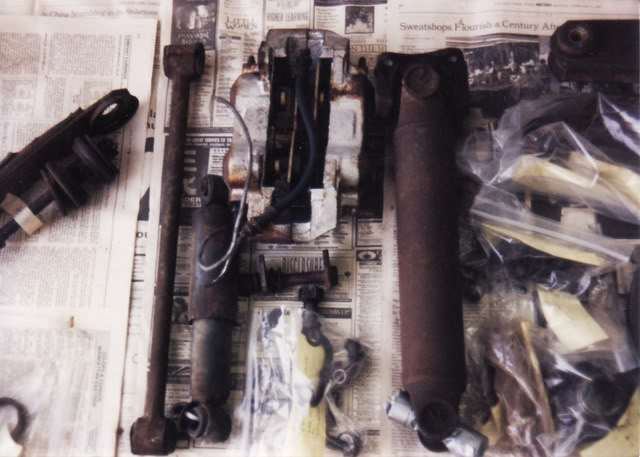
Are those halfshafts the original ones you've de-rusted etc?
Would love to have mine look like that!
Designer Imagines A Corvette That Looks More Like a Corvette Than the Corvette
Slideshow: A Jaguar designer's personal project imagines what a modern front-engined Corvette might look like if Chevrolet revisited the golden age of the Stingray.