


1989 Corvette Shift Indicator

Thread Starter
Burning Brakes


Joined: Mar 2012
Posts: 769
Likes: 22
From: California
FL Events Coordinator
St. Jude Donor'13
I was wondering if anyone could give me a detailed tutorial on how to install a new on that I just received. What I need it the actual installation of the indicator and how to take apart the console bezel that it is under so that I can get to it. Also is this an easy task or hard?
Thank you, Stephen
Thank you, Stephen

Burning Brakes
Joined: Nov 2011
Posts: 841
Likes: 1
I was wondering if anyone could give me a detailed tutorial on how to install a new on that I just received. What I need it the actual installation of the indicator and how to take apart the console bezel that it is under so that I can get to it. Also is this an easy task or hard?
Thank you, Stephen
Thank you, Stephen
Team Owner


Joined: Dec 2000
Posts: 90,675
Likes: 304
From: SE NY
Cruise-In II Veteran
...and believe all the dash trim has to come out starting with the cluster trim, then you work your way down to the console trim.

You need to remove:
-tilt lever (it unscrews)
-headlight **** (small flat-blade under the slot)
-digi-dash bezel
-radio & A/C bezel
-shifter buttom, C-clip & ****
-console screws
Lift shifter console rear, disconnect shift indicator lt bulb.
Remove shifter console, replace shift indicator & lt bulb.
I don't recall if the dash pad needs to be loosened to get at screws on top of radio & A/C bezel.
When installing all the plastic use caution to properly seat all pieces and to not over tighten the screws.
Have fun with the project.
Thread Starter
Burning Brakes
Joined: Mar 2012
Posts: 769
Likes: 22
From: California
FL Events Coordinator
St. Jude Donor'13
First, take the shift **** off. If your car is auto, just pry off the button then use a snap-ring pliers to remove the **** itself (you'll see the ring when the button is off) a manual **** should just un-screw. Then just remove the screws you see, I believe the radio bezel has to come off first but you can see how the panels overlap. I recently had the interior out of my car and believe all the dash trim has to come out starting with the cluster trim, then you work your way down to the console trim. Be careful when you lift the indicator trim because the indicator light is attached. It's pretty easy once the **** is off, don't loose that snap-ring.
Burning Brakes
Joined: Nov 2011
Posts: 841
Likes: 1

Burning Brakes
Joined: Nov 2011
Posts: 841
Likes: 1
One little thing I did when I replaced everything was change the screws. My plastic pieces had little cracks where the screws went and a few chips out of the plastic, so I went to the HELP section at the parts store and bought interior trim screws in black that have the black counter-sink washers on them. Everything looks mint. Another thing, if you wanna remove the shifter boot (to clean it ect.) be VERY VERY careful to NOT NOT break the studs off of the console trim piece, these things are OLD and very brittle. I broke mine off and had to remount the boot from the top with trim screws, it looks good but I'd rather not have broken it
Pro


Joined: Sep 2008
Posts: 694
Likes: 27
From: St James New York
If your just going to replace the orange/red shift indicator bar, and not replace the entire console bezel, you don't need to remove the shift ****. The shift indicator bar just pops into place and can be replaced by removing all the center console bezel mounting screws and lifting up the bezel while the shifter boot is still attached to the bezel and auto-stick. Just reach in under the bezel and R/R the indicator bar.
Burning Brakes
Joined: Nov 2011
Posts: 841
Likes: 1
If your just going to replace the orange/red shift indicator bar, and not replace the entire console bezel, you don't need to remove the shift ****. The shift indicator bar just pops into place and can be replaced by removing all the center console bezel mounting screws and lifting up the bezel while the shifter boot is still attached to the bezel and auto-stick. Just reach in under the bezel and R/R the indicator bar.
Corvette Stories
The Best of Corvette for Corvette Enthusiasts

Top 10 Most Expensive Corvettes Ever Sold on Bring A Trailer
Brett Foote
10 Things Every Corvette Owner Needs (2026 Edition)
Michael S. Palmer
8 Most "Only Corvette Owners Understand" Quirks and Problems
Pouria Savadkouei
10 Reasons the C6 Z06 is Still A Performance Benchmark After 20 Years
Joe Kucinski
How Much Horsepower Every Corvette Engine "LOST" in 1972
Joe Kucinski
Top 10 DOs and DON'Ts for Protecting Your Convertible Top!
Michael S. Palmer
Top 10 Most Explosive Corvettes Ever Made: Power-to-Weight Ratio Ranked!
Joe Kucinski
150 hp to 1,250 hp: Every Corvette Generation Compared by the Specs That Matter
Joe Kucinski
8 Coolest Corvette Pace Cars (and Replicas) of All Time
Verdad Gallardo
Race Director


Joined: Aug 2000
Posts: 11,470
Likes: 764
, and here's a very good, and perfect size snap-ring plier for the shift **** removal. ya know what they say about using the proper tool. besides, things like this are just the excuse i need to go to the tool store! KLINE #73242
Burning Brakes
Joined: Nov 2011
Posts: 841
Likes: 1
I picked one up thats adjustable and you can flip the jaw around for remove & install Then again, if it's kline it's probably not that cheap.
Thread Starter
Burning Brakes
Joined: Mar 2012
Posts: 769
Likes: 22
From: California
FL Events Coordinator
St. Jude Donor'13

Thread Starter
Burning Brakes
Joined: Mar 2012
Posts: 769
Likes: 22
From: California
FL Events Coordinator
St. Jude Donor'13
Thread Starter
Burning Brakes
Joined: Mar 2012
Posts: 769
Likes: 22
From: California
FL Events Coordinator
St. Jude Donor'13

Burning Brakes
Joined: Nov 2011
Posts: 841
Likes: 1
Race Director
Joined: Apr 2002
Posts: 10,036
Likes: 346
From: Anaheim CA
The snap ring is pretty deep in the **** and the holes are very small. I have a set of snap ring pliers like that and the tips are too big to fit in the holes in the snap ring. I don't think it will go down inside the shift **** far enough to reach the snap ring anyway.
I used one of these guys to get mine out (the straight one):

I used one of these guys to get mine out (the straight one):
Last edited by Cliff Harris; Apr 4, 2012 at 12:03 AM. Reason: Spelling error.
Burning Brakes
Joined: Nov 2011
Posts: 841
Likes: 1
The snap ring is pretty deep in the **** and the holes are very small. I have a set of snap ring pliers like that and the tips are too big to fit in the holes in the snap ring. I don't think it will go down inside the shift **** far enough to reach the snap ring anyway.
I used one of these guys to get mine out (the straight one):
I used one of these guys to get mine out (the straight one):
 and you can never have enough tools
Race Director
Joined: Apr 2002
Posts: 10,036
Likes: 346
From: Anaheim CA
I think the tips in the picture above are a little longer than the set I have. Mine has two straight tips but they're both the same size (and too large for the snap ring).
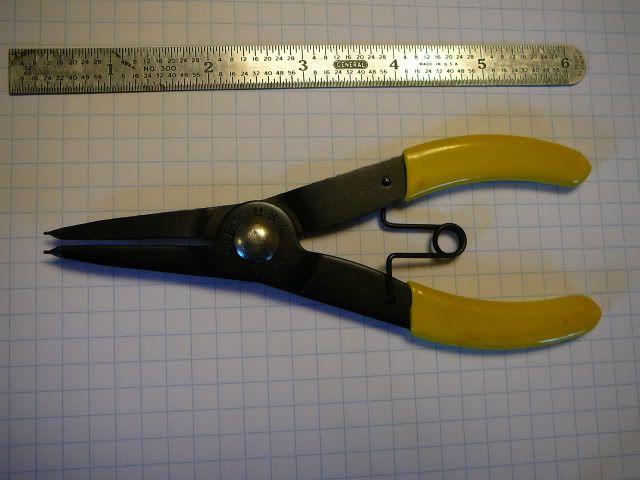
Here's what mine looks like. I replaced the spring pivot with a bolt because it wobbled around too much. I think they're Great Neck. Not sure because the printing is gone -- trans oil makes a great solvent. I saw a set at Harbor Freight that looks very close to these.

Here's what mine looks like. I replaced the spring pivot with a bolt because it wobbled around too much. I think they're Great Neck. Not sure because the printing is gone -- trans oil makes a great solvent. I saw a set at Harbor Freight that looks very close to these.
Last edited by Cliff Harris; Apr 5, 2012 at 04:00 AM.
Burning Brakes
Joined: Nov 2011
Posts: 841
Likes: 1
I think the tips in the picture above are a little longer than the set I have. Mine has two straight tips but they're both the same size (and too large for the snap ring).
Here's what mine looks like. I replaced the spring pivot with a bolt because it wobbled around too much. I think they're Great Neck. Not sure because the printing is gone -- trans oil makes a great solvent. I saw a set at Harbor Freight that looks very close to these.
Here's what mine looks like. I replaced the spring pivot with a bolt because it wobbled around too much. I think they're Great Neck. Not sure because the printing is gone -- trans oil makes a great solvent. I saw a set at Harbor Freight that looks very close to these.
Last edited by caddyboy84; Apr 5, 2012 at 06:31 AM.