


how to replace the front blinker lights

Thread Starter
Racer

Joined: Jun 2005
Posts: 335
Likes: 0
From: Portland OR
do i need a lift to replace the front blinkers? how do i get in there? also, what about the side markets and rear brake light? the tails were easy enough 
sorry, big newb here!
sorry, big newb here!
Safety Car


Joined: Feb 2001
Posts: 3,725
Likes: 53
From: Warrington Pa.
You can raise the headlights remove the black headlight surround (2 phillips screws)and reach down, or remove the outside airdam then remove the access panel and reach up to remove the bulb. If you have large hands and arms the second option is best.
4th Gear

Joined: Aug 2008
Posts: 4
Likes: 0
From: Forney Texas
i went in through the headlight bezels .......you have to remove 4 screws .....you can't see what your doing so its all by feel...took me about an hour to do both .....once you do one the other is fairly simple....good luck
Safety Car
Joined: Feb 2001
Posts: 3,725
Likes: 53
From: Warrington Pa.
Are you changing bulbs or changing the lenses??? Clear corners??? You can reach the side marker and third brake light by removing the tail lights.
here's a link for removing the front turn signal lenses.. Post #3
http://forums.corvetteforum.com/show....php?t=1817090
here's a link for removing the front turn signal lenses.. Post #3
http://forums.corvetteforum.com/show....php?t=1817090
Last edited by Bill Vett; Aug 13, 2008 at 10:11 PM.
Race Director


Joined: Aug 2003
Posts: 16,270
Likes: 30
From: "It's 106 miles to Chicago, we've got a full tank of gas, half a pack of cigarettes, it's dark, and
St. Jude Donor '03-'04-'05-'06-'07-'08-'09-'10-'11-'12-'13-'14-'15-'16-'17-�18-'19
NCM Sinkhole Donor
As Bill mentioned, you can reach the rear sidemarkers by removing the outboard taillight on each side. If you remove the inboard taillight, you should be able to get to the CHMSL. The CHMSL is an LED unit, and there are no bulbs to replace, BTW.
As far as the front, if you have smallish hands, you can reach through the front brake duct - push the duct itself out of the way and you should be able to get at the front bulbs. Failing that - you can remove the front access panel just behind the front airdams on each side and reach the whole assembly from the back side. It will be a lot easier if you turn the wheels in on each side and easier still if you jack up the front end so you can get under there. My car is lowered all the way on the stock bolts, and I can't easily get under there.
As far as the front, if you have smallish hands, you can reach through the front brake duct - push the duct itself out of the way and you should be able to get at the front bulbs. Failing that - you can remove the front access panel just behind the front airdams on each side and reach the whole assembly from the back side. It will be a lot easier if you turn the wheels in on each side and easier still if you jack up the front end so you can get under there. My car is lowered all the way on the stock bolts, and I can't easily get under there.
Administrator


Joined: Mar 2001
Posts: 368,340
Likes: 24,779
From: In a parallel universe. Currently own 2014 Stingray Coupe.
C7 of the Year - Modified Finalist 2021
MO Events Coordinator
St. Jude Co-Organizer
St. Jude Donor '03 thru '26
NCM Sinkhole Donor
CI 5, 8 & 11 Veteran
 with blacksedan87 - I found taking off the access panel under the front fascia was the easiest for me.
Corvette Stories
The Best of Corvette for Corvette Enthusiasts

Top 10 Most Expensive Corvettes Ever Sold on Bring A Trailer
Brett Foote
10 Things Every Corvette Owner Needs (2026 Edition)
Michael S. Palmer
8 Most "Only Corvette Owners Understand" Quirks and Problems
Pouria Savadkouei
10 Reasons the C6 Z06 is Still A Performance Benchmark After 20 Years
Joe Kucinski
How Much Horsepower Every Corvette Engine "LOST" in 1972
Joe Kucinski
Top 10 DOs and DON'Ts for Protecting Your Convertible Top!
Michael S. Palmer
Top 10 Most Explosive Corvettes Ever Made: Power-to-Weight Ratio Ranked!
Joe Kucinski
150 hp to 1,250 hp: Every Corvette Generation Compared by the Specs That Matter
Joe Kucinski
8 Coolest Corvette Pace Cars (and Replicas) of All Time
Verdad GallardoTech Contributor
Joined: Dec 2003
Posts: 19,384
Likes: 87
From: Horncastle Lincolnshire, England
2023 C5 of the Year Finalist - Unmodified
You'll get three suggestions
Go in through the brake ducts - not easy with a Z06 or if you have screens
Go in through the bottom by taking out the bottom panel

The one that works for me is:
Turn on the headlights and back off one position to kill the lights.
Unscrew the 3 small screws on the black plastic housing around the headlight. Gently pull the housing clear. Reach down around the headlight unit and release the bulb holder. It unscrews counter clockwise but it has a plastic clip which you need to squeeze to release it. Here’s how the bulb fits into the lamp unit. The DRL bulb is the lower of the two.
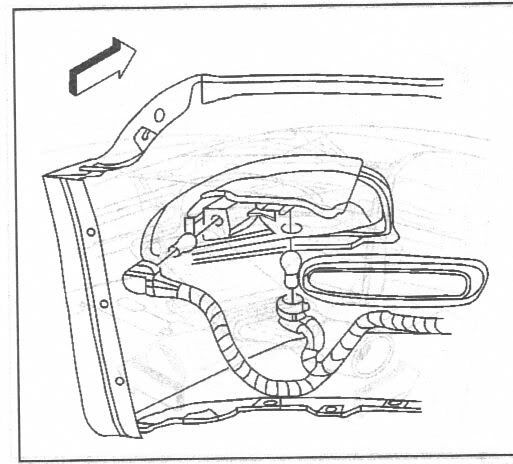
Here’s the light socket. This one’s after market but it gives you the idea. You can see the clip you need to squeeze.

Change the bulb. Reseat the bulb holder and turn until it clicks back in place. Put the plastic housing back in place making sure to locate the small plastic tab in the bracket on the headlamp cover. Replace the 3 screws and close the lights.
10 minute job. Some guys have had the lights close if they’ve taken a while to do the fix. If you’re worried about that, disconnect the battery once the lights are up.
The bulb is a 4157NA
Some guys with big arms remove the hood adjusting screw for better access. Guys with even bigger arms have had to take off the headlight cover. Four torx screws (2 back, 1 each side). Take the back ones off first with the lamps down. Raise the lights and take the side ones out.
For the rear sidemarkers you need to take out the rear outside light units. Its a tight fit down there. The lamp holder twists out counter clockwise. The bulb is a 194.
The high mount stop light is a complete LED assembly (Part # 10253893)and, again, you need to take out the tail lamp to get access. Unplug the connector. There are 2 screws on the underside of the lamp. Unscrew those and it lifts out.
Go in through the brake ducts - not easy with a Z06 or if you have screens
Go in through the bottom by taking out the bottom panel
The one that works for me is:
Turn on the headlights and back off one position to kill the lights.
Unscrew the 3 small screws on the black plastic housing around the headlight. Gently pull the housing clear. Reach down around the headlight unit and release the bulb holder. It unscrews counter clockwise but it has a plastic clip which you need to squeeze to release it. Here’s how the bulb fits into the lamp unit. The DRL bulb is the lower of the two.
Here’s the light socket. This one’s after market but it gives you the idea. You can see the clip you need to squeeze.
Change the bulb. Reseat the bulb holder and turn until it clicks back in place. Put the plastic housing back in place making sure to locate the small plastic tab in the bracket on the headlamp cover. Replace the 3 screws and close the lights.
10 minute job. Some guys have had the lights close if they’ve taken a while to do the fix. If you’re worried about that, disconnect the battery once the lights are up.
The bulb is a 4157NA
Some guys with big arms remove the hood adjusting screw for better access. Guys with even bigger arms have had to take off the headlight cover. Four torx screws (2 back, 1 each side). Take the back ones off first with the lamps down. Raise the lights and take the side ones out.
For the rear sidemarkers you need to take out the rear outside light units. Its a tight fit down there. The lamp holder twists out counter clockwise. The bulb is a 194.
The high mount stop light is a complete LED assembly (Part # 10253893)and, again, you need to take out the tail lamp to get access. Unplug the connector. There are 2 screws on the underside of the lamp. Unscrew those and it lifts out.
Last edited by DeeGee; Aug 14, 2008 at 01:26 AM.
Team Owner


Joined: Mar 2004
Posts: 58,501
Likes: 1,828
From: Oklahoma City OK
C6 of Year Finalist (appearance mods) 2019

Melting Slicks

Joined: Jun 2008
Posts: 2,500
Likes: 0
From: Lower, Slower Delaware, formerly from Mobtown, MD (Baltimore)
You'll get three suggestions
Go in through the brake ducts - not easy with a Z06 or if you have screens
Go in through the bottom by taking out the bottom panel
The one that works for me is:
Turn on the headlights and back off one position to kill the lights.
Unscrew the 3 small screws on the black plastic housing around the headlight. Gently pull the housing clear. Reach down around the headlight unit and release the bulb holder. It unscrews counter clockwise but it has a plastic clip which you need to squeeze to release it. Here�s how the bulb fits into the lamp unit. The DRL bulb is the lower of the two.
Here�s the light socket. This one�s after market but it gives you the idea. You can see the clip you need to squeeze.
Change the bulb. Reseat the bulb holder and turn until it clicks back in place. Put the plastic housing back in place making sure to locate the small plastic tab in the bracket on the headlamp cover. Replace the 3 screws and close the lights.
10 minute job. Some guys have had the lights close if they�ve taken a while to do the fix. If you�re worried about that, disconnect the battery once the lights are up.
The bulb is a 4157NA
Some guys with big arms remove the hood adjusting screw for better access. Guys with even bigger arms have had to take off the headlight cover. Four torx screws (2 back, 1 each side). Take the back ones off first with the lamps down. Raise the lights and take the side ones out.
For the rear sidemarkers you need to take out the rear outside light units. Its a tight fit down there. The lamp holder twists out counter clockwise. The bulb is a 194.
The high mount stop light is a complete LED assembly (Part # 10253893)and, again, you need to take out the tail lamp to get access. Unplug the connector. There are 2 screws on the underside of the lamp. Unscrew those and it lifts out.
