


2000 Vert Window leaking
Thread Starter
Instructor


Joined: Jul 2008
Posts: 152
Likes: 0
From: Creswell Oregon
I have a 2000 vert and the drivers side window appears to need to be adjusted. when it rains it drips in at the very top. If you look at it from the outside there is a really small gap at the seal. I don't have this problem on the passengers so so it looks to me like I might just need to adjust the window. Anyone have the same issue and already solve it? Starting into the rainy season and this is my DD.
thanks
thanks

Racer
Joined: Jun 2005
Posts: 438
Likes: 0
Yes, I'm going through this with my 2000 vert. I have had two annoying leaks on the driver's side, including the one you describe. I was able to fix yours by adjusting the window tip-in.
Over time the nut that is supposed to hold this adjustment in place loosened up, causing a loud rattle in the door when I'd hit a bump with the window down. When the tip-in went out of a adjustment the window was no longer pressing with enough force against the weather stripping to seal out water.
If you run a search, then you'll find something on tip in adjustment. Pop off the reflector on the inside of the door, then loosen the nut with a 10mm socket. Turn the bolt counterclockwise to tip the window towards the car and and clockwise to tip it out. There are two additional adjustments that can be done at the base of the door, it just seems like incorrect tip-in is the usual problem.
I also plumped up that area with a very small amount of expanding foam from the hardware store. If you go that route, then I recommend covering any holes with tape, so that extra foam doesn't stain your top!
My current problem is the weather stripping along the top edge of the window. It's leaking where the two pieces connect! I've smeared silicone grease on both sides in an effort to stop the leak. Otherwise, I don't know of any other fix, other than expensive weather stripping replacement.
Fiddling with the window tip in fixed the first leak, as witnessed by the all day rain we had last week. Unfortunately, I was still greeted with a small wet spot on the seat due to the second leak. That was before trying the silicone grease (aka dielectric grease).
I did wash the car yesterday, but that's not a good simulation of rain. In fact, the passenger side was soaked when I opened the door, which never happens in the rain. High pressure water brings out small leaks that nature never could!
Anyway, you could get a small tube of dielectric grease and smear a bit on the weather stripping joints. It's quick, easy and might head off some problems in the future, besides, it's good for the weather stripping. I wish I could tell you if it works first hand or not...
It's supposed to rain for four days straight next week, so will definitely know by the end of the week.
Good luck with your adjustments!
Last edited by 71vetteinva; Dec 14, 2008 at 10:21 AM.
Advanced

Joined: Jul 2006
Posts: 68
Likes: 0
From: Lyndon, KS
When you're washing the car, and using high pressure water, there may be something you need to do. I remember on my TA vert, you were supposed to set up the ventilation in a certain configuration to seal out the water. I don't have an e-copy of my vette's manual but I'll search for info later.
Jon
Jon

Race Director


Joined: Aug 2003
Posts: 13,421
Likes: 8
From: Lake Mary Florida
If I blast mine with the hose they drip a little, but nothing serious enough to be making adjustments over.
When you start the top up to the vertical position, look at the weather strip to determine its condition, also there is a piece of foam that is stuck in between the weatherstrip you can only see when its going to the vertical up position and make sure its ok. You can get that piece goes on both sides from any home supply/hardware store.
When you start the top up to the vertical position, look at the weather strip to determine its condition, also there is a piece of foam that is stuck in between the weatherstrip you can only see when its going to the vertical up position and make sure its ok. You can get that piece goes on both sides from any home supply/hardware store.
Race Director

Joined: Feb 2004
Posts: 11,651
Likes: 9
From: HOW FAST WAS I GOING OFFICER? Los Angeles Hating GM Dealership Service Dept.'s Since Sept. 2004
St. Jude Donor '04-'05-'06-'07
If you PM me your email address --- I'll send you the whole write up with pix.
Window Tip-In Adjustment
I found the instructions below on the web about how to adjust the side window tip in for a C5 Coupe. I don't remember the source, but I just wanted to augment this procedure with photos.
I was getting wind noise on my driver's side windowat speeds above 70 mph, and not the passenger side. I was going to adjust the blow-out clip towards the rear of the car one position, like I had also heard about. But upon closer inspection, I noticed with the door closed and the window fully up I could see the top edge of the window (the edge has a cloudy, or a rough finish). Which means it wasn't fully seated into the top portion of the weather stripping.
So this is why I chose to do a window tip in adjustment vs moving and/or adjusting the blow-out clip. My brother was also getting wind noise above 70mph. But his window was seated ok in its weather stripping. So on his we moved the blow-out clip.
Tools Required:
#6 Inverted TORX� Socket
10mm socket
1. Position the window fully up.
2. Remove the large access plug from under the front of the door.
3. Loosen the window regulator front channel mounting nut.
4. Remove the reflector from the trim panel
5. Loosen the jack screw jam nut.
6. Adjust tip in with the jack screw. Turn the jack screw clockwise to tip the window outward. Turn the jack screw counterclockwise to tip the window inward. One turn of the screw equals approximately 1 N�m (0.04 in) change at the top of the window.
7. Tighten the jack screw jam nut.
8. Lower the window.
9. Tighten the window regulator channel front mounting nut.
10. Raise the window and check the alignment.
11. Install the access plug under the front of the door.
12. Install the reflector in the door trim panel.
Racer
Joined: Jun 2005
Posts: 438
Likes: 0
A quick update. My Corvette was parked outside in the rain all day today while I was at work.
The dielectric grease seems to have worked perfectly as there was no water in the car at the end of the day! Adjusting window tip-in and applying dielectric grease to the weather stripping seems to have fixed my leak problem.
The dielectric grease seems to have worked perfectly as there was no water in the car at the end of the day! Adjusting window tip-in and applying dielectric grease to the weather stripping seems to have fixed my leak problem.
Le Mans Master


Joined: Oct 2005
Posts: 9,429
Likes: 44
From: Macon, GA
If you PM me your email address --- I'll send you the whole write up with pix.
Window Tip-In Adjustment
I found the instructions below on the web about how to adjust the side window tip in for a C5 Coupe. I don't remember the source, but I just wanted to augment this procedure with photos.
I was getting wind noise on my driver's side windowat speeds above 70 mph, and not the passenger side. I was going to adjust the blow-out clip towards the rear of the car one position, like I had also heard about. But upon closer inspection, I noticed with the door closed and the window fully up I could see the top edge of the window (the edge has a cloudy, or a rough finish). Which means it wasn't fully seated into the top portion of the weather stripping.
So this is why I chose to do a window tip in adjustment vs moving and/or adjusting the blow-out clip. My brother was also getting wind noise above 70mph. But his window was seated ok in its weather stripping. So on his we moved the blow-out clip.
Tools Required:
#6 Inverted TORX� Socket
10mm socket
1. Position the window fully up.
2. Remove the large access plug from under the front of the door.
3. Loosen the window regulator front channel mounting nut.
4. Remove the reflector from the trim panel
5. Loosen the jack screw jam nut.
6. Adjust tip in with the jack screw. Turn the jack screw clockwise to tip the window outward. Turn the jack screw counterclockwise to tip the window inward. One turn of the screw equals approximately 1 N�m (0.04 in) change at the top of the window.
7. Tighten the jack screw jam nut.
8. Lower the window.
9. Tighten the window regulator channel front mounting nut.
10. Raise the window and check the alignment.
11. Install the access plug under the front of the door.
12. Install the reflector in the door trim panel.
Window Tip-In Adjustment
I found the instructions below on the web about how to adjust the side window tip in for a C5 Coupe. I don't remember the source, but I just wanted to augment this procedure with photos.
I was getting wind noise on my driver's side windowat speeds above 70 mph, and not the passenger side. I was going to adjust the blow-out clip towards the rear of the car one position, like I had also heard about. But upon closer inspection, I noticed with the door closed and the window fully up I could see the top edge of the window (the edge has a cloudy, or a rough finish). Which means it wasn't fully seated into the top portion of the weather stripping.
So this is why I chose to do a window tip in adjustment vs moving and/or adjusting the blow-out clip. My brother was also getting wind noise above 70mph. But his window was seated ok in its weather stripping. So on his we moved the blow-out clip.
Tools Required:
#6 Inverted TORX� Socket
10mm socket
1. Position the window fully up.
2. Remove the large access plug from under the front of the door.
3. Loosen the window regulator front channel mounting nut.
4. Remove the reflector from the trim panel
5. Loosen the jack screw jam nut.
6. Adjust tip in with the jack screw. Turn the jack screw clockwise to tip the window outward. Turn the jack screw counterclockwise to tip the window inward. One turn of the screw equals approximately 1 N�m (0.04 in) change at the top of the window.
7. Tighten the jack screw jam nut.
8. Lower the window.
9. Tighten the window regulator channel front mounting nut.
10. Raise the window and check the alignment.
11. Install the access plug under the front of the door.
12. Install the reflector in the door trim panel.
Thanks for posting. I'll give this a try.

Tech Contributor

Joined: Dec 2003
Posts: 19,384
Likes: 87
From: Horncastle Lincolnshire, England
2023 C5 of the Year Finalist - Unmodified
Here are the pics to go with Dave's instructions. If this adjustment doesn't work the seals may be compressed and may need replacing.
Document ID # 657148
2002 Chevrolet Corvette
Window Tip-In Adjustment - Door
Tools Required
#6 Inverted TORX� Socket
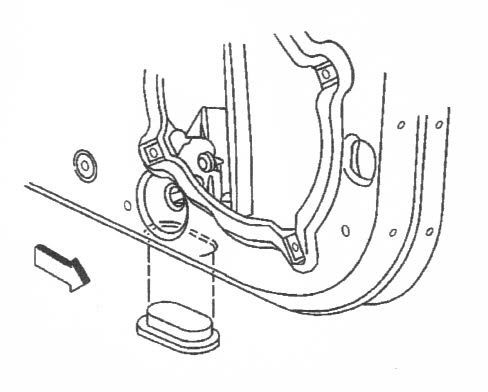
1. Position the window fully up.
2. Remove the large access plug from under the front of the door.
3. Loosen the window regulator front channel mounting nut.
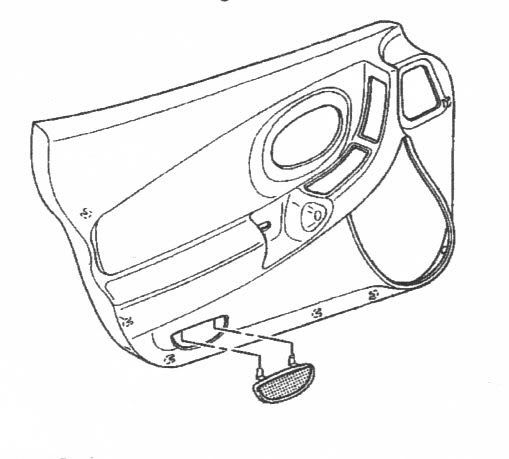
4. Remove the reflector from the trim panel
5. Loosen the jack screw jam nut.
6. Adjust tip in with the jack screw.
o Turn the jack screw clockwise to tip the window outward.
o Turn the jack screw counter-clockwise to tip the window inward.
o One turn of the screw equals approximately 1 Nm (0.04 in) change at the top of the window.
7. Tighten the jack screw jam nut.
8. Lower the window.
9. Tighten the window regulator channel front mounting nut.
10. Raise the window and check the alignment.
11. Install the access plug under the front of the door.
12. Install the reflector in the door trim panel.
Document ID # 657148
2002 Chevrolet Corvette
Window Tip-In Adjustment - Door
Tools Required
#6 Inverted TORX� Socket
1. Position the window fully up.
2. Remove the large access plug from under the front of the door.
3. Loosen the window regulator front channel mounting nut.
4. Remove the reflector from the trim panel
5. Loosen the jack screw jam nut.
6. Adjust tip in with the jack screw.
o Turn the jack screw clockwise to tip the window outward.
o Turn the jack screw counter-clockwise to tip the window inward.
o One turn of the screw equals approximately 1 Nm (0.04 in) change at the top of the window.
7. Tighten the jack screw jam nut.
8. Lower the window.
9. Tighten the window regulator channel front mounting nut.
10. Raise the window and check the alignment.
11. Install the access plug under the front of the door.
12. Install the reflector in the door trim panel.
Last edited by DeeGee; Dec 27, 2008 at 02:45 AM.
Corvette Stories
The Best of Corvette for Corvette Enthusiasts

Top 10 Most Expensive Corvettes Ever Sold on Bring A Trailer
Brett Foote
10 Things Every Corvette Owner Needs (2026 Edition)
Michael S. Palmer
8 Most "Only Corvette Owners Understand" Quirks and Problems
Pouria Savadkouei
10 Reasons the C6 Z06 is Still A Performance Benchmark After 20 Years
Joe Kucinski
How Much Horsepower Every Corvette Engine "LOST" in 1972
Joe Kucinski
Top 10 DOs and DON'Ts for Protecting Your Convertible Top!
Michael S. Palmer
Top 10 Most Explosive Corvettes Ever Made: Power-to-Weight Ratio Ranked!
Joe Kucinski
150 hp to 1,250 hp: Every Corvette Generation Compared by the Specs That Matter
Joe Kucinski
8 Coolest Corvette Pace Cars (and Replicas) of All Time
Verdad Gallardo
Advanced
Joined: Nov 2013
Posts: 58
Likes: 0
Anyone have suggestions on where to take it to try and get it fixed? The dealer said it is a known uncorrectable problem....
Had issues with one of the corvette repair shops here in North Dallas area where they wanted to charge me for a $800 part they said i needed. Turned out low tire preasure was the issue that through a code...
I am not terribly handy.
Thanks
Had issues with one of the corvette repair shops here in North Dallas area where they wanted to charge me for a $800 part they said i needed. Turned out low tire preasure was the issue that through a code...
I am not terribly handy.
Thanks

1st Gear
Joined: Oct 2016
Posts: 1
Likes: 0
I have the dreaded wind noise on my 2002 C5. I did some measurements and the passenger window's gap from the mid post is about �". The gap on the driver's side is almost 15/16". How do I correct this?
My apologies for the 2nd and 4th picture. The 2nd one is on the passenger side and the 4th is on the drivers side. I couldn't' figure out how to rotate them before uploading them.

My apologies for the 2nd and 4th picture. The 2nd one is on the passenger side and the 4th is on the drivers side. I couldn't' figure out how to rotate them before uploading them.
Safety Car


Joined: Dec 2010
Posts: 3,938
Likes: 498
From: Fords, NJ
I just replaced my passenger side regulator with a new OEM unit and had to adjust the height stops on it so the top of the window came to the stop as it was set at the factory. There is pictures in my thread showing where these adjustment screws are and how to go about setting them. Unfortunately you will have to remover the door panel and speaker to access the jack bolts.
https://www.corvetteforum.com/forums...placement.html
https://www.corvetteforum.com/forums...placement.html

Melting Slicks

Joined: Jul 2010
Posts: 2,793
Likes: 333
From: Leesburg Fl
2018 C5 of Year Finalist
St. Jude Donor '14,'18
Mine drips on my knee, comes thru where the A pillar meets the windshield. Will have to check on it while at the dealer tomorrow. Previously I had been told the window was ok. What a PITA