


ebcm repair
Thread Starter
Racer


Joined: Sep 2008
Posts: 461
Likes: 11
From: baton rouge louisiana
i had mine repaired and ...i drove my vette whitout it ,does anyone know if driving your car without the unit caused any situation where you need to reset a fuse or something,because the trouble and dash trouble lights are always on now,i did disc the bat for a few minutes

Burning Brakes

Joined: Jan 2006
Posts: 1,170
Likes: 27
From: Magnolia Greens NC
with the key in the on position, but the engine not running
push and release the reset button until all messages cleared
next push and HOLD button #4
next push and release button #1 four times while holding button #4
When first engaged the on-board diagnostics go into an "automatic" mode which shows all parameters: PCM-TCS-RTD-BCM-IPC-radio-HVAC-LDCM-RDCM-SCM-RFA. If there are no problems, you will see "no more codes" on the ICP display. The computer will show two kinds of codes, "current" and "history," designated "C" or "H". A current code indicates a malfunction is present in the system whose module is displaying data. A history code indicates a past problem. When the screen displays "manual diagnostics," select the desired module by pressing the "options" button to go forward or the "trip" button to go back. Press "gages" to go forward or "fuel" to go back. To exit the diagnostic mode at any time, press "E/M".
..........to "clear" codes, press "reset."
.... the DIC may display: "Service A/H, T/C & ABS" when
driving your Vette with the EBCM removed ...but when the EBCM has been correctly repaired (or replaced) and installed, you should be able to clear those messages (per above) ... a battery disconnect should not cause these warnings....if connections & battery are good.

Team Owner

Joined: Mar 2001
Posts: 21,325
Likes: 3,841
From: small town in S.E Pa. PA
St. Jude Donor '03-'04
i had mine repaired and ...i drove my vette whitout it ,does anyone know if driving your car without the unit caused any situation where you need to reset a fuse or something,because the trouble and dash trouble lights are always on now,i did disc the bat for a few minutes
You had your EBCM repaired... and while it was out you got trouble lights. This is because the EBCM was not able to complete a self diagnosis. Here is the unclear part:
After you installed the repaired EBCM, did you infact clear any codes?
Did you disconnect the neg cable from the battery.
if your traction control and active handling are still lit, and you are getting DIC warnings, you either cooked the new EBCM or it was not really fixed. I am assuming you read the trouble codes prior to sending the EBCM out for repair.
Also was there a point after the repair of the EBCM and install where there was no warning lights.
What made you assume the EBCM was bad in the first place.
Thread Starter
Racer
Joined: Sep 2008
Posts: 461
Likes: 11
From: baton rouge louisiana
forst,,i would start the car,no problem,drive it sometimes for a short while,no problem,after awile i got the ser abs and traction lights and some codes,1214 1000 and others,so i took it out sent it off ,drove it a little without the mod,got it back ,pluged it in and now i got a permanet trouble whitch i never had before the repair a c1242 that is in all the time,i disc the bat to maybe reset the sys,,now i guess i have to send it off again to someone else

Tech Contributor


Joined: Dec 1999
Posts: 32,910
Likes: 2,402
From: Anthony TX
CI 6,7,8,9,11 Vet
St. Jude Donor '08


 BC
BCClear the DTCs and post what DTCs re-appear once there ALL cleared. Disconnecting and re-connecting the battery can and most of the time will set random DTCs.
The EBTCM fixers can only fix specific year C5 EBTCM units and specific EBTCM issues. They cant fix the early ones and they are very LIMITED to what they can repair. BAD Circuit board connection, BAD relays and loose surface or board mounted components like resistors Caps and diodes.
IF,,,,the EBTCM / EBCM has issues inside the "MICROPROCESSOR" that is housed below the coils/circuit board, "Stick a FORK in it, its DONE!"

One of the EBTCM problems that they can NOT repair is " the module trips a DTC at a SPECIFIC MPH (For example 17 mph) My 02 ZO6 would trip a DTC at 42 MPH everytime. I could cruise around all day long below 42 mph without issue. The instant I reached 42 mph, it would trip a DTC.
 Ive see several of the same issues that would trip at different speeds (11, 17, 117 )
 A NEW EBTCM resolved that issue. Any EBTCM can be field stripped and yes the relays/components can be repaired. Just depends on how compentent you are with electronics/repairs. There potted (glued together with clear silicone RTV) that you will have to overcome.
Hey ET!

 Merry Christmas and Happy new Years!!!!!!!!!!!!!!!!
Bill Curlee

Burning Brakes
Joined: Sep 2007
Posts: 824
Likes: 0
From: Portland/Hillsboro OR
Hey Littlest Hobo,
I am very very very interested in "How" you went about fixing the EBCM (replacing the relay). I know absfixer does this but I want to know how to access the relay, replace it (should be easy if I can reach there) and how to seal it back ?
Looking forward to your reply.

I am very very very interested in "How" you went about fixing the EBCM (replacing the relay). I know absfixer does this but I want to know how to access the relay, replace it (should be easy if I can reach there) and how to seal it back ?
Looking forward to your reply.
If the Driver Information Center on your 2001-2004 C5 Corvette dashboard displays Service Active Handling, Service ABS, Service Traction Control and diagnostics code C1214 H C does not clear, this indicates an electronics related failure likely inside your EBCM (Electronic Body Control Module).
I don't work for GM, or any of its affiliates; this know-how was gained through a failure analysis. I make no warranty either; perform repair at own risk. The issue is likely that the relay inside your EBCM has become intermittent or a complete fault when activated due to internal contactor warpage. I do not understand why the Delphi & Chevrolet engineers decided to place an electromechanical part in a non-accessible, high heat and high vibration area (bound to fail much sooner than the accompanying solid state devices), and then practically welded it to the surrounding circuit boards and components with clear silicone; but I'm sure there must be a reason (might have to do with safety - if you're thinking job safety, lets not jump to conclusions yet). Although I wish that Tyco/Amp built the failing relay in question as 'tight' as Delphi built the EBCM assembly.
Again, don't ask me why Delphi practically welded the EBCM shut with black gasket maker, requiring One to drill a hole between the front and rear casings to pry it open. If only the cigarette makers took this approach to their product, we'd have a better world. Anyway if you're cheap, you can save yourself some money by performing this repair for about $20, and still have plenty of leftover materials. Here's what you will need:
(qty. 1) Tube of Permatex Clear Silicone No 66C, (qty. 1) Tube of Permatex Black RTV Gasket Maker No 17C ($20 @ Canadian Tire + gas + time)
(qty. 1) Potter & Brumfield Relay P/N T7NS5D1-12 ($1.54 + $8 Shipping and handling @ Digikey.com)
Also required - Soldering iron, Solder, Liquid Flux, Desolder Wick or Pump, Drill press, 1/8" drill bit and screwdriver or other prying tool with less than 1/8" diameter, Continuity or Multimeter. Time to eat some Pizza and Wings...Mmmmm. Will post procedure soon after. In the meantime maybe you can figure out how to replace the relay yourself, while you wait for the relay to arrive (the relay you are looking for is white and situated between the 2 circuit boards... the new one's gonna be black -- lets just say that the reason for this is so that you don't accidentally put the old one back in - stranger things do happen).
BTW, if you're wondering wat to do with the plenty of leftover materials, don't worry you'll need to do this repair again after about 70-80K kms. Hopefully the 90% remaining silicone and gasket maker won't be dried up by then. If you're more smart than you are cheap, you will understand that buying One spare relay will save you money in the long run.
Do the Math:
Scenario 1:
[Now] $1.54 + $8 = $9.54
[70-80K kms from Now] $1.54 + $8 = $9.54
Total: $19.08
Scenario 2:
[Now] $1.54 + $1.54 + $8 = $11.08
In other words, 42% savings by investing in One spare relay, unless you're planning to sell the car before the next 70-80K kms rolls about.. but if you have integrity and care about the environment, you would buy One spare relay anyway and give it to the next owner. It would also give you an interesting diversion topic when he asks you something like "So has it ever been winter driven?". (Instead of just saying Duh to him or her)
If you're actually reading this on Christmas day, I feel sorry for you - Don't worry I'll be back.
Hobo
Corvette Stories
The Best of Corvette for Corvette Enthusiasts

5 Best & 5 Worst Corvette Daily Drivers
Joe Kucinski
The Headlights of Every Corvette Generation Explained
Joe Kucinski
5 Best & 5 Most Overrated Corvette Track Packages of All Time!
Joe Kucinski
Every 2027 Corvette Engine Explained
Joe Kucinski
Designer Imagines A Corvette That Looks More Like a Corvette Than the Corvette
Verdad Gallardo
10 Ugly Corvettes That We Still Kinda Love
Joe Kucinski
Top 10 Most Expensive Corvettes Ever Sold on Bring A Trailer
Brett Foote
10 Things Every Corvette Owner Needs (2026 Edition)
Michael S. Palmer
8 Most "Only Corvette Owners Understand" Quirks and Problems
Pouria SavadkoueiRace Director


Joined: Feb 1999
Posts: 19,659
Likes: 34
From: Lenoir City Tennessee
Ci 6, 8 & 10 Veteran
St. Jude Donor '05-'06-'07-'08-'09-'10-'11-'12-'13-'14-'15
Just wanted to bump this back up so maybe we can get some pics added to this one. I may have to try this one out for myself. I wonder if this is the same as the relay for the door locks? I have plenty of them.

Safety Car


Joined: Mar 2007
Posts: 3,518
Likes: 37
Anyone have pics to show where to check the right front wheel sensor wiring?
Tech Contributor
Joined: Dec 1999
Posts: 32,910
Likes: 2,402
From: Anthony TX
CI 6,7,8,9,11 Vet
St. Jude Donor '08
Just look in the wheel well. Find the wheel spindle and the back of it you will find the sensor wiring pig tail:
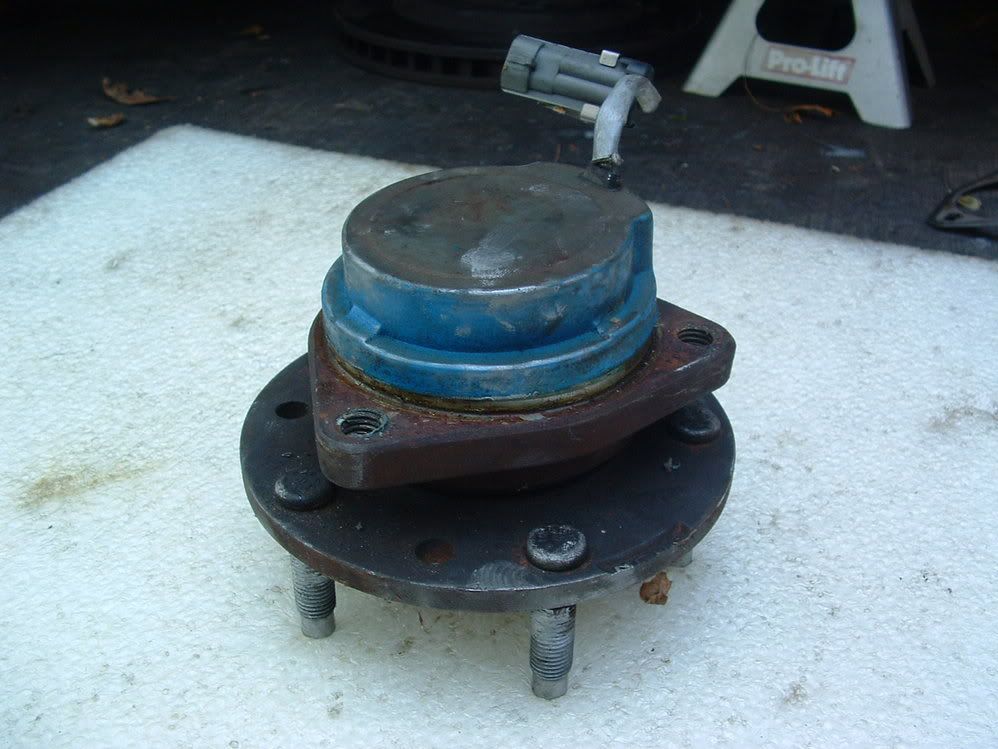

That connects to the JUMPER HARNESS:
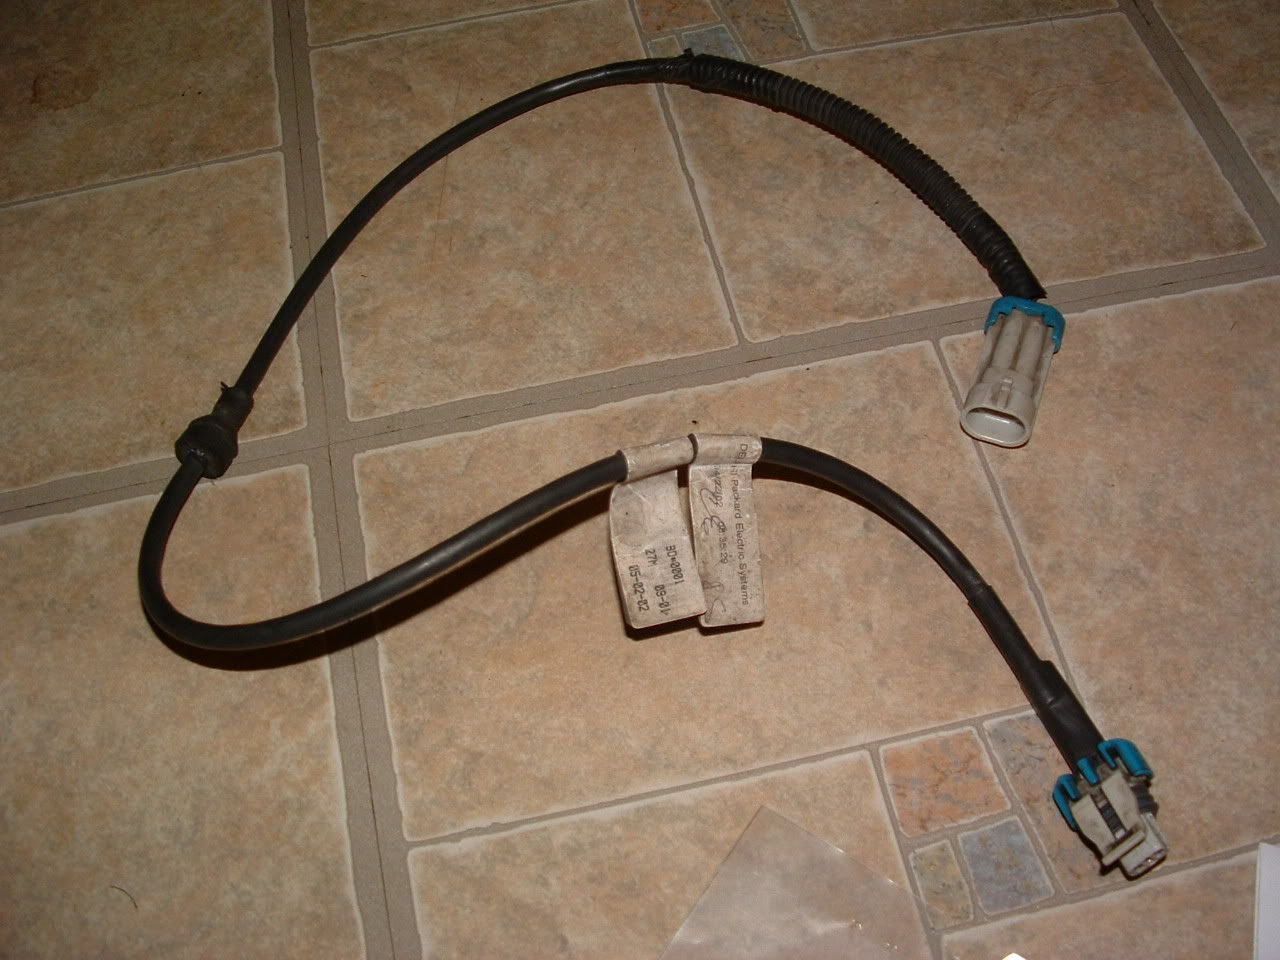
The jumper goes to the main harness connector connection on the K frame.
BC

Advanced
Joined: Jun 2009
Posts: 56
Likes: 0
Hey Littlest Hobo,
I am very very very interested in "How" you went about fixing the EBCM (replacing the relay). I know absfixer does this but I want to know how to access the relay, replace it (should be easy if I can reach there) and how to seal it back ?
Looking forward to your reply.
I am very very very interested in "How" you went about fixing the EBCM (replacing the relay). I know absfixer does this but I want to know how to access the relay, replace it (should be easy if I can reach there) and how to seal it back ?
Looking forward to your reply.
Thanks!
Pro

Joined: Jun 2009
Posts: 552
Likes: 4
From: Mukilteo WA
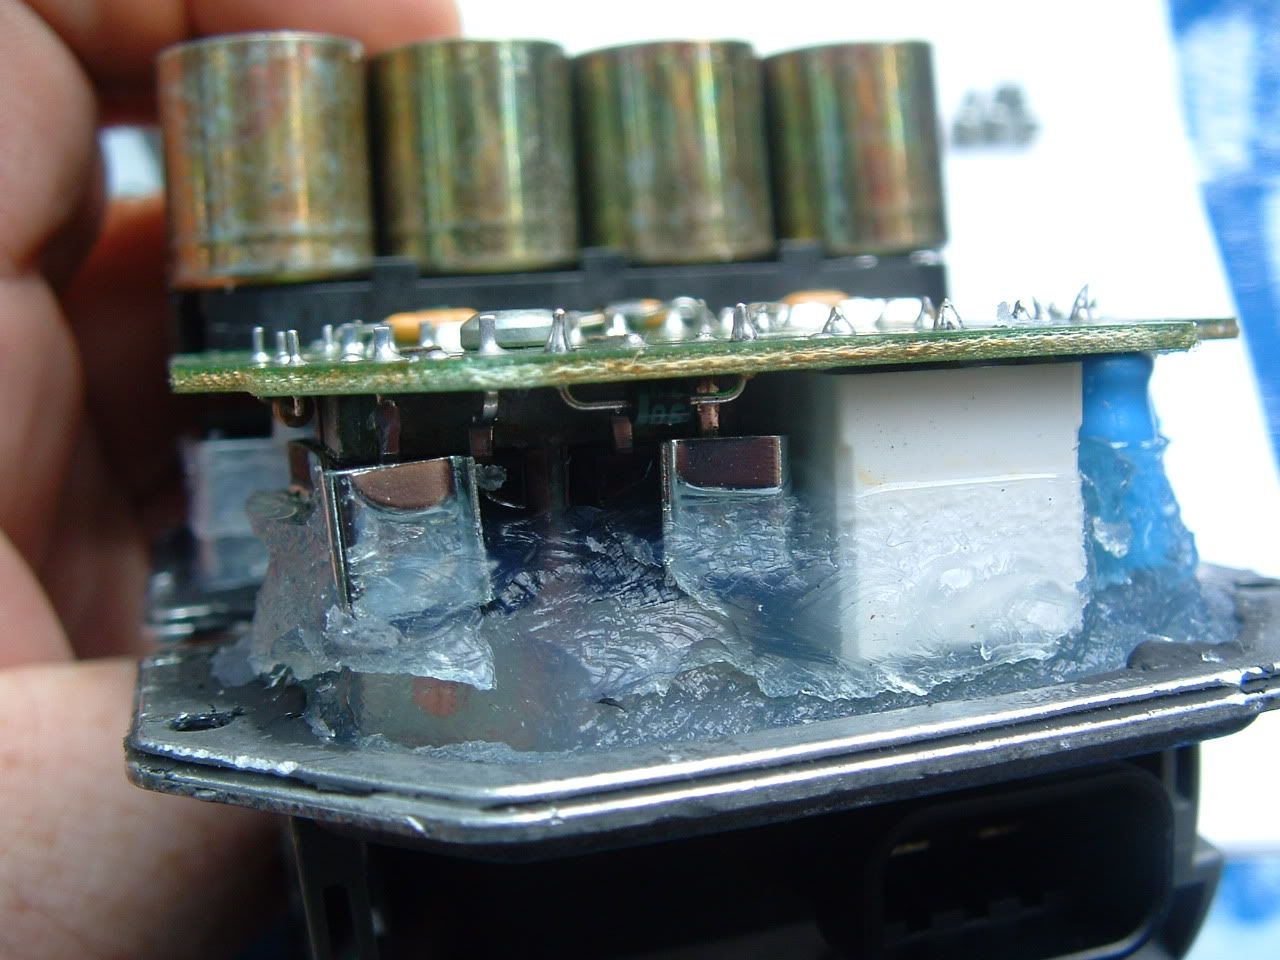
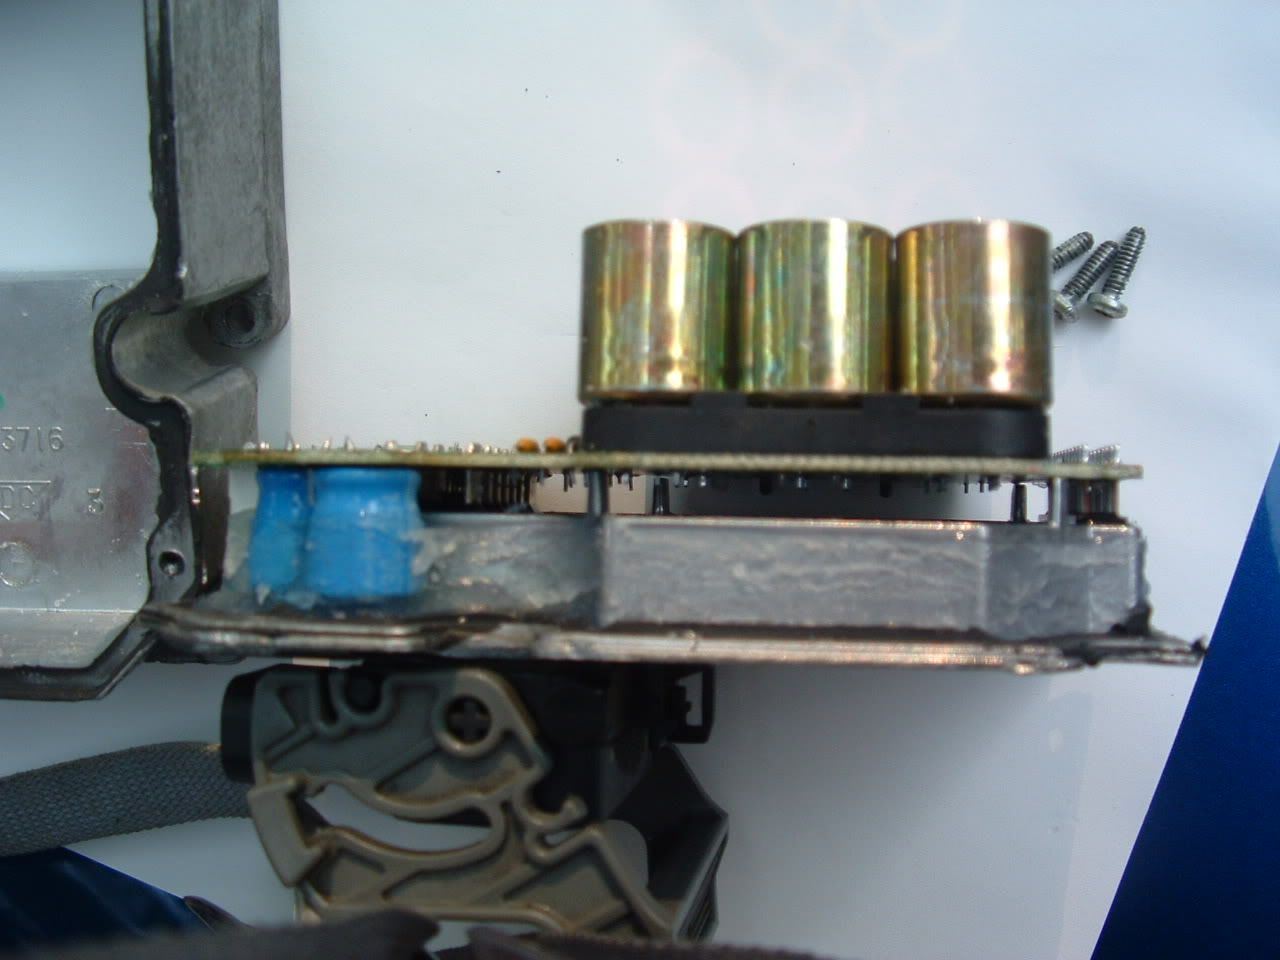
agh! I have the unit out. The cover with the connector is made with such cheap metal it just cracks and flakes off with any prying.
There was a hole in the back on the bottom corner with silicon in it. I dug out the silicon and tried pressing the cover off from there.
I cut around the seal with a razor. poured adhesive cleaner on it. hit it with a small torch. Nothing.
I can't get this thing to come off.
Anybody successfully removed this thing? I've already snapped off a corner of it.
Pro
Joined: Jun 2009
Posts: 552
Likes: 4
From: Mukilteo WA
ok I got it. Had to let the 3m adhesive cleaner do it's magic inside.
You are not removing a cover plate. You are removing a sleeve.
The big aluminum chunk basically just wraps around the sides of the control board with all the valve things you see on the back side. It's filled with silicon.
Consider 3m adhesive cleaner mandatory on this job.
You are not removing a cover plate. You are removing a sleeve.
The big aluminum chunk basically just wraps around the sides of the control board with all the valve things you see on the back side. It's filled with silicon.
Consider 3m adhesive cleaner mandatory on this job.
Burning Brakes
Joined: Sep 2007
Posts: 824
Likes: 0
From: Portland/Hillsboro OR
ok I got it. Had to let the 3m adhesive cleaner do it's magic inside.
You are not removing a cover plate. You are removing a sleeve.
The big aluminum chunk basically just wraps around the sides of the control board with all the valve things you see on the back side. It's filled with silicon.
Consider 3m adhesive cleaner mandatory on this job.
You are not removing a cover plate. You are removing a sleeve.
The big aluminum chunk basically just wraps around the sides of the control board with all the valve things you see on the back side. It's filled with silicon.
Consider 3m adhesive cleaner mandatory on this job.
Please please take tons of pictures. I plan to do this this weekend on my unit.
What do you mean by removing the sleeve ?
Pro
Joined: Jun 2009
Posts: 552
Likes: 4
From: Mukilteo WA
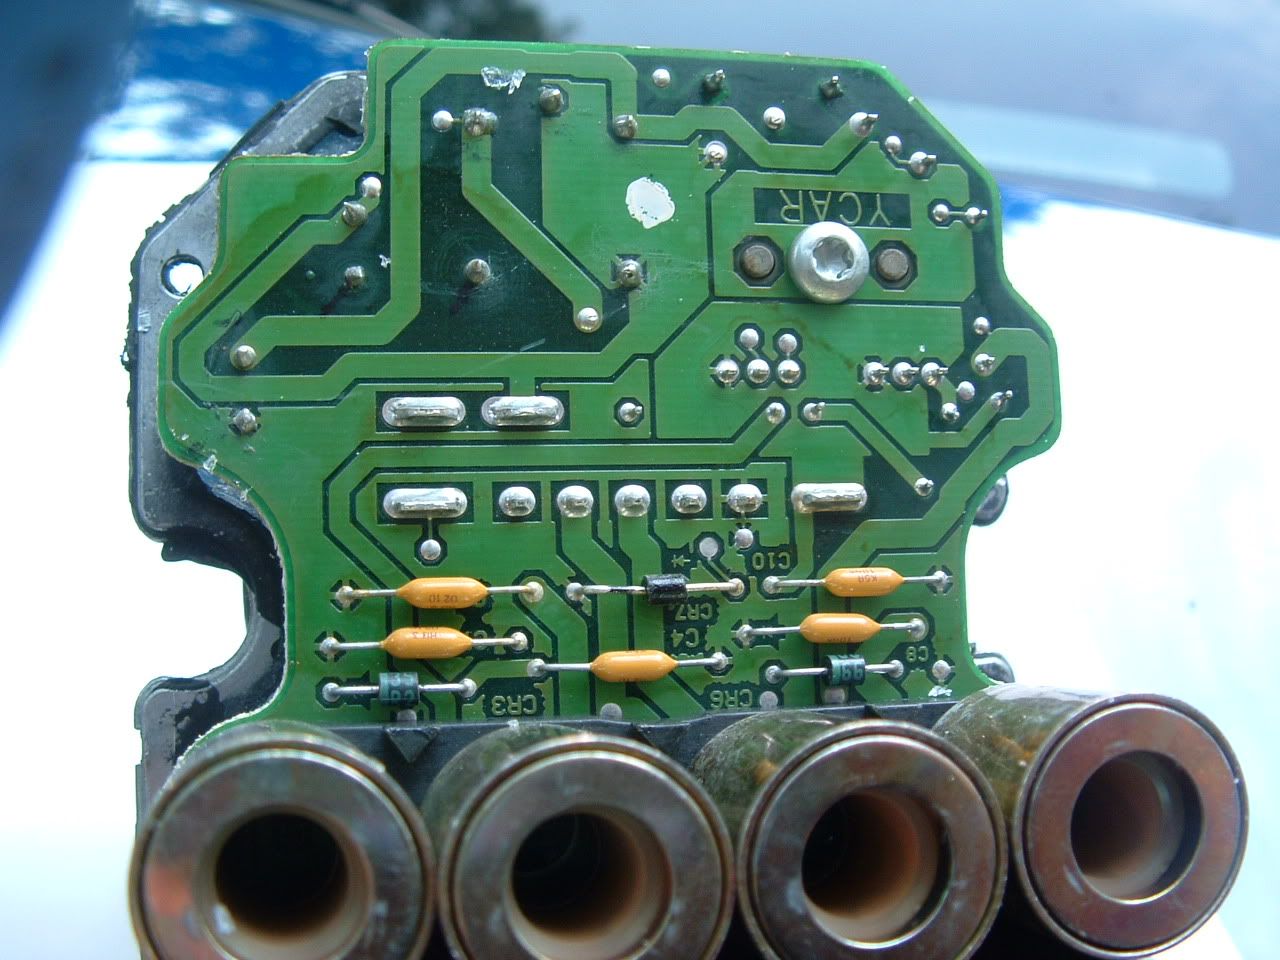
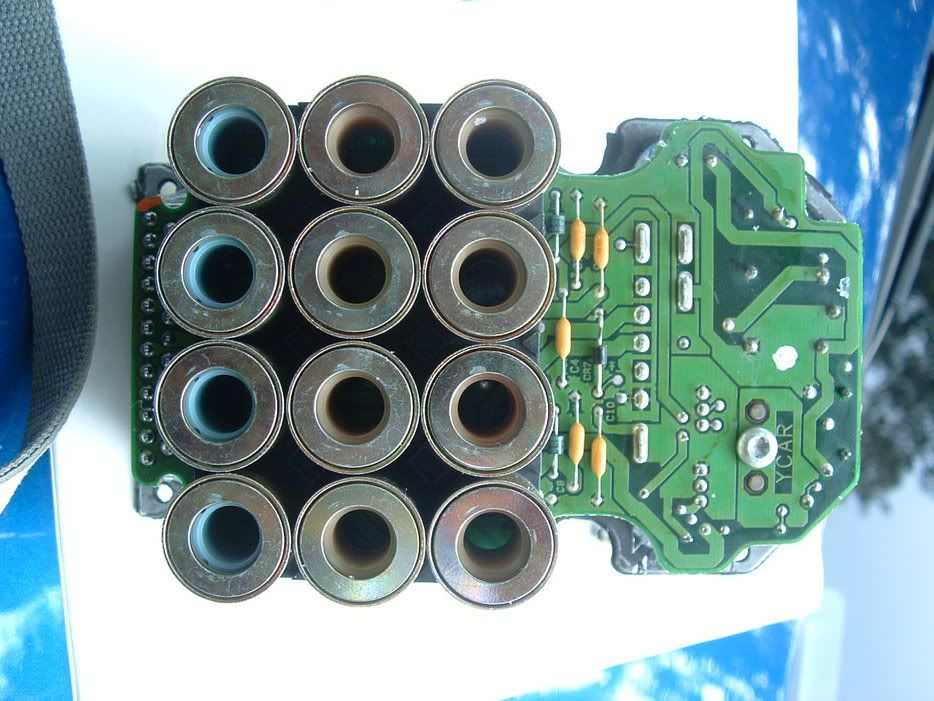
I took a couple with my blackberry.
The big chunk of aluminum is only four sided up where the control coils are. The whole board and what looks like a cover plate slide out of that in one big piece.
There is clear silicon all over inside that runs along the entire side.
So you are not just prying up on a plate with the connectors on it. You are fighting nearly an inch deep grip of glue all around.
Maybe the heat I applied to the side helped too.
The stuff all slides out.
Imagine is there was no glue you could leave the 6 screws in the big block on the car and just remove the four screws holding what looks like a plate and slide it out.
Hope it helps. Now I just need my relays from digitech.


Pro
Joined: Jun 2009
Posts: 552
Likes: 4
From: Mukilteo WA
Great pics.
I wonder why mine doesn't have a screw in the hole label YCAR.
I was missing the bottom right of the six mounting screws also.
But, I still have the white relay.
Fun, digging all the goo out to have room to remove it.
I wonder why mine doesn't have a screw in the hole label YCAR.
I was missing the bottom right of the six mounting screws also.
But, I still have the white relay.
Fun, digging all the goo out to have room to remove it.