


replacing FOG lights??

Thread Starter
Racer

Joined: Jul 2007
Posts: 313
Likes: 0
From: Hamilton NJ
Does anyone have instructions on how to remove the fog lights? Can I get to them from the bottom? Or do I have to remove the headlights and get to them from the top?
I'm replacing te fog lights/fog lights shrouds.
I'm replacing te fog lights/fog lights shrouds.
Tech Contributor


Joined: Dec 2003
Posts: 19,384
Likes: 87
From: Horncastle Lincolnshire, England
2023 C5 of the Year Finalist - Unmodified
This shows how to replace the bulbs. It should show what you need:
Document ID# 780025
2002 Chevrolet Corvette
________________________________________
Fog Lamp Bulb Replacement - Front
Removal Procedure
1. Raise and support the vehicle. Refer to Lifting and Jacking the Vehicle in General Information.
2. Remove the front fascia lower close out panel. Refer to Close Out Panel - Front Bumper Fascia Lower in Bumpers.

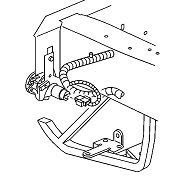
3. Release the brake caliper cooling duct from the front fascia and position the duct aside.

4. Disconnect the front fog lamp electrical connector from the fog lamp bulb/socket.
Caution
Halogen bulbs contain gas under pressure. Handling a bulb improperly could cause it to shatter into flying glass fragments. To help avoid personal injury:
o Turn off the lamp switch and allow the bulb to cool before changing the bulb.
o Leave the lamp switch OFF until the bulb change is complete.
o Always wear eye protection when changing a halogen bulb.
o Handle the bulb only by its base. Avoid touching the glass.
o Keep dirt and moisture off the bulb.
o Properly dispose of the used bulb.
o Keep halogen bulbs out of the reach of children.
5. Remove the fog lamp bulb/socket from the fog lamp.
6. Rotate the fog lamp bulb/socket counter-clockwise to release it from fog lamp.
Installation Procedure
1. Install the fog lamp bulb/socket to the fog lamp.
2. Rotate the fog lamp bulb/socket clockwise to secure it to the fog lamp.
3. Connect the front fog lamp electrical connector to the fog lamp bulb/socket.
4. Position the brake caliper cooling duct to the front fascia, and press to secure.
5. Install the front fascia lower close out panel. Refer to Close Out Panel - Front Bumper Fascia Lower in Bumpers.
6. Lower the vehicle.
7. Check and adjust fog lamp aim as necessary. Refer to Fog Lamp Aiming Procedure
Document ID# 780025
2002 Chevrolet Corvette
________________________________________
Fog Lamp Bulb Replacement - Front
Removal Procedure
1. Raise and support the vehicle. Refer to Lifting and Jacking the Vehicle in General Information.
2. Remove the front fascia lower close out panel. Refer to Close Out Panel - Front Bumper Fascia Lower in Bumpers.
3. Release the brake caliper cooling duct from the front fascia and position the duct aside.
4. Disconnect the front fog lamp electrical connector from the fog lamp bulb/socket.
Caution
Halogen bulbs contain gas under pressure. Handling a bulb improperly could cause it to shatter into flying glass fragments. To help avoid personal injury:
o Turn off the lamp switch and allow the bulb to cool before changing the bulb.
o Leave the lamp switch OFF until the bulb change is complete.
o Always wear eye protection when changing a halogen bulb.
o Handle the bulb only by its base. Avoid touching the glass.
o Keep dirt and moisture off the bulb.
o Properly dispose of the used bulb.
o Keep halogen bulbs out of the reach of children.
5. Remove the fog lamp bulb/socket from the fog lamp.
6. Rotate the fog lamp bulb/socket counter-clockwise to release it from fog lamp.
Installation Procedure
1. Install the fog lamp bulb/socket to the fog lamp.
2. Rotate the fog lamp bulb/socket clockwise to secure it to the fog lamp.
3. Connect the front fog lamp electrical connector to the fog lamp bulb/socket.
4. Position the brake caliper cooling duct to the front fascia, and press to secure.
5. Install the front fascia lower close out panel. Refer to Close Out Panel - Front Bumper Fascia Lower in Bumpers.
6. Lower the vehicle.
7. Check and adjust fog lamp aim as necessary. Refer to Fog Lamp Aiming Procedure
Melting Slicks


Joined: Oct 2007
Posts: 2,798
Likes: 8
From: It's true money can't buy happiness, but it is more comfortable crying in a Corvette than on a bicyc
St. Jude Donor '13
It's a whole lot easier doing the job from the top. No jacking. No struggle with the fog light mount bolt. No climbing under the car.
You just remove the 3 phillips screws holding the headlight bezel. The top cover is held on with 4 T-15 Torx screws. Depending on your arm size that's all you need to remove. If you have a bigger arm you can remove the head light pivot screws. They are lock tite'd on. I replaced mine with Nylock nuts from Lowes since I always seem to be playing with my lights. I was in there for the HID lows, HID Fogs, Switchback LEDs, Clear corners, a bad ballast, a relay harness for the fog lights. That's at least 6 times.
You just remove the 3 phillips screws holding the headlight bezel. The top cover is held on with 4 T-15 Torx screws. Depending on your arm size that's all you need to remove. If you have a bigger arm you can remove the head light pivot screws. They are lock tite'd on. I replaced mine with Nylock nuts from Lowes since I always seem to be playing with my lights. I was in there for the HID lows, HID Fogs, Switchback LEDs, Clear corners, a bad ballast, a relay harness for the fog lights. That's at least 6 times.
Last edited by Camjamsdad; Mar 17, 2009 at 11:45 PM.
Tech Contributor
Joined: Dec 2003
Posts: 19,384
Likes: 87
From: Horncastle Lincolnshire, England
2023 C5 of the Year Finalist - Unmodified
It's a whole lot easier doing the job from the top. No jacking. No struggle with the fog light mount bolt. No climbing under the car.
You just remove the 3 phillips screws holding the headlight bezel. The top cover is held on with 4 T-15 Torx screws. Depending on your arm size that's all you need to remove. If you have a bigger arm you can remove the head light pivot screws. They are lock tite'd on. I replaced mine with Nylock nuts from Lowes since I always seem to be playing with my lights. I was in there for the HID lows, HID Fogs, Switchback LEDs, Clear corners, a bad ballast, a relay harness for the fog lights. That's at least 6 times.
You just remove the 3 phillips screws holding the headlight bezel. The top cover is held on with 4 T-15 Torx screws. Depending on your arm size that's all you need to remove. If you have a bigger arm you can remove the head light pivot screws. They are lock tite'd on. I replaced mine with Nylock nuts from Lowes since I always seem to be playing with my lights. I was in there for the HID lows, HID Fogs, Switchback LEDs, Clear corners, a bad ballast, a relay harness for the fog lights. That's at least 6 times.
 although I think I'd go in from below for replacing fogs.
Just a reminder, if you go in through the top this will job take a while. Disconnect the battery so the headlights don't stow and trap your arm.
Drifting


Joined: Oct 2007
Posts: 1,698
Likes: 2
From: Bellows Falls Vermont
The shrouds are removed from the lower access panel in front of the tire .If you are in there you can easilly access the fog lights .There are 4 small self tapping screws with a hex head on them .that hold the shrouds in place. There are a couple of wire clips attached to them to keep side marker wires out of the way. Hope this help you out ..
Corvette Stories
The Best of Corvette for Corvette Enthusiasts

Top 10 Most Expensive Corvettes Ever Sold on Bring A Trailer
Brett Foote
10 Things Every Corvette Owner Needs (2026 Edition)
Michael S. Palmer
8 Most "Only Corvette Owners Understand" Quirks and Problems
Pouria Savadkouei
10 Reasons the C6 Z06 is Still A Performance Benchmark After 20 Years
Joe Kucinski
How Much Horsepower Every Corvette Engine "LOST" in 1972
Joe Kucinski
Top 10 DOs and DON'Ts for Protecting Your Convertible Top!
Michael S. Palmer
Top 10 Most Explosive Corvettes Ever Made: Power-to-Weight Ratio Ranked!
Joe Kucinski
150 hp to 1,250 hp: Every Corvette Generation Compared by the Specs That Matter
Joe Kucinski
8 Coolest Corvette Pace Cars (and Replicas) of All Time
Verdad GallardoMelting Slicks
Joined: Mar 2004
Posts: 2,149
Likes: 6
From: NCCO Oklahoma
It's a whole lot easier doing the job from the top. No jacking. No struggle with the fog light mount bolt. No climbing under the car.
You just remove the 3 phillips screws holding the headlight bezel. The top cover is held on with 4 T-15 Torx screws. Depending on your arm size that's all you need to remove. If you have a bigger arm you can remove the head light pivot screws.
You just remove the 3 phillips screws holding the headlight bezel. The top cover is held on with 4 T-15 Torx screws. Depending on your arm size that's all you need to remove. If you have a bigger arm you can remove the head light pivot screws.
Much, much easier to get at from the top.

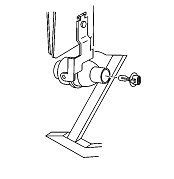
Just remove the two pivot screws:

The head light pivot screws removed and the headlight tucked down into the front fascia:
From there, it's simple to reach the fog light bolt:
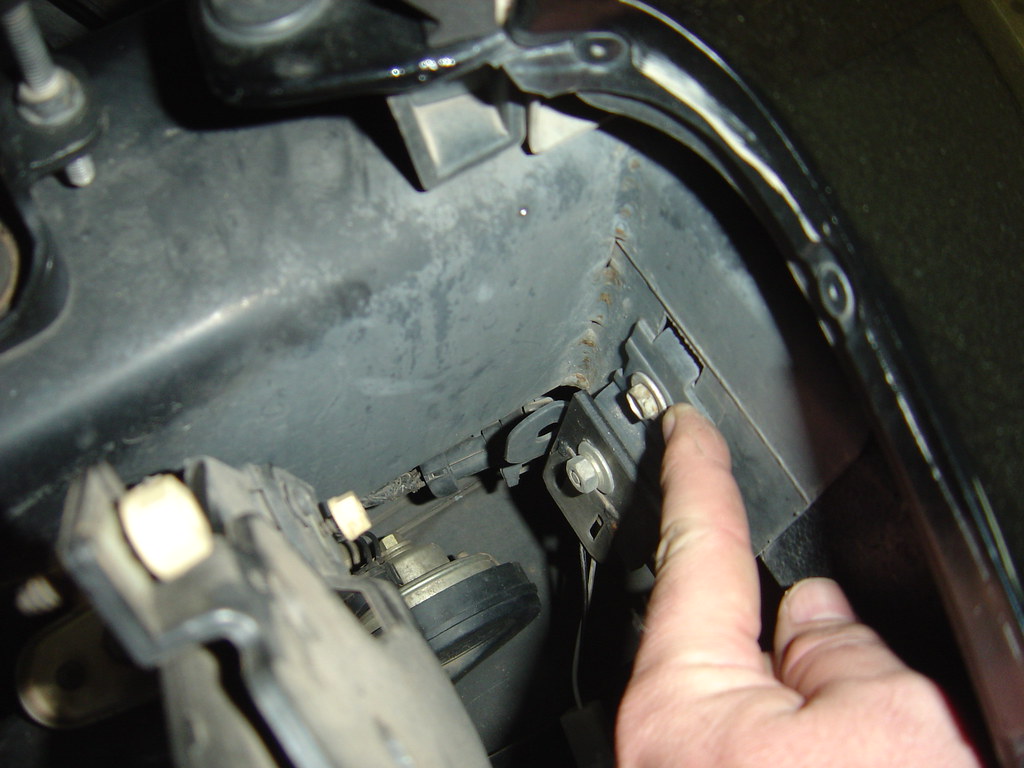
Hope this helps.
Mark
Drifting
Joined: Oct 2007
Posts: 1,698
Likes: 2
From: Bellows Falls Vermont
I am sure I did this when I put in my free flow shrouds . I had the front Up maybe a foot ,Removed the lower panel about 6 screws .Then with my 1/4 inch ratchet and an extension I reached the securing screws. From the top might be easier as suggested previously but I would be concerned about alignment of the buckets afterwards. I know I have changed the fog bulbs from the top by just removing the headlight bezels and reaching down in, but you can't have Popie arms . Good luck to ya

Tech Contributor
Joined: Dec 2003
Posts: 19,384
Likes: 87
From: Horncastle Lincolnshire, England
2023 C5 of the Year Finalist - Unmodified
Most members seem to go the HIDs route:
http://forums.corvetteforum.com/show....php?t=1647998

Instructor
Joined: Jan 2007
Posts: 149
Likes: 2
From: South Shore MA
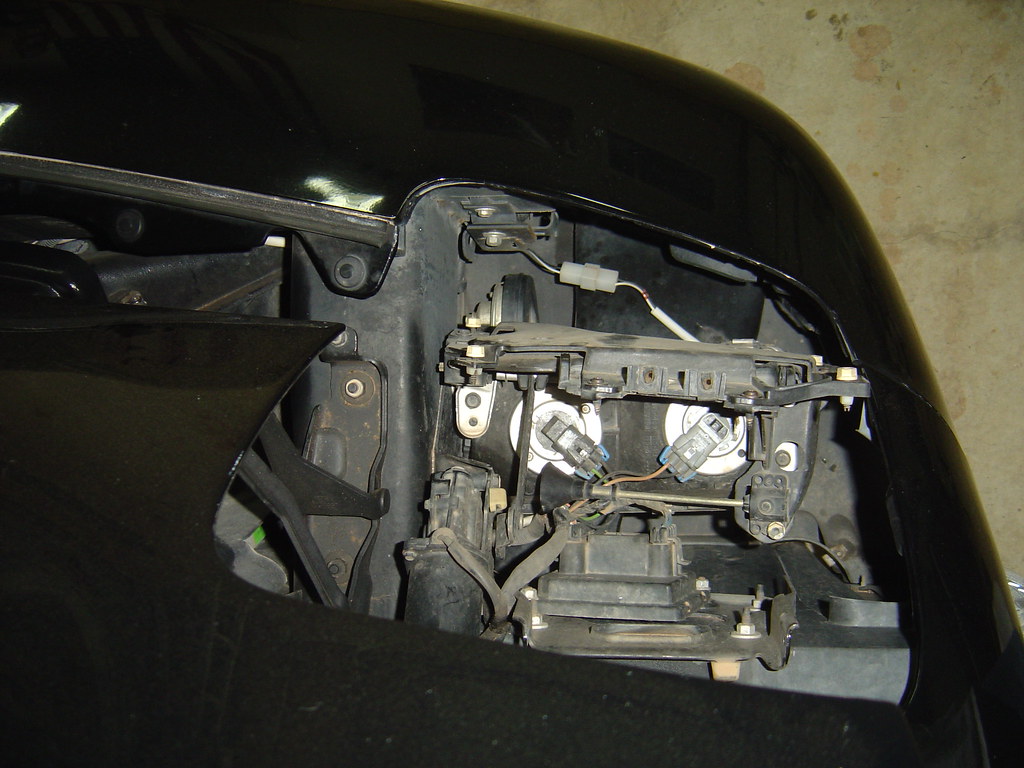
you dont have to do any of that! just manually crank up the headlights about 3/4 open and you can fit your arm down far enough and you can twist out the old in twist in the new. i do it at work in 4 minutes on customer's cars after they've "fiddled with it for hours"
Safety Car


Joined: Sep 2000
Posts: 3,572
Likes: 420
From: Taildragers rule! USA1
Where is the manual system?
Instructor
Joined: Jan 2007
Posts: 149
Likes: 2
From: South Shore MA
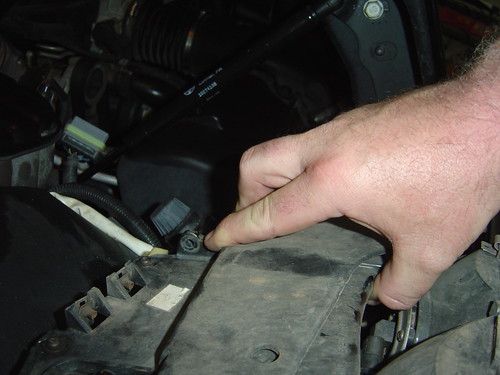
With the hood open, the black **** next to each headlight. Turn them one way for up the other way for down. When your finished put the lights down manually then turn your lights on and they'll go back into synch. (in the first picture posted above his finger is almost on the ****.) You dont have to remove anything for the job, nor to manually raise the headlight.
Last edited by trk982003; Mar 25, 2009 at 07:46 PM.
Melting Slicks
Joined: Apr 2002
Posts: 2,308
Likes: 1
From: Portsmouth VA
Great tips! 
Yeah, I just did it the manual way... took about 10 minutes to do both sides, and that was even with trying to make sure I didn't get dirty. Maybe my arms are bigger than yours, but I cranked it up all the way to be able to get a little more room. Then I adjusted both sides to get them both at just the right angle. I also used the 885s cuz they are the same price as the 893s but are 50w instead of 37.5. Fit fine, no issues, and look great!
See ya,
Sonny