

Fuel pump voltage?

Thread Starter
Former Vendor
Joined: Jan 2008
Posts: 16,312
Likes: 0
From: Surprise Arizona
My fuel pressure isn't staying steady (surging at idle and dropping at high rpm under WOT). My fuel pump will support my power so I know the pump is not the issue unless it's going bad. I can hear the pump surge occasionally and the fuel pressure with it.
I've checked the connections and they all seem fine. What's weird is that this issue just started happening. I'm getting between 11.7 and 11.8 volts at the plug. Is my voltage ok? I've checked the fuse and relay and they're both fine. I guess the next thing to do would be to check the ground for the pump. Where would I find the fuel pump ground?
I've checked the connections and they all seem fine. What's weird is that this issue just started happening. I'm getting between 11.7 and 11.8 volts at the plug. Is my voltage ok? I've checked the fuse and relay and they're both fine. I guess the next thing to do would be to check the ground for the pump. Where would I find the fuel pump ground?
Last edited by 1SikVette; Nov 21, 2009 at 02:48 AM.
Tech Contributor


Joined: Dec 2003
Posts: 19,384
Likes: 87
From: Horncastle Lincolnshire, England
2023 C5 of the Year Finalist - Unmodified
Outside my experience I'm afraid
This may help run it down
Document ID# 793995
2002 Chevrolet Corvette
Fuel Pump Electrical Circuit Diagnosis
Circuit Description
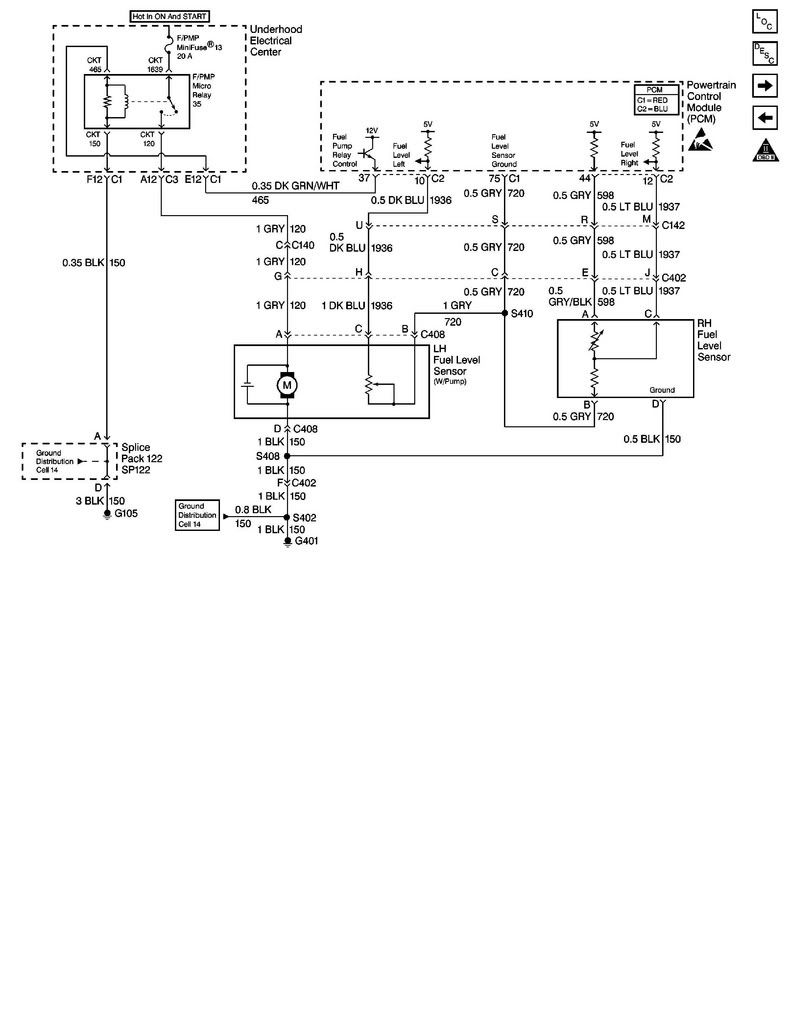
When you turn ON the ignition switch, the control module enables the fuel pump relay which powers the fuel pump ON. The fuel pump remains ON as long as the engine is cranking or running and the control module receives ignition reference pulses. If there are no ignition reference pulses, the control module shuts the fuel pump OFF within 2 seconds after the ignition was switched to the ON position or if the engine stops.
The electric fuel pump is attached to the fuel sender assembly inside the left fuel tank. The in-tank fuel pump supplies fuel through a fuel feed pipe, a fuel filter/fuel pressure regulator assembly, to the fuel rail. The fuel pump supplies fuel to the siphon jet pump of the right fuel tank. This allows the pump to transfer fuel from the right fuel tank to the left fuel tank. The fuel pump provides fuel at a pressure that is above the pressure needed by the fuel injectors. The fuel pressure regulator, part of the fuel filter, keeps the fuel available to the fuel injectors at a regulated pressure. Unused fuel returns to the left fuel tank by a separate fuel return pipe.
Diagnostic Aids
Fuel Pump Relay Underhood Electrical Center Terminal Identification
Front of Vehicle
Left Side of Vehicle
Ground
Ignition
Right Side of Vehicle
Fuel Pump Supply
Control
The following conditions may have caused the fuel pump fuse to open:
* The fuse was faulty.
* There is an intermittent short in the power feed circuit of the fuel pump.
* The fuel pump has an internal intermittent condition.
For an intermittent condition, refer to Intermittent Conditions .
Test Description
The numbers below refer to the step numbers on the diagnostic table.
2.
Command the ON and the OFF states. Repeat the commands as necessary.
3.
This step determines if the condition is located on the coil side, or on the switch side of the circuit.
4.
This step verifies that the powertrain control module is providing voltage to the fuel pump relay.
5.
This step tests for an open in the ground circuit to the fuel pump relay.
6.
This step determines if a voltage is constantly being applied to the fuel pump relay.
12.
This step tests for a grounded supply circuit between the fuel pump relay and the harness connector of the fuel pump.
13.
This step determines if the condition with the circuit is intermittent. If the fuse does not open, inspect the supply voltage circuit between the fuse and the fuel pump for an intermittent condition.
15.
This step determines if the fuel pump relay is causing the condition. Use the appropriate-size fused jumper wire.
16.
This step tests for an open, or for excess resistance in the supply circuit between the relay and the harness connector of the fuel pump.
17.
Inspect the fuel pump ground circuit thoroughly. Corrosion or a poor connection may cause the fuel pump stop operating.
18.
This step inspects for a poor connection or for corrosion at the fuel pump harness connector which may cause the condition.
Step
Action
Yes
No
Schematic Reference: Engine Controls Schematics
1
Did you perform the Diagnostic System Check-Engine Controls?
Go to Step 2
Go to Diagnostic System Check - Engine Controls
2
1. Install a scan tool.
2. Turn ON the ignition, with the engine OFF.
3. With a scan tool, command the fuel pump relay ON and OFF.
Does the fuel pump turn ON and OFF?
Go to Diagnostic Aids
Go to Step 3
3
With a scan tool, command the fuel pump relay ON and OFF.
Do you hear a click if you command the fuel pump relay ON and OFF?
Go to Step 9
Go to Step 4
4
1. Turn OFF the ignition.
2. Disconnect the fuel pump relay.
3. Turn ON the ignition, with the engine OFF.
Important
Refer to Diagnostic Aids for fuel pump relay terminal identification.
4. Probe the control circuit of the fuel pump relay with a test lamp connected to ground.
5. With a scan tool, command the fuel pump relay ON and OFF.
Does the test lamp turn ON and OFF?
Go to Step 5
Go to Step 6
5
1. Connect a test lamp between the control circuit of the fuel pump relay and the ground circuit of the fuel pump relay.
2. With a scan tool, command the fuel pump relay ON and OFF.
Does the test lamp turn ON and OFF?
Go to Step 19
Go to Step 22
6
Does the test lamp remain illuminated with each command?
Go to Step 7
Go to Step 8
7
Test the control circuit of the fuel pump relay for a short to voltage. Refer to Circuit Testing and Wiring Repairs in Wiring Systems.
Did you find and correct the condition?
Go to Step 27
Go to Step 26
8
Test the control circuit of the fuel pump relay for a short to ground, or for an open. Refer to Circuit Testing and Wiring Repairs in Wiring Systems.
Did you find and correct the condition?
Go to Step 27
Go to Step 20
9
Turn ON the ignition, with the engine OFF.
Does the fuel pump operate continuously?
Go to Step 10
Go to Step 11
10
1. Turn OFF the ignition.
2. Disconnect the fuel pump relay.
3. Turn ON the ignition, with the engine OFF.
Does the fuel pump operate continuously?
Go to Step 21
Go to Step 25
11
Is the fuel pump fuse open?
Go to Step 12
Go to Step 14
12
1. Test the supply voltage circuit of the fuel pump for a grounded circuit between the fuel pump fuse and the fuel pump. Refer to Circuit Testing and Wiring Repairs in Wiring Systems.
2. Replace the fuel pump fuse if necessary.
Did you find and correct the condition?
Go to Step 27
Go to Step 13
13
1. Install all disconnected components.
2. Install a new fuel pump fuse.
3. With a scan tool, turn ON the fuel pump.
Is the fuel pump fuse open?
Go to Step 24
Go to Intermittent Conditions
14
1. Turn OFF the ignition.
2. Disconnect the fuel pump relay.
3. Turn ON the ignition, with the engine OFF.
4. Probe the battery voltage circuit of the fuel pump relay switch with a test lamp connected to ground.
Does the test lamp illuminate?
Go to Step 15
Go to Step 23
15
Connect a 20-amp fused jumper wire between the battery voltage circuit of the relay switch and the supply voltage circuit of the fuel pump.
Does the fuel pump operate?
Go to Step 19
Go to Step 16
16
Test the supply voltage circuit of the fuel pump for an open, or for high resistance between the relay and the fuel pump harness connector. Refer to Circuit Testing and Wiring Repairs in Wiring Systems.
Did you find and correct the condition?
Go to Step 27
Go to Step 17
17
Important
Inspect the ground circuit for tightness, for corrosion on terminals, or for damage to the wiring harness.
Test the ground circuit of the fuel pump for an open, or for high resistance. Refer to Circuit Testing and Wiring Repairs in Wiring Systems.
Did you find and correct the condition?
Go to Step 27
Go to Step 18
18
Inspect for poor connections at the harness connector of the fuel pump. Refer to Testing for Intermittent and Poor Connections and Connector Repairs in Wiring Systems.
Did you find and correct the condition?
Go to Step 27
Go to Step 24
19
Inspect for poor connections at the fuel pump relay. Refer to Testing for Intermittent and Poor Connections and Connector Repairs in Wiring Systems.
Did you find and correct the condition?
Go to Step 27
Go to Step 25
20
Inspect for poor connections at the harness connector of the PCM. Refer to Testing for Intermittent and Poor Connections and Connector Repairs in Wiring Systems.
Did you find and correct the condition?
Go to Step 27
Go to Step 26
21
Repair the supply voltage circuit of the fuel pump for a short to voltage. Refer to Wiring Repairs in Wiring Systems.
Did you complete the repair?
Go to Step 27
--
22
Repair the open ground circuit of the fuel pump relay. Refer to Wiring Repairs in Wiring Systems.
Did you complete the repair?
Go to Step 27
--
23
Repair the battery voltage circuit of the fuel pump relay switch. Refer to Wiring Repairs in Wiring Systems.
Did you complete the repair?
Go to Step 27
--
24
Important
Before replacing the fuel pump, inspect for bad connections at the fuel pump, and within the fuel tank.
1. Replace the fuel pump. Refer to Fuel Sender Assembly Replacement .
2. Replace the fuel pump fuse if necessary.
Did you complete the replacement?
Go to Step 27
--
25
Replace the fuel pump relay.
Did you complete the replacement?
Go to Step 27
--
26
Replace the PCM. Refer to Powertrain Control Module (PCM) Replacement .
Did you complete the replacement?
Go to Step 27
--
27
Operate the system in order to verify the repair.
Did you correct the condition?
System OK
Go to Step 2
Document ID# 793995
2002 Chevrolet Corvette
This may help run it down
Document ID# 793995
2002 Chevrolet Corvette
Fuel Pump Electrical Circuit Diagnosis
Circuit Description
When you turn ON the ignition switch, the control module enables the fuel pump relay which powers the fuel pump ON. The fuel pump remains ON as long as the engine is cranking or running and the control module receives ignition reference pulses. If there are no ignition reference pulses, the control module shuts the fuel pump OFF within 2 seconds after the ignition was switched to the ON position or if the engine stops.
The electric fuel pump is attached to the fuel sender assembly inside the left fuel tank. The in-tank fuel pump supplies fuel through a fuel feed pipe, a fuel filter/fuel pressure regulator assembly, to the fuel rail. The fuel pump supplies fuel to the siphon jet pump of the right fuel tank. This allows the pump to transfer fuel from the right fuel tank to the left fuel tank. The fuel pump provides fuel at a pressure that is above the pressure needed by the fuel injectors. The fuel pressure regulator, part of the fuel filter, keeps the fuel available to the fuel injectors at a regulated pressure. Unused fuel returns to the left fuel tank by a separate fuel return pipe.
Diagnostic Aids
Fuel Pump Relay Underhood Electrical Center Terminal Identification
Front of Vehicle
Left Side of Vehicle
Ground
Ignition
Right Side of Vehicle
Fuel Pump Supply
Control
The following conditions may have caused the fuel pump fuse to open:
* The fuse was faulty.
* There is an intermittent short in the power feed circuit of the fuel pump.
* The fuel pump has an internal intermittent condition.
For an intermittent condition, refer to Intermittent Conditions .
Test Description
The numbers below refer to the step numbers on the diagnostic table.
2.
Command the ON and the OFF states. Repeat the commands as necessary.
3.
This step determines if the condition is located on the coil side, or on the switch side of the circuit.
4.
This step verifies that the powertrain control module is providing voltage to the fuel pump relay.
5.
This step tests for an open in the ground circuit to the fuel pump relay.
6.
This step determines if a voltage is constantly being applied to the fuel pump relay.
12.
This step tests for a grounded supply circuit between the fuel pump relay and the harness connector of the fuel pump.
13.
This step determines if the condition with the circuit is intermittent. If the fuse does not open, inspect the supply voltage circuit between the fuse and the fuel pump for an intermittent condition.
15.
This step determines if the fuel pump relay is causing the condition. Use the appropriate-size fused jumper wire.
16.
This step tests for an open, or for excess resistance in the supply circuit between the relay and the harness connector of the fuel pump.
17.
Inspect the fuel pump ground circuit thoroughly. Corrosion or a poor connection may cause the fuel pump stop operating.
18.
This step inspects for a poor connection or for corrosion at the fuel pump harness connector which may cause the condition.
Step
Action
Yes
No
Schematic Reference: Engine Controls Schematics
1
Did you perform the Diagnostic System Check-Engine Controls?
Go to Step 2
Go to Diagnostic System Check - Engine Controls
2
1. Install a scan tool.
2. Turn ON the ignition, with the engine OFF.
3. With a scan tool, command the fuel pump relay ON and OFF.
Does the fuel pump turn ON and OFF?
Go to Diagnostic Aids
Go to Step 3
3
With a scan tool, command the fuel pump relay ON and OFF.
Do you hear a click if you command the fuel pump relay ON and OFF?
Go to Step 9
Go to Step 4
4
1. Turn OFF the ignition.
2. Disconnect the fuel pump relay.
3. Turn ON the ignition, with the engine OFF.
Important
Refer to Diagnostic Aids for fuel pump relay terminal identification.
4. Probe the control circuit of the fuel pump relay with a test lamp connected to ground.
5. With a scan tool, command the fuel pump relay ON and OFF.
Does the test lamp turn ON and OFF?
Go to Step 5
Go to Step 6
5
1. Connect a test lamp between the control circuit of the fuel pump relay and the ground circuit of the fuel pump relay.
2. With a scan tool, command the fuel pump relay ON and OFF.
Does the test lamp turn ON and OFF?
Go to Step 19
Go to Step 22
6
Does the test lamp remain illuminated with each command?
Go to Step 7
Go to Step 8
7
Test the control circuit of the fuel pump relay for a short to voltage. Refer to Circuit Testing and Wiring Repairs in Wiring Systems.
Did you find and correct the condition?
Go to Step 27
Go to Step 26
8
Test the control circuit of the fuel pump relay for a short to ground, or for an open. Refer to Circuit Testing and Wiring Repairs in Wiring Systems.
Did you find and correct the condition?
Go to Step 27
Go to Step 20
9
Turn ON the ignition, with the engine OFF.
Does the fuel pump operate continuously?
Go to Step 10
Go to Step 11
10
1. Turn OFF the ignition.
2. Disconnect the fuel pump relay.
3. Turn ON the ignition, with the engine OFF.
Does the fuel pump operate continuously?
Go to Step 21
Go to Step 25
11
Is the fuel pump fuse open?
Go to Step 12
Go to Step 14
12
1. Test the supply voltage circuit of the fuel pump for a grounded circuit between the fuel pump fuse and the fuel pump. Refer to Circuit Testing and Wiring Repairs in Wiring Systems.
2. Replace the fuel pump fuse if necessary.
Did you find and correct the condition?
Go to Step 27
Go to Step 13
13
1. Install all disconnected components.
2. Install a new fuel pump fuse.
3. With a scan tool, turn ON the fuel pump.
Is the fuel pump fuse open?
Go to Step 24
Go to Intermittent Conditions
14
1. Turn OFF the ignition.
2. Disconnect the fuel pump relay.
3. Turn ON the ignition, with the engine OFF.
4. Probe the battery voltage circuit of the fuel pump relay switch with a test lamp connected to ground.
Does the test lamp illuminate?
Go to Step 15
Go to Step 23
15
Connect a 20-amp fused jumper wire between the battery voltage circuit of the relay switch and the supply voltage circuit of the fuel pump.
Does the fuel pump operate?
Go to Step 19
Go to Step 16
16
Test the supply voltage circuit of the fuel pump for an open, or for high resistance between the relay and the fuel pump harness connector. Refer to Circuit Testing and Wiring Repairs in Wiring Systems.
Did you find and correct the condition?
Go to Step 27
Go to Step 17
17
Important
Inspect the ground circuit for tightness, for corrosion on terminals, or for damage to the wiring harness.
Test the ground circuit of the fuel pump for an open, or for high resistance. Refer to Circuit Testing and Wiring Repairs in Wiring Systems.
Did you find and correct the condition?
Go to Step 27
Go to Step 18
18
Inspect for poor connections at the harness connector of the fuel pump. Refer to Testing for Intermittent and Poor Connections and Connector Repairs in Wiring Systems.
Did you find and correct the condition?
Go to Step 27
Go to Step 24
19
Inspect for poor connections at the fuel pump relay. Refer to Testing for Intermittent and Poor Connections and Connector Repairs in Wiring Systems.
Did you find and correct the condition?
Go to Step 27
Go to Step 25
20
Inspect for poor connections at the harness connector of the PCM. Refer to Testing for Intermittent and Poor Connections and Connector Repairs in Wiring Systems.
Did you find and correct the condition?
Go to Step 27
Go to Step 26
21
Repair the supply voltage circuit of the fuel pump for a short to voltage. Refer to Wiring Repairs in Wiring Systems.
Did you complete the repair?
Go to Step 27
--
22
Repair the open ground circuit of the fuel pump relay. Refer to Wiring Repairs in Wiring Systems.
Did you complete the repair?
Go to Step 27
--
23
Repair the battery voltage circuit of the fuel pump relay switch. Refer to Wiring Repairs in Wiring Systems.
Did you complete the repair?
Go to Step 27
--
24
Important
Before replacing the fuel pump, inspect for bad connections at the fuel pump, and within the fuel tank.
1. Replace the fuel pump. Refer to Fuel Sender Assembly Replacement .
2. Replace the fuel pump fuse if necessary.
Did you complete the replacement?
Go to Step 27
--
25
Replace the fuel pump relay.
Did you complete the replacement?
Go to Step 27
--
26
Replace the PCM. Refer to Powertrain Control Module (PCM) Replacement .
Did you complete the replacement?
Go to Step 27
--
27
Operate the system in order to verify the repair.
Did you correct the condition?
System OK
Go to Step 2
Document ID# 793995
2002 Chevrolet Corvette
Instructor

Joined: Oct 2009
Posts: 212
Likes: 0
From: North Las Vegas NV
That does sound like a bad ground or a bad pump. Is the pump noisy? Both can cause a surge. I swear there is a ground to the frame behind the drivers rear inner fender panel but would not take it apart on my suggestion till somebody confirms it. What is your system voltage at the altenator?
Thread Starter
Former Vendor
Joined: Jan 2008
Posts: 16,312
Likes: 0
From: Surprise Arizona
That does sound like a bad ground or a bad pump. Is the pump noisy? Both can cause a surge. I swear there is a ground to the frame behind the drivers rear inner fender panel but would not take it apart on my suggestion till somebody confirms it. What is your system voltage at the altenator?

Tech Contributor


Joined: Dec 1999
Posts: 32,910
Likes: 2,402
From: Anthony TX
CI 6,7,8,9,11 Vet
St. Jude Donor '08
You might have a bad ignition switch. The HOT in START and Run voltage comes right off the switch.
Check out this post!
- http://forums.corvetteforum.com/c5-t...ch-repair.html
See if that clears up your issue!
BC
Check out this post!
- http://forums.corvetteforum.com/c5-t...ch-repair.html
See if that clears up your issue!
BC


