


Harmonic Balancer install

Thread Starter
Intermediate


Joined: Nov 1999
Posts: 42
Likes: 0
From: Yuba City CA
I have a 2000 C5 with 189K and my balancer failed...after following Ls1howto's great instructions, I'm ready to install my new Professional Products replacement balancer. Now here's my problem, the old balancer was paint marked and the new one has a keyway, which of course, the crank snout does not have....Where do I install the new balancer on the crank?...the paint marking is visible on the crank snout, but where do I line it up with the balancer?...I called PP's tech support line and was told "anywhere, the computer makes up for it"!...With as much work as is required to replace the balancer, I only want to take it apart once!!
Safety Car


Joined: Jul 2005
Posts: 3,572
Likes: 9
From: Jackson Tn
St. Jude Donor '06-'07-'08-'09
I have a 2000 C5 with 189K and my balancer failed...after following Ls1howto's great instructions, I'm ready to install my new Professional Products replacement balancer. Now here's my problem, the old balancer was paint marked and the new one has a keyway, which of course, the crank snout does not have....Where do I install the new balancer on the crank?...the paint marking is visible on the crank snout, but where do I line it up with the balancer?...I called PP's tech support line and was told "anywhere, the computer makes up for it"!...With as much work as is required to replace the balancer, I only want to take it apart once!!

Team Owner


Joined: Mar 1999
Posts: 22,025
Likes: 192
From: At the beach in little Rhody
And if you follow LS1howto for installation there is a very high likelihood of damaging the threads in the crank 
Proceed at your own risk, that site has caused many damaged crank threads.
Proceed at your own risk, that site has caused many damaged crank threads.

Instructor


Joined: Nov 2004
Posts: 190
Likes: 0
From: Pittsburgh Pennsylvania
Why not pin the balance now?. Suggest you put a new oil seal on the timing chain cover before you install the HB..... if that goes in the near future you will be doing all that work over again.....good luck

Le Mans Master


Joined: Jun 2008
Posts: 5,284
Likes: 235
From: Rockledge FL
Are you talking about the part where he says to take the old crank bolt and use it to push the balancer back on?
Drifting

Joined: Jan 2005
Posts: 1,590
Likes: 5
From: Forsyth Illinois
Corvette Stories
The Best of Corvette for Corvette Enthusiasts

Every 2027 Corvette Engine Explained
Joe Kucinski
Designer Imagines A Corvette That Looks More Like a Corvette Than the Corvette
Verdad Gallardo
10 Ugly Corvettes That We Still Kinda Love
Joe Kucinski
Top 10 Most Expensive Corvettes Ever Sold on Bring A Trailer
Brett Foote
10 Things Every Corvette Owner Needs (2026 Edition)
Michael S. Palmer
8 Most "Only Corvette Owners Understand" Quirks and Problems
Pouria Savadkouei
10 Reasons the C6 Z06 is Still A Performance Benchmark After 20 Years
Joe Kucinski
How Much Horsepower Every Corvette Engine "LOST" in 1972
Joe Kucinski
Top 10 DOs and DON'Ts for Protecting Your Convertible Top!
Michael S. PalmerTeam Owner
Joined: Mar 1999
Posts: 22,025
Likes: 192
From: At the beach in little Rhody


Tech Contributor


Joined: Dec 1999
Posts: 32,910
Likes: 2,402
From: Anthony TX
CI 6,7,8,9,11 Vet
St. Jude Donor '08
If you install a new aftermarket damper,, it is most likely ZERO balanced. Unless you have a machine shop, match balance the new damper to the old,, I wouldn't worry about it too much. I did a power bond damper and just installed it. Had NO issues. I also pinned it to the crank.
RECOMMENDATION! You already have access to the timing chain and oil pump. Recommend installing an up graded LS2 timing chain and a new oil pump. Your chain is most likely SHOT and ready to die if it has never been changed.
A new Melling Oil Pump will do wonders for your oil pressure!!
BC
BC
RECOMMENDATION! You already have access to the timing chain and oil pump. Recommend installing an up graded LS2 timing chain and a new oil pump. Your chain is most likely SHOT and ready to die if it has never been changed.
A new Melling Oil Pump will do wonders for your oil pressure!!
BC
BC
Drifting
Joined: Jan 2008
Posts: 1,722
Likes: 138
From: Florida
St. Jude Donor '09
Manual transmission dampners cannot be installed anywhere on the crank pulley unless you are using a fluid style dampner.
The service manual states you must match mark the old dampner to the crank snout and install the new at the same relative location to the crank shaft snout and to transfer any balance weights that are present from the old to the new balancer.
VETTENUTS is correct, following the service manual procedure with this installation is critical. The dampner and snout are a tapered fit, they will not come apart if installed correctly to the required torque value.
Pinning the new dampner is not necessary unless you plan on installing a blower; you can do some irreversible damage to the crank shaft if you do not have the correct tools and know what you are doing.
Tech Contributor
Joined: Dec 1999
Posts: 32,910
Likes: 2,402
From: Anthony TX
CI 6,7,8,9,11 Vet
St. Jude Donor '08
I agree 100% BUT,,,,,,, what do you do IF,,, you install an AFTERMARKET DAMPER that does NOT have any balance marks or places to insert off set weights.
Like I stated previously, you could have the old and new balancer/damper matched and then install the matched new damper to the reference marks.
BC
Like I stated previously, you could have the old and new balancer/damper matched and then install the matched new damper to the reference marks.
BC
Drifting
Joined: Jan 2008
Posts: 1,722
Likes: 138
From: Florida
St. Jude Donor '09
I agree 100% BUT,,,,,,, what do you do IF,,, you install an AFTERMARKET DAMPER that does NOT have any balance marks or places to insert off set weights.
Like I stated previously, you could have the old and new balancer/damper matched and then install the matched new damper to the reference marks.
BC
Like I stated previously, you could have the old and new balancer/damper matched and then install the matched new damper to the reference marks.
BC
Race Director

Joined: Sep 2005
Posts: 11,060
Likes: 291
From: Pasco WA
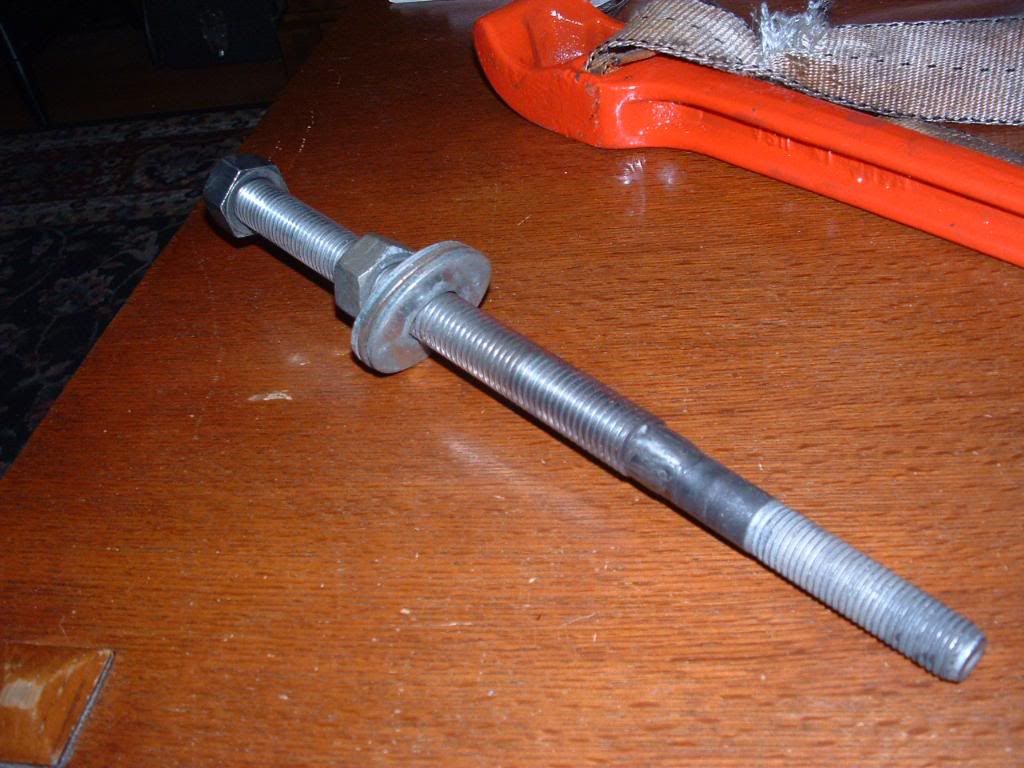
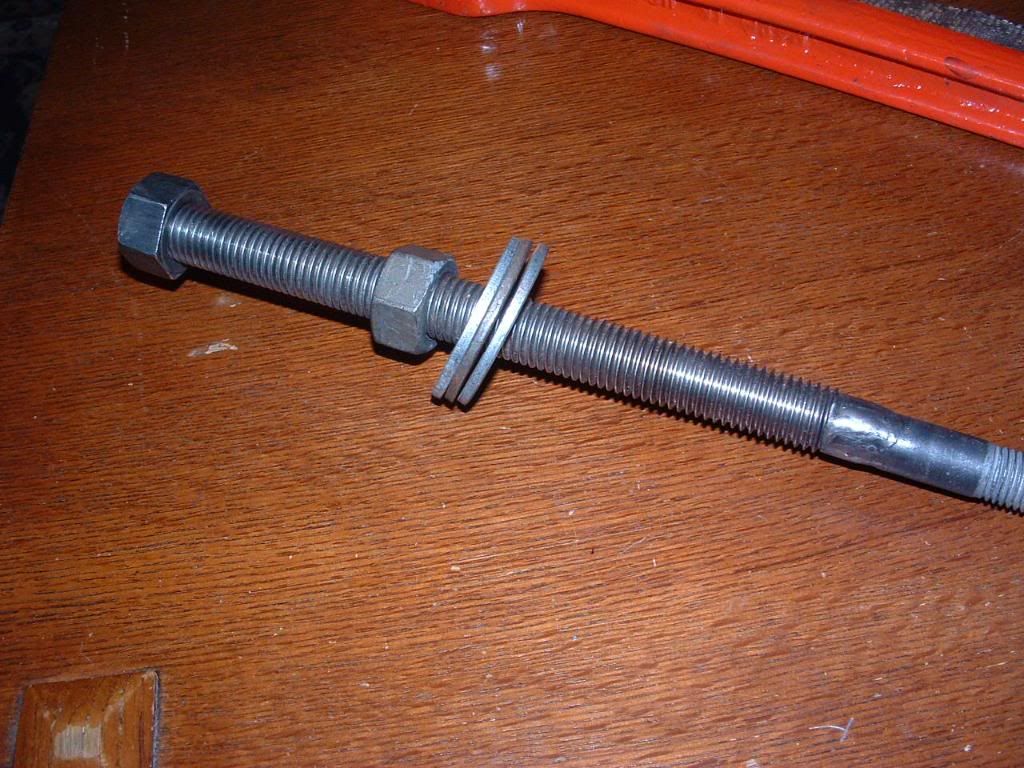
That's part of it, also the final tightening uses a torque value that is incorrect, you need to rotate the stock bolt after an initial torque to a specified number of degrees rotation. Here is a tool I made to install that will not damage the threads, it cost less than $20. You should follow the service manual for this. I also agree with the above, you should change the front seal while the harmonic damper is out of the car.
I just got the correct size bolt from Fastenal in a longer length. (I think it was 135mm long) That and a couple of matching nuts/washers is all it takes to easily, and safely, re-install the dampner. Some people are strictly "by-the-book", but there's no need to waste money/time on a special tool, in this instance. As far as the ls1howto's TQ info, I thought their method was to use the original bolt, and TQ it to a certain value; then remove it, and put in the new bolt, tighten it to the same value, and then another 240 degrees? (it's been a long time, so my not be exact) This method was used by hundreds of people, and it worked great for me.


Tech Contributor
Joined: Dec 1999
Posts: 32,910
Likes: 2,402
From: Anthony TX
CI 6,7,8,9,11 Vet
St. Jude Donor '08
Manual transmission dampners cannot be installed anywhere on the crank pulley unless you are using a fluid style dampner.
The service manual states you must match mark the old dampner to the crank snout and install the new at the same relative location to the crank shaft snout and to transfer any balance weights that are present from the old to the new balancer.
VETTENUTS is correct, following the service manual procedure with this installation is critical. The dampner and snout are a tapered fit, they will not come apart if installed correctly to the required torque value.
Pinning the new dampner is not necessary unless you plan on installing a blower; you can do some irreversible damage to the crank shaft if you do not have the correct tools and know what you are doing.
The service manual states you must match mark the old dampner to the crank snout and install the new at the same relative location to the crank shaft snout and to transfer any balance weights that are present from the old to the new balancer.
VETTENUTS is correct, following the service manual procedure with this installation is critical. The dampner and snout are a tapered fit, they will not come apart if installed correctly to the required torque value.
Pinning the new dampner is not necessary unless you plan on installing a blower; you can do some irreversible damage to the crank shaft if you do not have the correct tools and know what you are doing.
" The dampner and snout are a tapered fit, they will not come apart if installed correctly to the required torque value."
ABSOLUTY NOT! THE DAMPER AND SNOUT ARE A MACHINED PRESSED FIT! Not a tapered fit!!
When you remove the damper with a three fingered puller,,,,,, its just as snug when you start as when its near the end of the crank!
If you incorrectly tighten the the bolt, the damper will spin on the crank.
If it is pinned, it wont spin it will just walk forward.
Drifting
Joined: Jan 2008
Posts: 1,722
Likes: 138
From: Florida
St. Jude Donor '09
The dampner and snout are a tapered fit, they will not come apart if installed correctly to the required torque value. Pinning the new dampner is not necessary unless you plan on installing a blower; you can do some irreversible damage to the crank shaft if you do not have the correct tools and know what you are doing.
" The dampner and snout are a tapered fit, they will not come apart if installed correctly to the required torque value."
ABSOLUTY NOT! THE DAMPER AND SNOUT ARE A MACHINED PRESSED FIT! Not a tapered fit!!
When you remove the damper with a three fingered puller,,,,,, its just as snug when you start as when its near the end of the crank!
If you incorrectly tighten the the bolt, the damper will spin on the crank.
If it is pinned, it wont spin it will just walk forward.

Heel & Toe
Joined: Aug 2011
Posts: 18
Likes: 0
Those of you searching for service manual help...I found this link to be helpful.
http://www.alldatadiy.com/index.html
It is a subscription service for technicians. Since its not actually a GM product, I'd be careful...however, the description on how to do this harmonic balancer install seems spot on per all the threads. It clearly lays out the method to torque the new bolt and to actually use the old bolt AFTER AND ONLY AFTER using the proper install tool, then installing new bolt to torque angle specs.
I am currently fighting with getting the steering gear to clear the cross member on the drivers side wheel well. And am looking for the thread that I know is in here with regards to that.
Mike