


Car just died - Won't Start
Thread Starter
Instructor


Joined: Jul 2010
Posts: 180
Likes: 2
From: Clayton NC
I pulled into the neighborhood last night, and 2000 FRC just died. Lucky to roll in garage. Now it won't start. Turns over fine. Fuel pressure 45-60. Tries to run but won't even get up to an idle. Codes= p0108, p1637, b0502, b0507, b2284, u1064. Any help appreciated. I already have a code chart.
Burning Brakes


Joined: Jan 2008
Posts: 941
Likes: 3
From: Grand Rapids MI
I searched "p1637" in the tech section. This was on the first page.
and the entire thread: http://forums.corvetteforum.com/c5-t...ode-p1637.html
Based on this, I'm assuming maybe you have longtubes? Perhaps recently installed longtubes?
Jack
I see this too very often. Your battery and alternator are connected THRU the starter solenoid. That connection frequently gets dirty/corroded/loose /corrupted. Take your pick.
The poorer the connection is, the more you will see charging system fault and voltage fluctuations.
Try this to prove that out:
Start the engine. Connect the leads of the voltmeter between the battery terminals and the alternator BATT terminal. Polarity will not matter with a digital volt meter.
The optimum reading should be ZERO volts. The higher the DC volt reading, the more degraded the connection between the alt and battery is.
Try that first and see what you find.
THEN
Connect a heavy gage wire from the POSITIVE battery cable to the BATT terminal on the back of the alternator under the black boot. (I have used a jumper cable in the past.)
IF,,,, the symptoms improve or go away, that could be all of the issue. Clean/ repair/or replace the solenoid connections depending on what you find wrong. If you want to see how bad the connection really is, use a DC Volt meter to see the VOLTAGE DROP across that connection.
Heres the generator schematic you need:
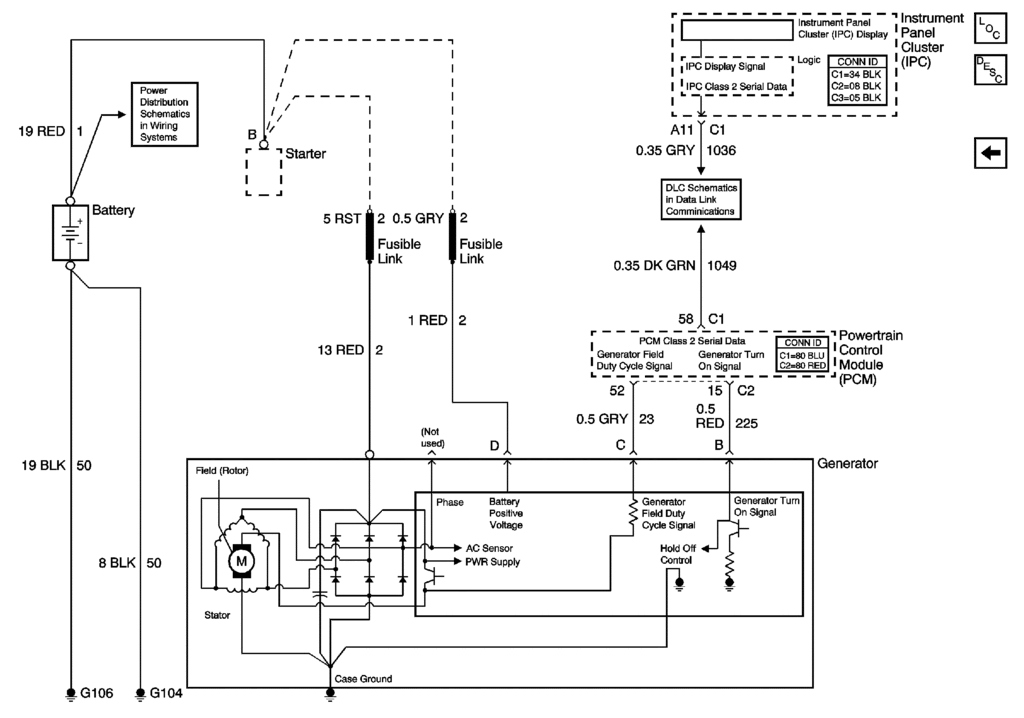
BC
The poorer the connection is, the more you will see charging system fault and voltage fluctuations.
Try this to prove that out:
Start the engine. Connect the leads of the voltmeter between the battery terminals and the alternator BATT terminal. Polarity will not matter with a digital volt meter.
The optimum reading should be ZERO volts. The higher the DC volt reading, the more degraded the connection between the alt and battery is.
Try that first and see what you find.
THEN
Connect a heavy gage wire from the POSITIVE battery cable to the BATT terminal on the back of the alternator under the black boot. (I have used a jumper cable in the past.)
IF,,,, the symptoms improve or go away, that could be all of the issue. Clean/ repair/or replace the solenoid connections depending on what you find wrong. If you want to see how bad the connection really is, use a DC Volt meter to see the VOLTAGE DROP across that connection.
Heres the generator schematic you need:
BC
Based on this, I'm assuming maybe you have longtubes? Perhaps recently installed longtubes?
Jack
Last edited by cptinjak; Jul 19, 2012 at 07:17 PM.
Burning Brakes
Joined: Jan 2008
Posts: 941
Likes: 3
From: Grand Rapids MI
Burning Brakes
Joined: Mar 2006
Posts: 813
Likes: 13
From: Hampton Va
my 2000 died one night like it ran out of fuel,thought it was fuel pumps,after along time and alot of searching ,it was the throttle control sensor ( think thats whats its called,its under the starter.my car would start and run for about 1 or 2 minutes then die, good luck

Tech Contributor


Joined: Dec 1999
Posts: 32,910
Likes: 2,402
From: Anthony TX
CI 6,7,8,9,11 Vet
St. Jude Donor '08
Codes have the answer but,,, Im not sure that the codes are telling the truth:
P0108 = MAP Sensor. That would cause engine issues.
Clear ALl the DTCs and see what comes back You also have a alternator L circuit DTC and some other NON ENGINE issue ones
Make sure that you post the H and C for the read DTCs
See if the MAP sensor one comes back.
Document ID# 554038
2000 Chevrolet/Geo Corvette
--------------------------------------------------------------------------------
DTC P0108 Manifold Absolute Pressure (MAP) Sensor Circuit High Voltage
Circuit Description
The manifold absolute pressure (MAP) sensor is mounted to the rear of the intake manifold. The MAP sensor measures the pressure changes within the intake manifold which is an indication of the engine load. The MAP sensor has a 5.0 volt reference, a ground, and a signal circuit.
The MAP sensor contains a diaphragm which changes the sensors resistance based on pressure. When the manifold pressure is low (high vacuum) the sensor output voltage is low. When the manifold pressure is high (low vacuum), the sensor output voltage is high.
The MAP sensor voltage (depending on altitude) can range from 1.0-1.5 volts at idle (high vacuum) to 4.0 - 4.9 volts at wide open throttle (WOT) (low vacuum).
When the PCM senses a signal voltage higher than the normal operating range of the sensor, this DTC will set.
Conditions for Running the DTC
No TP sensor DTCs
The engine is running.
The TP sensor angle is less than 5 percent when engine speed is less than 1000 RPM. Or The TP sensor angle is less than 18 percent when engine speed is more than 1,000 RPM.
Conditions for Setting the DTC
The MAP voltage is more than 4.3 volts
All conditions met for more than 4.0 seconds.
Action Taken When the DTC Sets
The PCM illuminates the malfunction indicator lamp (MIL) on the second consecutive ignition cycle that the diagnostic runs and fails.
The PCM records the operating conditions at the time the diagnostic fails. The first time the diagnostic fails, the PCM stores this information in the Failure Records. If the diagnostic reports a failure on the second consecutive ignition cycle, the PCM records the operating conditions at the time of the failure. The PCM writes the conditions to the Freeze Frame and updates the Failure Records.
Conditions for Clearing the MIL/DTC
The PCM turns OFF the malfunction indicator lamp (MIL) after 3 consecutive ignition cycles that the diagnostic runs and does not fail.
A last test failed, or current DTC, clears when the diagnostic runs and does not fail.
A history DTC clears after 40 consecutive warm-up cycles, if no failures are reported by this or any other emission related diagnostic.
Use a scan tool in order to clear the MIL and the DTC.
Diagnostic Aids
Important
Remove any debris from the PCM\TAC module connector surfaces before servicing the PCM\TAC module. Inspect the PCM\TAC module connector gaskets when diagnosing/replacing the modules. Ensure that the gaskets are installed correctly. The gaskets prevent contaminate intrusion into the PCM\TAC modules.
For any test that requires probing the PCM or a component harness connector, use the Connector Test Adapter Kit J 35616-A . Using this kit prevents damage to the harness/component terminals. Refer to Using Connector Test Adapters in Wiring Systems.
The PCM 5.0 volt reference circuits are internally connected within the PCM. If all the MAP sensor circuits are OK, inspect the engine oil pressure sensor circuits for malfunctions.
For an intermittent, refer to Symptoms .
Test Description
The numbers below refer to the step numbers on the diagnostic table.
If DTC P1635 sets at the same time, this indicates that the 5 volt reference circuit is either shorted to a ground or shorted to a voltage. The 5 volt reference circuit is internally connected within the PCM. The Engine Oil Pressure sensor may be causing this DTC to set.
This step determines if the malfunction is present.
Freeze Frame and/or Failure Records data may aid in locating an intermittent condition. If you cannot duplicate the DTC, the information included in the Freeze Frame and/or Failure Records data can help determine how many miles since the DTC set. The Fail Counter and Pass Counter can also help determine how many ignition cycles the diagnostic reported a pass and/or a fail. Operate the vehicle within the same freeze frame conditions (RPM, load, vehicle speed, temperature , etc.) that you observed. This will isolate when the DTC failed.
This step tests whether the signal circuit is shorted to a voltage.
This step tests whether a ground circuit is available at the MAP sensor.
Remove the MAP sensor and verify if vacuum is available to the sensor. Also, inspect the MAP sensor seal for nicks and cuts.
Step
Action
Values
Yes
No
1
Did you perform the Powertrain On-Board Diagnostic (OBD) System Check?
--
Go to Step 2
Go to Powertrain On Board Diagnostic (OBD) System Check
2
Install a scan tool.
Start the engine.
Monitor the DTC Information option with the scan tool.
Did DTC P1635 and P1639 fail this ignition cycle?
--
Go to DTC P1635 5 Volt Reference 1 Circuit
Go to Step 3
3
Important
If the engine idle is rough, unstable or incorrect, repair the idle condition before performing this diagnostic. Refer to Symptoms .
Monitor the MAP sensor voltage on the Engine 1 Data List on the scan tool.
Is the MAP sensor voltage above the specified value?
4.3V
Go to Step 5
Go to Step 4
4
Turn ON the ignition with the engine OFF.
Review the Freeze Frame and/or Failure Records data for this DTC and observe the parameters.
Turn OFF the ignition for 15 seconds.
Start the engine.
Operate the vehicle within the conditions required for this diagnostic to run, and as close to the conditions recorded in the Freeze Frame/Failure Records as possible. Special operating conditions that you need to meet before the PCM will run this diagnostic, where applicable, are listed in Conditions for Running the DTC.
Select the Diagnostic Trouble Code (DTC) option, the Specific DTC option, then enter the DTC number with the scan tool.
Does the scan tool indicate that this diagnostic failed this ignition?
--
Go to Step 5
Go to Diagnostic Aids
5
Disconnect the MAP sensor electrical connector.
Observe the MAP sensor voltage displayed on the scan tool.
Is the MAP sensor voltage below the specified value?
1V
Go to Step 6
Go to Step 7
6
Probe the sensor ground circuit with a test lamp J 34142-B to B+.
Is the test lamp illuminated?
--
Go to Step 8
Go to Step 10
7
Test the MAP sensor signal circuit for a short to voltage or a short to the 5 volt reference circuit.
Repair the MAP sensor signal circuit if the circuit is shorted. Refer to Wiring Repairs in Wiring Systems.
Is the MAP sensor signal circuit shorted?
--
Go to Step 16
Go to Step 12
8
Measure the voltage at the 5 volt reference circuit to the battery ground with a DMM .
Is the voltage near the specified value?
5V
Go to Step 9
Go to Step 15
9
Inspect for a plugged or leaking vacuum supply to the MAP sensor.
Is the vacuum supply OK?
--
Go to Step 13
Go to Step 14
10
Inspect for a poor connections at the PCM. Refer to Testing for Intermittent and Poor Connections in Wiring Systems.
If you find a poor connection repair the condition as necessary. Refer to Repairing Connector Terminals in Wiring Systems.
Did you find and correct the condition?
--
Go to Step 16
Go to Step 11
11
Test for continuity of the MAP sensor ground circuit. Refer to Testing for Continuity in Wiring Systems.
Repair the open or the poor connection if the MAP sensor ground circuit measures over the specified value. Refer to Wiring Repairs in Wiring Systems.
Did you find and correct the condition?
2ohms
Go to Step 16
Go to Step 12
12
Important
Program the replacement PCM.
Replace the PCM. Refer to Powertrain Control Module (PCM) Replacement .
Is the action complete?
--
Go to Step 16
--
13
Important
Inspect for poor connections at the MAP sensor electrical connector before replacing the sensor.
Replace the MAP sensor. Refer to Manifold Absolute Pressure (MAP) Sensor Replacement .
Is the action complete?
--
Go to Step 16
--
14
Repair the faulty vacuum supply.
Is the action complete?
--
Go to Step 16
--
15
Repair the 5 volt reference circuit for a short to voltage. Refer to Wiring Repairs in Wiring Systems.
Is the action complete?
--
Go to Step 16
--
16
Select the Diagnostic Trouble Code (DTC) option and the Clear DTC Information option with the scan tool.
Start the engine and idle at the normal operating temperature.
Select the Diagnostic Trouble Code (DTC) option and the Specific DTC option, then enter the DTC number with the scan tool.
Operate the vehicle within the Conditions for Running the DTC as specified in the supporting text, if applicable.
Does the scan tool indicate that this test ran and passed?
--
Go to Step 17
Go to Step 2
17
Select the Capture Info option and the Review Info option with the scan tool.
Does the scan tool display any DTCs that you have not diagnosed?
--
Go to the applicable DTC table
System OK
--------------------------------------------------------------------------------
Document ID# 554038
2000 Chevrolet/Geo Corvette
Bill
Thread Starter
Instructor
Joined: Jul 2010
Posts: 180
Likes: 2
From: Clayton NC
Thanks Bill. I cleared the codes and tried to crank it twice. The following codes returned:
B0502 H C
B0507 H C
B2482 H C
No other codes returned, but the car will not start either. I don't have a scan tool. Is there anything else I can check before I take it to the shop to have it scanned?
B0502 H C
B0507 H C
B2482 H C
No other codes returned, but the car will not start either. I don't have a scan tool. Is there anything else I can check before I take it to the shop to have it scanned?
Corvette Stories
The Best of Corvette for Corvette Enthusiasts

Top 10 Most Expensive Corvettes Ever Sold on Bring A Trailer
Brett Foote
10 Things Every Corvette Owner Needs (2026 Edition)
Michael S. Palmer
8 Most "Only Corvette Owners Understand" Quirks and Problems
Pouria Savadkouei
10 Reasons the C6 Z06 is Still A Performance Benchmark After 20 Years
Joe Kucinski
How Much Horsepower Every Corvette Engine "LOST" in 1972
Joe Kucinski
Top 10 DOs and DON'Ts for Protecting Your Convertible Top!
Michael S. Palmer
Top 10 Most Explosive Corvettes Ever Made: Power-to-Weight Ratio Ranked!
Joe Kucinski
150 hp to 1,250 hp: Every Corvette Generation Compared by the Specs That Matter
Joe Kucinski
8 Coolest Corvette Pace Cars (and Replicas) of All Time
Verdad GallardoTech Contributor


Joined: Jan 2007
Posts: 19,472
Likes: 1,171
From: Dyer, IN
Thanks Bill. I cleared the codes and tried to crank it twice. The following codes returned:
B0502 H C
B0507 H C
B2482 H C
No other codes returned, but the car will not start either. I don't have a scan tool. Is there anything else I can check before I take it to the shop to have it scanned?
B0502 H C
B0507 H C
B2482 H C
No other codes returned, but the car will not start either. I don't have a scan tool. Is there anything else I can check before I take it to the shop to have it scanned?
Tech Contributor
Joined: Jan 2007
Posts: 19,472
Likes: 1,171
From: Dyer, IN