


P1416 went away by itself.....

Thread Starter
Pro

Joined: Oct 2015
Posts: 651
Likes: 45
From: Raleigh area, NC
Had this come on this winter in NC so relatively mild temps, usually above freezing if that matters.
Yesterday cleared by itself....this is the right air check valve which needs the manifold removed to replace.
Any suggestions on trying the wd-40 carb cleaner trick, or should I replace?
If I remove the manifold do I need a new gasket?
Thanks.
Yesterday cleared by itself....this is the right air check valve which needs the manifold removed to replace.
Any suggestions on trying the wd-40 carb cleaner trick, or should I replace?
If I remove the manifold do I need a new gasket?
Thanks.

mike v


Joined: Feb 2013
Posts: 465
Likes: 92
From: Riner Va
I did mine without removing the intake,, I removed from the heads, then disconnected the lines on the L side of the Eng. . I used break cleaner from both sides of each line and used air to blow the crap out. Did this several times until they were clean. Then used wd-40, sprayed the H*** out of them..Put it back together and all is good..Remove the NEG. from the battery 1st. and put back on last thing.. Take it for a nice ride. It can take several starts... The air pump only runs for several seconds on start up..
mike v
mike v
Last edited by mike venth; Mar 17, 2016 at 08:38 PM.
Pro

Joined: Dec 2011
Posts: 718
Likes: 69
From: North Reading MA
I went through that scenario. It started 2 years ago and I read every thread on the subject. Since I had nothing to loose I did the bandaid fix using sea foam spray and compressed air down that side. It bought me a year and then came back so I pulled the manifold and replaced the valve and the oil sending unit for preventative while I was in there. I probably could have done the sea foam treatment again but inevitably it would have to go.
The hardest part was getting the old valve off of the hose assembly....
You can reuse the gasket.
The hardest part was getting the old valve off of the hose assembly....
You can reuse the gasket.

Tech Contributor


Joined: Dec 1999
Posts: 32,910
Likes: 2,402
From: Anthony TX
CI 6,7,8,9,11 Vet
St. Jude Donor '08
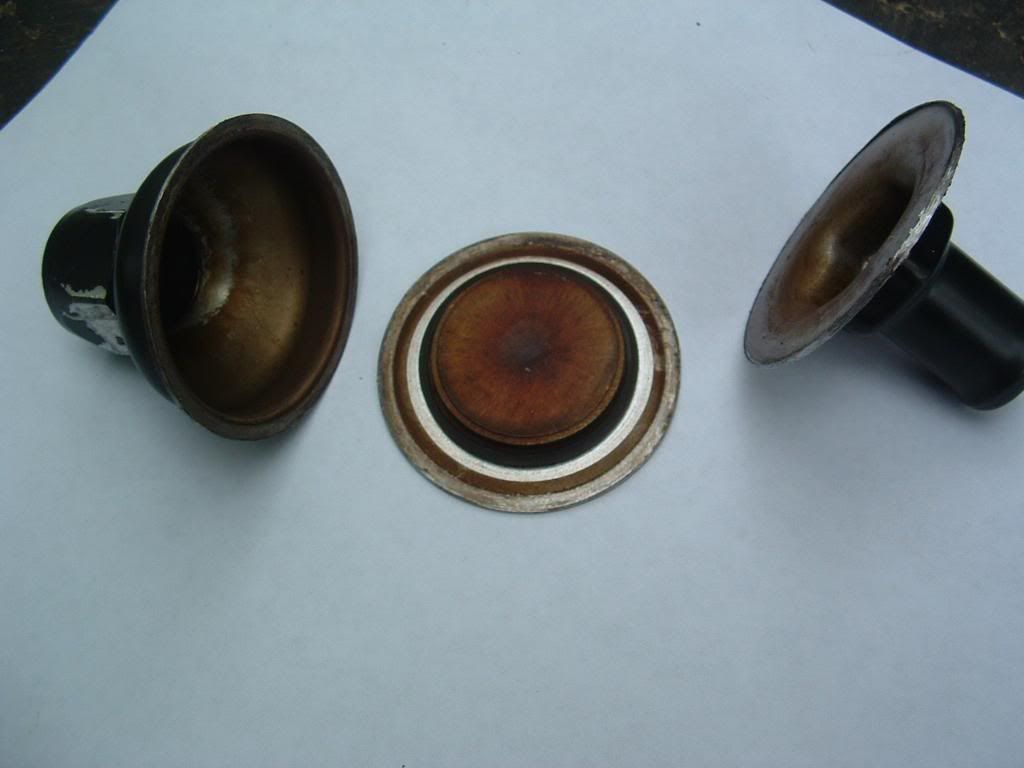
I started this CLEANING thing a LONG LONG time ago. Partly because I did NOT know how GM designed the valve.
My thoughts were that there was a metal DIAPHRAGM with a seat and the diaphragm was sticking to the seat. If that were the case, cleaning would have been the golden ticket.
WELL, I like to take things apart and I dissected that valve after it failed after cleaning.

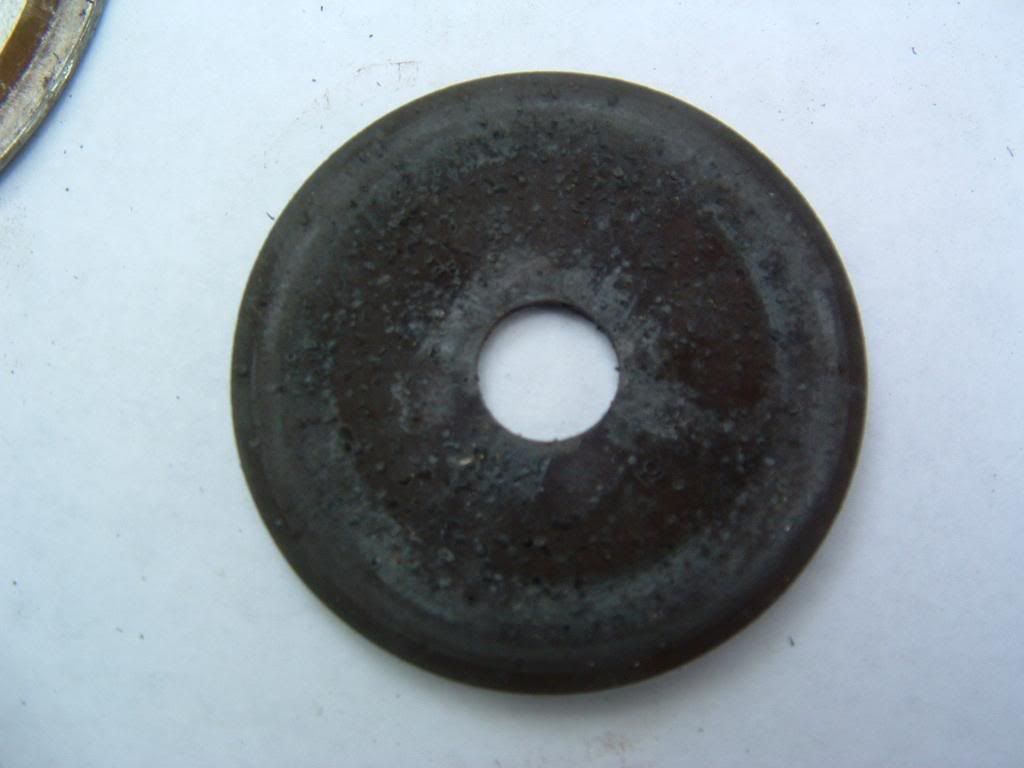
The actual valve is a RUBBER DISK. That rubber disk gets STIFF after being exposed to heat and exhaust gasses and does not flex enough to let the air pump provide the proper volume of AIR pump air into that bank. The PCM looks for a specific change in O2 Sensor reading when the pump puts fresh into the manifold.
SO,,, in hind sight, the fix is temporary and you SHOULD plan on installing a NEW VALVE or eliminate the A.I.R. System and tune it out of the PCM.
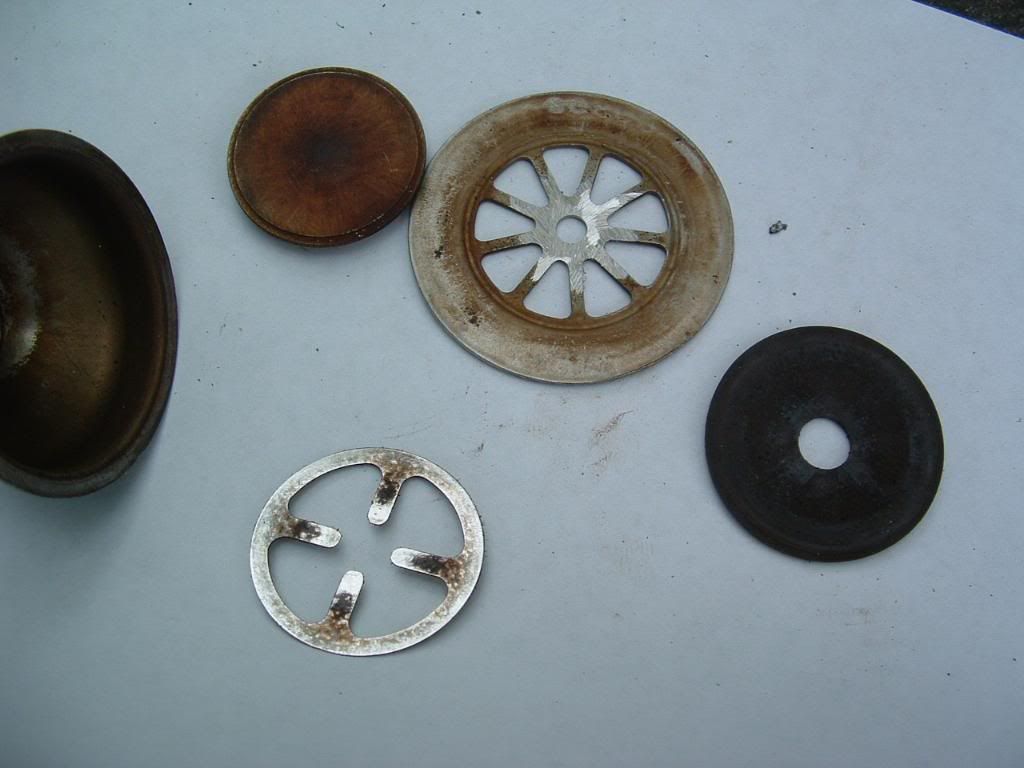
Here is the valve blown apart:


My thoughts were that there was a metal DIAPHRAGM with a seat and the diaphragm was sticking to the seat. If that were the case, cleaning would have been the golden ticket.
WELL, I like to take things apart and I dissected that valve after it failed after cleaning.
The actual valve is a RUBBER DISK.
That rubber disk gets STIFF after being exposed to heat and exhaust gasses and does not flex enough to let the air pump provide the proper volume of AIR pump air into that bank. The PCM looks for a specific change in O2 Sensor reading when the pump puts fresh into the manifold. SO,,, in hind sight, the fix is temporary and you SHOULD plan on installing a NEW VALVE or eliminate the A.I.R. System and tune it out of the PCM.
Here is the valve blown apart:
Last edited by Bill Curlee; Mar 18, 2016 at 11:30 AM.
mike v
Joined: Feb 2013
Posts: 465
Likes: 92
From: Riner Va
I started this CLEANING thing a LONG LONG time ago. Partly because I did NOT know how GM designed the valve.
My thoughts were that there was a metal DIAPHRAGM with a seat and the diaphragm was sticking to the seat. If that were the case, cleaning would have been the golden ticket.
WELL, I like to take things apart and I dissected that valve after it failed after cleaning.
The actual valve is a RUBBER DISK. That rubber disk gets STIFF after being exposed to heat and exhaust gasses and does not flex enough to let the air pump provide the proper volume of AIR pump air into that bank. The PCM looks for a specific change in O2 Sensor reading when the pump puts fresh into the manifold.
SO,,, in hind sight, the fix is temporary and you SHOULD plan on installing a NEW VALVE or eliminate the A.I.R. System and tune it out of the PCM.
Here is the valve blown apart:
My thoughts were that there was a metal DIAPHRAGM with a seat and the diaphragm was sticking to the seat. If that were the case, cleaning would have been the golden ticket.
WELL, I like to take things apart and I dissected that valve after it failed after cleaning.
The actual valve is a RUBBER DISK.
That rubber disk gets STIFF after being exposed to heat and exhaust gasses and does not flex enough to let the air pump provide the proper volume of AIR pump air into that bank. The PCM looks for a specific change in O2 Sensor reading when the pump puts fresh into the manifold. SO,,, in hind sight, the fix is temporary and you SHOULD plan on installing a NEW VALVE or eliminate the A.I.R. System and tune it out of the PCM.
Here is the valve blown apart:
Hi Bill,, heading back to VA in early April. I did mine couple years back and still working. I realize it's a band-aid and will be tuning it out when we I do headers, P&P TB, and the tune. Nice work on the disassemble & pics.. THANKS
mike
Drifting

Joined: Feb 2008
Posts: 1,596
Likes: 67
From: Bahama North Carolina
Had this come on this winter in NC so relatively mild temps, usually above freezing if that matters.
Yesterday cleared by itself....this is the right air check valve which needs the manifold removed to replace.
Any suggestions on trying the wd-40 carb cleaner trick, or should I replace?
If I remove the manifold do I need a new gasket?
Thanks.
Yesterday cleared by itself....this is the right air check valve which needs the manifold removed to replace.
Any suggestions on trying the wd-40 carb cleaner trick, or should I replace?
If I remove the manifold do I need a new gasket?
Thanks.
You usually don't have to replace the intake gaskets if you go that route. If they look intact then they are probably fine and good to go. Be careful when you reinstall.
The manifold is plastic and doesn't take much to snug it down.
Last edited by BigGun; Mar 18, 2016 at 02:47 PM.
Thread Starter
Pro
Joined: Oct 2015
Posts: 651
Likes: 45
From: Raleigh area, NC
A lot of people find it easier to just have this troublesome code (along with the rear O2 sensors) turned off with a tune. Carolina Auto Masters in Durham can do this for you. They know Vettes inside and out. They can also do some transmission tweaks that will wake up the car if you have an auto.
You usually don't have to replace the intake gaskets if you go that route. If they look intact then they are probably fine and good to go. Be careful when you reinstall.
The manifold is plastic and doesn't take much to snug it down.
You usually don't have to replace the intake gaskets if you go that route. If they look intact then they are probably fine and good to go. Be careful when you reinstall.
The manifold is plastic and doesn't take much to snug it down.
Thanks will look them up would not mind getting some tweaks....
Corvette Stories
The Best of Corvette for Corvette Enthusiasts

Top 10 Most Expensive Corvettes Ever Sold on Bring A Trailer
Brett Foote
10 Things Every Corvette Owner Needs (2026 Edition)
Michael S. Palmer
8 Most "Only Corvette Owners Understand" Quirks and Problems
Pouria Savadkouei
10 Reasons the C6 Z06 is Still A Performance Benchmark After 20 Years
Joe Kucinski
How Much Horsepower Every Corvette Engine "LOST" in 1972
Joe Kucinski
Top 10 DOs and DON'Ts for Protecting Your Convertible Top!
Michael S. Palmer
Top 10 Most Explosive Corvettes Ever Made: Power-to-Weight Ratio Ranked!
Joe Kucinski
150 hp to 1,250 hp: Every Corvette Generation Compared by the Specs That Matter
Joe Kucinski
8 Coolest Corvette Pace Cars (and Replicas) of All Time
Verdad GallardoTech Contributor
Joined: May 2008
Posts: 3,100
Likes: 17
From: Somers, CT and Clermont, FL
St. Jude Donor '09-'10-'11-'12-'13-'14-'15-'16
I agree with Bill Curlee 100% that cleaning attempts on the check valve will only provide a short-term solution at best.
The pics of the check valve internal parts, shown in Bill's posting, are actually the original bank 2 check valve from my 2001, which had about 28k miles at that time. Bill wanted to dissect it, in order to find the root cause of the P1416 code.
As a footnote, I replaced that original check valve with an AV-7 check valve made by Standard Motor Parts. It has a metal diaphragm, instead of rubber like the original one had.
It's been working great for nearly 7 years now.