


BCM replacement 2000 coupe

Thread Starter
Instructor


Joined: Jun 2007
Posts: 146
Likes: 1
From: Williamsville NY
I may have to replace the BCM in my 2000 coupe (stock). I plan to install either a new or refurbished unit. I don't have a TechII. My question is 'can I install the unit then drive the car to the dealer'? Will the keys work? What is the process after install? I've looked at different threads but couldn't find what I was looking for. Thanks.
Thread Starter
Instructor
Joined: Jun 2007
Posts: 146
Likes: 1
From: Williamsville NY
The ABS light, TCS light, inoperable passenger/driver window/AC, DIC warnings - service vehicle soon, check tire pressure and a couple other warnings. I checked the grounds and they are like new. I viewed some YouTube videos for BCM repair and plan to remove it and check the circuit board for bad solder joints.
While all the warning lights were on I had a Corvette Shop mechanic look at the car. He was perplexed and stated there were no guarantees he could isolate the problem. If the shop can't determine what's wrong I thought I'd replace the BCM myself and save $500. Battery was replaced today. Any suggestions?
My brother-in-law has a 2000 C5 with similar issues. However, his warnings surface every 2-3 months then go away. My warnings/issues return each drive cycle. Thanks for your response and the link, very much appreciated.
What symptoms do you have that make you think the BCM is bad??? While the BCM can go bad it is not a common failure unless it got wet. Even then the BCM board inside the aluminum can is often able to be cleaned up and still work.
Once you install the new BCM you MUST do the BCM/PCM relearn procedure to be able to start the car. Make certain your battery is fully charged before you start this lengthy procedure. Here is the info you need to do that:
BCM/PCM RELEARN PROCEDURE
You will need to conduct the PCM/BCM relearn process. This matches their handshake ID's and allows them to talk to each other.
Do this before you worry about VATS issues:
1. Turn on the key for 11 minutes.
2 Turn off the key for 30 seconds.
3. Repeat 1&2 two more times.
4. Turn on the key for 30 seconds.
The car should start and run with the new BCM.
This will sync the PCM to the New BCM
Once the BCM and PCM are sync'ed up you can start and drive the car. However, RPO's that the car has installed MUST be programmed into the BCM using a TECH II. RPO's on the car must be turned on in the BCM. For example if your car had options like the F45 or F55 suspension, the BCM must be told its there. Similarly with wheher the car is a manual vs automatic, etc. You can get the RPO list from the Glove box door and if you have someone that has a TECH II you can do that yourself. Not all the RPO's listed on the Glove box door get programmed into the BCM. [/QUOTE]

Tech Contributor


Joined: Dec 1999
Posts: 32,910
Likes: 2,402
From: Anthony TX
CI 6,7,8,9,11 Vet
St. Jude Donor '08
Sounds like you have a SERIAL DATA BUSS issue. The MOST common causes are:
A wet BCM
OR
DAMAGED door wiring harness connectors and or Seat Connector.
To the LEFT of the BCM are two THIN CONNECTORS. They are the "Serial Data Buss STAR CONNECTORS!"
Find the one that has FOUR wires in it and POP THE TOP OFF THAT CONNECTOR.
With the top shorting buss removed, see if the feasible of light and alarms are subsided.
You will NOT have any COMMUNICATIONS for the LRCM, RDCM and Seat module but,, that is expected.
Post the results.
BC
Thread Starter
Instructor
Joined: Jun 2007
Posts: 146
Likes: 1
From: Williamsville NY
[QUOTE=8VETTE7;1592329410]Your first mistake was taking the car to a "Corvette" mechanic that is not familiar with these C5 symptoms. 
UNLIKELY that the BCM is the cause of your problems. For one thing the BCM does not control the TCS or ABS so it is NOT related to those symptoms.
I posted in another of your threads and requested you to post the codes.
https://www.corvetteforum.com/forums...sues-help.html
You will be throwing away good money by throwing parts at a problem that you don't know the cause of.
Pull and post ALL your codes.
Your symptoms suggest that there are multiple problems going on here. Without the codes you are stabbing in the dark..............
Car has 35K, moisture not an issue. Here are the codes that keep recurring:
10 PCM-P1626H
28 TCS-U1301H,U1016H
40 BCM-B0503H,B0432H,B0508H
58 SDM-U1000H,U1301H,U1064H
60 IPC-U1255H, U1064H,U1160H,U1040H,U1016H,U1176H,U1088 H
99 HVAC-U1064H,U1160H,U1096H,U1255H
AO LCDM-U1064H
A1 RDCM-B2283H,B2277H,B2285H,B1255H,U1064H,U1016 H,U1096H
A6 SCM-U1300H,U1255H
BO RFA-U1255H,U1064H,U1096H,U1016H
I did replace the seat bushings the other day so the driver seat was out. I checked the seat wiring harnesses and they are attached firmly. Thanks very much for your help.
Last edited by dboldt; Jun 1, 2016 at 10:42 PM.
Thread Starter
Instructor
Joined: Jun 2007
Posts: 146
Likes: 1
From: Williamsville NY
Sounds like you have a SERIAL DATA BUSS issue. The MOST common causes are:
A wet BCM
OR
DAMAGED door wiring harness connectors and or Seat Connector.
To the LEFT of the BCM are two THIN CONNECTORS. They are the "Serial Data Buss STAR CONNECTORS!"
Find the one that has FOUR wires in it and POP THE TOP OFF THAT CONNECTOR.
With the top shorting buss removed, see if the feasible of light and alarms are subsided.
You will NOT have any COMMUNICATIONS for the LRCM, RDCM and Seat module but,, that is expected.
Post the results.
BC
Bill, here is the sequence of events:
Car was operating with no issues.
Removed driver seat and replaced bushings, reinstalled with no issues.
Out for a drive, wife got out of the car and closed passenger door, that's when all the warnings started.
Had battery checked and replaced, two days ago.
During each drive cycle (about 6) all warnings and alarms kept cycling, coming back.
Last night drove car and no alarms plus TPMS was displaying pressures, something that was absent up until that time.
Today-cleared all codes, removed top of SDB (4 wire). Drove car for 30 miles-no codes or warnings. However, TPMS not displaying pressures. At present that is the only anomaly.
Not sure if closing the passenger door was a coincidence or an indication of where the problem might be.
My eyesight is terrible but the BUSS connection appeared to be clean.
Thanks for your help! Dave
Thread Starter
Instructor
Joined: Jun 2007
Posts: 146
Likes: 1
From: Williamsville NY
[QUOTE=8VETTE7;1592339504]VERY likely the 6 pin connector for the passenger door is the cause of the symptoms.
You said you cleared ALL the codes before removing the top of the small connector... Did you pull the codes after driving the car before you shut off the engine???? What were the codes????
Here is a thread that Bill put together that has a picture of the connector that is very likely causing the symptoms.
Go down to the 5th picture:
http://forums.corvetteforum.com/c5-t...-there-is.html
You need to fish the black connector out of the A-Pillar on the passenger side and separate the connector halves. You either have corrosion on the contact surfaces or the contact surfaces are deformed and NOT making constant contact in the two halves. This causes the serial buss to see constant interruptions and causes the other sensors in the car to get very upset. Clean the contact surfaces and reshape as needed to get good constant contact. Reassemble. Reconnect the cap on the SDB small connector. Clear all codes again and repeat the test drive. PULL ALL codes with the engine running when you return. Post results.........
[Yes-I pulled the codes before separating the SDB. Here they are:
10 PCM-P1626H
28 TCS-U1301H,U1016H
40 BCM-B0503H,B0432H,B0508H
58 SDM-U1000H,U1301H,U1064H
60 IPC-U1255H, U1064H,U1160H,U1040H,U1016H,U1176H,U1088 H
99 HVAC-U1064H,U1160H,U1096H,U1255H
AO LCDM-U1064H
A1 RDCM-B2283H,B2277H,B2285H,U1255H,U1064H,U1016 H,U1096H
A6 SCM-U1300H,U1255H
BO RFA-U1255H,U1064H,U1096H,U1016H \
I pulled the codes while the car was running but there were none. I'm going to look at the connector you referenced and get back. Thanks again for all your help. ]
Tech Contributor
Joined: Dec 1999
Posts: 32,910
Likes: 2,402
From: Anthony TX
CI 6,7,8,9,11 Vet
St. Jude Donor '08
The Serial data buss STAR connector is used to BREAK INTO & TEST the serial data buss. GM actually has a test box for that very reason. Your GOAL is to remove the top of the FOUR WIRE connector to do a TEST!
IF,,,,,,,,,,,,,,,,,,,, You remove the top, and ALL the issues GO AWAY,,,, you most likely have an issue with the LDCM, and or RDCM and or Seat Control Module.
Wife shutting the door = A WTF MOMENT.


Man,,, ,,,, that COULD be what I was looking for!!!
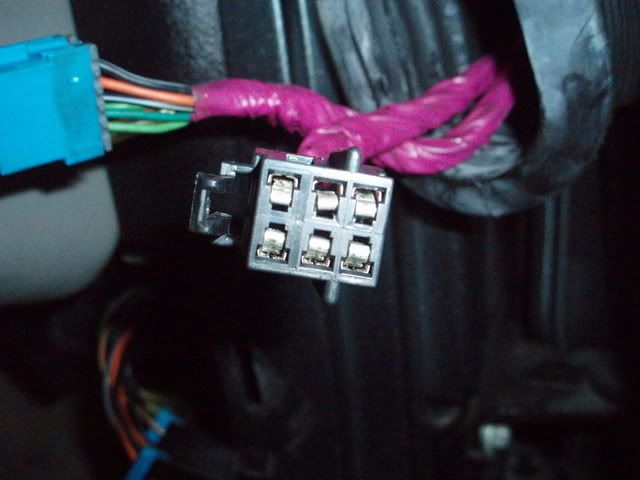
POP out the rubber accordion tube between the DOOR and DOOR A PILLAR,, fish the door harness connectors out of the hole in the A pillar and disconnect the SIX WIRE POWER CONNECTOR.
Look for misshappened / SPREAD APART / DAMAGED FEMALE PINS!
EXAMPLE: Look at the top row, center pin. Its a PRIME example of a damaged / spread apart pin and the cause of many issues which is the same as yours:
IF,,,,,,,,,,,,,,,,,,,, You remove the top, and ALL the issues GO AWAY,,,, you most likely have an issue with the LDCM, and or RDCM and or Seat Control Module.
Wife shutting the door = A WTF MOMENT.
Man,,,
,,,, that COULD be what I was looking for!!!POP out the rubber accordion tube between the DOOR and DOOR A PILLAR,, fish the door harness connectors out of the hole in the A pillar and disconnect the SIX WIRE POWER CONNECTOR.
Look for misshappened / SPREAD APART / DAMAGED FEMALE PINS!
EXAMPLE: Look at the top row, center pin. Its a PRIME example of a damaged / spread apart pin and the cause of many issues which is the same as yours:
Last edited by Bill Curlee; Jun 2, 2016 at 02:50 PM.

Racer
Joined: Mar 2012
Posts: 357
Likes: 9
From: Aston (Philadelphia) PA
I have a BCM that came from a 2000 Corvette if you need one. The one I have is part number 10304930. It came from a car that was parted out. Let me know if you happen to figure your problems are from a defective BCM and you are interested. Good luck with sorting out your gremlins.
Mike
Mike
Corvette Stories
The Best of Corvette for Corvette Enthusiasts

Top 10 Most Expensive Corvettes Ever Sold on Bring A Trailer
Brett Foote
10 Things Every Corvette Owner Needs (2026 Edition)
Michael S. Palmer
8 Most "Only Corvette Owners Understand" Quirks and Problems
Pouria Savadkouei
10 Reasons the C6 Z06 is Still A Performance Benchmark After 20 Years
Joe Kucinski
How Much Horsepower Every Corvette Engine "LOST" in 1972
Joe Kucinski
Top 10 DOs and DON'Ts for Protecting Your Convertible Top!
Michael S. Palmer
Top 10 Most Explosive Corvettes Ever Made: Power-to-Weight Ratio Ranked!
Joe Kucinski
150 hp to 1,250 hp: Every Corvette Generation Compared by the Specs That Matter
Joe Kucinski
8 Coolest Corvette Pace Cars (and Replicas) of All Time
Verdad Gallardo
Thread Starter
Instructor
Joined: Jun 2007
Posts: 146
Likes: 1
From: Williamsville NY
[QUOTE=8VETTE7;1592339504]VERY likely the 6 pin connector for the passenger door is the cause of the symptoms.
You said you cleared ALL the codes before removing the top of the small connector... Did you pull the codes after driving the car before you shut off the engine???? What were the codes????
Here is a thread that Bill put together that has a picture of the connector that is very likely causing the symptoms.
Go down to the 5th picture:
http://forums.corvetteforum.com/c5-t...-there-is.html
You need to fish the black connector out of the A-Pillar on the passenger side and separate the connector halves. You either have corrosion on the contact surfaces or the contact surfaces are deformed and NOT making constant contact in the two halves. This causes the serial buss to see constant interruptions and causes the other sensors in the car to get very upset. Clean the contact surfaces and reshape as needed to get good constant contact. Reassemble. Reconnect the cap on the SDB small connector. Clear all codes again and repeat the test drive. PULL ALL codes with the engine running when you return. Post results........
[Ok-is the connector you reference behind the accordion boot on the door itself? Do I peel back the boot and use a needle nose pliers or similar to pull out the connector. I did look at the picture you referenced and it looks to me like the connector was inside the door. Thanks]
Thread Starter
Instructor
Joined: Jun 2007
Posts: 146
Likes: 1
From: Williamsville NY
[QUOTE=Bill Curlee;1592340326]The Serial data buss STAR connector is used to BREAK INTO & TEST the serial data buss. GM actually has a test box for that very reason. Your GOAL is to remove the top of the FOUR WIRE connector to do a TEST!
IF,,,,,,,,,,,,,,,,,,,, You remove the top, and ALL the issues GO AWAY,,,, you most likely have an issue with the LDCM, and or RDCM and or Seat Control Module.
Wife shutting the door = A WTF MOMENT.
Man,,, ,,,, that COULD be what I was looking for!!!
POP out the rubber accordion tube between the DOOR and DOOR A PILLAR,, fish the door harness connectors out of the hole in the A pillar and disconnect the SIX WIRE POWER CONNECTOR.
Look for misshappened / SPREAD APART / DAMAGED FEMALE PINS!
EXAMPLE: Look at the top row, center pin. Its a PRIME example of a damaged / spread apart pin and the cause of many issues which is the same as yours:
[/
Thanks Bill, I'll check out that connector and get back. I was able to get at the harness and all contacts look new, no damage or corrosion. I really appreciate your direction!
IF,,,,,,,,,,,,,,,,,,,, You remove the top, and ALL the issues GO AWAY,,,, you most likely have an issue with the LDCM, and or RDCM and or Seat Control Module.
Wife shutting the door = A WTF MOMENT.
Man,,,
,,,, that COULD be what I was looking for!!!POP out the rubber accordion tube between the DOOR and DOOR A PILLAR,, fish the door harness connectors out of the hole in the A pillar and disconnect the SIX WIRE POWER CONNECTOR.
Look for misshappened / SPREAD APART / DAMAGED FEMALE PINS!
EXAMPLE: Look at the top row, center pin. Its a PRIME example of a damaged / spread apart pin and the cause of many issues which is the same as yours:
[/Thanks Bill, I'll check out that connector and get back. I was able to get at the harness and all contacts look new, no damage or corrosion. I really appreciate your direction!
Last edited by dboldt; Jun 2, 2016 at 03:11 PM.
Drifting


Joined: Jun 2013
Posts: 1,294
Likes: 367
From: Iowa
Just a helpful hint for easier viewing of quoted text. The beginning QUOTE= within the [] brackets is correct but before you start typing in your message please use /quote inside brackets [] to end the quote so it shows as a quote box.
Originally Posted by Example
Example
Thread Starter
Instructor
Joined: Jun 2007
Posts: 146
Likes: 1
From: Williamsville NY
[QUOTE=Tuffguy610;1592340327]I have a BCM that came from a 2000 Corvette if you need one. The one I have is part number 10304930. It came from a car that was parted out. Let me know if you happen to figure your problems are from a defective BCM and you are interested. Good luck with sorting out your gremlins.
Mike
Good to know. Still working on those gremlins. Thanks very much,
Dave
Mike
Good to know. Still working on those gremlins. Thanks very much,
Dave
Thread Starter
Instructor
Joined: Jun 2007
Posts: 146
Likes: 1
From: Williamsville NY
I was wondering how that worked. Hopefully I did this correctly. I'll find out after I hit reply. Thanks
Thread Starter
Instructor
Joined: Jun 2007
Posts: 146
Likes: 1
From: Williamsville NY
99 HVAC U1160H and A1 RDCM 1064H.
Earlier I had the SDB (4 wire) separated. Contacts looked clean. I put a thin coating of dielectric grease on the SDB before clipping back together. Same process with the right door wiring harness. I appreciate your assistance. Dave
.
Tech Contributor
Joined: Dec 1999
Posts: 32,910
Likes: 2,402
From: Anthony TX
CI 6,7,8,9,11 Vet
St. Jude Donor '08
DIELECTRIC GREASE is an INSULATOR! WHY,,,,,,,,,,,,,,,,,,,,,,,,,,,, would you put and insulating compound INSIDE an electrical connector? Especially one that inside the cabin.
If, any of the contacts inside that connector are the least bit questionable, adding dielectric grease makes it 10 times more questionable.
Asking you to remove the shorting bar on the STAR CONNECTOR was not suggesting that it was a connection issue. I've only seen one person with a damaged star connector and it was most likely damaged when the car was manufactured.
The star connector shorting buss was removed to ISOLATE the serial data wires of the LDCM, RDCM and SCM and to see if the issue went away when the modules were isolated. If it goes away, the modules listed above are INVOLVED with the issue.
Just my opinion.
Thread Starter
Instructor
Joined: Jun 2007
Posts: 146
Likes: 1
From: Williamsville NY
 Di-electric grease is indeed an electrical insulator. It is most commonly used by packing it around the outside of electrical connections to prevent water penetration. NOT a good idea to use it the way you did between electrical contact surfaces. JMHO.
As far as the problem going away, it may come back as it sounds like you did not actually alter the contact surfaces. In some cases the deformation of the contacts can be very small. It only takes a momentary interruption of the SDB to cause noise on it that affects others sensors. I hope the problem doesn't come back quickly but if it does you will know that it is not the BCM ( unless the BCM gets wet) and you will know how to go about isolating which sensor may be causing the symptoms..

Is it possible the root of the issues was battery related? As mentioned earlier the battery tested defective and was replaced. Thanks for your continued feedback. I sincerely appreciate all the support!