


Please Help! '99 'vert goes mad!

Thread Starter
Instructor


Joined: Apr 2003
Posts: 211
Likes: 3
From: Sarasota FL
C5-Tech,
Thanks for checking in. I appreciate your feedback.
Per other posts, I had adjusted the gaps in the black connectors in the door jam and checked the grounds in and around the engine compartment. While I did not disconnect any, I did check physical tightness and visually check for corrosion. No problem found.
Do I have to remove body panels to gain access to the ground locations you suggested? Should I raise the car to check them?
I really hope that this is a bad ground situation and not a BCM replacement. Just in case, anyone know where I can get a BCM for a '99 at a reasonable rate? Maybe a place that might take one back if it proves not to be the problem?
Again, thanks to all for your help. I'm sure we'll get to the bottom of this, one step at a time.
Thread Starter
Instructor
Joined: Apr 2003
Posts: 211
Likes: 3
From: Sarasota FL
Knowme,
I did not figure this out yet. Got evacuated on Friday due to Charley. Will inspect the ground points referenced by C5-Tech tonight (weather permitting). Please let me know how you resolve your situation. I imagine that what fixes yours will fix mine. I'll keep the thead updated.
I did not figure this out yet. Got evacuated on Friday due to Charley. Will inspect the ground points referenced by C5-Tech tonight (weather permitting). Please let me know how you resolve your situation. I imagine that what fixes yours will fix mine. I'll keep the thead updated.
Race Director


Joined: Nov 2001
Posts: 18,682
Likes: 4
St. Jude Donor '05-'06-'07-'08-'09-'10-'11-'12
Andy I will keep you updated. I am leaving for UK on the 24th and will not be back before the 10th September. I am debating leave the car to the dealership before that or not. 

Tech Contributor


Joined: Dec 1999
Posts: 32,910
Likes: 2,402
From: Anthony TX
CI 6,7,8,9,11 Vet
St. Jude Donor '08
Andy
Here are some recommendations to get you back to daily driving! First off, I believe that your BCM (Silver box located in the passengers foot well) got wet or has been wet at some time. I strongly recommend, removing the seat, and removing the passengers carpet (It comes out in about 5 minutes) and make sure that it is not wet. The water always drains to the back.
The BCM controls almost all of the systems and circuits that you are having isues with. The dreded "NO COMMS" means that that module is NOT resopnding or transmitting it's State of Health message or signals to the other modules that communicate with it or it communicates with. I would remove the BCM and set it under a heat lamp for 2-3 hours and while that is drying out i would remove the carpets and make sure that they are BONE dry!
Then I would remove the AC/Heater box drain tube and cut the crimped end off of it, use a wet/dry vac to suck on the metal tube that the 90 deg rubber drain tube came off of and then reinstall it.
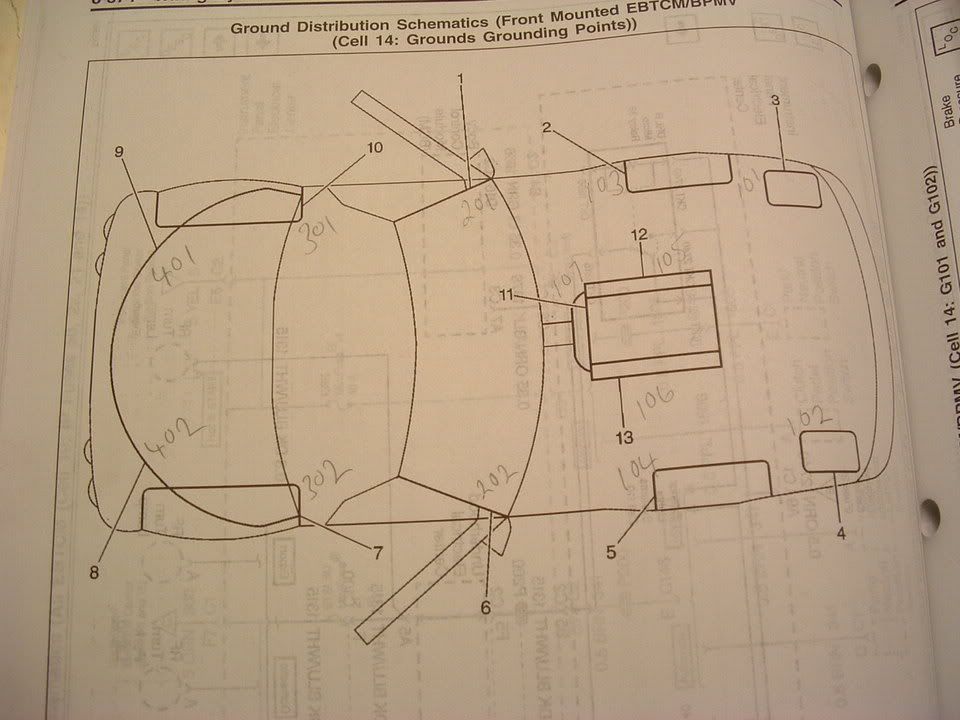
Nex in line for troubleshooting is checking and cleaning all of the grounds. There are 13 chassis grounds. Of those 13 grounds, there are two types of connections that connect the ground wires to the chassis. Here are pictures of the grounds and schematics where they are located.
[IMG] [/IMG]
[IMG] [/IMG]
[IMG] [/IMG]
Schematics
[IMG]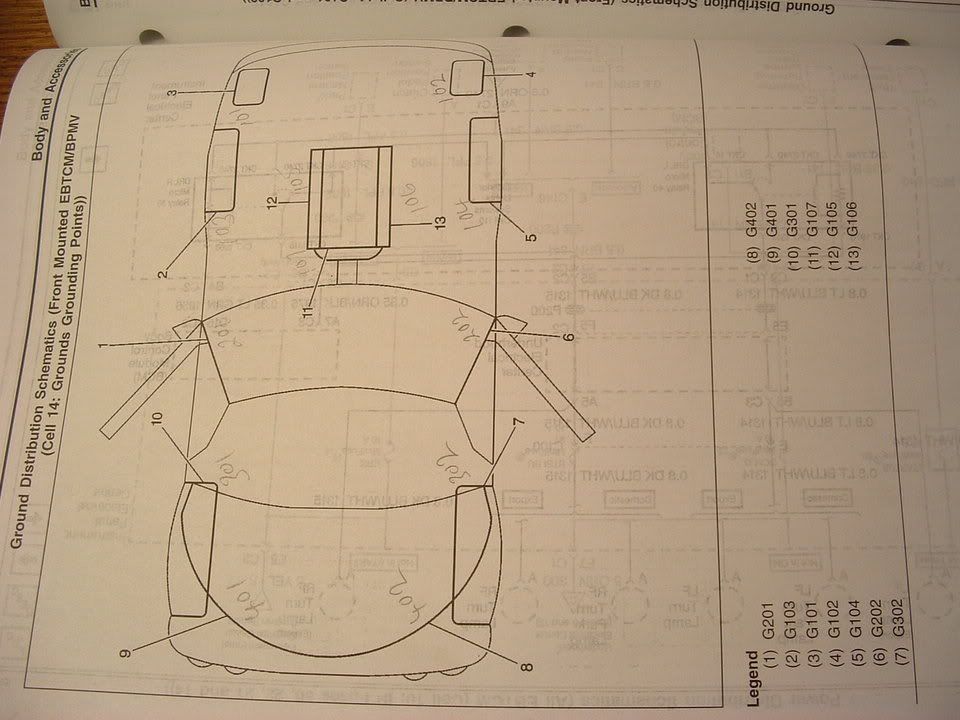 [/IMG]
[IMG] [/IMG]
When you service your grounds, you need to do the following things. Spray each ground lug with WD-40 or PB Blaster and let it soak in. DO NOT be afraid to use too much!
locate and remove each ground connection. Be careful when removing the nuts on the ground lugs. If you are NOT carefull, they will wring off. If they do, dont worry! All you need to do is grind off the stud down to the chassis, drill a small pilot hole and use a self tapping sheet metal screw. The picture that I included of the ground eyelet behind the drivers rear wheel has a self tapping screw inplace of the stud. (YES,,, I wrung it off)
When you remove the connector type ground lug, give "EACH" of the ground wires a good tug to make sure that they are properly seated in the "V" grove of the connector. These types of connectore are known to be problematic on older C5's. The GM engineer that I spoke to at Bowling Green recommended that I cut off the connector and replace it with an eyelet type of connector. I have NOT done that yet but, if those connectors give me ANY more problems, they will be REMOVED!
Bill
After you check the carpet for water, cut and clean out the AC/heater box drain and do all of the ground checks and ground lug cleaning. Please let us know
Here are some recommendations to get you back to daily driving!
First off, I believe that your BCM (Silver box located in the passengers foot well) got wet or has been wet at some time. I strongly recommend, removing the seat, and removing the passengers carpet (It comes out in about 5 minutes) and make sure that it is not wet. The water always drains to the back. The BCM controls almost all of the systems and circuits that you are having isues with. The dreded "NO COMMS" means that that module is NOT resopnding or transmitting it's State of Health message or signals to the other modules that communicate with it or it communicates with. I would remove the BCM and set it under a heat lamp for 2-3 hours and while that is drying out i would remove the carpets and make sure that they are BONE dry!
Then I would remove the AC/Heater box drain tube and cut the crimped end off of it, use a wet/dry vac to suck on the metal tube that the 90 deg rubber drain tube came off of and then reinstall it.
Nex in line for troubleshooting is checking and cleaning all of the grounds. There are 13 chassis grounds. Of those 13 grounds, there are two types of connections that connect the ground wires to the chassis. Here are pictures of the grounds and schematics where they are located.
[IMG]
[/IMG] [IMG]
[/IMG] [IMG]
[/IMG] Schematics
[IMG]
[/IMG] [IMG]
[/IMG] When you service your grounds, you need to do the following things. Spray each ground lug with WD-40 or PB Blaster and let it soak in. DO NOT be afraid to use too much!
locate and remove each ground connection. Be careful when removing the nuts on the ground lugs. If you are NOT carefull, they will wring off. If they do, dont worry! All you need to do is grind off the stud down to the chassis, drill a small pilot hole and use a self tapping sheet metal screw. The picture that I included of the ground eyelet behind the drivers rear wheel has a self tapping screw inplace of the stud. (YES,,, I wrung it off)
When you remove the connector type ground lug, give "EACH" of the ground wires a good tug to make sure that they are properly seated in the "V" grove of the connector. These types of connectore are known to be problematic on older C5's. The GM engineer that I spoke to at Bowling Green recommended that I cut off the connector and replace it with an eyelet type of connector. I have NOT done that yet but, if those connectors give me ANY more problems, they will be REMOVED!
Bill
After you check the carpet for water, cut and clean out the AC/heater box drain and do all of the ground checks and ground lug cleaning. Please let us know
Former Vendor
Joined: May 2000
Posts: 2,406
Likes: 0
From: Roseville CA
Try this, pull the panel that covers the BCM. Look to the left and you will see two connectors with gray tops. They are about 2" long. Remove the two gray covers to expose the connections. Spray a little WD 40 in the connectors, the reinstall the gray covers. There is a small clip at the top and bottom of the connector. Make sure they seat all the way.
Go through the DIC to check codes to make sure that you do not have "No Comm" codes. You may have to reseat the gray connectors.
We had this problem with No comm on several of the pcm modes. When we programmed the Magnachargers with the Superchips programmer, these are the gray connector you must by pass with the supplied star connector to program. We had a couple of problems with no communications because the gray connectors were not fully seated.
Good luck, let me know if this helps.
Terry
Corvette Stories
The Best of Corvette for Corvette Enthusiasts

Top 10 Most Expensive Corvettes Ever Sold on Bring A Trailer
Brett Foote
10 Things Every Corvette Owner Needs (2026 Edition)
Michael S. Palmer
8 Most "Only Corvette Owners Understand" Quirks and Problems
Pouria Savadkouei
10 Reasons the C6 Z06 is Still A Performance Benchmark After 20 Years
Joe Kucinski
How Much Horsepower Every Corvette Engine "LOST" in 1972
Joe Kucinski
Top 10 DOs and DON'Ts for Protecting Your Convertible Top!
Michael S. Palmer
Top 10 Most Explosive Corvettes Ever Made: Power-to-Weight Ratio Ranked!
Joe Kucinski
150 hp to 1,250 hp: Every Corvette Generation Compared by the Specs That Matter
Joe Kucinski
8 Coolest Corvette Pace Cars (and Replicas) of All Time
Verdad Gallardo
Tech Contributor
Joined: Dec 1999
Posts: 32,910
Likes: 2,402
From: Anthony TX
CI 6,7,8,9,11 Vet
St. Jude Donor '08
Terry
Good point! I examined those on mine. Thet were tight but I did not do the WD-40 corrosion prevention treatment! I might just do that as a good preventive measure.
BC
Good point! I examined those on mine. Thet were tight but I did not do the WD-40 corrosion prevention treatment! I might just do that as a good preventive measure.
BC
Thread Starter
Instructor
Joined: Apr 2003
Posts: 211
Likes: 3
From: Sarasota FL
Bill & Terry,
Thanks for your input and help.
I plan on soaking the ground points in PB Blaster tonight and removing/cleaning them tomorrow night.
I will also seperate and spray the STAR connectors with WD40.
I will remove the BCM and bring it indoors. I don't have a heating lamp. Is this something I can pick up at Home depot?
Can i seperate the BCM case to inspect the internal components?
Remember, the drivers side carpet was absolutely soaked due to heavy rains and a leaky top. I wonder if it's possible that humidity caused this problem?...
Anyway, I will remove the seats and carpet on both sides and ensure that all id dried out.
I guess the seats are 4 bolts 2F, 2R and disconnect the power connectors.
Where is the A/C drain hose located?
I'm feeling pretty confident that with help I can resolve this.
Thanks again for your help.
Safety Car


Joined: Mar 2001
Posts: 3,567
Likes: 0
From: Aurora IL
Originally Posted by Andy H
Bill & Terry,
Thanks for your input and help.
I plan on soaking the ground points in PB Blaster tonight and removing/cleaning them tomorrow night.
I will also seperate and spray the STAR connectors with WD40.
I will remove the BCM and bring it indoors. I don't have a heating lamp. Is this something I can pick up at Home depot?
Can i seperate the BCM case to inspect the internal components?
Remember, the drivers side carpet was absolutely soaked due to heavy rains and a leaky top. I wonder if it's possible that humidity caused this problem?...
Anyway, I will remove the seats and carpet on both sides and ensure that all id dried out.
I guess the seats are 4 bolts 2F, 2R and disconnect the power connectors.
Where is the A/C drain hose located?
I'm feeling pretty confident that with help I can resolve this.
Thanks again for your help.
Thanks for your input and help.
I plan on soaking the ground points in PB Blaster tonight and removing/cleaning them tomorrow night.
I will also seperate and spray the STAR connectors with WD40.
I will remove the BCM and bring it indoors. I don't have a heating lamp. Is this something I can pick up at Home depot?
Can i seperate the BCM case to inspect the internal components?
Remember, the drivers side carpet was absolutely soaked due to heavy rains and a leaky top. I wonder if it's possible that humidity caused this problem?...
Anyway, I will remove the seats and carpet on both sides and ensure that all id dried out.
I guess the seats are 4 bolts 2F, 2R and disconnect the power connectors.
Where is the A/C drain hose located?
I'm feeling pretty confident that with help I can resolve this.
Thanks again for your help.

6th Gear
Joined: Aug 2004
Posts: 6
Likes: 0
From: Mount Pearl Newfoundland
I experienced the same series of codes on my 2000 coupe. Brough it to the dealer and he linked it back to the Column Lock problem. Had the fix done on August 23 and problem has not retuned yet. I also noticed one of the failure codes you listed was associated with the steering column? Although water was involved in your case maybe that is not the real source of the problem
Pro

Joined: May 2004
Posts: 673
Likes: 1
From: Pembroke Pines Florida
Bill Curlee, for someone to go to all that effort to help someone is incredible. People like yourself is what makes forums like this work. You help with great information without insulting.
Scott
Scott
Melting Slicks

Joined: Jan 2003
Posts: 3,251
Likes: 4
I'd pull the battery again and poor a mixture of baking soda and water in the area the battery sits and on the positive and negative leads. If it bubbles the acid is leaking and your wiring harness is the problem. The plastic wire covers are impervious to acid but the wires are not. So visual inspection will not yield an answer for you. good luck.
Tech Contributor
Joined: Dec 1999
Posts: 32,910
Likes: 2,402
From: Anthony TX
CI 6,7,8,9,11 Vet
St. Jude Donor '08
Many of you have asked me for help on solving electrical problems and I thought this would be VERY interesting!
I will eventualy post this on the forum but in the mean time you get a sneak preview on what could be causing your electrical headaches.
My 98 coupe would get the infamous "REDUCED ENGINE POWER", "TRACTION CONTROL FAILURE" and a host of random failure codes. After many, many hours of troubleshooting, replacing the BCM and TAC module, I solved most of the driveability issues. Still getting the random failure codes I thought that I may be having ground issues. Back in June I cleaned ALL of the chassis grounds and the car virtually stopped throwing the "RANDOM" failure codes. Just moving the wires in the chassis ground connector was enough to change the indications and make the issues stop happening.
I had a chance to speak with some GM C5 Trouble Desk Engineers when I went to Bowling Green KY in April and they pointed out that MANY of the C5 electrical issues can be directly linked to chassis ground problems. The engineer even went as far as to recommending that I chop off the factory under hood chassis ground connectors and combine all of the wires into a single ground lug. Not wanting to just LOP off the factory connector, I took a chance and disassembled one of the ground plug connectors and to my surprise it was indeed full of corroded connections.
I strongly recommend that any C5 owner that has had or who are having electrical issues, examine and clean the chassis ground connectors. This may save you from needlessly replacing expensive electronics modules. Each connector can be disassembled and cleaned in about 20 min.
Just cleaning the ground connection between the chassis and the plug is only a bandaid solution. Now that I look back, when I cleaned my chassis grounds and solved my issues, I believe that when the connector is being removed to clean the connection between chassis and the connector, just the wires being moved inside the plug is what changed the indications and made everything work better. Disassembly of the chassis ground plug and cleaning the contacts inside the connector is the correct method of solving the issue!
I took some pictures of the underhood chassis ground connector and the corrosion that was in it. I cleaned the two connections on the frame rails and the left one was significantly corroded! Taking it apart and cleaning it is a very straight forward procedure and I believe that if you follow this recommendation, you will be on the way to solving the many of the electrical issues.
Here are some detailed pictures of the ground connector and the corrosion that was found inside it!
Picture of the underhood Chassis Ground connector
[IMG] [/IMG]
Corossion inside connector! (You aint seen nothing yet!)
[IMG]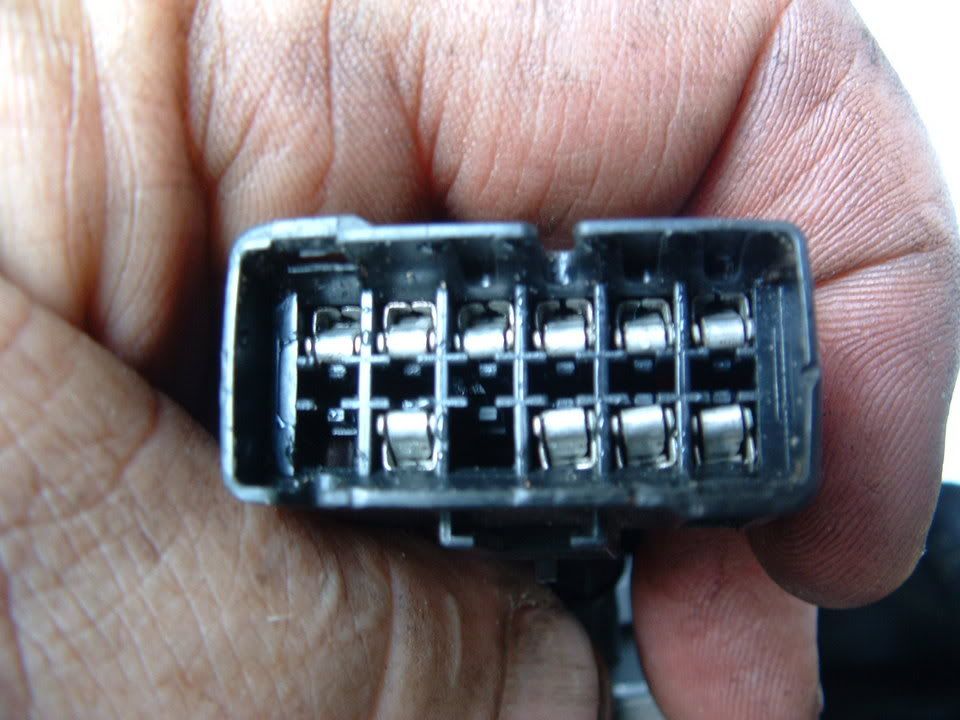 [/IMG] [IMG]
 [/IMG]
Next three photos are of the corrosion fornd on the connector terminals!
[IMG]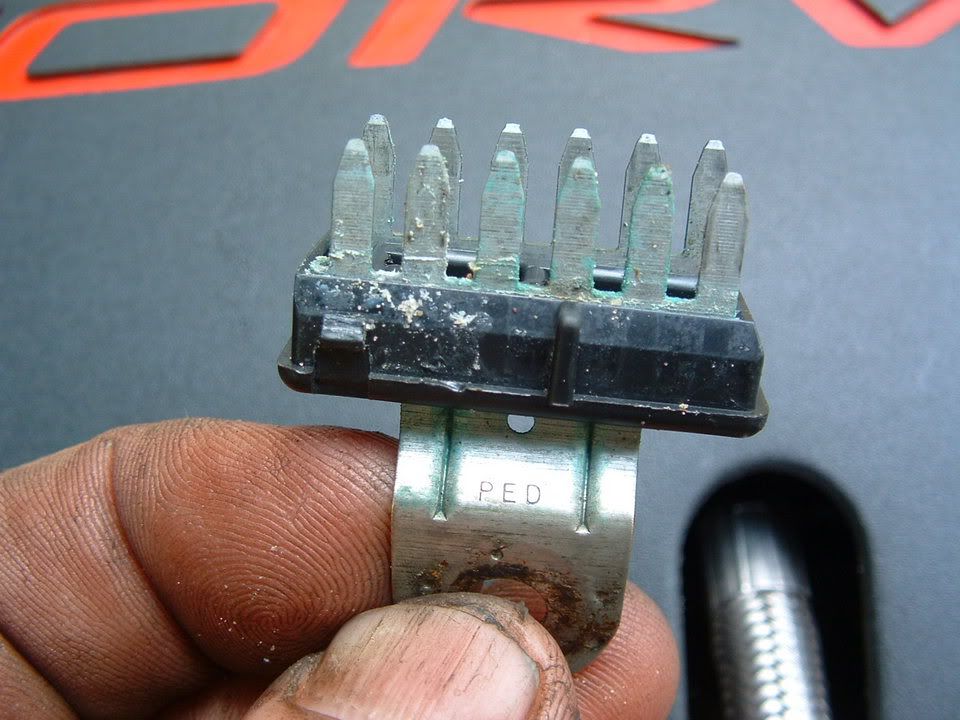 [/IMG] [IMG]
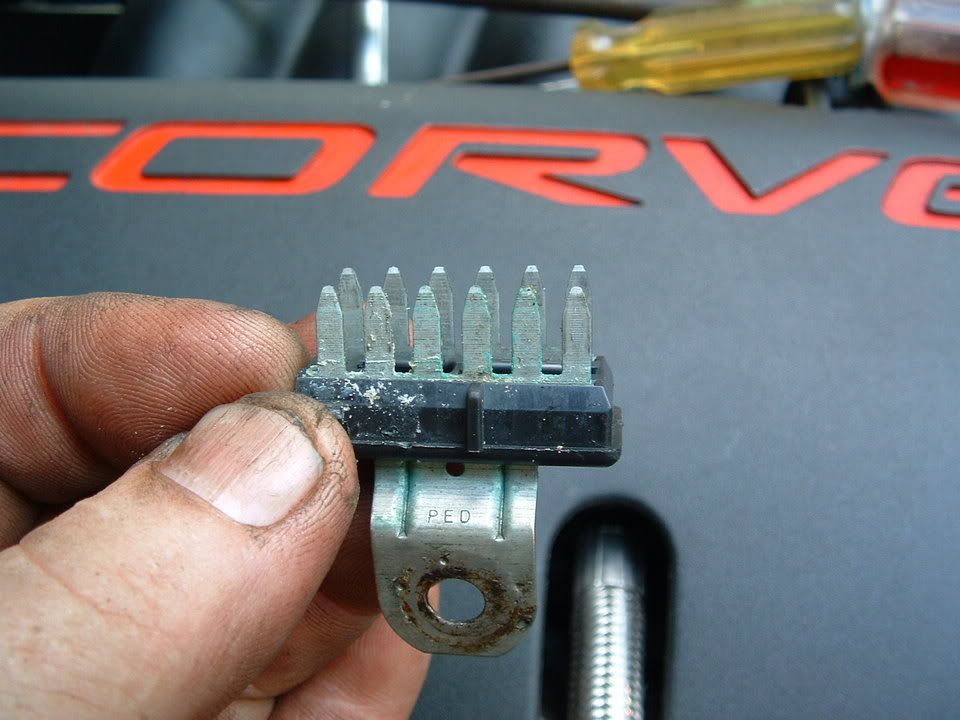 [/IMG] [IMG]
 [/IMG]
A small wire brush and contact cleaner works wonders!!
[IMG][IMG]
Self tapping ground screw and star washer. This is what you will need if the ground stud breaks off during removal!
[IMG]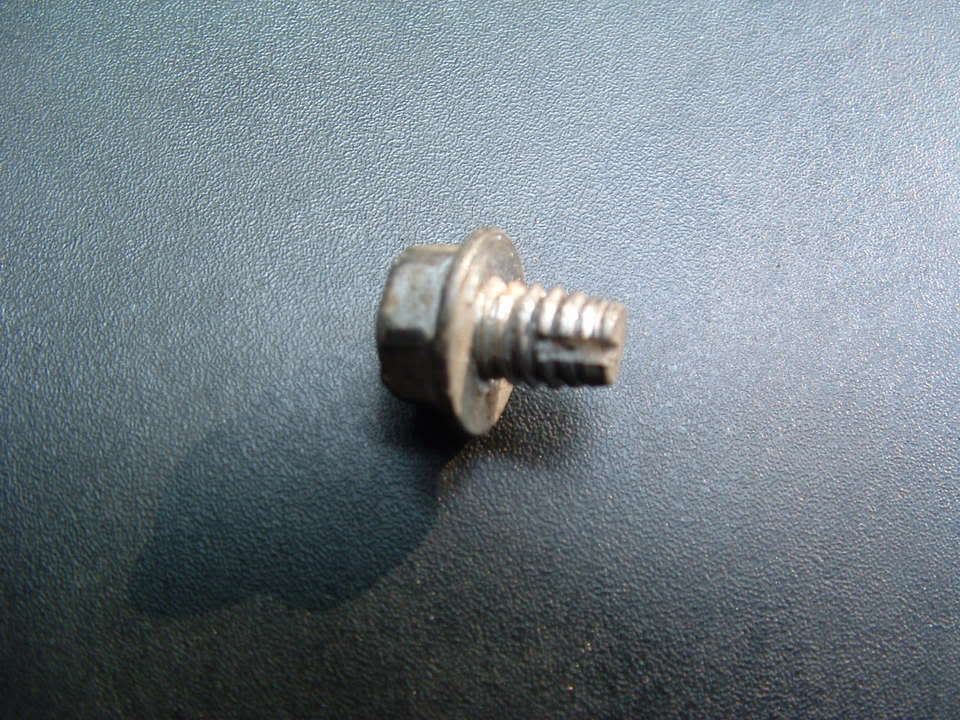 [/IMG] [IMG]
 [/IMG]
PLEASE let me know if you have any questions.
Bill Curlee
I will eventualy post this on the forum but in the mean time you get a sneak preview on what could be causing your electrical headaches.
My 98 coupe would get the infamous "REDUCED ENGINE POWER", "TRACTION CONTROL FAILURE" and a host of random failure codes. After many, many hours of troubleshooting, replacing the BCM and TAC module, I solved most of the driveability issues. Still getting the random failure codes I thought that I may be having ground issues. Back in June I cleaned ALL of the chassis grounds and the car virtually stopped throwing the "RANDOM" failure codes. Just moving the wires in the chassis ground connector was enough to change the indications and make the issues stop happening.
I had a chance to speak with some GM C5 Trouble Desk Engineers when I went to Bowling Green KY in April and they pointed out that MANY of the C5 electrical issues can be directly linked to chassis ground problems. The engineer even went as far as to recommending that I chop off the factory under hood chassis ground connectors and combine all of the wires into a single ground lug. Not wanting to just LOP off the factory connector, I took a chance and disassembled one of the ground plug connectors and to my surprise it was indeed full of corroded connections.
I strongly recommend that any C5 owner that has had or who are having electrical issues, examine and clean the chassis ground connectors. This may save you from needlessly replacing expensive electronics modules. Each connector can be disassembled and cleaned in about 20 min.
Just cleaning the ground connection between the chassis and the plug is only a bandaid solution. Now that I look back, when I cleaned my chassis grounds and solved my issues, I believe that when the connector is being removed to clean the connection between chassis and the connector, just the wires being moved inside the plug is what changed the indications and made everything work better. Disassembly of the chassis ground plug and cleaning the contacts inside the connector is the correct method of solving the issue!
I took some pictures of the underhood chassis ground connector and the corrosion that was in it. I cleaned the two connections on the frame rails and the left one was significantly corroded! Taking it apart and cleaning it is a very straight forward procedure and I believe that if you follow this recommendation, you will be on the way to solving the many of the electrical issues.
Here are some detailed pictures of the ground connector and the corrosion that was found inside it!
Picture of the underhood Chassis Ground connector
[IMG]
[/IMG] Corossion inside connector! (You aint seen nothing yet!)
[IMG]
[/IMG] [IMG][/IMG] Next three photos are of the corrosion fornd on the connector terminals!
[IMG]
[/IMG] [IMG][/IMG] [IMG][/IMG] A small wire brush and contact cleaner works wonders!!
[IMG][IMG]
Self tapping ground screw and star washer. This is what you will need if the ground stud breaks off during removal!
[IMG]
[/IMG] [IMG][/IMG] PLEASE let me know if you have any questions.
Bill Curlee
 [/IMG]