
RPI ZR1 spoiler install
 12-31-2008, 06:19 PM
#1
Instructor

Thread Starter


I thought some of you might be interested in putting or seeing the ZR1 spoiler on a 'vert. (Those of you not interested can exit now.)
I chose the ZR1 spoiler for a few reasons. First, I like the style. It has a little more character than the GM racing spoiler. I really like the CDC spoiler, and probably would've installed one of those if I had a coupe. But with the convertible, I wanted something with a little less...well, just less. I didn't want too much character to stand out when the top is down.
The price is ridiculous, but I have settled for something I really didn't want in the past because it was cheaper and lived to regret it. I considered this long and hard before I made the purchase. Once I got past the price, everything else is positive!
Then I had to decide if I wanted to drill holes in my $60k+ new car. I thought, well, if Chevy can drill holes in the $100k+ ZR1, I can drill holes in my 'vert.
So, here is a pic of what I started with:

Different angle:

Here is a pic of the spoiler, the stock CHMSL housing (can you really call that a spoiler? Maybe practically, but no way if you consider styling!), & the RPI-supplied template installed:

I rubbed crayon on the studs that will need new holes drilled:

Then I carefully test-fitted the spoiler by sliding the original CHMSL-mounting studs into their holes, and carefully rubbed the new studs against the template:

You can see where the template 'cross-hairs' are and where the holes actually need to be drilled; I don't know if this is because the template moved, the studs moved, or a combination, but this is where I drilled:

I used an awl to mark the body through the template, then removed the template and put masking tape over the marks. I used the awl again so I could see the marks better, then drilled pilot holes. I then drilled holes large enough for the studs. Last, I re-test-fitted the spoiler, again marking the tape with the crayon-tipped studs. This showed where I had to elongate three of the holes on one side:

It was a biotch getting to all of the studs to tighten the nuts. I used a 10mm deep socket and shortie ratchet for the original studs, but had to use a 10mm box-end wrench to reach the new ones (they are between the spoiler and taillight housings). But the results were well worth it:


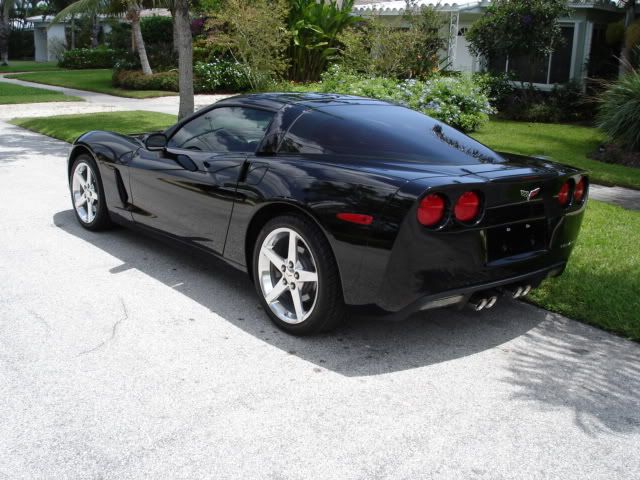
A couple shots with the top down:


I chose the ZR1 spoiler for a few reasons. First, I like the style. It has a little more character than the GM racing spoiler. I really like the CDC spoiler, and probably would've installed one of those if I had a coupe. But with the convertible, I wanted something with a little less...well, just less. I didn't want too much character to stand out when the top is down.
The price is ridiculous, but I have settled for something I really didn't want in the past because it was cheaper and lived to regret it. I considered this long and hard before I made the purchase. Once I got past the price, everything else is positive!
Then I had to decide if I wanted to drill holes in my $60k+ new car. I thought, well, if Chevy can drill holes in the $100k+ ZR1, I can drill holes in my 'vert.
So, here is a pic of what I started with:
Different angle:
Here is a pic of the spoiler, the stock CHMSL housing (can you really call that a spoiler? Maybe practically, but no way if you consider styling!), & the RPI-supplied template installed:
I rubbed crayon on the studs that will need new holes drilled:
Then I carefully test-fitted the spoiler by sliding the original CHMSL-mounting studs into their holes, and carefully rubbed the new studs against the template:
You can see where the template 'cross-hairs' are and where the holes actually need to be drilled; I don't know if this is because the template moved, the studs moved, or a combination, but this is where I drilled:
I used an awl to mark the body through the template, then removed the template and put masking tape over the marks. I used the awl again so I could see the marks better, then drilled pilot holes. I then drilled holes large enough for the studs. Last, I re-test-fitted the spoiler, again marking the tape with the crayon-tipped studs. This showed where I had to elongate three of the holes on one side:
It was a biotch getting to all of the studs to tighten the nuts. I used a 10mm deep socket and shortie ratchet for the original studs, but had to use a 10mm box-end wrench to reach the new ones (they are between the spoiler and taillight housings). But the results were well worth it:
A couple shots with the top down:
Last edited by DDuke; 12-31-2008 at 07:49 PM.


 12-31-2008, 06:52 PM
#4
Instructor
Thread Starter
 But that's a whole other thread...

 12-31-2008, 07:10 PM
#10
Safety Car

Nice job and the vert looks great with the spoiler.  The color matches really well.
Stick with the C6 Flag emblems only!!! I went with the CDC spoiler on my Coupe.
The color matches really well. Stick with the C6 Flag emblems only!!! I went with the CDC spoiler on my Coupe.
 12-31-2008, 07:35 PM
#12
Platinum Supporting Vendor

That is a great write up and your pictures are awesome!
Thanks again for the business and have a Happy New Year!
Thanks again for the business and have a Happy New Year!
 12-31-2008, 08:17 PM
#15
Le Mans Master

Member Since: Apr 2006
Location: The Beautiful Inland Empire WA.
Posts: 5,933
Likes: 0
Received 11 Likes
on
7 Posts
That spoiler just seems to compliment the lines at the rear of the car better than any other I've seen......simply beautiful -- you must be very proud!


 12-31-2008, 10:39 PM
#20
Instructor
Thread Starter
Thanks for all the compliments, guys! 
You know, when I drilled the first hole in a roof to install an aftermarket sunroof (circa early '80's), I got all nervous and flushed...I thought 'oh my God I'm gonna ruin my car!'  This time, I made an effort to not think about it. After I marked the fascia with the awl and peeled away the template, it started to register when I saw the marks, but I slapped on the masking tape and grabbed the drill before I could get nervous!
  After it was all drilled and the spoiler covered the holes, it was fine.
This time, I made an effort to not think about it. After I marked the fascia with the awl and peeled away the template, it started to register when I saw the marks, but I slapped on the masking tape and grabbed the drill before I could get nervous! After it was all drilled and the spoiler covered the holes, it was fine.