


Trick flow install underway
Melting Slicks


Joined: Mar 2008
Posts: 2,835
Likes: 5
From: Avon Park FLORIDA
St. Jude Donor '08-'09-'10
I have used a similar procedure to Spins, here is what he used and it works for me!!
Using a die grinder as opposed to a scotch bright pad and gentle back and forth motions equal to no more effort than you use to erase a pencil mark on your test paper is hardly the same thing. While I wasnt the one who did this cleaning on the motor I can tell you that I would NEVER use anythimg powered, ever. That said when I use scotch bright pads to clean a piston, I do the same proceedure; I bring the piston to be cleaned to TDC and put heavy grease around the perimeter of the piston so nothing gets in there. The deck surface is taped over the same as I did it there n the pictures. At the conclusion of the clean-up on that piston, I lower the piston into the cylinder and clean all the grease which traps 100% of the crap that would other wise get into the ring land area. I use a solvent too to soften the material as did Phil. There wasnt any effort at all in the use of the pad.
Anyone who used a die grinder for cleaning the deck surface is an idiot and I dont see why they get compared to this build which was done 100% correct. The issue at hand is the question of if Phil should have taken a precaution with material dripping down into the ring land area and I dont think its an issue for two reasons. When the carbon is removed there are no hard particles. It is essentially a dirty liquid and two, the seal of the rings to the cylinder walls isnt letting ant solid particles past it. We turned this motor so many times by hand that there is no way anything was in the ring land area.
Thread Starter
Melting Slicks

Joined: Sep 2007
Posts: 2,597
Likes: 3
From: READING PA
St. Jude Donor '08-'09-'10
I have used a similar procedure to Spins, here is what he used and it works for me!!
Using a die grinder as opposed to a scotch bright pad and gentle back and forth motions equal to no more effort than you use to erase a pencil mark on your test paper is hardly the same thing. While I wasnt the one who did this cleaning on the motor I can tell you that I would NEVER use anythimg powered, ever. That said when I use scotch bright pads to clean a piston, I do the same proceedure; I bring the piston to be cleaned to TDC and put heavy grease around the perimeter of the piston so nothing gets in there. The deck surface is taped over the same as I did it there n the pictures. At the conclusion of the clean-up on that piston, I lower the piston into the cylinder and clean all the grease which traps 100% of the crap that would other wise get into the ring land area. I use a solvent too to soften the material as did Phil. There wasnt any effort at all in the use of the pad.
Anyone who used a die grinder for cleaning the deck surface is an idiot and I dont see why they get compared to this build which was done 100% correct. The issue at hand is the question of if Phil should have taken a precaution with material dripping down into the ring land area and I dont think its an issue for two reasons. When the carbon is removed there are no hard particles. It is essentially a dirty liquid and two, the seal of the rings to the cylinder walls isnt letting ant solid particles past it. We turned this motor so many times by hand that there is no way anything was in the ring land area.
Using a die grinder as opposed to a scotch bright pad and gentle back and forth motions equal to no more effort than you use to erase a pencil mark on your test paper is hardly the same thing. While I wasnt the one who did this cleaning on the motor I can tell you that I would NEVER use anythimg powered, ever. That said when I use scotch bright pads to clean a piston, I do the same proceedure; I bring the piston to be cleaned to TDC and put heavy grease around the perimeter of the piston so nothing gets in there. The deck surface is taped over the same as I did it there n the pictures. At the conclusion of the clean-up on that piston, I lower the piston into the cylinder and clean all the grease which traps 100% of the crap that would other wise get into the ring land area. I use a solvent too to soften the material as did Phil. There wasnt any effort at all in the use of the pad.
Anyone who used a die grinder for cleaning the deck surface is an idiot and I dont see why they get compared to this build which was done 100% correct. The issue at hand is the question of if Phil should have taken a precaution with material dripping down into the ring land area and I dont think its an issue for two reasons. When the carbon is removed there are no hard particles. It is essentially a dirty liquid and two, the seal of the rings to the cylinder walls isnt letting ant solid particles past it. We turned this motor so many times by hand that there is no way anything was in the ring land area.
When you remove it juts lift it up and peal it out. Its not sticky and
is quite similar to modeling clay. Here is what it looks like now.
Tech Contributor


Joined: Jul 2002
Posts: 14,950
Likes: 264
From: St. Louis, MO
St. Jude Donor '08
Well the cleanup is about to begin. I may try the LAQUER THINNER soaked rags and put a bead of insulation putty around the piston . It wont get down into the Ring area and wont let anything else either.
When you remove it juts lift it up and peal it out. Its not sticky and
is quite similar to modeling clay. Here is what it looks like now.
When you remove it juts lift it up and peal it out. Its not sticky and
is quite similar to modeling clay. Here is what it looks like now.
With your newfound power you may find yourself leaning on your brakes...if you've ever boiled brake fluid, you know its an experience you don't want to repeat again. I grabbed a foot full of floorboard heading into a 90 degree turn at 110 once....I made it but just barely.
I learned real quick that proper brake maintenance is key. Matter of fact I have to bleed mine tonight!

Safety Car

Joined: Jun 1999
Posts: 3,570
Likes: 3
From: Austin, Singapore, Kuala Lumpur, Houston, Dallas, Hong Kong, Elgin, etc.. Texas
Well the cleanup is about to begin. I may try the LACQUER THINNER soaked rags and put a bead of insulation putty around the piston . It wont get down into the Ring area and wont let anything else either.
When you remove it juts lift it up and peal it out. Its not sticky and
is quite similar to modeling clay. Here is what it looks like now.
When you remove it juts lift it up and peal it out. Its not sticky and
is quite similar to modeling clay. Here is what it looks like now.
Before I put the heads on, I used a shop vac to suck as much of the small stuff from the cylinders, head bolt holes, and lifter valley, I wiped everything down with lacquer thinner, then oiled the cylinder walls with motor oil. Use a bright shop light with a 100 watt bulb installed so you can see if you missed anything.
Thread Starter
Melting Slicks
Joined: Sep 2007
Posts: 2,597
Likes: 3
From: READING PA
St. Jude Donor '08-'09-'10
Don't know about insulation puddy but it sounds good. I did the same trick with lacquer thinner to cleaned the piston tops of my previous 'Vette. I covered the rags with plastic to keep the lacquer thinner from evaporating. Left it over night. Removed about 90% of the stains.
Before I put the heads on, I used a shop vac to suck as much of the small stuff from the cylinders, head bolt holes, and lifter valley, I wiped everything down with lacquer thinner, then oiled the cylinder walls with motor oil. Use a bright shop light with a 100 watt bulb installed so you can see if you missed anything.
Before I put the heads on, I used a shop vac to suck as much of the small stuff from the cylinders, head bolt holes, and lifter valley, I wiped everything down with lacquer thinner, then oiled the cylinder walls with motor oil. Use a bright shop light with a 100 watt bulb installed so you can see if you missed anything.
It has no grit, does not harden and seals liquids and particulates. Very strange the bolt holes in the Head were dry. However there are 2 bolts
stuck on the old heads each one of them. I should of taken all the rockers off and I wouldn't have to fight so much with all the push rods falling out,and wind up with mechanics Fingers. " My hands are now Claws "
I also made a neat Starter Jog without going down to the starter connection. Works like A champ and will keep it there if for any reason the car dont turn over. Perfect for setting up valves. I will post a schematic on that one. I may call it startermonster. oh oh Spin might chime in I hope. LOL Leon
Thread Starter
Melting Slicks
Joined: Sep 2007
Posts: 2,597
Likes: 3
From: READING PA
St. Jude Donor '08-'09-'10
Thanks, I will take some pics of the "PUTTY INSULATION" idea. It will seal around the ring area till its time to move the piston. Then Just pull it off .
It has no grit, does not harden and seals liquids and particulates. Very strange the bolt holes in the Head were dry. However there are 2 bolts
stuck on the old heads each one of them. I should of taken all the rockers off and I wouldn't have to fight so much with all the push rods falling out,and wind up with mechanics Fingers. " My hands are now Claws "
I also made a neat Starter Jog without going down to the starter connection. Works like A champ and will keep it there if for any reason the car dont turn over. Perfect for setting up valves. I will post a schematic on that one. I may call it startermonster. oh oh Spin might chime in I hope. LOL Leon
Safety Car
Joined: Jun 1999
Posts: 3,570
Likes: 3
From: Austin, Singapore, Kuala Lumpur, Houston, Dallas, Hong Kong, Elgin, etc.. Texas
3M� Roloc� Bristle Disc are great at cleaning up the deck and cylinder head surfaces.
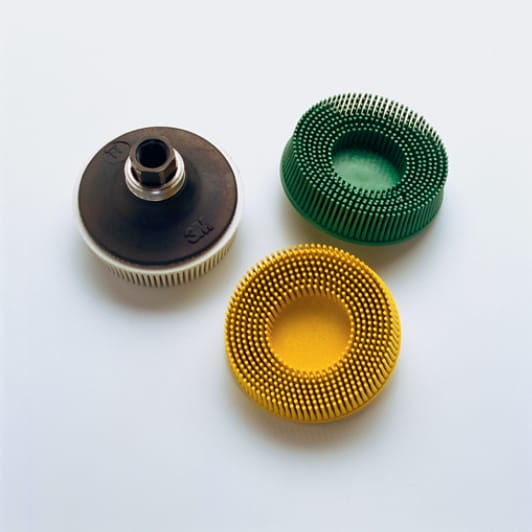
LINK TO 3M ROLOC DISC
LINK TO 3M ROLOC DISC
Corvette Stories
The Best of Corvette for Corvette Enthusiasts

Top 10 Most Explosive Corvettes Ever Made: Power-to-Weight Ratio Ranked!
Joe Kucinski
150 hp to 1,250 hp: Every Corvette Generation Compared by the Specs That Matter
Joe Kucinski
8 Coolest Corvette Pace Cars (and Replicas) of All Time
Verdad Gallardo
Top 10 Corvette Engines RANKED by Peak Torque (70+ Years of Muscle!)
Joe Kucinski
Corvette ZR1X Will Be Pacing the Indy 500, And Could Probably Race, Too!
Verdad Gallardo
Top 10 Corvettes Coming to Mecum Indy 2026!
Brett Foote
Top 10 C9 Corvette MUST-HAVES to Fix These C8 Generation Flaws!
Michael S. Palmer
10 Revolutionary 'Corvette Firsts' Most People Don't Know
Joe Kucinski
5 Reasons to Upgrade to an LS6-Powered Corvette; 5 Reasons to Stay LT2
Michael S. Palmer
Thread Starter
Melting Slicks
Joined: Sep 2007
Posts: 2,597
Likes: 3
From: READING PA
St. Jude Donor '08-'09-'10
I am using TF 225's. They come stock at 65CC and I had them cut to make the Chamber size 59Cc. It did check out well with the rather crude apparatus I used. I now have peace of mind. There is no way of knowing
without checking it. Leon
without checking it. Leon

Melting Slicks
Joined: Mar 2008
Posts: 2,835
Likes: 5
From: Avon Park FLORIDA
St. Jude Donor '08-'09-'10
Straight or angle??


Thread Starter
Melting Slicks
Joined: Sep 2007
Posts: 2,597
Likes: 3
From: READING PA
St. Jude Donor '08-'09-'10
Heads are on & torqued. Spin was right about the mismatch at the bottom. I got about a quarter inch there pics are comming tonight.
570
570

Thread Starter
Melting Slicks
Joined: Sep 2007
Posts: 2,597
Likes: 3
From: READING PA
St. Jude Donor '08-'09-'10
Well I finally got the TF HEADS on. It was a real hastle torquing the lower
bolts cause the Headers were in the way big time. My Hands are shot but
they are on.
The Pics highlight what Spin was saying particularly about the Floor which
stands out as you can see. The Port Matches are fine as is probably the
case with any Member employing TF/FAST. Its just that in most builds the
person doesn't concern themselves about ceilings & Floors. To Me I had to see it for myself and if anyone is sending A FAST out for porting what is the Porter going to open the Head side inlets to. Anyway here are the Pics.