When you click on links to various merchants on this site and make a purchase, this can result in this site earning a commission. Affiliate programs and affiliations include, but are not limited to, the eBay Partner Network.
Hi Chuck you are a great guy I changed my gas pump and found that if I move the intake manifold forward about an inch to keep it from limiting how much I can lower the cradle assembly I can just lay on top of the diff and trany to man handle the cross over tube with ease with out removing my auto trany and going true that extra mess, hope this helps someone all the best Dave.
I never thought of that.... But there's always more than one way to skin a cat!
IMO it really depends on how well the lines inside the crossover tube come apart. If they come apart normally and everything pulls right off then it's really not bad. But, if the lines inside the tube are stuck and pull out with the tube it can be a royal PITA to get them disconnected without breaking anything with the very limited space that there is to work with while the transmission is in
So, yeah, just depends. I've had it go both ways..
Oh yes......... You're right. Those parts GLUE themselves together... Just wait till you pull out a crossover tube and
the o-rings or spacers shoot across the room.... Or you pull the crossover tube and it yanks the guts
out of the tube or the tank.... and plastic parts break or go flying....
I keep 5 or 6 hose assemblies, o-rings, cross over tubes, and other parts here in bulk as we do LOTS of these
not just for superchargers but for simple repairs or leaks....etc.
ANOTHER thing for people to consider is it depends on how big or bulky you are.....
If you're a big dude, you can almost forget it with the trans in the car....
OR, you can just accept all the new ARM TATTOOS scratches, cuts, and scrapes that go along with trying to
keep the trans in the car...... 2 Hours of extra work saves lots of broken parts and cuts and scars!
Wanna know how many times I jump in a car to tune it and any one of a number of employees messed
up the job over the years...... and I gotta fix it???
It's happened more than once. From here on in, the guys take the trans out....
And I do the tank work..... Not something I like doing..... or re-doing.
Oh yes......... You're right. Those parts GLUE themselves together... Just wait till you pull out a crossover tube and the o-rings or spacers shoot across the room.... Or you pull the crossover tube and it yanks the guts out of the tube or the tank.... and plastic parts break or go flying....
I took the liberty of getting rid of all the random spaces you add to your posts
But yeah, I've pretty much had most of those happen. Once it's apart once it at least usually comes back apart easier the second time. First time I took mine off on a 10 year old car with 150K miles on it..yeah, didn't go so well.
Pretty sure you're fine, I remember trying to find an extra o-ring for an hour or so thinking I had lost one but finally accepted the lower tube must not matter as much if it leaks a little so they only used 1 o-ring
I took the liberty of getting rid of all the random spaces you add to your posts
But yeah, I've pretty much had most of those happen. Once it's apart once it at least usually comes back apart easier the second time. First time I took mine off on a 10 year old car with 150K miles on it..yeah, didn't go so well.
You removed all my spaces and "......"s ????
Man, you took all of the emotion and "feeling" out of my post.
Yes, it is a pretty smurfy job... I keep lots of extra parts around for those jobs.....
Hi, I have a 2007 corvette C6 that was receiving a P2068 code. I've watch many videos regarding replacing the sending unit in the passenger tank from YouTube. After building up the confidence I decided to do the work myself after the $1700.00 quote I received from the dealership. The question I have is I replaced the passenger sending unit, but now after driving the car I now receive a P2066 code. Has anyone heard of this? Do I need to go back and replace the driver side sending unit as well? Thanks RH
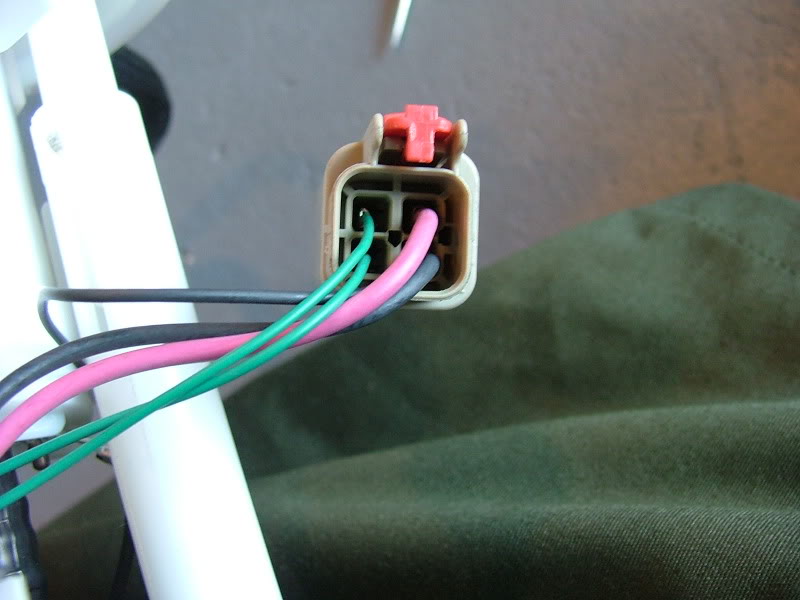
Today I tackled this daunting repair in hopes of addressing code P2068 and found this thread extremely helpful. After struggling with seized lines in the crossover pipe I finally managed to remove the passenger tank. Here are a few photos showing how to remove the sender wires from the connector.
Originally Posted by Motorhead-47
-You'll need to remove the fuel sending unit wire leads from the old connector and plug them into your new fuel pump's connector. The two smaller gauge wires on the left are the ones that have to come out. In the center of the back of that connector is a hole. Inserting a small jeweler's screwdriver allows you to release a lock which then allows the front of that wire connector shell to come off. From the front you insert that jeweler's screwdriver into the shell and release the tang holding those two wires in. The fuel sending unit wires then simply plug into the bottom of the new fuel pump connector. Double check to make sure they are secure. If not, you'll be doing this all over again for a "no gas gauge" problem.
Last edited by bjmsam; Jun 22, 2018 at 05:12 PM.
Reason: figured it out
Kudos to Motorhead-47 and others who contributed, I replaced a drivers fuel pump today in a 2011 auto and it was not as bad as it could have been. It took me and a friend around 4hrs or so on jack stands, sorry no pics of my own to add. I was lucky that the lines in the crossover to tank pulled out easy. A few details I find is a must on a auto ( Remove mid pipe and drivers side axle over, shifter must be in S for clearance to remove axle over muffler), the crossover disconnect and connect is a one hand use only while working mostly blind with the help of a friend eyes looking from the cavity where the muffler was removed ( a good location to see but to far of a reach to do anything). A few notes on the black locking tab, clockwise rotation first to release pressure on black safety locking tab when disconnecting and then release it ( view pic arrow in red, tab is recessed under tank flange and pressure forced locked by locking collar ring). On install once crossover collar is locked to tank by rotating clockwise, place black locking tab ring back and make sure it is under the wedge of the tank flange and rotate counterclockwise for the collar ring to keep pressure on the black safety tab.
I remember seeing one person try and it was a mess. Don't do it. I can't remember whether if even worked, but I remember them having to cut a lot more than they expected and it wasn't worth the trouble in the end
Just drop the tanks. I can literally have the rear drivetrain down out of the way in like 2 hours, so worst case, it isn't THAT bad to get to if it comes to that. Not worth hacking your car up over, that's for sure.
Has anyone considered cutting access panels in the hatch floor to get to fuel tank components from the top? Would it be possible?
Originally Posted by schpenxel
I remember seeing one person try and it was a mess. Don't do it. I can't remember whether if even worked, but I remember them having to cut a lot more than they expected and it wasn't worth the trouble in the end
Just drop the tanks. I can literally have the rear drivetrain down out of the way in like 2 hours, so worst case, it isn't THAT bad to get to if it comes to that. Not worth hacking your car up over, that's for sure.
I think this is the post and here is a pic of the damage.
I'm just bumping up this old thread to see if I can confirm that when the left side fuel pump is replaced under warranty, if the new left side pump comes with a new sending unit, or if they reuse the old one.
Does anyone have any good photos of the ends of the two tubes in the crossover tube itself (not the ones in the tank)? I got my tank out but it pulled the tubes out of the tank and appears to have also dislodged the ones in the crossover tube. I'm assuming there is some sort of tab arrangement inside the crossover tube that holds the ends of the tubes in it so that they line up. I'd like to see a photo of that if anyone has one.
Ok, I think I figured it out, and managed to capture a photo. There are some small fittings on the inside of the crossover tube that engage tabs on the side of the two internal hose fittings and hold the fittings into place properly. This is a photo of the crossover tube on the passenger fuel tank fitting, I suspect the one on the drivers side are the same. This should let you see the proper position of the ends of the hoses when they are engaged in the fittings in the crossover tube. Hope this helps someone.
Last edited by CSixDude; Jan 18, 2019 at 02:25 PM.
1. Disconnect the negative battery cable. Refer to Battery Negative Cable Disconnection and Connection in Engine Electrical.
2. Drain the fuel tank. Refer to Fuel Tank Draining .
3. Raise and support the vehicle. Refer to Lifting and Jacking the Vehicle in General Information.
4. Remove the left rear tire. Refer to Tire and Wheel Removal and Installation in Tires and Wheels.
5. Remove the left rear wheelhouse panel. Refer to Wheelhouse Panel Replacement in Body Rear End.
6. Remove both mufflers. (A6 only) Refer to Exhaust Muffler Replacement - Left Side and Exhaust Muffler Replacement - Right Side in Engine Exhaust.
7. Remove the driveline support assembly. (A6 only) Refer to Driveline Support Assembly Replacement in Propeller Shaft.
8. Disconnect the fuel fill hose and recirc line from the fill pipe.
9. Disconnect the fuel pump jumper harness connector.
10. Disconnect the fuel feed pipe (4) at the rear of the left fuel tank. Refer to Plastic Collar Quick Connect Fitting Service .
11. Cap the fuel pipes to prevent fuel system contamination.
12. Loosen the fuel tank strap in order to drop the tank approximately one inch.
13. Disengage the crossover tube connector position assurance (CPA) retainer by pulling the tab (1) outward and rotate.
Important: The crossover tube CPA is released when the latch disengages from the tank connection groove.
14. Rotate crossover tube collar counterclockwise to disengage.
15. Disconnect the crossover tube from the left fuel tank by pulling straight out.
Important: Take care not to disturb the internal O-rings in the fuel tank connections.
16. Disconnect the evaporative emission (EVAP) crossover pipe quick connect fitting at the left fuel tank.
17. Cap the evaporative emission (EVAP) pipe to prevent system contamination.
18. Remove the fuel tank strap mount bolts.
19. Remove the fuel tank strap from the vehicle.
20. Remove the fuel tank.
Installation Procedure
Install the fuel tank.
21. Install the fuel tank strap to the vehicle.
22. Install the fuel tank strap bolts loosely leaving the tank hanging approximately one inch.
23. Remove the cap from the EVAP pipe.
24. Connect the EVAP crossover pipe quick connect fitting at the left fuel tank.
25. Lubricate the crossover tube to fuel tank connection O-rings with GM P/N 1051717 (Canadian P/N 5728223) rubber lubricant.
Important: Note the location of the T-shaped alignment feature (5) between the jet pump feed/return pipes connector.
26. Lubricate the crossover tube O-ring mating surfaces with GM P/N 1051717 (Canadian P/N 5728223) rubber lubricant.
Important: Note the T-shaped alignment feature on the crossover tube.
Important: The crossover tube will not fully seat into the fuel tank if the jet pump lines are misaligned.
27. Connect the crossover tube to the left fuel tank using the features previously noted.
Important: The crossover tube collar tangs will not latch if misalignment exists.
28. Rotate the crossover tube collar clockwise to engage the tangs.
29. Rotate the crossover tube CPA retainer counterclockwise past the collar latching tang and push the tab (1) into the locked position.
Important: If the CPA retainer is locked into position, the crossover tube collar will not rotate.
30. Test the crossover tube to fuel tank connection by attempting to rotate the crossover tube collar counterclockwise.
Tighten the fuel tank strap bolts.
Tighten
Tighten the bolts to 25 N�m (18 lb in).
31. Remove the cap from the fuel pipes.
32. Connect the fuel feed pipe at the rear of the left fuel tank. Refer to Plastic Collar Quick Connect Fitting Service .
33. Connect the fuel pump jumper harness connector.
34. Connect the fuel fill hose and recirc line to the fill tube.
Tighten
Tighten the clamp to 4 N�m (35 lb in).
35. Install the driveline support assembly. (A6 only) Refer to Driveline Support Assembly Replacement in Propeller Shaft.
36. Install both mufflers. Refer to Exhaust Muffler Replacement - Left Side and Exhaust Muffler Replacement - Right Side in Engine Exhaust.
37. Install the left rear wheelhouse panel. Refer to Wheelhouse Panel Replacement in Body Rear End.
38. Install the Left rear tire. Refer to Tire and Wheel Removal and Installation in Tires and Wheels.
39. Lower the vehicle.
40. Refuel the fuel tank.
41. Connect the negative battery cable. Refer to Battery Negative Cable Disconnection and Connection in Engine Electrical.
42. Perform the following procedure in order to test for leaks:
Ken,
Thanks for the great post on replacing the fuel pump. It was incredibly informative and helpful. I 'm nervous I'm missing an o-ring on my crossover tube. There is a yellow o-ring on the lower tube, but no o-ring on the upper tube (see picture). Is this correct or am I missing an o-ring? I had a very hard time separating the crossover tube so maybe it fell off wrestling the crossover tube off the tank? The plastic piece that holds the fuel lines in place at the top of the gas tank broke so I ordered new in tank fuel lines that come with the broken holder piece.
My vehicle is a 2006 convertible with APS twin turbos with MDS BAP. My new fuel pump is a unit from Racetronix that is a drop in replacement, requires no BAP, and can support 800 RWH. They just came out with the new pump a month ago. I have been speaking with the manager Jack. I'm also installing their beefed up wiring harness's that run directly off the alternator.
Thank you for your input and you post!
Sincerely,
Rick Voss
Last edited by Rick Voss; Oct 2, 2019 at 11:00 AM.
Reason: Spelling
Hello Motorhead,
I have purchased a Racetronix fuel pump for my 2006 vert with APS twin turbo's. I have the tank out and have replaced the in tank lines. I'm having a very hard time trying to get the in tank lines connected to the fuel pump. I have tried your trick with the safety wire, read the factory shop manual, but still having trouble. First I tried not clipping in the fuel lines where they meet the crossover tube but kept getting snagged on fuel sending unit. Now I have clipped in the lines in the top of the tank. Was this a mistake, should have left them floating and unclipped. Still feel like I'm forcing to much and can't get my fingers on the lines. Any other suggestions?
Thanks for your help!
Rick Voss