


Wiper Door Vacuum Switch
Thread Starter
Pro


Joined: Sep 2016
Posts: 720
Likes: 205
From: Michigan
Anyone have a good picture of the proper alignment of the vacuum switch that detects that the wipers are in park before allowing the door to close?
I believe mine is on its way out, ordered a new one, and I want to make sure it aligns properly so that the plunger is pushed in enough to switch the vacuum path and allow the door to close.
There doesn't seem to be a good flat surface on the wiper arm to interface with the current switch, and it appears to be pushing it in at an angle, which may be the cause of the failure over the years.
I'd like to start the new switch off with a proper alignment, and all I see are slots in the mounting bracket that don't appear to affect the angle.
What is supposed to actually press on the switch? And shouldn't it be pressing in-line with the plunger?
Thanks!
Team Owner


Joined: Sep 2006
Posts: 31,273
Likes: 4,366
From: Westminster Maryland
Hi b,
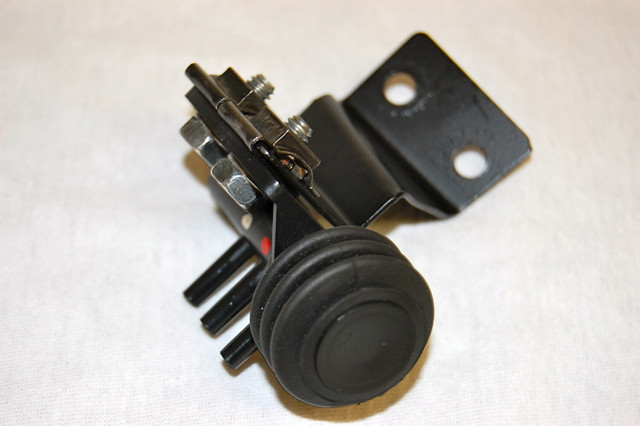
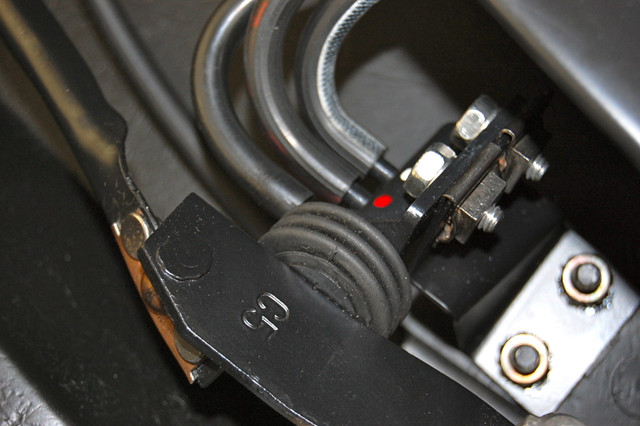
There's a short 'lever' (3") that's part of the wiper transmission that depresses the plunger on the vacuum switch when the wipers move to the park position.
The wiper arm doesn't contact the switch.
Regards,
Alan
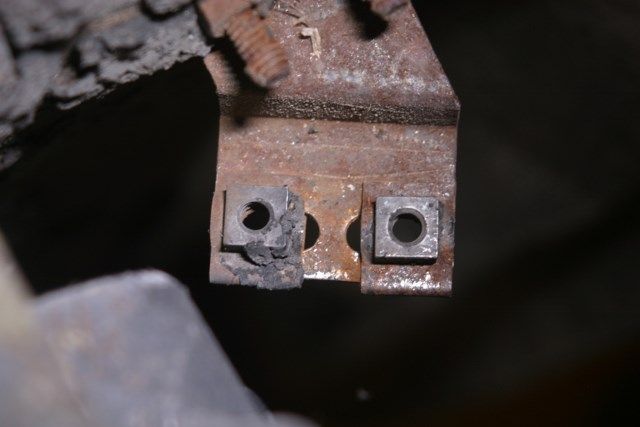
The position of the small bracket that mounts to the cowl is adjustable, as is the position of the switch on the bracket.

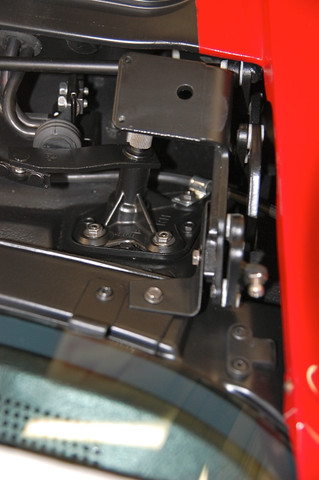
There's a short 'lever' (3") that's part of the wiper transmission that depresses the plunger on the vacuum switch when the wipers move to the park position.
The wiper arm doesn't contact the switch.
Regards,
Alan
The position of the small bracket that mounts to the cowl is adjustable, as is the position of the switch on the bracket.
Last edited by Alan 71; May 24, 2017 at 08:24 AM.
Safety Car

Joined: Oct 2007
Posts: 3,729
Likes: 267
From: Austin Texas
Corvette of the Year Winner 2017
2016 C3 of Year Finalist
the switch should be depressed all the way in but, leaving about 1/8" of switch travel.
so the switch does not bottom out when wipers are parked.
so the switch does not bottom out when wipers are parked.
Thread Starter
Pro
Joined: Sep 2016
Posts: 720
Likes: 205
From: Michigan
Thanks All, and especially Alan once again - pristine pictures of a pristine car!
It appears from your pix that the contacting part of the transmission, that 3" lever, as you call it, depresses on the switch button at a bit of an angle, no?
That's how mine is hitting also, which I thought might be a mis-adjusted situation. I can't imagine that this is good for the longevity of the valve seals inside (being cycled with an off-center force repeatedly).
Is there a good view of the parked system, sighting straight down on the lever and switch?
Mine is pretty mangled anyway, so for $30, I'll go ahead and replace it. But now I'm not convinced that is has failed yet. I need to continue root causing the vacuum issue that has recently turned into an intermittent inop of the wiper door, and then the wipers of course.
Also - the availability of replacement switches is in question. The $50 unit from Ecklers is out of stock, and the $30 from C.C. is also on backorder due to "production difficulties from the supplier". Ecklers does show availability of (what looks like) the same unit - pictured above - as what C.C. says is in delay.
Last edited by Bergerboy; May 24, 2017 at 07:27 PM.

Instructor


Joined: Feb 2013
Posts: 126
Likes: 5

Team Owner
Joined: Sep 2006
Posts: 31,273
Likes: 4,366
From: Westminster Maryland
Hi F,
Yes, there's some adjustment possible.
The small bracket that is mounted on 2 studs in the wiper bay has a little adjustment.
The point at which the valve mounts to the small bracket has quite a bit of adjustment possible. Not the 2 slots in the bracket that the captured nuts can slide in.
On my 71 the lever isn't perfectly perpendicular to the plunger but is close as the photos I posted earlier show.
Regards,
Alan
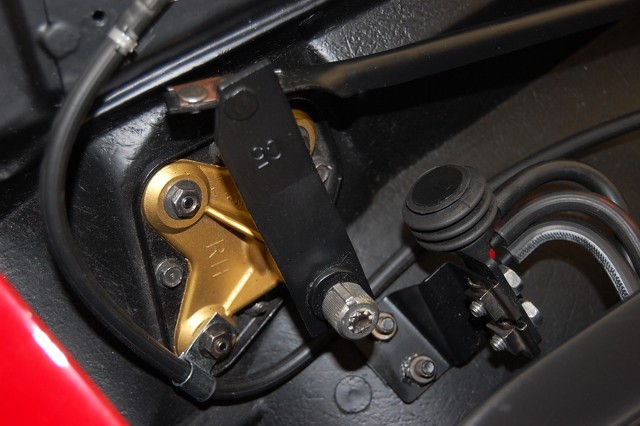
The lever is QUITE perpendicular to the travel of the plunger.
Yes, there's some adjustment possible.
The small bracket that is mounted on 2 studs in the wiper bay has a little adjustment.
The point at which the valve mounts to the small bracket has quite a bit of adjustment possible. Not the 2 slots in the bracket that the captured nuts can slide in.
On my 71 the lever isn't perfectly perpendicular to the plunger but is close as the photos I posted earlier show.
Regards,
Alan
The lever is QUITE perpendicular to the travel of the plunger.
Last edited by Alan 71; May 28, 2017 at 02:01 PM.
Drifting


Joined: Jul 2006
Posts: 1,259
Likes: 154
From: Deplorableville Nebraska
Yes, there is an adjustment. The base mount has slots rather than holes for the mounting bolts. The nuts can be hard to adjust if they're rusty. The safety valve must be adjusted up so the vacuum path is allowed to go through the valve when the plunger is depressed.

Corvette Stories
The Best of Corvette for Corvette Enthusiasts

Top 10 Most Expensive Corvettes Ever Sold on Bring A Trailer
Brett Foote
10 Things Every Corvette Owner Needs (2026 Edition)
Michael S. Palmer
8 Most "Only Corvette Owners Understand" Quirks and Problems
Pouria Savadkouei
10 Reasons the C6 Z06 is Still A Performance Benchmark After 20 Years
Joe Kucinski
How Much Horsepower Every Corvette Engine "LOST" in 1972
Joe Kucinski
Top 10 DOs and DON'Ts for Protecting Your Convertible Top!
Michael S. Palmer
Top 10 Most Explosive Corvettes Ever Made: Power-to-Weight Ratio Ranked!
Joe Kucinski
150 hp to 1,250 hp: Every Corvette Generation Compared by the Specs That Matter
Joe Kucinski
8 Coolest Corvette Pace Cars (and Replicas) of All Time
Verdad GallardoFormer Vendor
Joined: Aug 2006
Posts: 76,656
Likes: 1,853
From: Jeffersonville Indiana 812-288-7103
St. Jude Donor '08-'09-'10-'11-'12-'13-'14-'15
Anyone have a good picture of the proper alignment of the vacuum switch that detects that the wipers are in park before allowing the door to close?
I believe mine is on its way out, ordered a new one, and I want to make sure it aligns properly so that the plunger is pushed in enough to switch the vacuum path and allow the door to close.
There doesn't seem to be a good flat surface on the wiper arm to interface with the current switch, and it appears to be pushing it in at an angle, which may be the cause of the failure over the years.
I'd like to start the new switch off with a proper alignment, and all I see are slots in the mounting bracket that don't appear to affect the angle.
What is supposed to actually press on the switch? And shouldn't it be pressing in-line with the plunger?
Thanks!
I believe mine is on its way out, ordered a new one, and I want to make sure it aligns properly so that the plunger is pushed in enough to switch the vacuum path and allow the door to close.
There doesn't seem to be a good flat surface on the wiper arm to interface with the current switch, and it appears to be pushing it in at an angle, which may be the cause of the failure over the years.
I'd like to start the new switch off with a proper alignment, and all I see are slots in the mounting bracket that don't appear to affect the angle.
What is supposed to actually press on the switch? And shouldn't it be pressing in-line with the plunger?
Thanks!
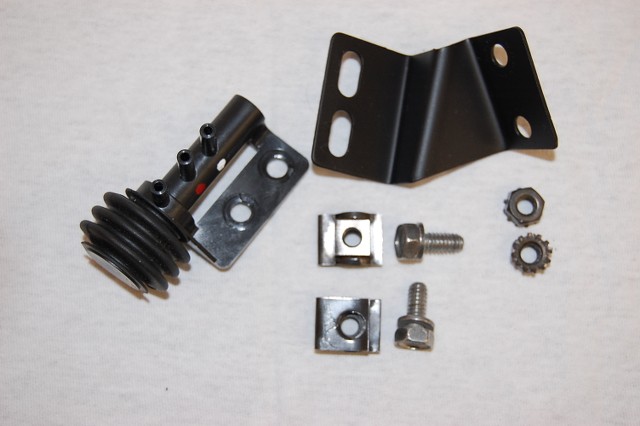
If you are buying the valve you show in the picture above.... we'll you might pass... it's imported and won't work properly. The import valves leak when the wipers are on and leak down when the system is off.
I have the US made relay in stock.
https://willcoxcorvette.com/corvette...t-really-works
69-72 Wiper Arm Vacuum Relay testing.
Team Owner

Joined: Jan 2006
Posts: 37,637
Likes: 3,118
From: Crossville TN
One of the problems with this aftermarket part is that the relative position of that switch may not be correct once it is assembled to the car. The mounting holes in the plastic flange are NOT elongated; but they may need to be elongated to assure that the switch is "made" when the wiper depresses it.
When I replaced this on my car, I found that if I just bolted it down as it came, the contact button would not be depressed enough to pass vacuum. So, I had to elongate the mounting holes with my Dremel so that the switch would work properly.
When I replaced this on my car, I found that if I just bolted it down as it came, the contact button would not be depressed enough to pass vacuum. So, I had to elongate the mounting holes with my Dremel so that the switch would work properly.
Instructor
Joined: Feb 2013
Posts: 126
Likes: 5
Man you guys are of great help, can' get any plainer than this, I do have the import valve since it has the white plunger I've tested both of the ones I have and neither holds vac, I'm going to remove the bracket and elongate the holes etc. reinstall and see what happens on the car, if doesn't work I will buy the American one for sure Thanks and Ill get back.
Team Owner
Joined: Sep 2006
Posts: 31,273
Likes: 4,366
From: Westminster Maryland
Hi f,
I hope you don't elongate the 2 holes in the switch body.
The adjustment is intended to be made in the elongated holes in the small bracket.
That's why the 2 nuts are captured on the small bracket in the way they are.
Regards,
Alan
I hope you don't elongate the 2 holes in the switch body.
The adjustment is intended to be made in the elongated holes in the small bracket.
That's why the 2 nuts are captured on the small bracket in the way they are.
Regards,
Alan
Last edited by Alan 71; May 29, 2017 at 03:54 PM.
Former Vendor
Joined: Aug 2006
Posts: 76,656
Likes: 1,853
From: Jeffersonville Indiana 812-288-7103
St. Jude Donor '08-'09-'10-'11-'12-'13-'14-'15
One of the problems with this aftermarket part is that the relative position of that switch may not be correct once it is assembled to the car. The mounting holes in the plastic flange are NOT elongated; but they may need to be elongated to assure that the switch is "made" when the wiper depresses it.
When I replaced this on my car, I found that if I just bolted it down as it came, the contact button would not be depressed enough to pass vacuum. So, I had to elongate the mounting holes with my Dremel so that the switch would work properly.
When I replaced this on my car, I found that if I just bolted it down as it came, the contact button would not be depressed enough to pass vacuum. So, I had to elongate the mounting holes with my Dremel so that the switch would work properly.
If you have the imported valve.. you can elongate until your blue in the face... the valve will not work. When the wipers are in operation the valve will leak vacuum and when the arms are parked the valve will leak down.
Last edited by Willcox Corvette; May 30, 2017 at 10:51 AM.
Team Owner
Joined: Jan 2006
Posts: 37,637
Likes: 3,118
From: Crossville TN
I didn't purchase this item from Willcox. In fact, it was purchased years ago. Maybe I didn't know how to adjust it properly, but I couldn't identify another way to reposition it relative to the wiper without elongating the holes.
Just sharing what experience I've had with that item.
Just sharing what experience I've had with that item.
Instructor
Joined: Feb 2013
Posts: 126
Likes: 5
Thanks to Alan 71,69 vet Dave with all of the info you gave after messing with this switch etc. for a month or so I got the vac. working as it should, the switch has the white button, I removed the bracket cleaned and lubricated the sliding nuts to where I could get the adjustment as needed for the switch, also elongated the holes in the switch just a bit for more adjustment with 1/8 inch before the switch bottoms out and the door works good, no vac leak down at all, I have learned a bunch about the vacuum system on these old vettes which has been a pain but very interesting, Thanks to all
Former Vendor
Joined: Aug 2006
Posts: 76,656
Likes: 1,853
From: Jeffersonville Indiana 812-288-7103
St. Jude Donor '08-'09-'10-'11-'12-'13-'14-'15
Thanks to Alan 71,69 vet Dave with all of the info you gave after messing with this switch etc. for a month or so I got the vac. working as it should, the switch has the white button, I removed the bracket cleaned and lubricated the sliding nuts to where I could get the adjustment as needed for the switch, also elongated the holes in the switch just a bit for more adjustment with 1/8 inch before the switch bottoms out and the door works good, no vac leak down at all, I have learned a bunch about the vacuum system on these old vettes which has been a pain but very interesting, Thanks to all
Please post back if you don't mind.
Willcox
Team Owner
Joined: Jan 2006
Posts: 37,637
Likes: 3,118
From: Crossville TN
Apparently, fever1 had the same results that I did...which required elongating the mounting holes regardless of 'normal' adjustment feature on the car.
These aftermarket parts are made to LOOK LIKE the original parts. There is little done by the aftermarket folks to understand the function of the part and/or to specify reasonable dimensional measurements. Worse yet is the poor quality of materials used to fabricate them; the materials used are cheap substitutes for those used with the original parts. Even if you can get the replacement parts to function properly (with some "adjustments" normally required), they don't seem to have the durability and lifespan anywhere close to the factory parts. But, this is what happens when the customers are buying primarily based on PRICE. Shame on us, too.
{Note: Re the above discussion, I am referring to the manufacturers of the aftermarket parts...not (necessarily) the vendors. The vendors are basically reacting to what the buyers want [that's US]. If we want to pay for better quality parts, we have to REJECT the cr@p and be willing to pay for better quality products.}
Last edited by 7T1vette; May 31, 2017 at 12:56 PM.
Le Mans Master

Joined: May 2006
Posts: 9,993
Likes: 1,136
From: League City Tx
Apparently, fever1 had the same results that I did...which required elongating the mounting holes regardless of 'normal' adjustment feature on the car.
These aftermarket parts are made to LOOK LIKE the original parts. There is little done by the aftermarket folks to understand the function of the part and/or to specify reasonable dimensional measurements. Worse yet is the poor quality of materials used to fabricate them; the materials used are cheap substitutes for those used with the original parts. Even if you can get the replacement parts to function properly (with some "adjustments" normally required), they don't seem to have the durability and lifespan anywhere close to the factory parts. But, this is what happens when the customers are buying primarily based on PRICE. Shame on us, too.
{Note: Re the above discussion, I am referring to the manufacturers of the aftermarket parts...not (necessarily) the vendors. The vendors are basically reacting to what the buyers want [that's US]. If we want to pay for better quality parts, we have to REJECT the cr@p and be willing to pay for better quality products.}
These aftermarket parts are made to LOOK LIKE the original parts. There is little done by the aftermarket folks to understand the function of the part and/or to specify reasonable dimensional measurements. Worse yet is the poor quality of materials used to fabricate them; the materials used are cheap substitutes for those used with the original parts. Even if you can get the replacement parts to function properly (with some "adjustments" normally required), they don't seem to have the durability and lifespan anywhere close to the factory parts. But, this is what happens when the customers are buying primarily based on PRICE. Shame on us, too.
{Note: Re the above discussion, I am referring to the manufacturers of the aftermarket parts...not (necessarily) the vendors. The vendors are basically reacting to what the buyers want [that's US]. If we want to pay for better quality parts, we have to REJECT the cr@p and be willing to pay for better quality products.}
I agree 100%... ALL of the repro switches/valves are complete junk.
A few years ago, I installed one of the "good"/"non imported" wiper switches to replace my original 44 year old switch that was leaking by...(but still worked)... I head out on a road trip, hit bad weather, and soon figure out that my new "good" switch is not working and slamming the wiper door down on the arms. I had to use the bypass pull down for the rest of the trip.
After I got home, I pulled the new "good" switch and figured out that it sticks when in the parked position. It had a crunchy spot in its travel. My dad had an old original switch off of a 69' thats been sitting for decades. I slapped it in, door works perfect..

Unfortunately I couldnt return the "good" switch because I had already had it for a year before I installed it.

I've had similar issues with the relays, one of which I still have a problem with....
Instructor
Joined: Feb 2013
Posts: 126
Likes: 5
Raise the wiper door, and stop the arms in the upward position with your center dash switch. Then pull the middle nipple hose off and put a vacuum gauge on the nipple, with the wipers open the imported valve will almost always leak vacuum. Actually I've not seen one that didn't. (unless they finally fixed the valves and if they did it would have been very recent).
Please post back if you don't mind.
Willcox
Please post back if you don't mind.
Willcox