


Flat rivets: install tool recommendations?
Thread Starter
Drifting


Joined: May 2006
Posts: 1,409
Likes: 136
From: PHOENIX, AZ Yes, it's true. You are a good woman. Then again, you may be the Antichrist.
For those of you who have installed the factory style flat rivets:
What are your recommendations for install tools? From what I've found online so far, an air chisel with a special bit and a bucking block look to be the ticket.
Ecklers has a set for about $47 shipped on ebay.
Any other suggestions? I just need to do a couple rivets to reattach some brackets in the driver's footwell. Add in the cost of the rivets, and that'll be about $60 to do half a dozen rivets.
I have an air chisel and a block of metal I could use for a bucking block. Any inventive low $ solutions, or is this one of those things you're better off biting the bullet on?
Team Owner


Joined: Sep 2006
Posts: 31,267
Likes: 4,362
From: Westminster Maryland
Hi r,
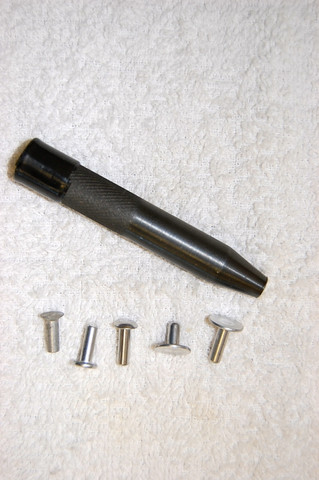
I use a rivet set tool and a hammer which is the cheap way to do it.
If you have an air source each rivet takes only a second to set.
Generally the most difficult thing to do is to find someone who can buck the head side of the rivet.
The length of the shank of the rivet is important so there's enough to form the mushroom fully, but not so much so that the shank wants to lay over to the side.
Good Luck!
Regards,
Alan
This tool has a 'dome' shaped depression machined into it's tip.
Thread Starter
Drifting
Joined: May 2006
Posts: 1,409
Likes: 136
From: PHOENIX, AZ Yes, it's true. You are a good woman. Then again, you may be the Antichrist.
Hi r,
I use a rivet set tool and a hammer which is the cheap way to do it.
If you have an air source each rivet takes only a second to set.
Generally the most difficult thing to do is to find someone who can buck the head side of the rivet.
The length of the shank of the rivet is important so there's enough to form the mushroom fully, but not so much so that the shank wants to lay over to the side.
Good Luck!
Regards,
Alan


Thanks, guys.
Rick


Race Director


Joined: Apr 2009
Posts: 19,294
Likes: 2,754
From: Charlotte NC
 This will work.
OR....you can buy the correct bit with the concave already made in it like I used when I shot rivets in the front wall and rear wall at Fruehauf Trailers. NOW...they did not care that the 'bucked' end of the rivet was compressed with a rounded look like what GM did I when making the Corvettes....because the heads of the rivets were domed...and they were more worried that the heads looked undamaged.
That way...if you have the correct concave bit...you can install the rivets GM used that have a domed head and then use a bucking bar like what Alan has shown in a photo.
I do agree...with out my air hammers...I could not do what I do ..especially when I ahve so many rivets to install on a Corvette from time to time...and even with the air hammer it can take hours of shooting and bucking the rivets.
DUB
Thread Starter
Drifting
Joined: May 2006
Posts: 1,409
Likes: 136
From: PHOENIX, AZ Yes, it's true. You are a good woman. Then again, you may be the Antichrist.
This will work. That's the direction I'm leaning. $6 for a set of 4 Harbor Freight air chisels. I have grinders and can shape one of them appropriately. OR....you can buy the correct bit with the concave already made in it like I used when I shot rivets in the front wall and rear wall at Fruehauf Trailers.
Team Owner


Joined: Jun 2001
Posts: 23,375
Likes: 1,065
From: Virginia USA
I'm sure Harbor Freight or other places have pneumatic rivet guns and rivet sets for sale. I have my A&P (aircraft mechanic) and to buck flush or flathead rivets you need what is called a flush set. It is a flat rivet set that goes in your rivet gun. Riveting properly takes a lot of practice and experience (at least when it comes to aircraft riveting). It's kind of in tune with welding. Yes, most anyone can weld two pieces of metal together but will it be strong, look good and last. Same with riveting. If it's just two or three rivets you are doing then an air hammer with a homemade set could be used. Be careful on what you use to make the set and buck the rivets. If the wrong material is used it could explode like hitting two hammers together. A trick with the bucking bars......the heavier the better.
If you are doing a lot then I suggest practicing first and get the feel for it before doing it on your car. Once you get the feel for it you can tell the rivet is sufficiently bucked by feel and sound.
Good rule of thumb:

Rivet sets

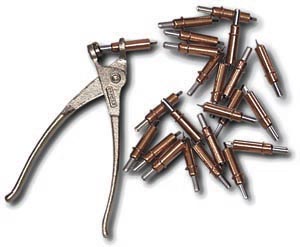
Get some cleko fasteners and pliers. Holds everything in place. There are different sizes for different hole diameters.
If you are doing a lot then I suggest practicing first and get the feel for it before doing it on your car. Once you get the feel for it you can tell the rivet is sufficiently bucked by feel and sound.
Good rule of thumb:
Rivet sets
Get some cleko fasteners and pliers. Holds everything in place. There are different sizes for different hole diameters.
Last edited by theandies; Jul 3, 2017 at 03:22 AM.
Racer

Joined: Apr 2016
Posts: 493
Likes: 65
Floor panels in a C141 or a C5 can take a few days, with 3 shifts working on them, to get done. Thousands of rivets, just like those trailers.

Corvette Stories
The Best of Corvette for Corvette Enthusiasts

Top 10 Most Expensive Corvettes Ever Sold on Bring A Trailer
Brett Foote
10 Things Every Corvette Owner Needs (2026 Edition)
Michael S. Palmer
8 Most "Only Corvette Owners Understand" Quirks and Problems
Pouria Savadkouei
10 Reasons the C6 Z06 is Still A Performance Benchmark After 20 Years
Joe Kucinski
How Much Horsepower Every Corvette Engine "LOST" in 1972
Joe Kucinski
Top 10 DOs and DON'Ts for Protecting Your Convertible Top!
Michael S. Palmer
Top 10 Most Explosive Corvettes Ever Made: Power-to-Weight Ratio Ranked!
Joe Kucinski
150 hp to 1,250 hp: Every Corvette Generation Compared by the Specs That Matter
Joe Kucinski
8 Coolest Corvette Pace Cars (and Replicas) of All Time
Verdad Gallardo
Thread Starter
Drifting
Joined: May 2006
Posts: 1,409
Likes: 136
From: PHOENIX, AZ Yes, it's true. You are a good woman. Then again, you may be the Antichrist.
Race Director
Joined: Apr 2009
Posts: 19,294
Likes: 2,754
From: Charlotte NC
DUB
Race Director
Joined: Apr 2009
Posts: 19,294
Likes: 2,754
From: Charlotte NC
All I can add is this.....DEPENDING on your air hammer....going in and pulling on the trigger all the way MAY NOT be a GOOD idea. What I do is slowly throttle mine from a slow cadence where it seems that the air hammer is doing nothing...and then pull the trigger to increase the cadence and force to get the rivet to smash correctly...BECAUSE what this does is allow me to STAY in control of the air hammer and not let it beat the living crap out of me or the body or the rivet. From start to finish on a rivet ...a full second in most cases. And that full second is the time I am increasing the trigger pull.
Try it out and see for yourself. BECAUSE the new guys that transferred in my area at the plant I worked at went to try to do what I was doing...were actually allowing the rivet set tool to damage the aluminum panels because they had not learned the air hammers that we had that were SERIOUS air hammers that had a punch like a heavy weight fighter.
DUB
Race Director
Joined: Apr 2009
Posts: 19,294
Likes: 2,754
From: Charlotte NC
DUB
Thread Starter
Drifting
Joined: May 2006
Posts: 1,409
Likes: 136
From: PHOENIX, AZ Yes, it's true. You are a good woman. Then again, you may be the Antichrist.
All I can add is this.....DEPENDING on your air hammer....going in and pulling on the trigger all the way MAY NOT be a GOOD idea. What I do is slowly throttle mine from a slow cadence where it seems that the air hammer is doing nothing...and then pull the trigger to increase the cadence and force to get the rivet to smash correctly...BECAUSE what this does is allow me to STAY in control of the air hammer and not let it beat the living crap out of me or the body or the rivet. From start to finish on a rivet ...a full second in most cases. And that full second is the time I am increasing the trigger pull.
Try it out and see for yourself.
DUB
Try it out and see for yourself.
DUB
Rick
Team Owner
Joined: Jun 2001
Posts: 23,375
Likes: 1,065
From: Virginia USA
Riveting technique is as Dub explained and a good rivet gun has a trigger that will control the air and speed. That is why I personally would not use an air chisel. At least my air chisel's trigger is all on or all off and I would not use it to rivet. Start slow so the set doesn't jump off the rivet and cause what we called a smiley face.
Team Owner

Joined: Jan 2006
Posts: 37,637
Likes: 3,118
From: Crossville TN
Just "mushrooming" the head on a rivet does NOT a finished rivet make!
The strength in a riveted joint is in the FILLING OF THE HOLE IN WHICH IT IS PLACED. The shank of the rivet must compress and then get squeezed out to completely fill the hole....THEN the head must be formed.
If you just put a head on the end, the joint will be very weak and not get the job done nearly as well as the original assembly.
I've described and discussed this MANY time on this Forum...and the same folks give their spiel over and over again about 'bucking the head of the rivet'. Buck all you want... It isn't a riveted joint until the rivet material fills the hole.
Last edited by 7T1vette; Jul 4, 2017 at 12:02 AM.
Thread Starter
Drifting
Joined: May 2006
Posts: 1,409
Likes: 136
From: PHOENIX, AZ Yes, it's true. You are a good woman. Then again, you may be the Antichrist.
Thanks to all for your input.
I'm just going to be reattaching a couple brackets and the dimmer switch pedal. Nothing structural that I'd be worried about failing. I have a pop riveter and considered using that, but I'd like to reinstall the stock style rivets...just a preference.
I'll be trying out the air chisel method and see how that goes. If I'm not satisfied, I'll drill them out and break out the pop riveter.
Race Director
Joined: Apr 2009
Posts: 19,294
Likes: 2,754
From: Charlotte NC
Team Owner
Joined: Jun 2001
Posts: 23,375
Likes: 1,065
From: Virginia USA
Just "mushrooming" the head on a rivet does NOT a finished rivet make!
The strength in a riveted joint is in the FILLING OF THE HOLE IN WHICH IT IS PLACED. The shank of the rivet must compress and then get squeezed out to completely fill the hole....THEN the head must be formed.
If you just put a head on the end, the joint will be very weak and not get the job done nearly as well as the original assembly.
I've described and discussed this MANY time on this Forum...and the same folks give their spiel over and over again about 'bucking the head of the rivet'. Buck all you want... It isn't a riveted joint until the rivet material fills the hole.
The strength in a riveted joint is in the FILLING OF THE HOLE IN WHICH IT IS PLACED. The shank of the rivet must compress and then get squeezed out to completely fill the hole....THEN the head must be formed.
If you just put a head on the end, the joint will be very weak and not get the job done nearly as well as the original assembly.
I've described and discussed this MANY time on this Forum...and the same folks give their spiel over and over again about 'bucking the head of the rivet'. Buck all you want... It isn't a riveted joint until the rivet material fills the hole.
BTW you don't buck the head, you buck the shank.
Race Director
Joined: Apr 2009
Posts: 19,294
Likes: 2,754
From: Charlotte NC
Thanks to all for your input.
I'm just going to be reattaching a couple brackets and the dimmer switch pedal. Nothing structural that I'd be worried about failing. I have a pop riveter and considered using that, but I'd like to reinstall the stock style rivets...just a preference.
I'll be trying out the air chisel method and see how that goes. If I'm not satisfied, I'll drill them out and break out the pop riveter.
I'm just going to be reattaching a couple brackets and the dimmer switch pedal. Nothing structural that I'd be worried about failing. I have a pop riveter and considered using that, but I'd like to reinstall the stock style rivets...just a preference.
I'll be trying out the air chisel method and see how that goes. If I'm not satisfied, I'll drill them out and break out the pop riveter.
Using 'pop' rivets would work here. But I also can appreciate your wiliness to try to put it back like it was built....and increase your abilities at the same time and do something different.DUB