


PSlow's '72 Restomod Project
Thread Starter
Burning Brakes

Joined: Sep 2017
Posts: 1,219
Likes: 365
From: Tolland CT
I never paint anything that I am able to powder coat; it is much better and faster to coat than paint.
Thread Starter
Burning Brakes
Joined: Sep 2017
Posts: 1,219
Likes: 365
From: Tolland CT
Thanks! The plan is to continue with my OCD....err, attention to detail like this until the car is done. That may take some time given how slow I have to work and how I really can't leave anything half done but hopefully the end results will be worth it.
Melting Slicks


Joined: Dec 2000
Posts: 3,363
Likes: 303
From: Lansdale 19446 PA
2024 C3 of the Year Finalist- Unmodified
St. Jude Donor '10-'11, '15, '19
Great work you are doing and thanks for taking the time to post your progress. Great therapy for those hands and wrists!
I have been powder coating for almost 20 years and yes - I started out with the Harbor Freight gun. Moved to a much better gun quickly! Picked up an oven cheap from someone remodeling their kitchen.
I would like information on your powder coating booth. You must have a fan in the back to draw the powder through the filter. MELIKES!!!
Great work PS
John
Last edited by Go Vette Go; Jan 4, 2018 at 04:13 PM.
Thread Starter
Burning Brakes
Joined: Sep 2017
Posts: 1,219
Likes: 365
From: Tolland CT
Well, it has warmed up to a balmy 20 degrees outside (and in my shop) so I did some work today. We just got 12" of snow so I took advantage of my two teenagers being home from school and had them help me remove the hood.
I spent some time trying to get those damn headlights out...separate thread coming.
After that I started draining fluids and removing what I could to begin preparing for the engine removal.
Thanks John. It is really nice being able to powder coat your own stuff, isn't it?
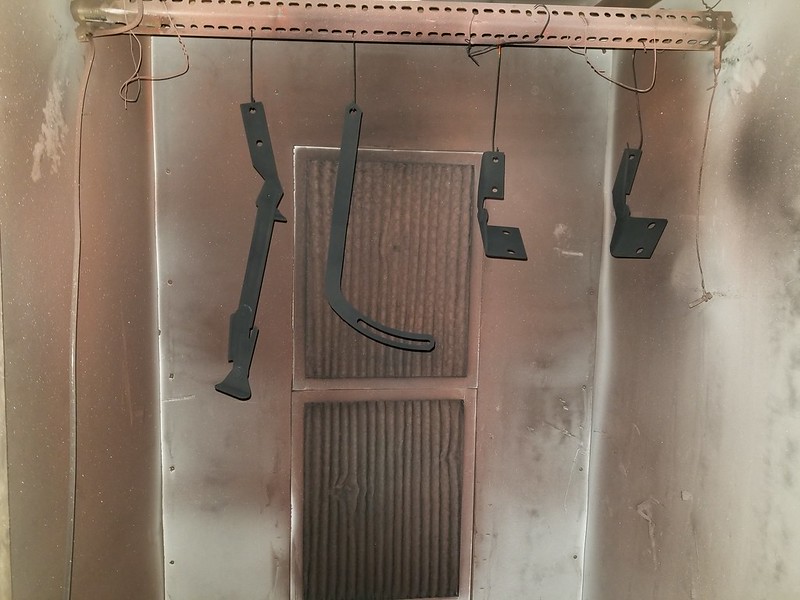
I will try to get some pictures of my booth later but it is basically a 6' tall x 4' wide x 4' deep cabinet, open at one end. The inside walls are made from thin melamine so that it is very smooth and easy to clean. The powder doesn't stick much to it, and it wipes clean with a rag.
In the back I cut out space for two house filters and in the framing built a plenum from the filters to a 12" exhaust outlet. I power the exhaust with a 2300 CFM exhaust fan and hose. The good news is that the filters do a fantastic job capturing the powder so you do not even need to vent this outdoors. Just turn the fan on and let the filters capture the errant powder.
This is all I have right now for a picture of the booth.
This is the exhaust fan that I use
I spent some time trying to get those damn headlights out...separate thread coming.
After that I started draining fluids and removing what I could to begin preparing for the engine removal.
You are moving along a ton faster then I am!! With it 40 in the shop and the mid 50's in the garage, the family room is more comfortable.
Great work you are doing and thanks for taking the time to post your progress. Great therapy for those hands and wrists!
I have been powder coating for almost 20 years and yes - I started out with the Harbor Freight gun. Moved to a much better gun quickly! Picked up an oven cheap from someone remodeling their kitchen.
I would like information on your powder coating booth. You must have a fan in the back to draw the powder through the filter. MELIKES!!!
Great work PS
John
I will try to get some pictures of my booth later but it is basically a 6' tall x 4' wide x 4' deep cabinet, open at one end. The inside walls are made from thin melamine so that it is very smooth and easy to clean. The powder doesn't stick much to it, and it wipes clean with a rag.
In the back I cut out space for two house filters and in the framing built a plenum from the filters to a 12" exhaust outlet. I power the exhaust with a 2300 CFM exhaust fan and hose. The good news is that the filters do a fantastic job capturing the powder so you do not even need to vent this outdoors. Just turn the fan on and let the filters capture the errant powder.
This is all I have right now for a picture of the booth.
This is the exhaust fan that I use
Last edited by PainfullySlow; Jan 4, 2018 at 07:46 PM.
Melting Slicks
Joined: Dec 2000
Posts: 3,363
Likes: 303
From: Lansdale 19446 PA
2024 C3 of the Year Finalist- Unmodified
St. Jude Donor '10-'11, '15, '19
Well, it has warmed up to a balmy 20 degrees outside (and in my shop) so I did some work today. We just got 12" of snow so I took advantage of my two teenagers and had them help me remove the hood.
I spent some time trying to get those damn headlights out...separate thread coming.
After that I started draining fluids and removing what I could to begin preparing for the engine removal.
Thanks John. It is really nice being able to powder coat your own stuff, isn't it?
I will try to get some pictures of my booth later but it is basically a 6' tall x 4' wide x 4' deep cabinet, open at one end. The inside walls are made from thin melamine so that it is very smooth and easy to clean. The powder doesn't stick much to it, and it wipes clean with a rag.
In the back I cut out space for two house filters and in the framing built a plenum from the filters to a 12" exhaust outlet. I power the exhaust with a 2300 CFM exhaust fan and hose. The good news is that the filters do a fantastic job capturing the powder so you do not even need to vent this outdoors. Just turn the fan on and let the filters capture the errant powder.
I don't have a ton of room but I can easily fabricate a "paint" booth from what I see. Appreciate the sharing. I think I have a 4 x 8 sheet of the melamine in the garage out back. Man, you just added to my To Do list! LOL
I got into doing my own powder coating after I disassembled the front suspension on my 76. I painted the control arms and cross shafts. Looked great - for a year or so and started looking dull. Tore it apart again, blasted all the parts again but this time I powder coated the parts - they still look great today - just wipe them clean!!
John
Last edited by Go Vette Go; Jan 4, 2018 at 06:17 PM.
Thread Starter
Burning Brakes
Joined: Sep 2017
Posts: 1,219
Likes: 365
From: Tolland CT
Of all the things I have learned over the last 20 years - doing my own powder coating has given me the greatest satisfaction. It was easier to do before my wife retired!!! She doesn't like the smell that occasionally got inside!!! OH NO!!!! LOL
I don't have a ton of room but I can easily fabricate a "paint" booth from what I see. Appreciate the sharing. I think I have a 4 x 8 sheet of the melamine in the garage out back. Man, you just added to my To Do list! LOL
I got into doing my own powder coating after I disassembled the front suspension on my 76. I painted the control arms and cross shafts. Looked great - for a year or so and started looking dull. Tore it apart again, blasted all the parts again but this time I powder coated the parts - they still look great today - just wipe them clean!!
John
In other news, I just ordered my complete suspension package

Thread Starter
Burning Brakes
Joined: Sep 2017
Posts: 1,219
Likes: 365
From: Tolland CT
I didn't get a lot done today :-(
I spent the first half of my day sitting in a waiting room for my orthopedic surgeon...
It looks like I am going to have surgery #5 later this month on my left wrist which will likely put me out of commission for a while. Not happy.
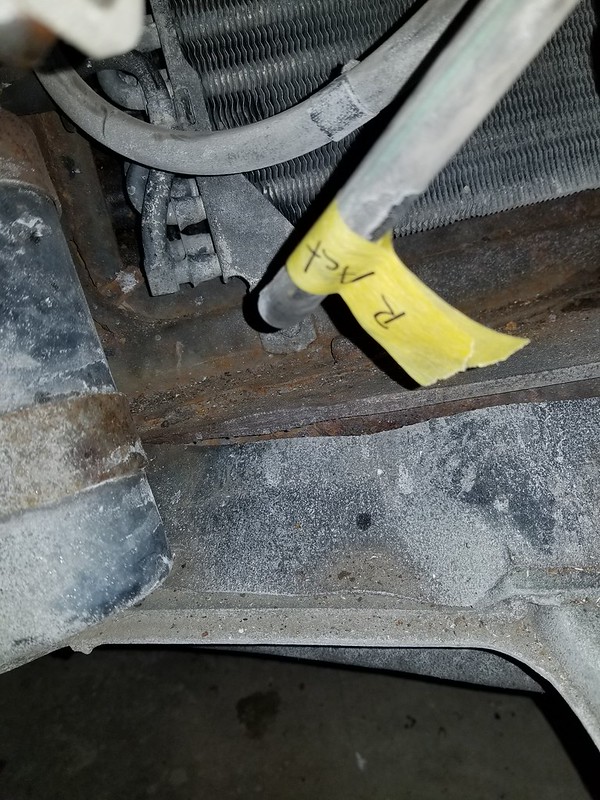
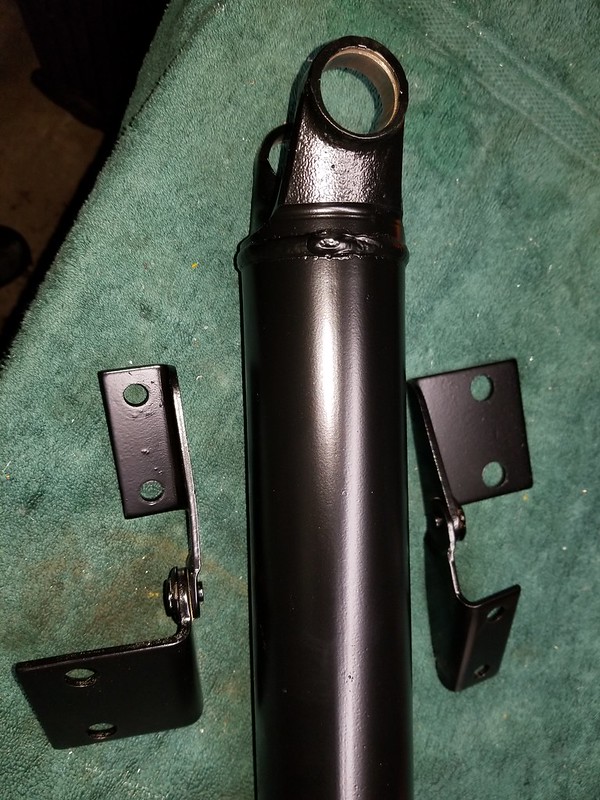
Anyway, the part du jour to be reconditioned is the driveshaft that came with my T56 conversion, mostly because it was in my way and also because I can do it quickly which is important when it is 7 degrees in my shop where my blasting cabinet is.
The first step was to remove the old u-joints
I accomplished this using the 'clamp and socket' method described in the following video. Worked like a charm!
The driveshaft had some surface rust but was otherwise in good shape so it was off to the blast cabinet. (brrr)
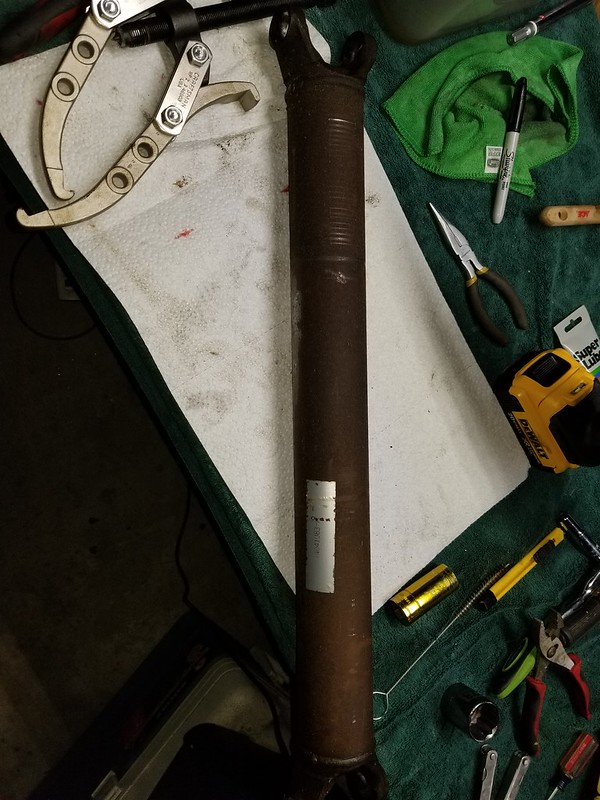
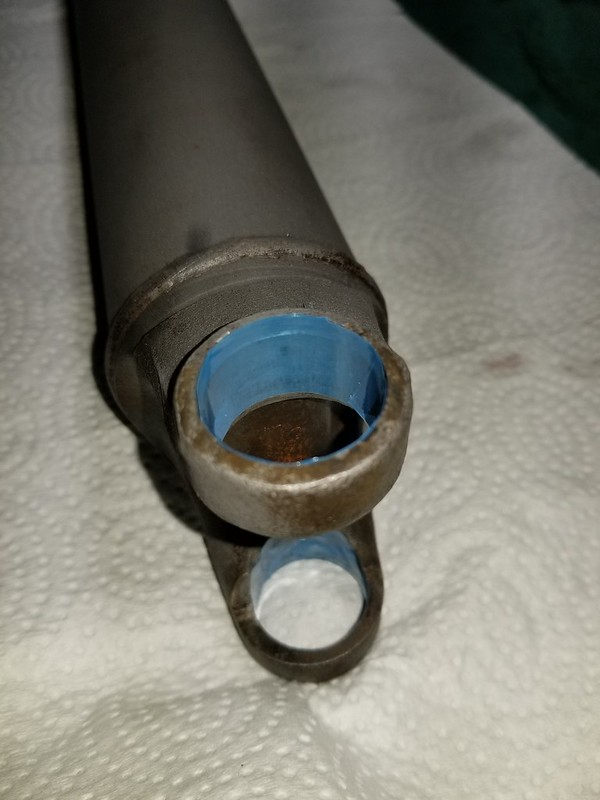
I didn't want to risk blasting the surface where the u-joints go so I did the ends with a dremel and wire wheel just to be safe. That done, it was time for the 'after blast' treatment with zinc phosphate (I abhor rust!).
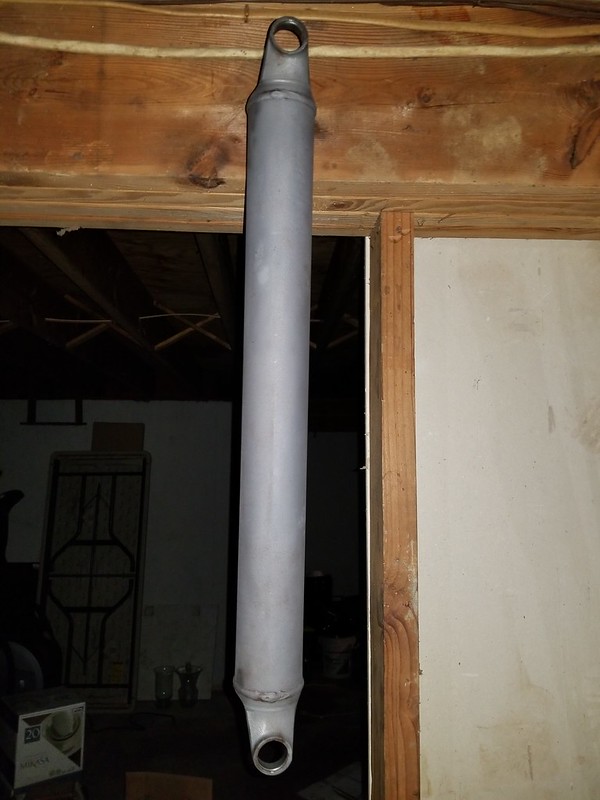
Finally I masked off the areas where I did not want to get powder.
It is too damn cold to spend any more time in my garage today so I will wait until tomorrow to do the actual powder coating. The good news is that this cold snap is supposed to end on Monday where it will be an absolutely tropical 36 degrees! It sounds cold until you realize it is a full 30 degrees warmer than today.
In other news, it is still Xmas here as parts arrive daily. Even though I will not need them for some time I took advantage of the crazy year-end sale taking place at Crutchfield and purchased the head unit, speakers, amp, and subwoofer that I will be using. It was too good of a deal to pass up!
More tomorrow!
I spent the first half of my day sitting in a waiting room for my orthopedic surgeon...
It looks like I am going to have surgery #5 later this month on my left wrist which will likely put me out of commission for a while. Not happy.
Anyway, the part du jour to be reconditioned is the driveshaft that came with my T56 conversion, mostly because it was in my way and also because I can do it quickly which is important when it is 7 degrees in my shop where my blasting cabinet is.
The first step was to remove the old u-joints
I accomplished this using the 'clamp and socket' method described in the following video. Worked like a charm!
The driveshaft had some surface rust but was otherwise in good shape so it was off to the blast cabinet. (brrr)
I didn't want to risk blasting the surface where the u-joints go so I did the ends with a dremel and wire wheel just to be safe. That done, it was time for the 'after blast' treatment with zinc phosphate (I abhor rust!).
Finally I masked off the areas where I did not want to get powder.
It is too damn cold to spend any more time in my garage today so I will wait until tomorrow to do the actual powder coating. The good news is that this cold snap is supposed to end on Monday where it will be an absolutely tropical 36 degrees! It sounds cold until you realize it is a full 30 degrees warmer than today.
In other news, it is still Xmas here as parts arrive daily. Even though I will not need them for some time I took advantage of the crazy year-end sale taking place at Crutchfield and purchased the head unit, speakers, amp, and subwoofer that I will be using. It was too good of a deal to pass up!
More tomorrow!
Corvette Stories
The Best of Corvette for Corvette Enthusiasts

Every 2027 Corvette Engine Explained
Joe Kucinski
Designer Imagines A Corvette That Looks More Like a Corvette Than the Corvette
Verdad Gallardo
10 Ugly Corvettes That We Still Kinda Love
Joe Kucinski
Top 10 Most Expensive Corvettes Ever Sold on Bring A Trailer
Brett Foote
10 Things Every Corvette Owner Needs (2026 Edition)
Michael S. Palmer
8 Most "Only Corvette Owners Understand" Quirks and Problems
Pouria Savadkouei
10 Reasons the C6 Z06 is Still A Performance Benchmark After 20 Years
Joe Kucinski
How Much Horsepower Every Corvette Engine "LOST" in 1972
Joe Kucinski
Top 10 DOs and DON'Ts for Protecting Your Convertible Top!
Michael S. PalmerLe Mans Master


Joined: Nov 2016
Posts: 9,268
Likes: 951
From: Lake Tahoe, CA
I didn't get a lot done today :-(
I spent the first half of my day sitting in a waiting room for my orthopedic surgeon...
It looks like I am going to have surgery #5 later this month on my left wrist which will likely put me out of commission for a while. Not happy.
Anyway, the part du jour to be reconditioned is the driveshaft that came with my T56 conversion, mostly because it was in my way and also because I can do it quickly which is important when it is 7 degrees in my shop where my blasting cabinet is.
The first step was to remove the old u-joints
I accomplished this using the 'clamp and socket' method described in the following video. Worked like a charm!
https://www.youtube.com/watch?v=LJLuzkJ4X20
The driveshaft had some surface rust but was otherwise in good shape so it was off to the blast cabinet. (brrr)
I didn't want to risk blasting the surface where the u-joints go so I did the ends with a dremel and wire wheel just to be safe. That done, it was time for the 'after blast' treatment with zinc phosphate (I abhor rust!).
Finally I masked off the areas where I did not want to get powder.
It is too damn cold to spend any more time in my garage today so I will wait until tomorrow to do the actual powder coating. The good news is that this cold snap is supposed to end on Monday where it will be an absolutely tropical 36 degrees! It sounds cold until you realize it is a full 30 degrees warmer than today.
In other news, it is still Xmas here as parts arrive daily. Even though I will not need them for some time I took advantage of the crazy year-end sale taking place at Crutchfield and purchased the head unit, speakers, amp, and subwoofer that I will be using. It was too good of a deal to pass up!
More tomorrow!
We don't have to look far to see someone in a more unfavorable place than we are sometimes. Your work is outstanding and I look forward to seeing more down the road.
Hang in there.

Thread Starter
Burning Brakes
Joined: Sep 2017
Posts: 1,219
Likes: 365
From: Tolland CT
Gotta celebrate the little things that make you happy.
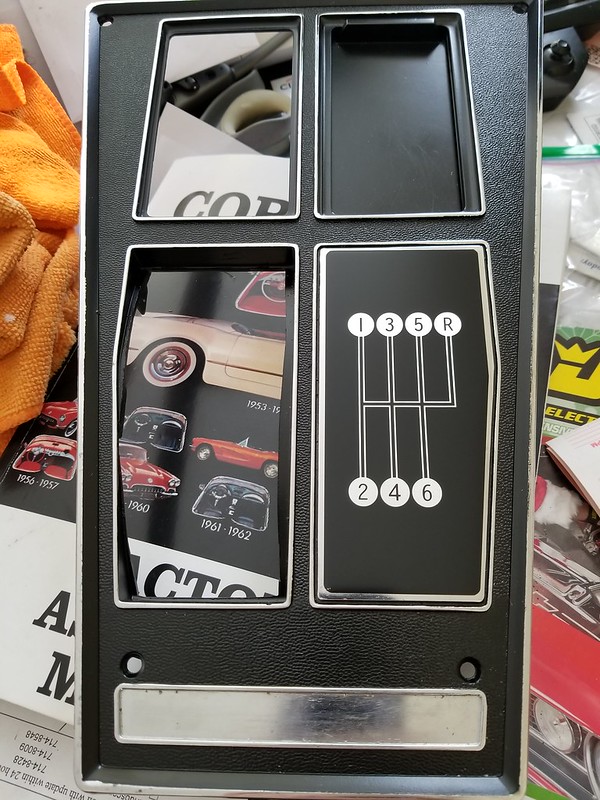
Thank's to our friends at Silver Sport Transmissions I was able to get the 6sp T-56 shift pattern. Now I just need my boot and engine plate from Willcox and I can mark this as 'done'.
So very true. It is difficult at times to maintain perspective; I have lost so much of my former life but I do have to remind myself (and get friendly reminders from fine folks like you) that things are worse for others. I have a friend of mine who lost his leg below the knee while racing this past year so yeah, it can be worse.
Last edited by PainfullySlow; Jan 6, 2018 at 02:26 PM.


Thread Starter
Burning Brakes
Joined: Sep 2017
Posts: 1,219
Likes: 365
From: Tolland CT
Normally my work on vehicles is high performance modern motorcycles so all of this work is new to me.
I do have to say that it is therapeutic to remove 47 years of rust and crud from these parts. In other news: I have probably spent more time at my blast cabinet in the past month than I have in the past 5 years.
The non-therapeutic part is tools. I am used to having every tool that I need on hand but since everything is SAE I have had to make numerous tool purchases in the recent past.
Anyway, took a bunch of random parts that needed blasting and took care of it since it warmed up to a whopping 18 degrees today. That doesn't sound very warm until you realize it is an 18 degree improvement :-p. I can work in that temp.
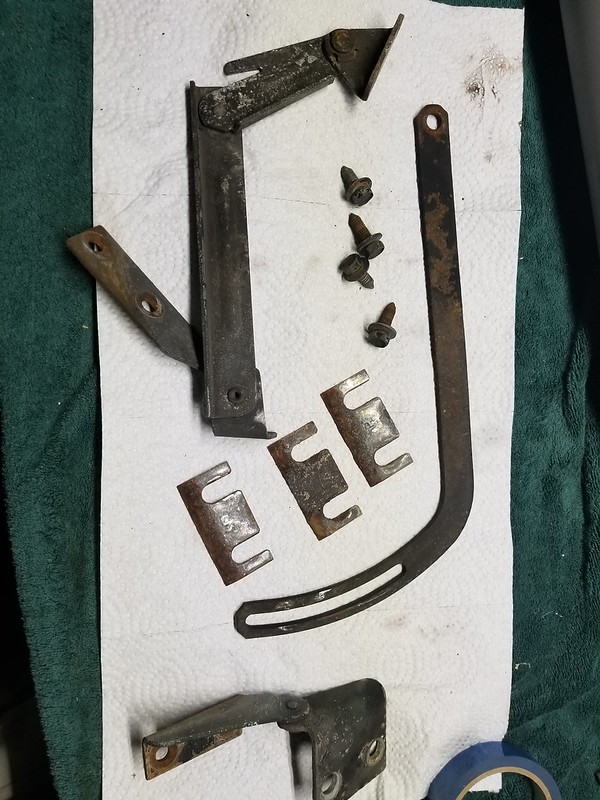
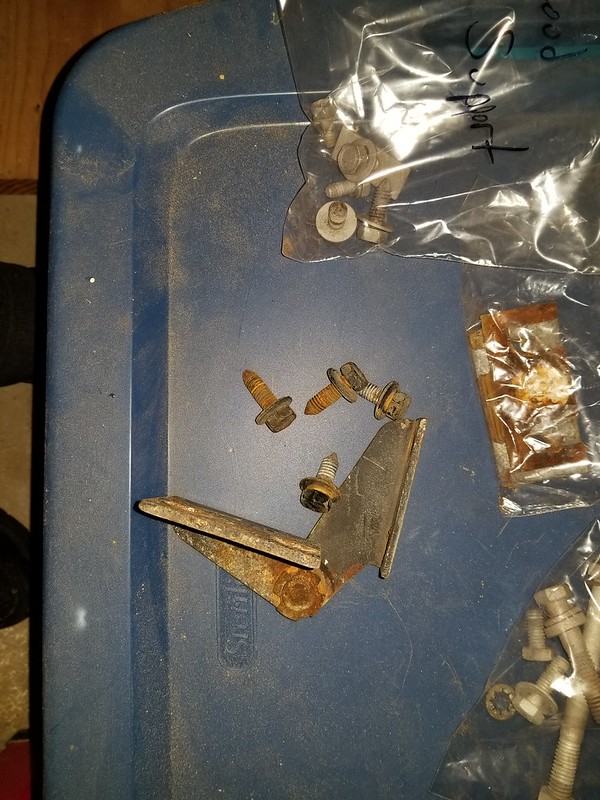
When I said in the beginning that I would leave no bolt un-touched, I meant it.
And of course, everything that I blasted gets the phosphate treatment to prevent rust.
And now that I have enough parts blasted to make it worthwhile to fire up the coating oven I will spend a little time coating some stuff later today. Stay tuned!
Thread Starter
Burning Brakes
Joined: Sep 2017
Posts: 1,219
Likes: 365
From: Tolland CT
A few pieces waiting for the oven to come up to temp.
While parts were in the oven I got back to taking the front end apart. My OCD takes full charge here. Every wiring harness or vacuum hose gets labeled so I know exactly where it goes when it comes time to putting things back together.
...and 20 minutes later.
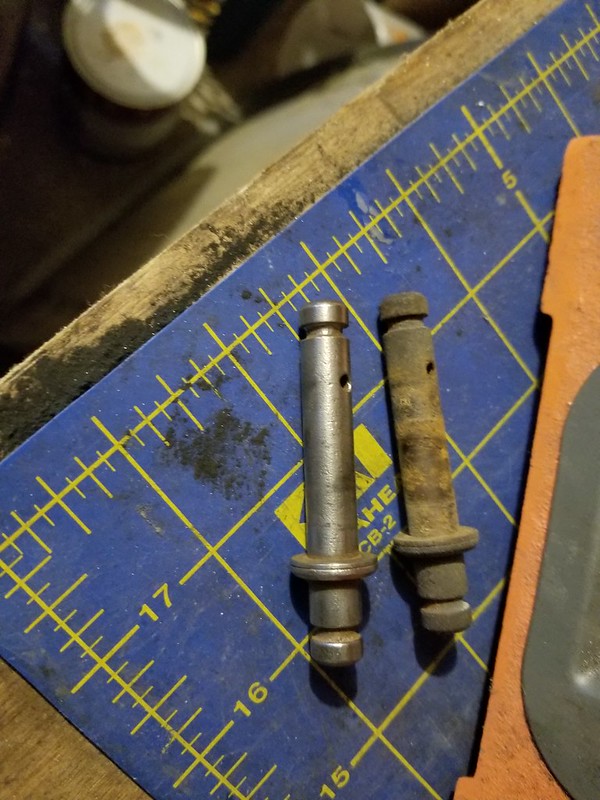
This made me a sad panda. Two of the studs on the headlight actuators sheared right off as soon as I put any torque onto them. The rest came out fine. I am not sure what my options are now. It is annoying because both actuators hold vacuum perfectly.
Gotta give my hands a rest now but will hopefully be back to it later tonight.
While parts were in the oven I got back to taking the front end apart. My OCD takes full charge here. Every wiring harness or vacuum hose gets labeled so I know exactly where it goes when it comes time to putting things back together.
...and 20 minutes later.
This made me a sad panda. Two of the studs on the headlight actuators sheared right off as soon as I put any torque onto them. The rest came out fine. I am not sure what my options are now. It is annoying because both actuators hold vacuum perfectly.
Gotta give my hands a rest now but will hopefully be back to it later tonight.
Le Mans Master
Joined: Nov 2016
Posts: 9,268
Likes: 951
From: Lake Tahoe, CA
http://www.corvetteamerica.com/catal...ght-components
Actuator #s 5008 & 5009 just buy a new one. Won't hurt too bad.
Your doing great work.
Actuator #s 5008 & 5009 just buy a new one. Won't hurt too bad.
Your doing great work.
Thread Starter
Burning Brakes
Joined: Sep 2017
Posts: 1,219
Likes: 365
From: Tolland CT
Since my hands are hurting I thought I would spend a little time researching and digging around. Rather than purchase another vacuum headlight actuator to replace the one with the broken studs I managed to find a local scrapyard that has two Mazda Miata headlamp motors sitting there with my name on them. I will be picking up both of them for less than the cost of one actuator and will no longer have to mess with vacuum which is a good thing since the cam I chose will need all of its vacuum to operate the brakes.
Now to do some digging on the headlight motor conversion...
Now to do some digging on the headlight motor conversion...
Le Mans Master
Joined: Nov 2016
Posts: 9,268
Likes: 951
From: Lake Tahoe, CA
Since my hands are hurting I thought I would spend a little time researching and digging around. Rather than purchase another vacuum headlight actuator to replace the one with the broken studs I managed to find a local scrapyard that has two Mazda Miata headlamp motors sitting there with my name on them. I will be picking up both of them for less than the cost of one actuator and will no longer have to mess with vacuum which is a good thing since the cam I chose will need all of its vacuum to operate the brakes.
Now to do some digging on the headlight motor conversion...
Now to do some digging on the headlight motor conversion...
Melting Slicks
Joined: Dec 2000
Posts: 3,363
Likes: 303
From: Lansdale 19446 PA
2024 C3 of the Year Finalist- Unmodified
St. Jude Donor '10-'11, '15, '19
Last edited by Go Vette Go; Jan 9, 2018 at 09:28 AM.
Thread Starter
Burning Brakes
Joined: Sep 2017
Posts: 1,219
Likes: 365
From: Tolland CT
Thread Starter
Burning Brakes
Joined: Sep 2017
Posts: 1,219
Likes: 365
From: Tolland CT
Ugh, so many projects going on! I am basically working on whatever comes through my door first so I am hopping around on many different parts at once.
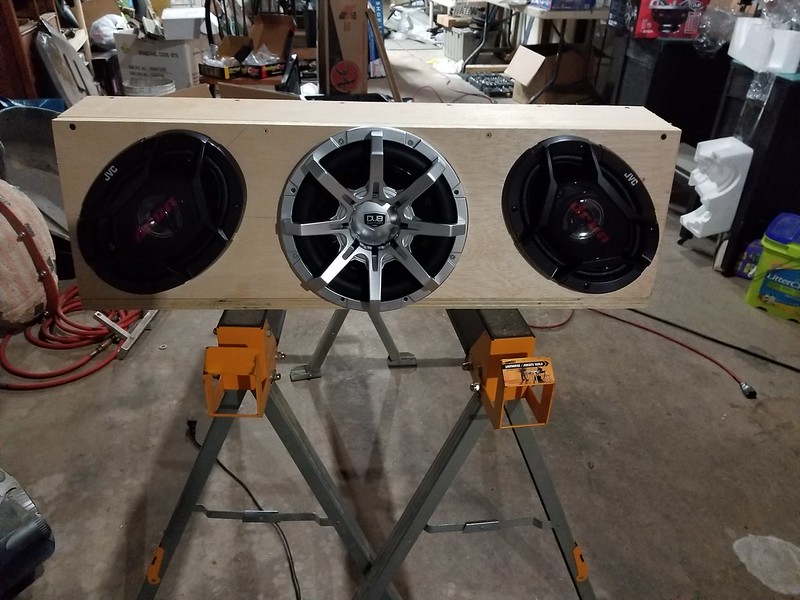
This is a quick mock-up of the rear speaker enclosure. If my measurements are correct it will allow the rear window storage tray to drop down enough and still have enough room in the rear compartment for the t-tops. The 6x9s are baffled behind which allows the sub to use about 90% of the enclosure volume. With any luck this will be sufficient for my needs but if not I am only out a few scrap pieces of plywood.
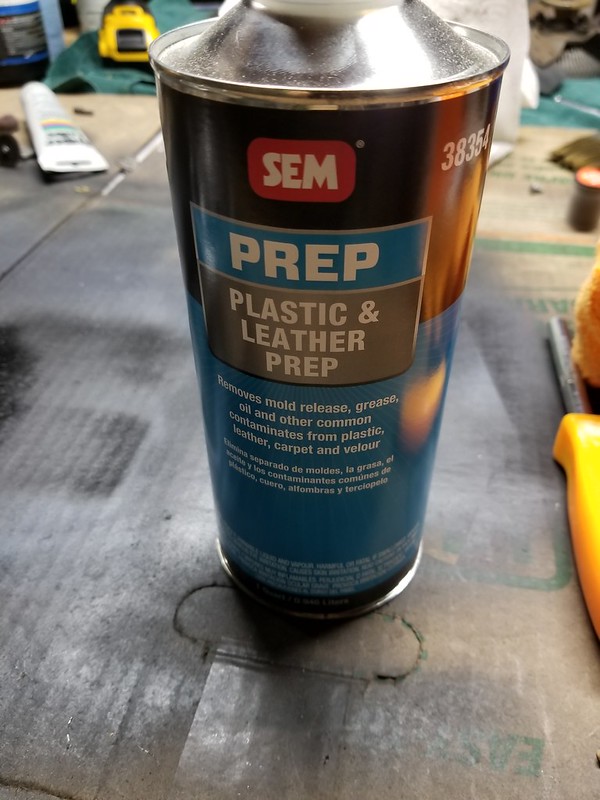
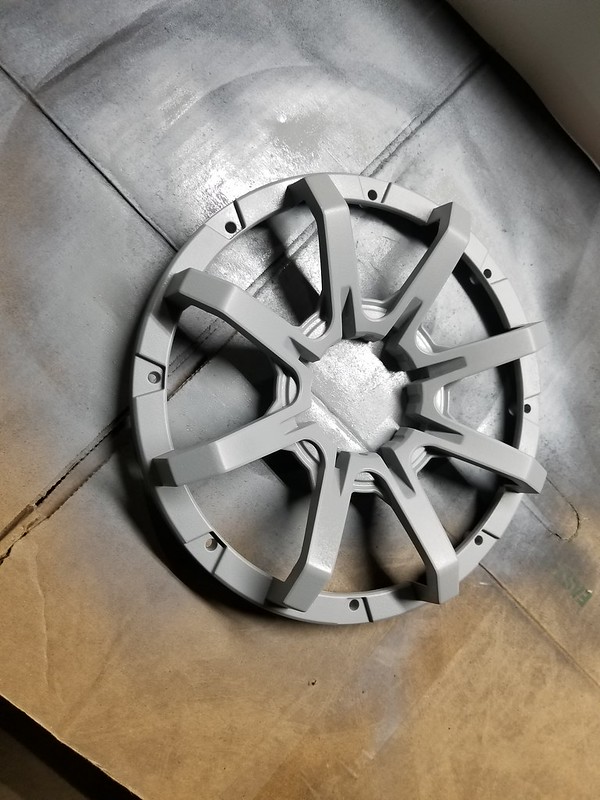
I definitely need to paint that subwoofer speaker grille; it looks like something an angry teenager would use. A quick scuff, wipe down with plastic prep, and primer...
Back to the rest of the stuff. I always say 'the Devil is in the details' but it doesn't make it any easier. I have a lot of nuts, bolts, and small hardware to powder coat which requires a little creativity to get done. These were both methods that I came up with and am happy with the way they work out.
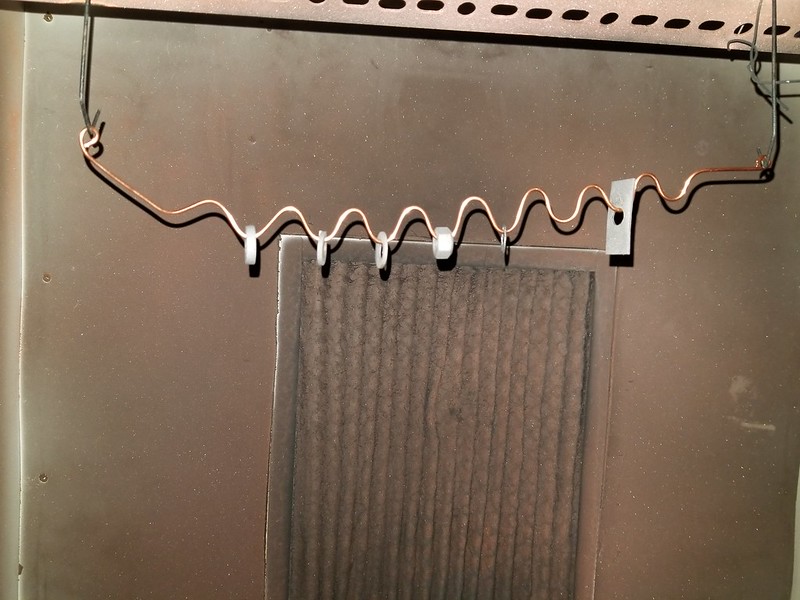
For the nuts/washers I grabbed a scrap piece of romex wire, pulled out the ground, and bent it into a 'wavy' pattern. After that it was a simple matter to put the parts on and then roll the ends for the hanging hooks.
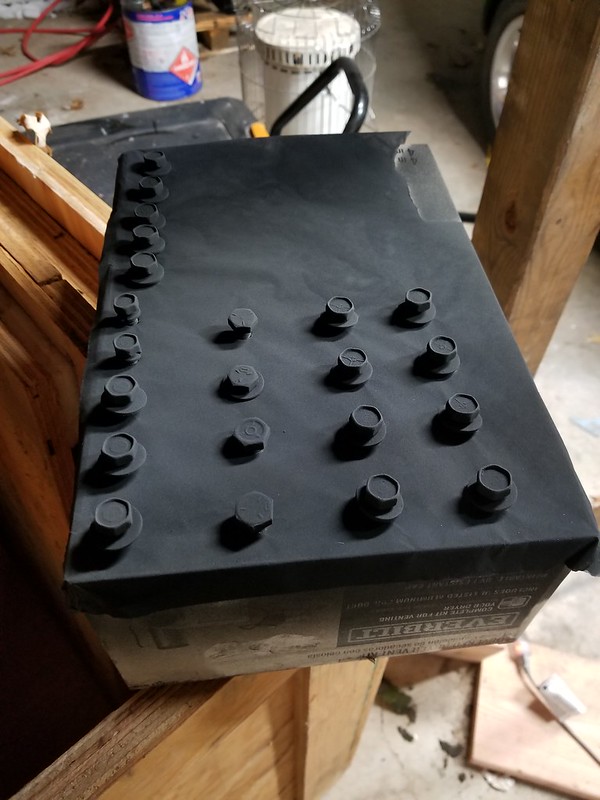
The bolts are quite easy to do. Through the magic of science I know that cardboard does not combust until 451 degrees (thank you Ray Bradbury). Since powder cures at 400 it is safe to put a cardboard box into the oven however we still need a metal base to conduct the ground for the parts while they are being coated. The answer is commercial grade aluminum foil.
I simply wrap the top of the box in the foil and then poke holes through using an awl. After that I can push the bolts into the box/foil and it holds them steady as well as provides a ground. All that I need to do is to have a bit of wire between the powder booth ground and the aluminum foil.

After coating and waiting for the oven to come up to temp
I had 20 minutes to kill so I got back to working on the headlight assemblies and spent a few minutes with the wire wheel. A little before and after. Naturally as soon as these were cleaned they got the phosphoric acid treatment.
By the time I was done, so were my parts! Back to the oven to remove everything. I gave it a few minutes to cool and then removed all the parts from their holders.
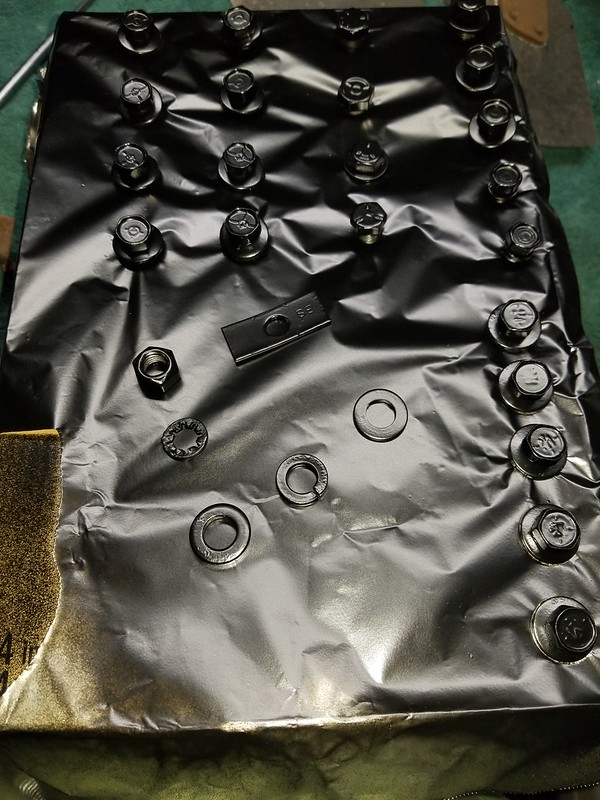
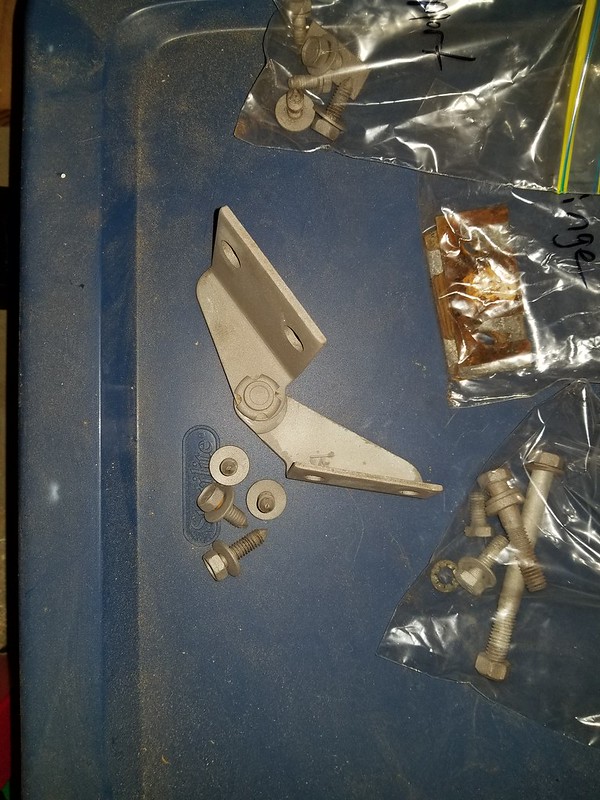
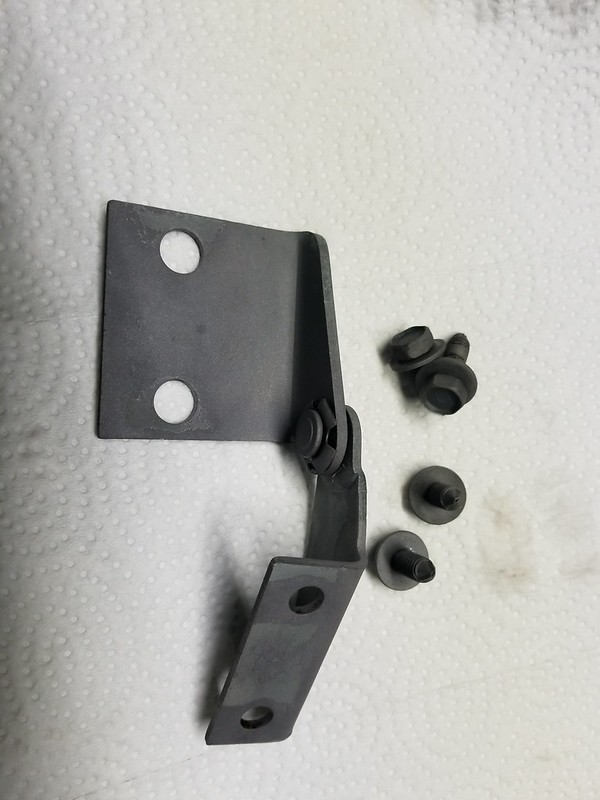
Finally we have some perfectly coated hardware. The parts that have not been coated (threads, etc) have been phosphate treated so there will be no rust!
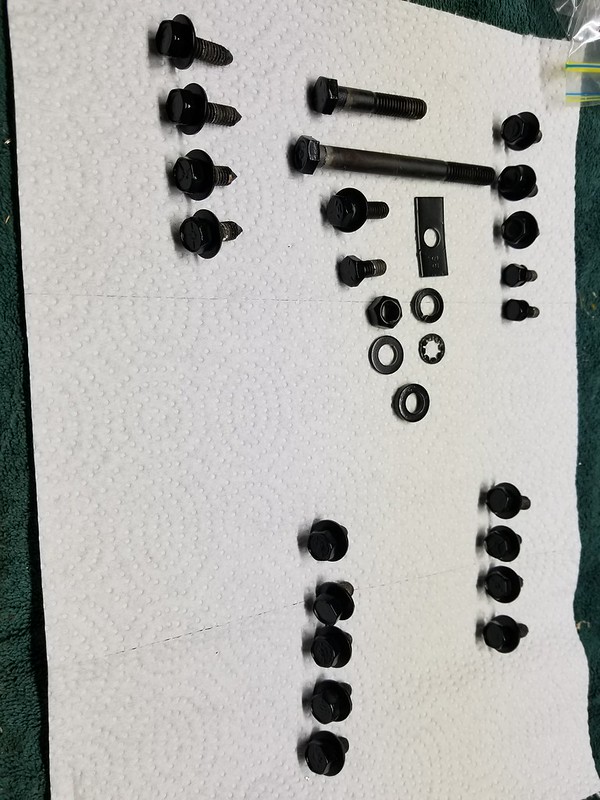
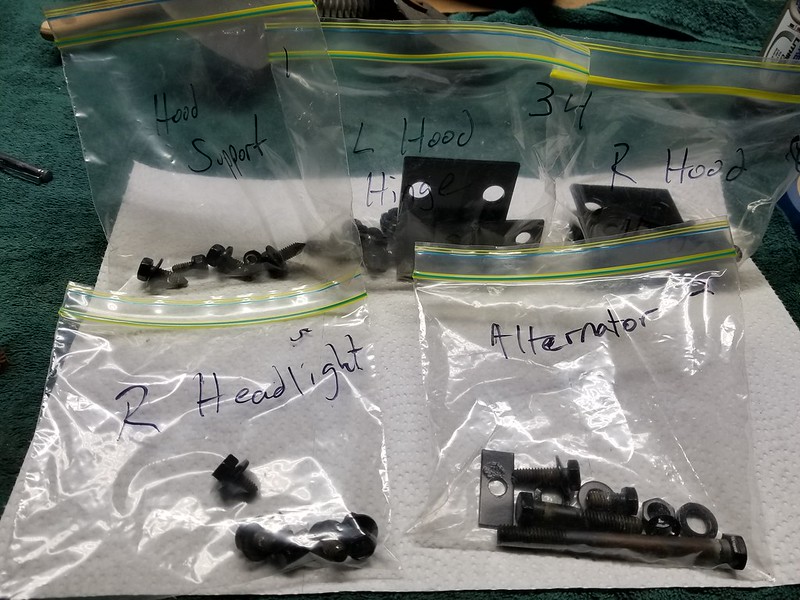
And then back to my usual OCD process. Every bit goes into a labeled ziplock bag and placed on the 'done' shelf.
Back to the blast cabinet...
This is a quick mock-up of the rear speaker enclosure. If my measurements are correct it will allow the rear window storage tray to drop down enough and still have enough room in the rear compartment for the t-tops. The 6x9s are baffled behind which allows the sub to use about 90% of the enclosure volume. With any luck this will be sufficient for my needs but if not I am only out a few scrap pieces of plywood.
I definitely need to paint that subwoofer speaker grille; it looks like something an angry teenager would use. A quick scuff, wipe down with plastic prep, and primer...
Back to the rest of the stuff. I always say 'the Devil is in the details' but it doesn't make it any easier. I have a lot of nuts, bolts, and small hardware to powder coat which requires a little creativity to get done. These were both methods that I came up with and am happy with the way they work out.
For the nuts/washers I grabbed a scrap piece of romex wire, pulled out the ground, and bent it into a 'wavy' pattern. After that it was a simple matter to put the parts on and then roll the ends for the hanging hooks.
The bolts are quite easy to do. Through the magic of science I know that cardboard does not combust until 451 degrees (thank you Ray Bradbury). Since powder cures at 400 it is safe to put a cardboard box into the oven however we still need a metal base to conduct the ground for the parts while they are being coated. The answer is commercial grade aluminum foil.
I simply wrap the top of the box in the foil and then poke holes through using an awl. After that I can push the bolts into the box/foil and it holds them steady as well as provides a ground. All that I need to do is to have a bit of wire between the powder booth ground and the aluminum foil.
After coating and waiting for the oven to come up to temp
I had 20 minutes to kill so I got back to working on the headlight assemblies and spent a few minutes with the wire wheel. A little before and after. Naturally as soon as these were cleaned they got the phosphoric acid treatment.
By the time I was done, so were my parts! Back to the oven to remove everything. I gave it a few minutes to cool and then removed all the parts from their holders.
Finally we have some perfectly coated hardware. The parts that have not been coated (threads, etc) have been phosphate treated so there will be no rust!
And then back to my usual OCD process. Every bit goes into a labeled ziplock bag and placed on the 'done' shelf.
Back to the blast cabinet...
Last edited by PainfullySlow; Jan 9, 2018 at 02:01 PM.
