


Finally: the build can start

Safety Car


Joined: Apr 2005
Posts: 3,624
Likes: 431
From: Dale City VA

It makes it easier when you only have to remove 2grams on a replacement piston/rod instead of 10grams.
Will

Thread Starter
Drifting


Joined: Dec 2005
Posts: 1,313
Likes: 2
From: High Ridge Missouri
It's just the balance card. Most places give you one incase you spin a rod or burn a piston. That way you can buy replacement parts that are closest in weight to the old ones.
It makes it easier when you only have to remove 2grams on a replacement piston/rod instead of 10grams.
Will
It makes it easier when you only have to remove 2grams on a replacement piston/rod instead of 10grams.
Will

Corvette Enthusiast

Joined: Oct 2007
Posts: 6,800
Likes: 2,724
From: So. Cal.
2025 C7 of the Year Finalist- Unmodified
2024 C7 of the Year Finalist - Unmodified
2023 C7 of the Year Finalist - Unmodified
engine
What you putting on top for an intake setup?
Very nice
Corvette mike
Very nice
Corvette mike
Thread Starter
Drifting
Joined: Dec 2005
Posts: 1,313
Likes: 2
From: High Ridge Missouri
Flame suit on, here's a brief description of my build I just copied from another thread I'd posted in.
AFR 195's
Comp cams 268 xfi (218 I 224 E .570 I .565 E 113 LSA)
Hooker 2151's into custom 2.5" dual
Heavily ported Accel base, siamesed SLP runners and plenum
383 short-block with about 10.75-1 compression (I originally intended on a 350, but when pulling out my cam for the swap last month I found out the bearings were wiped)
This is being routed through a ZF6 with stage 2 clutch and SM aluminum flywheel and D44 w/3.45's
I know some think it's nuts to use the LTR intake, but I think it should make for a fun to drive car. All sims I've run show this combo to pull to 5500rpm and make around 425hp and 525-550 ftlb at the crank. These numbers should make for a great street car and still tickle the 11's on the track with some traction(which still makees it faster than most of whats on the street). I've run the same sims on the same setup except switched out to a MR intake and yes I pickup quite abit, like numbers change to almost 500hp at the crank and torque drops to 470 ftlb at the crank and puts me running low 11's but it also puts me spinning up to 6500-6700 rpm and gets me worrying about longivity.
Thread Starter
Drifting
Joined: Dec 2005
Posts: 1,313
Likes: 2
From: High Ridge Missouri
 .
. I actually got to do a little work on the short block yesterday, but I'm limited until I receive my Summit, should be here Wed.
I'll post a couple pics and details about yesterdays progress later.
Thread Starter
Drifting
Joined: Dec 2005
Posts: 1,313
Likes: 2
From: High Ridge Missouri
Yesterday I got my cam in and the Cloyes double roller timing set.

The only issue I had (and this seemed odd to me) is the bolt holes for the cam retainer plate were closer together on the new 383 than the old 350. It was a simple fix all I did was enlongate the holes in the retainer plate. Forgot to take a pic of the plate when done but here's a pic of the front of each block, see if you can see the difference.
Pic of 350

Pic of 383
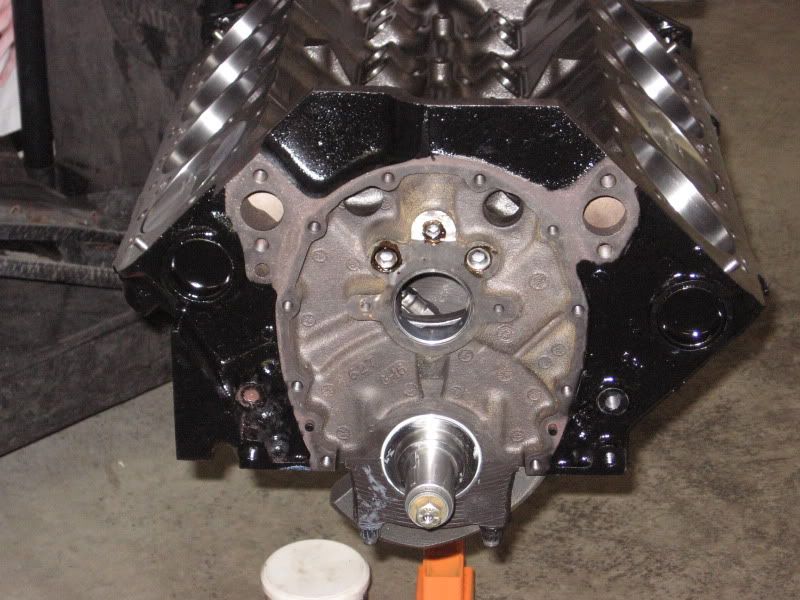
I painted my timing cover and installed it with new gasket, seal, and stainless hardware (BTW fits fine over Cloyes double roller timing chain)

Modifed oil filter adapter (removed and plugged bypass per Lingenfelter recommendation) and installed. $20-$40 for an adapter without bypass or $1.15 for the plug at Lowes.

Installed new motors mounts and new fuel pump block off plate.

And last but not least got the old short block out of the car.

The only issue I had (and this seemed odd to me) is the bolt holes for the cam retainer plate were closer together on the new 383 than the old 350. It was a simple fix all I did was enlongate the holes in the retainer plate. Forgot to take a pic of the plate when done but here's a pic of the front of each block, see if you can see the difference.
Pic of 350
Pic of 383
I painted my timing cover and installed it with new gasket, seal, and stainless hardware (BTW fits fine over Cloyes double roller timing chain)
Modifed oil filter adapter (removed and plugged bypass per Lingenfelter recommendation) and installed. $20-$40 for an adapter without bypass or $1.15 for the plug at Lowes.
Installed new motors mounts and new fuel pump block off plate.
And last but not least got the old short block out of the car.
Thread Starter
Drifting
Joined: Dec 2005
Posts: 1,313
Likes: 2
From: High Ridge Missouri
Well I made some progress today. It's amazing how time consuming some of the little stuff can be.
I received my Summit order today so that helped out alot, it allowed to button up the bottom end.
First thing I did today was get the oil pump assembly squared away. I'm running just your basic Meliing M155 pump, but this pump will take a 3/4" pickup like the LT1 as opposed to the only a 5/8" used on the L98. So along with that I got a Mel-254s pick-up for the LT1 and per Lingenfelters recommendation switched out the yellow spring in the pump for the higher pressure orange spring that will bump pressure up 10-15lbs before it hits the bypass. I did have to sand down the pick-up tube to get it in the pump which seemed odd (the hole in the pump was .740" and the tube was .747 this made for too tight of an interference fit and I sanded the pick-up down to .742). Even sanded down I still couldn't drive the pick-up all the way in so after sitting the pan on and using clay I set the pick-up to 3/8" off the bottom of the pan I made sure to tack the pickup to the pump body (had not installed the new spring yet at this time because as you know the excessive heat of welding can cause a spring to lose its tension, just an FYI).
When installing oil pump swapped out OEM bolt for an ARP stud and the factory style pump drive with nylon collar for a solid shaft that eiminates the collar.
I also swithced out the three ARP main studs that came in the new short block that were in the locations where the stock windage tray bolted for three adjustable height studs I found from Milodon so I could use the facory windage tray (factory windage tray did still require a few love taps with hammer to create proper clearance for rod bolts).
Pump, you can see the tack weld here

Here's a comparison of the 2 springs

The pump packed with lube (makes for easier priming

Comparison pic of other new goodies to go with the pump

Pic of the new studs, you can see in the plastic bag in the corner of the pic the studs I removed and the lenght difference

Pic of the oil pump and windage tray now installed A note: While putting in the new studs since Pete K has me wondering about threads being rolled in now, and I don't know if the main studs had been when the engine was built I went ahead and loosened and retorqued them all 3 more times while I was working on installing the new ones anyway.


And lastly, which I thought was good stopping point for the night, I got the oil pan cleaned up and bolted on (obviously with a new one piece gasket and stainless hardware where I could use it). And slapped on the new balancer.
Oil pan and balancer pic

I'm sure I forgot some stuff, but who wants to read this long azz post anyway.
I received my Summit order today so that helped out alot, it allowed to button up the bottom end.
First thing I did today was get the oil pump assembly squared away. I'm running just your basic Meliing M155 pump, but this pump will take a 3/4" pickup like the LT1 as opposed to the only a 5/8" used on the L98. So along with that I got a Mel-254s pick-up for the LT1 and per Lingenfelters recommendation switched out the yellow spring in the pump for the higher pressure orange spring that will bump pressure up 10-15lbs before it hits the bypass. I did have to sand down the pick-up tube to get it in the pump which seemed odd (the hole in the pump was .740" and the tube was .747 this made for too tight of an interference fit and I sanded the pick-up down to .742). Even sanded down I still couldn't drive the pick-up all the way in so after sitting the pan on and using clay I set the pick-up to 3/8" off the bottom of the pan I made sure to tack the pickup to the pump body (had not installed the new spring yet at this time because as you know the excessive heat of welding can cause a spring to lose its tension, just an FYI).
When installing oil pump swapped out OEM bolt for an ARP stud and the factory style pump drive with nylon collar for a solid shaft that eiminates the collar.
I also swithced out the three ARP main studs that came in the new short block that were in the locations where the stock windage tray bolted for three adjustable height studs I found from Milodon so I could use the facory windage tray (factory windage tray did still require a few love taps with hammer to create proper clearance for rod bolts).
Pump, you can see the tack weld here
Here's a comparison of the 2 springs
The pump packed with lube (makes for easier priming
Comparison pic of other new goodies to go with the pump
Pic of the new studs, you can see in the plastic bag in the corner of the pic the studs I removed and the lenght difference
Pic of the oil pump and windage tray now installed A note: While putting in the new studs since Pete K has me wondering about threads being rolled in now, and I don't know if the main studs had been when the engine was built I went ahead and loosened and retorqued them all 3 more times while I was working on installing the new ones anyway.
And lastly, which I thought was good stopping point for the night, I got the oil pan cleaned up and bolted on (obviously with a new one piece gasket and stainless hardware where I could use it). And slapped on the new balancer.
Oil pan and balancer pic
I'm sure I forgot some stuff, but who wants to read this long azz post anyway.
Corvette Stories
The Best of Corvette for Corvette Enthusiasts

5 Best & 5 Worst Corvette Daily Drivers
Joe Kucinski
The Headlights of Every Corvette Generation Explained
Joe Kucinski
5 Best & 5 Most Overrated Corvette Track Packages of All Time!
Joe Kucinski
Every 2027 Corvette Engine Explained
Joe Kucinski
Designer Imagines A Corvette That Looks More Like a Corvette Than the Corvette
Verdad Gallardo
10 Ugly Corvettes That We Still Kinda Love
Joe Kucinski
Top 10 Most Expensive Corvettes Ever Sold on Bring A Trailer
Brett Foote
10 Things Every Corvette Owner Needs (2026 Edition)
Michael S. Palmer
8 Most "Only Corvette Owners Understand" Quirks and Problems
Pouria Savadkouei
Thread Starter
Drifting
Joined: Dec 2005
Posts: 1,313
Likes: 2
From: High Ridge Missouri
Since I finished up the bottom end yesterday I got to work on the upper end today. I got both heads on and performed the procedure of rolling in all the head bolt threads (what a f'in job). I used a cheap head gasket I picked up at the Zone for rolling in the threads using plenty of Molylube on the bolt heads and washers and oil on the threads. Then I removed both heads, cleaned up the heads, block and all the bolts/washers and reinstalled the heads using new head gaskets plenty of Molylube on the boltheads and washers again and thread sealer on all the bolts.
Used new set of ARP 12pt head bolts
Pic of the drivers head on, the blue gasket is a $15 Felpro and the white gasket is the final head gasket that was installed under the pass head

Got the lifters, retainers and spider in.
Once the heads were on and the final torque done I was able to install my 2 light weight test springs.

And using an adjustable push rod length tester I came in with this pattern at 7.293 (push rods are available off the shelf in a lenght of 7.290, close enough)

Don't forget with AFR heads you need to remove the rocker studs (AFR only says the intake need it, but I figured while I was doing it I'd do them all) apply sealer and torque to 60ftlbs as AFR only installs them untorqued for shipping.
Used new set of ARP 12pt head bolts
Pic of the drivers head on, the blue gasket is a $15 Felpro and the white gasket is the final head gasket that was installed under the pass head
Got the lifters, retainers and spider in.
Once the heads were on and the final torque done I was able to install my 2 light weight test springs.
And using an adjustable push rod length tester I came in with this pattern at 7.293 (push rods are available off the shelf in a lenght of 7.290, close enough)
Don't forget with AFR heads you need to remove the rocker studs (AFR only says the intake need it, but I figured while I was doing it I'd do them all) apply sealer and torque to 60ftlbs as AFR only installs them untorqued for shipping.
Thread Starter
Drifting
Joined: Dec 2005
Posts: 1,313
Likes: 2
From: High Ridge Missouri
Once the heads were on I started assembling the engine for mock up so I could start fabbing necessary vaccum lines, routing plug wires and looking for any other surprises that might arise. Remeber from the post above this I don't have push-rods and before I order them I wanted to make sure I didn't need anything else. I ended up making a PCV line and brake booster line out of aluminum fuel tubing sine the new intake and valve covers made the old ones unusable. The Alt/PS bracket is going to need a little work as well as the bolts for it. I modified almost every header bolt for ease of installation. I made up my plug wires routed, sheilded where necessary and installed all the looms. Thats about where I'm at.
The pushrods will be in next week, so not much more than tinkering left to do till then.
Here's a bunch of pics ofthe engine mock up from different angles.
What ya' think?


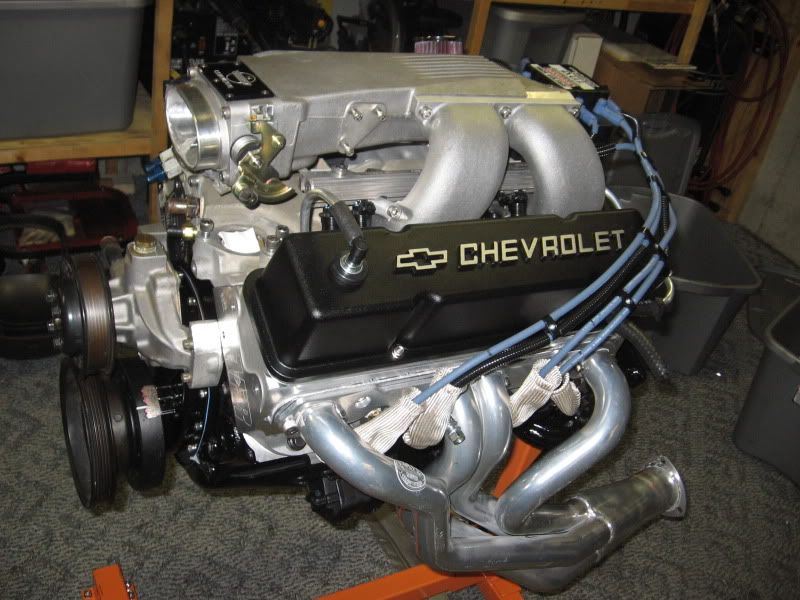
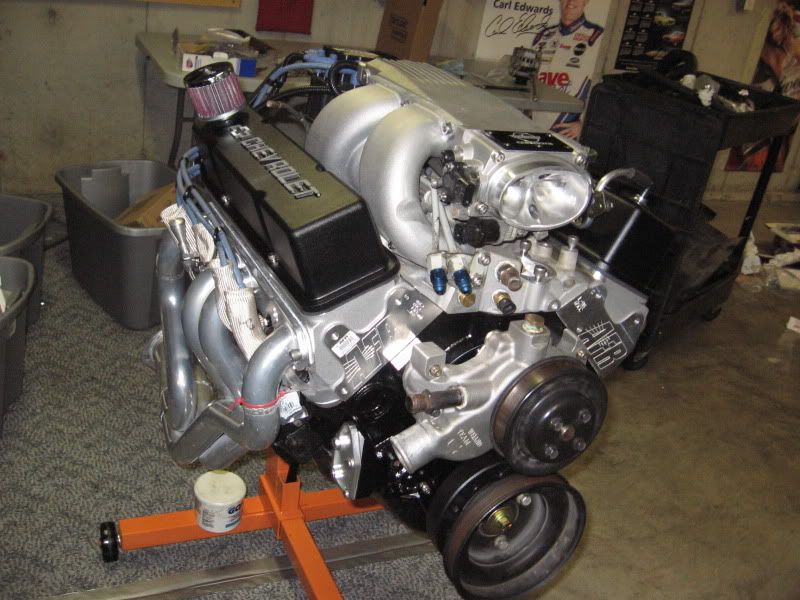


The pushrods will be in next week, so not much more than tinkering left to do till then.
Here's a bunch of pics ofthe engine mock up from different angles.
What ya' think?
Race Director

Joined: Nov 2003
Posts: 12,222
Likes: 446
From: Overland Park Kansas
2020 Corvette of the Year Finalist (appearance mods)
C4 of Year Winner (appearance mods) 2019
Makes me wanna grunt like Tim "The Tool Man" Taylor!
"Oh yeah, yeah, yeah..... arrrrgh!"

"Oh yeah, yeah, yeah..... arrrrgh!"
Last edited by GREGGPENN; May 29, 2009 at 02:18 AM.
Thread Starter
Drifting
Joined: Dec 2005
Posts: 1,313
Likes: 2
From: High Ridge Missouri
Got some of the detail stuff sorted out yesterday.
Plenum extension was hitting new distributor so I ground some off of it, turned out pretty nice, unless you know you can't even tell.

I switched the rest of the hardware over to allen head stainless, and modifeid the necessary bolts (water pump bolts cut down 2mm each, cut down alt/ps bracket bolts 7mm each) and hung the accessories on the engine.

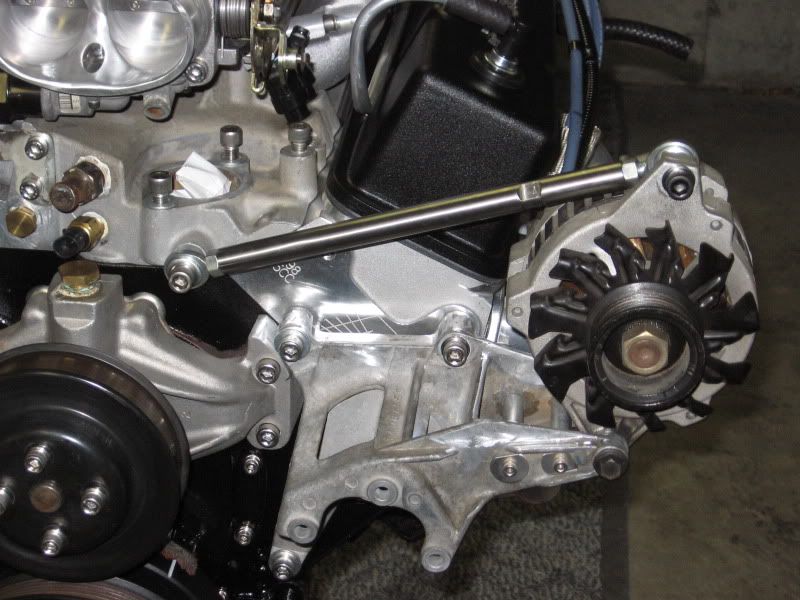
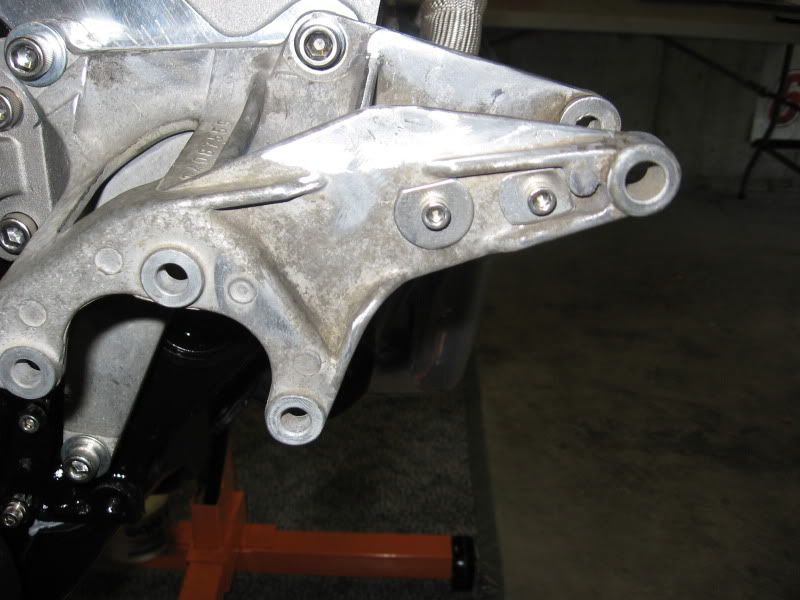
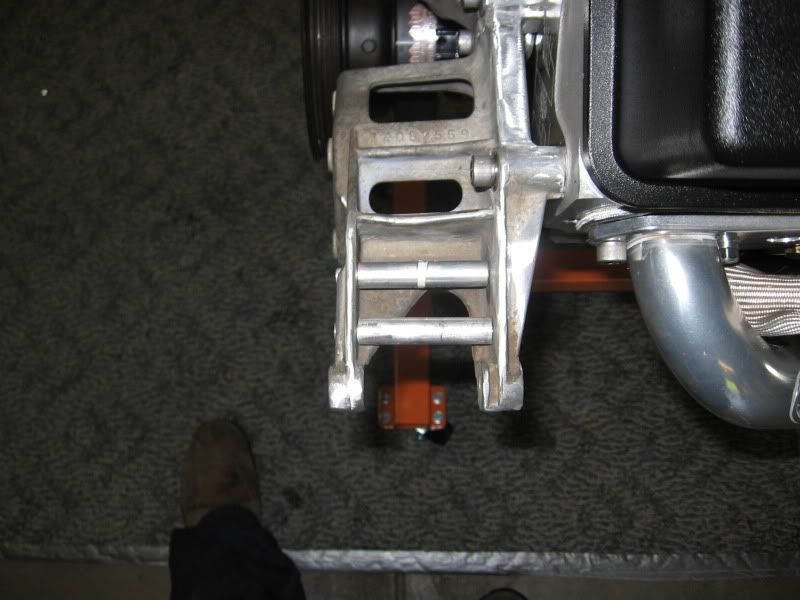
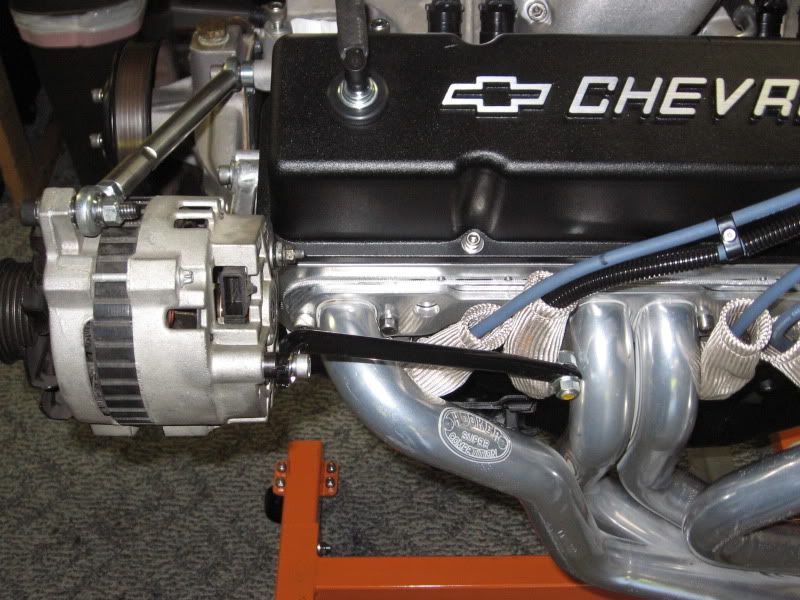
I'm running the heim joint set-up on my alternator eliminating the A/C and air pump. Doing this I know people have had problems with the bracket and/or alt case breaking, to hopefully provide a little insurance against this I did some extra fab work. I made some spacers out of aluminum rod drilled and tapped them and fitted them in the alt bracket drilled 4 holes in the bracket made some custom washers and bolted it all together, this should add some structural rigidness to the bracket. With the Hooker 2151's and this setup I also had to fab my on rear alt support which I did this out of 1/2" steel rod. (I think I'll make separate thread on this, as so many have done the A/C-air pum delete)
I also found that the EVAP solenoid and bracket weren't even close to fitting on the SLP/Accel intake set-up so I modded the he!! out of the bracket and got it to fit. (no pic)
And lastly the GF said that car being Dark Red Metallic and the engine being mostly black and natural aluminum the she didn't like the blue plug wires so I had to install conduit over all of them. Simple enough but cutting and installing all those little pieces is awful damn tedious.


Push rods should be here Tuesday so I can tear it back down, put it back together and hopefully be dropping it in next weekend.
Plenum extension was hitting new distributor so I ground some off of it, turned out pretty nice, unless you know you can't even tell.
I switched the rest of the hardware over to allen head stainless, and modifeid the necessary bolts (water pump bolts cut down 2mm each, cut down alt/ps bracket bolts 7mm each) and hung the accessories on the engine.
I'm running the heim joint set-up on my alternator eliminating the A/C and air pump. Doing this I know people have had problems with the bracket and/or alt case breaking, to hopefully provide a little insurance against this I did some extra fab work. I made some spacers out of aluminum rod drilled and tapped them and fitted them in the alt bracket drilled 4 holes in the bracket made some custom washers and bolted it all together, this should add some structural rigidness to the bracket. With the Hooker 2151's and this setup I also had to fab my on rear alt support which I did this out of 1/2" steel rod. (I think I'll make separate thread on this, as so many have done the A/C-air pum delete)
I also found that the EVAP solenoid and bracket weren't even close to fitting on the SLP/Accel intake set-up so I modded the he!! out of the bracket and got it to fit. (no pic)
And lastly the GF said that car being Dark Red Metallic and the engine being mostly black and natural aluminum the she didn't like the blue plug wires so I had to install conduit over all of them. Simple enough but cutting and installing all those little pieces is awful damn tedious.
Push rods should be here Tuesday so I can tear it back down, put it back together and hopefully be dropping it in next weekend.
Thread Starter
Drifting
Joined: Dec 2005
Posts: 1,313
Likes: 2
From: High Ridge Missouri
Got the push rods. Push rods in, 1.6 Trick flow roller rockers in and lash set to 1 turn past zero.
Got a question on some lifters 1 turn past zero it went fine and on a few by the time I got to 3/4+ turn I was noting quite a bit of resistance is this normal.
Procedure I used was obviously
(1) Made sure on which ever valve I was adjusting that the lifter was on base circle
(2) Between all the components being new and the assembly lube the push rods spun so easy that I couldn't use the spin method I actually turned the poly-loc by hand and watched just as the push rod began to push the lifter plunger in
(3)Then turned poly-loc one full turn (but as I said some went one full turn no problem and some started showing notable resistance by 3/4 turn) and tightened set screw
I'd like to get some of your input on this


Got a question on some lifters 1 turn past zero it went fine and on a few by the time I got to 3/4+ turn I was noting quite a bit of resistance is this normal.
Procedure I used was obviously
(1) Made sure on which ever valve I was adjusting that the lifter was on base circle
(2) Between all the components being new and the assembly lube the push rods spun so easy that I couldn't use the spin method I actually turned the poly-loc by hand and watched just as the push rod began to push the lifter plunger in
(3)Then turned poly-loc one full turn (but as I said some went one full turn no problem and some started showing notable resistance by 3/4 turn) and tightened set screw
I'd like to get some of your input on this
Race Director
Joined: Nov 2003
Posts: 12,222
Likes: 446
From: Overland Park Kansas
2020 Corvette of the Year Finalist (appearance mods)
C4 of Year Winner (appearance mods) 2019
I'm running the heim joint set-up on my alternator eliminating the A/C and air pump. Doing this I know people have had problems with the bracket and/or alt case breaking, to hopefully provide a little insurance against this I did some extra fab work. I made some spacers out of aluminum rod drilled and tapped them and fitted them in the alt bracket drilled 4 holes in the bracket made some custom washers and bolted it all together, this should add some structural rigidness to the bracket. With the Hooker 2151's and this setup I also had to fab my on rear alt support which I did this out of 1/2" steel rod. (I think I'll make separate thread on this, as so many have done the A/C-air pum delete)
And lastly the GF said that car being Dark Red Metallic and the engine being mostly black and natural aluminum the she didn't like the blue plug wires so I had to install conduit over all of them. Simple enough but cutting and installing all those little pieces is awful damn tedious.


Le Mans Master


Joined: Jul 2007
Posts: 5,043
Likes: 8
From: Tampa Florida
Got the push rods. Push rods in, 1.6 Trick flow roller rockers in and lash set to 1 turn past zero.
Got a question on some lifters 1 turn past zero it went fine and on a few by the time I got to 3/4+ turn I was noting quite a bit of resistance is this normal.
Procedure I used was obviously
(1) Made sure on which ever valve I was adjusting that the lifter was on base circle
(2) Between all the components being new and the assembly lube the push rods spun so easy that I couldn't use the spin method I actually turned the poly-loc by hand and watched just as the push rod began to push the lifter plunger in
(3)Then turned poly-loc one full turn (but as I said some went one full turn no problem and some started showing notable resistance by 3/4 turn) and tightened set screw
I'd like to get some of your input on this
Got a question on some lifters 1 turn past zero it went fine and on a few by the time I got to 3/4+ turn I was noting quite a bit of resistance is this normal.
Procedure I used was obviously
(1) Made sure on which ever valve I was adjusting that the lifter was on base circle
(2) Between all the components being new and the assembly lube the push rods spun so easy that I couldn't use the spin method I actually turned the poly-loc by hand and watched just as the push rod began to push the lifter plunger in
(3)Then turned poly-loc one full turn (but as I said some went one full turn no problem and some started showing notable resistance by 3/4 turn) and tightened set screw
I'd like to get some of your input on this


Thread Starter
Drifting
Joined: Dec 2005
Posts: 1,313
Likes: 2
From: High Ridge Missouri
Nice idea! It was my impression that the lack of real alt supports is what made the bracket prone to failure. Since you're using one, I'm not sure it would have been an issue. (Can't hurt though!) Where'd you get the heim joint/arm? It looks like a nice one! (You'll need a shorter belt, right?)
Ahhhh....The things we do for love!
Ahhhh....The things we do for love!
I agree with your comment about the rear support being key, but I figured better safe than sorry by adding the internal braces to the bracket I know it couldn't hurt and I had the materials laying around.
Yes, shorter belt it is 56"
The heim joint link is from March, if you wnat more details I can dig them up and get part numbers. PM me if you want (I'll respond to your last PM in a little while).
UV
Thread Starter
Drifting
Joined: Dec 2005
Posts: 1,313
Likes: 2
From: High Ridge Missouri
Thanks