






Race Car Engine Build
Thread Starter
Le Mans Master


Joined: Oct 2007
Posts: 9,683
Likes: 3,437
From: Akron Ohio
2025 Corvette of the Year Finalist - Modified
2024 C5 of the Year Winner - Modified
2023 C5 of the Year Finalist - Modified
2022 C5 of the Year Finalist - Modified
St. Jude Donor '09-'10-'11

This may or may not fit a Canton pan, but from JEGS website; melling 10552c oil pump, for 7" oil pan use pickup tube #689-12557;
Personally, I didn't realize how shallow a 7 inch pan really is; when I previously tried using a Melling 10555, (which is a high volume version of your oil pump), in a stock 7 inch pan (which is closer to a 6 and 7/8th inch pan) I had to cut off and extend the pan sump approximately 1/8th to 1/4 inch to accommodate the thicker base on the oil pump; so I understand how difficult Corvette oil pan / pump / pickups relationships can be. I hope you can post some pictures of your ultimate assembly.
Personally, I didn't realize how shallow a 7 inch pan really is; when I previously tried using a Melling 10555, (which is a high volume version of your oil pump), in a stock 7 inch pan (which is closer to a 6 and 7/8th inch pan) I had to cut off and extend the pan sump approximately 1/8th to 1/4 inch to accommodate the thicker base on the oil pump; so I understand how difficult Corvette oil pan / pump / pickups relationships can be. I hope you can post some pictures of your ultimate assembly.
Thread Starter
Le Mans Master
Joined: Oct 2007
Posts: 9,683
Likes: 3,437
From: Akron Ohio
2025 Corvette of the Year Finalist - Modified
2024 C5 of the Year Winner - Modified
2023 C5 of the Year Finalist - Modified
2022 C5 of the Year Finalist - Modified
St. Jude Donor '09-'10-'11
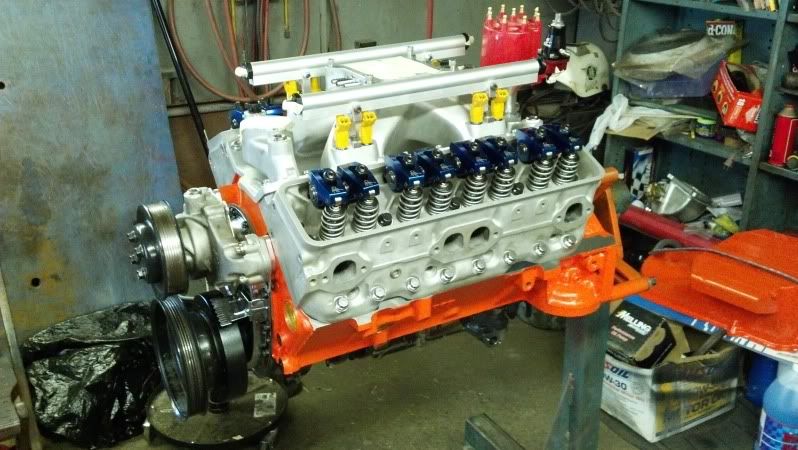
Made a little more progress. Got the intake on after drilling and tapping holes for vacuum ports and the IAT. Also the injectors and fuel rails are now in place. 

Thread Starter
Le Mans Master
Joined: Oct 2007
Posts: 9,683
Likes: 3,437
From: Akron Ohio
2025 Corvette of the Year Finalist - Modified
2024 C5 of the Year Winner - Modified
2023 C5 of the Year Finalist - Modified
2022 C5 of the Year Finalist - Modified
St. Jude Donor '09-'10-'11
Some might remember when I put a hood scoop on my car about a year ago (yes this engine/race car build has been going on a looong time). When I did that I also did all the mock up for the new intake before I took the old engine out. That thread is here for a refresher:
http://forums.corvetteforum.com/c4-t...ne-intake.html
I will get some new pictures soon of the elbow on the new engine.
http://forums.corvetteforum.com/c4-t...ne-intake.html
I will get some new pictures soon of the elbow on the new engine.
Thread Starter
Le Mans Master
Joined: Oct 2007
Posts: 9,683
Likes: 3,437
From: Akron Ohio
2025 Corvette of the Year Finalist - Modified
2024 C5 of the Year Winner - Modified
2023 C5 of the Year Finalist - Modified
2022 C5 of the Year Finalist - Modified
St. Jude Donor '09-'10-'11
Finally all buttoned up!! Now it sits for a little bit while I finish wiring up the car. I hope to get it in the car within the next month or so.
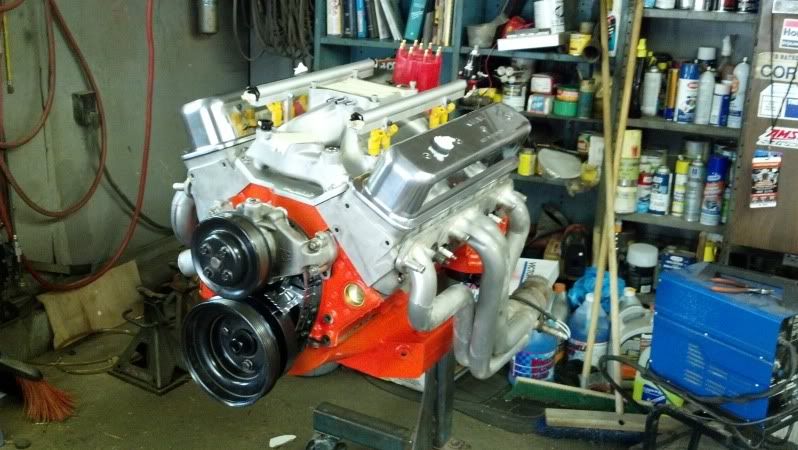

I had the valve covers engraved to match the saying on my Grandpa's old race engine. Kind of a tribute.

I hope to get it in the car within the next month or so.I had the valve covers engraved to match the saying on my Grandpa's old race engine. Kind of a tribute.

Team Owner

Joined: Aug 2005
Posts: 34,988
Likes: 515
From: Riverside County Southern California
Co-winner 2020 C4 of the Year - Modified
2018 Corvette of Year Finalist
2017 C4 of Year
2016 C7 of Year Finalist
St. Jude Donor '09 thru '20
Damn that thing is not even hooked up and it's already screaming.
Corvette Stories
The Best of Corvette for Corvette Enthusiasts

Top 10 Most Explosive Corvettes Ever Made: Power-to-Weight Ratio Ranked!
Joe Kucinski
150 hp to 1,250 hp: Every Corvette Generation Compared by the Specs That Matter
Joe Kucinski
8 Coolest Corvette Pace Cars (and Replicas) of All Time
Verdad Gallardo
Top 10 Corvette Engines RANKED by Peak Torque (70+ Years of Muscle!)
Joe Kucinski
Corvette ZR1X Will Be Pacing the Indy 500, And Could Probably Race, Too!
Verdad Gallardo
Top 10 Corvettes Coming to Mecum Indy 2026!
Brett Foote
Top 10 C9 Corvette MUST-HAVES to Fix These C8 Generation Flaws!
Michael S. Palmer
10 Revolutionary 'Corvette Firsts' Most People Don't Know
Joe Kucinski
5 Reasons to Upgrade to an LS6-Powered Corvette; 5 Reasons to Stay LT2
Michael S. Palmer
Thread Starter
Le Mans Master
Joined: Oct 2007
Posts: 9,683
Likes: 3,437
From: Akron Ohio
2025 Corvette of the Year Finalist - Modified
2024 C5 of the Year Winner - Modified
2023 C5 of the Year Finalist - Modified
2022 C5 of the Year Finalist - Modified
St. Jude Donor '09-'10-'11
Thanks for the compliments guys! I don't "remember" the orange engine because I wasn't born until '87, but I always thought they looked the coolest in hot rods and older cars. I wanted the engine to stand out a bit, and the black block is too bland.

Thread Starter
Le Mans Master
Joined: Oct 2007
Posts: 9,683
Likes: 3,437
From: Akron Ohio
2025 Corvette of the Year Finalist - Modified
2024 C5 of the Year Winner - Modified
2023 C5 of the Year Finalist - Modified
2022 C5 of the Year Finalist - Modified
St. Jude Donor '09-'10-'11


Thread Starter
Le Mans Master
Joined: Oct 2007
Posts: 9,683
Likes: 3,437
From: Akron Ohio
2025 Corvette of the Year Finalist - Modified
2024 C5 of the Year Winner - Modified
2023 C5 of the Year Finalist - Modified
2022 C5 of the Year Finalist - Modified
St. Jude Donor '09-'10-'11


Thread Starter
Le Mans Master
Joined: Oct 2007
Posts: 9,683
Likes: 3,437
From: Akron Ohio
2025 Corvette of the Year Finalist - Modified
2024 C5 of the Year Winner - Modified
2023 C5 of the Year Finalist - Modified
2022 C5 of the Year Finalist - Modified
St. Jude Donor '09-'10-'11
Well not too much to update, other than the engine and the car are now in the same garage!! I mentioned in my first post that the car was at my dad's and I was building the engine at my grandpa's garage. Well the two are finally in the same location again for the first time in about 2 years!  Shouldn't be much longer now.


(yes I know the engine is facing backwards, but that's the only way the car and engine will fit in the same space)
Shouldn't be much longer now.(yes I know the engine is facing backwards, but that's the only way the car and engine will fit in the same space)


Thread Starter
Le Mans Master
Joined: Oct 2007
Posts: 9,683
Likes: 3,437
From: Akron Ohio
2025 Corvette of the Year Finalist - Modified
2024 C5 of the Year Winner - Modified
2023 C5 of the Year Finalist - Modified
2022 C5 of the Year Finalist - Modified
St. Jude Donor '09-'10-'11
Got to spend a little more time on it last night.


Some people have stated the engine can go in with the headers on. I found this to not be true for TPiS headers. Perhaps others will. I only had to remove one side though.
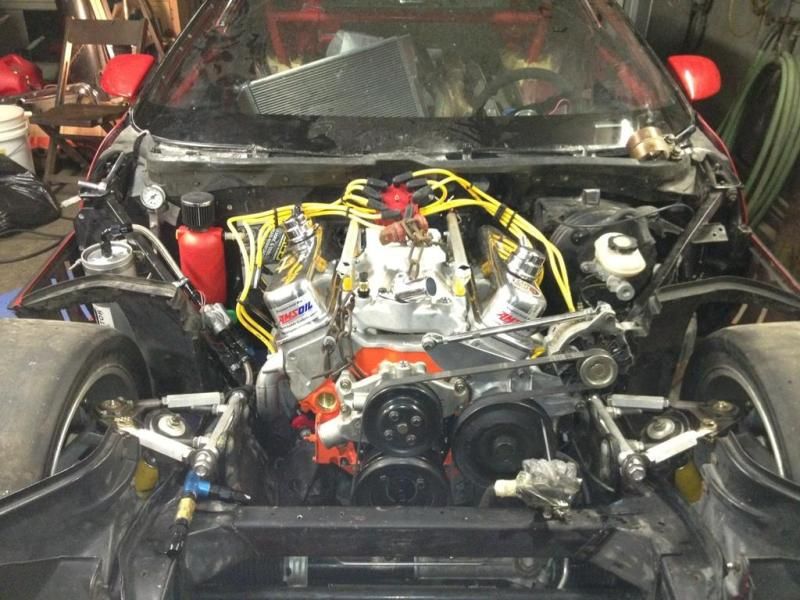

Some people have stated the engine can go in with the headers on. I found this to not be true for TPiS headers. Perhaps others will. I only had to remove one side though.

Le Mans Master


Joined: Oct 2008
Posts: 9,758
Likes: 49
From: Houston Texas
Thread Starter
Le Mans Master
Joined: Oct 2007
Posts: 9,683
Likes: 3,437
From: Akron Ohio
2025 Corvette of the Year Finalist - Modified
2024 C5 of the Year Winner - Modified
2023 C5 of the Year Finalist - Modified
2022 C5 of the Year Finalist - Modified
St. Jude Donor '09-'10-'11


Race Director

Joined: Apr 2000
Posts: 15,344
Likes: 4,009
From: Texas